2023年4月

Stringbuild类

由于String类的对象内容不可改变,每次拼接都会构建一个新的String对象,既耗时,又浪费内存空间
这时需要通过java提供的StringBuild类解决这个问题
StringBuilder又称为可变字符序列,它是一个类似于 String 的字符串缓冲区,可以看作是一个容器,容器中可以装很多字符串

可变指的是StringBuilder对象中的内容是可变的

构造方法

public StringBuilder()
: 创建一个空的缓冲区
public StringBuilder(String srt)
: 创建一个存储了str的缓冲区

//public StringBuilder():创建一个空白可变字符串对象,不含有任何内容
StringBuilder sb = new StringBuilder();
System.out.println("sb:" + sb);
System.out.println("sb.length():" + sb.length());

//public StringBuilder(String str):根据字符串的内容,来创建可变字符串对象
StringBuilder sb2 = new StringBuilder("hello");
System.out.println("sb2:" + sb2);
System.out.println("sb2.length():" + sb2.length());

append

public StringBuilder append(Object obj)
: 向容器中追加任意类型数据, 转为字符串

// 链式编程, 链式编程返回结果 看最后调用的方法
StringBuilder abc = new StringBuilder(stringBuilder.append(10).append("abc").append(10.1).append(new Object()).toString());
System.out.println("abc = " + abc);

reverse

public StringBuilding reverse()
: 将缓冲区数据反转

String string = new StringBuilder(abc).reverse().toString();
System.out.println(string);

Date类

java.util.Date
表示特定的瞬间,精确到毫秒

构造方法

public Date()
: 当前日期对象, 从运行程序的时间到时间原点经历的毫秒值,转换成Date对象,分配Date对象并初始化此对象,以表示分配它的时间(精确到毫秒)。
public Date(long date)
:将指定参数的毫秒值date,转换成Date对象,分配Date对象并初始化此对象

时间原点: 1970年1月1日 00:00:00
中国处于东8区 严格来说是1970年1月1日 00:08:00
1s = 1000ms

public static void main(String[] args) {
	// 创建日期对象,把当前的时间
	System.out.println(new Date()); // Tue Jan 16 14:37:35 CST 2020
	// 创建日期对象,把当前的毫秒值转成日期对象
	System.out.println(new Date(0)); // Thu Jan 01 08:00:00 CST 1970
}

getTime

long getTime()
: 获取日期对象的毫秒值

// 获取从 时间原点 到 当前日期 的毫秒值
long time = nowTime.getTime();
System.out.println(time);

setTime

void setTime(long time)
: 设置毫秒值

 // 设置偏移毫秒值为0, 即时间原点
nowTime.setTime(0);
System.out.println(nowTime);

DateFormat

java.text.DateFormat
是日期/时间格式化子类的抽象类,我们通过这个类可以帮我们完成日期和文本之间的转换,也就是可以在Date对象与String对象之间进行来回转换。

SimpleDateFormat

由于DateFormat为抽象类,不能直接使用,所以需要常用的子类
java.text.SimpleDateFormat

这个类需要一个模式(格式)来指定格式化或解析的标准。

构造方法

public SimpleDateFormat()
: 用默认的模式和语言环境的日期格式符号构造SimpleDateFormat。

默认格式为: (年)-(月)-(日) (上午/下午)xx:xx

public SimpleDateFormat(String pattern)
:用给定的模式和默认语言环境的日期格式符号构造SimpleDateFormat。

参数pattern是一个字符串,代表日期时间的自定义格式。

常用的格式规则为:

标识字母(区分大小写) 含义
y
M
d
H
m
s

备注:更详细的格式规则,可以参考SimpleDateFormat类的API文档。

日期对象转换为字符串

public String format(Date date)
: 传递日期对象,返回格式化后的字符串。

// 将当前日期 转换为 x年x月x日 xx:xx:xx
Date nowTime = new Date();
DateFormat df = new SimpleDateFormat("yyyy年MM月dd日 HH:mm:ss E");
System.out.println(df.format(nowTime));

字符串转换为日期对象

public Date parse(String source)
传递字符串,返回日期对象

// 获取sDate所代表的时间的毫秒值
String sDate = "1949-10-01";
DateFormat df2 = new SimpleDateFormat("yyyy-MM-dd");
// parse 若无法解析字符串会抛出异常 ParseException
Date date = df2.parse(sDate);
long time = date.getTime();
System.out.println(time);

Calendar类

java.util.Calendar
Calendar 日历类, 替换掉了许多Date的方法
它是一个抽象类, 但提供了静态方法创建对象, 同时也提供了很多静态属性

月份 0-11 代表 1-12月
国外每周的第一天是星期日

getInstance

public static Calendar getInstance()
:使用默认时区和语言环境获得一个日历。

Calendar c = Calendar.getInstance();
System.out.println(c);

静态属性及其对应字段

使用
类名.属性名
调用,代表给定的日历字段:

字段值 含义
YEAR
MONTH 月(从0开始,可以+1使用)
DAY_OF_MONTH 月中的天(几号)
HOUR 时(12小时制)
HOUR_OF_DAY 时(24小时制)
MINUTE
SECOND
DAY_OF_WEEK 周中的天(周几,周日为1,可以-1使用)

get

int get(int field)
: 返回给定日历字段的值

int year = c.get(Calendar.YEAR);
// 0-11表示月份 需要+1
int month = c.get(Calendar.MONTH) + 1;
// DATE 和 DAY_OF_MONTH 的值是一样的
int day = c.get(Calendar.DAY_OF_MONTH);
System.out.println(year+"年"+month+"月"+day+"日");

getTimeZone

TimeZone getTimeZone()
获取时区

TimeZone timeZone = c.getTimeZone();
System.out.println(timeZone);

add

void add(int field, int amount)
: 根据日历规则 为给定的字段添加或减去指定的时间量

// 将日历设置为2000.5.1, 当前时间为2023.4.5
// add方法设置偏移量
c.add(Calendar.YEAR, -23);
c.add(Calendar.MONTH, 1);
c.add(Calendar.DATE, -4);
System.out.println(c.get(Calendar.YEAR)+"."+(c.get(Calendar.MONTH) + 1)+"."+c.get(Calendar.DAY_OF_MONTH));

set

void set(int field, int value)
: 将给定的日历字段设置为给定值
void set(int year, int month, int date)
直接设置年月日为指定值

// set(int field, int value)方法 将日历设置为2001.4.2
c.set(Calendar.YEAR, 2001);
c.set(Calendar.MONTH, 3);
c.set(Calendar.DAY_OF_MONTH, 2);
System.out.println(c.get(Calendar.YEAR)+"."+(c.get(Calendar.MONTH) + 1)+"."+c.get(Calendar.DAY_OF_MONTH));

// set(int year, int month, int date)方法 将日历设置为2003.10.1
c.set(2003, 9, 1);
System.out.println(c.get(Calendar.YEAR)+"."+(c.get(Calendar.MONTH) + 1)+"."+c.get(Calendar.DAY_OF_MONTH));

getTime

Date getTime()
: 将日历对象转为日期对象

Date date = c.getTime();
System.out.println(date);

练习

定义一个方法, 使用StringBuild将数组转换为 [元素1,元素2...] 的格式

public class Demo {
    public static void main(String[] args) {
        int[] arr = {3,765,8234,1,23};
        System.out.println(arrayConcatToSting(arr));
    }

    public static String arrayConcatToSting(int[] arr) {
        StringBuilder stringBuilder1 = new StringBuilder("[");
        for (int i = 0; i < arr.length; i++) {
            stringBuilder1.append(arr[i]);
            if (i < arr.length - 1) {
                stringBuilder1.append(", ");
            } else if (i == arr.length - 1){
                stringBuilder1.append("]");
            }
        }
        return stringBuilder1.toString();
    }

}

计算一个人活了多少天

import java.text.DateFormat;
import java.text.ParseException;
import java.text.SimpleDateFormat;
import java.util.Date;
import java.util.Scanner;
public class Demo {
    public static void main(String[] args) throws ParseException {
        Scanner sc = new Scanner(System.in);
        System.out.print("请输入您的生日(年.月.日): ");
        System.out.println("您活了"+howLongHaveYouLived(sc.nextLine())+"天");
    }

    public static long howLongHaveYouLived (String str) throws ParseException {
        DateFormat df = new SimpleDateFormat("yyyy.MM.dd");
        Date birthDay = df.parse(str);
        long birthDayTime = birthDay.getTime();
        long nowTime = new Date().getTime();
        return (nowTime - birthDayTime) / 1000 / 60 / 60 /24;
    }
}

计算指定年份的2月有多少天

import java.util.Calendar;
import java.util.Date;
import java.util.Scanner;
public class Demo {
    public static void main(String[] args) {
        // 计算指定年份的2月有多少天
        Scanner sc = new Scanner(System.in);
        System.out.print("请输入您要指定的年份: ");
        int inputYear = sc.nextInt();
        System.out.println(inputYear+"年的2月有"+getDay(inputYear)+"天");
    }

    public static int getDay(int year) {
        Calendar calendar = Calendar.getInstance();
        calendar.set(year, 2, 1);
        calendar.add(Calendar.DATE, -1);
        return calendar.get(Calendar.DATE);
    }
}

MySQL explain 和 profiling 详解

mysql explain

MySQL 的 EXPLAIN 是一个用于查询优化的工具,它可以显示 MySQL 数据库如何执行查询。它返回一组关于查询执行计划的信息,包括用到的索引,表的连接顺序以及 MySQL 使用的查询类型。下面是 EXPLAIN 返回的列及其含义:

id

id:查询中每个 SELECT 子句或者操作的唯一标识符。如果 id 相同,那么这些操作在同一个查询中。

select_type

  • select_type:查询的类型,有以下几种类型:
    • SIMPLE:简单 SELECT 查询,不使用 UNION 或子查询等。
    • PRIMARY:最外层的查询,即包含了子查询的查询。
    • UNION:UNION 查询的第二个或后续查询语句,不包括第一个查询语句。
    • DEPENDENT UNION:UNION 查询中的第二个或后续查询语句,依赖于外部查询的结果。
    • UNION RESULT:UNION 的结果集。
    • SUBQUERY:子查询中的第一个 SELECT 语句,结果用于外部查询。
    • DEPENDENT SUBQUERY:子查询中的第一个 SELECT 语句,依赖于外部查询的结果。
    • DERIVED:派生表的 SELECT,MySQL 会将其存储在临时表中。
    • MATERIALIZED:派生表的 SELECT,MySQL 会将其存储在临时表中。
    • UNCACHEABLE SUBQUERY:子查询不可缓存。
  • table:显示查询的表名。
  • partitions:匹配到查询的分区列表。
  • type:表访问的类型,性能从好到坏依次是:
    • system:仅有一行记录的表。
    • const:基于索引进行的等值查询。
    • eq_ref:对于每个查询,使用了索引查找符合条件的一行。
    • ref:非唯一性索引查找,返回匹配某个单独值的所有行。
    • range:使用索引查找一定范围内的行。
    • index:使用索引扫描全表,一般用于ORDER BY和GROUP BY操作。
    • all:全表扫描。
  • possible_keys:可能使用的索引列表。
  • key:实际使用的索引名称。
  • key_len:使用索引的长度。
  • ref:显示索引的哪一列或常量与表列进行比较。
  • rows:估算的行数。
  • filtered:过滤器过滤的行数百分比。
  • Extra:关于 MySQL 如何解析查询的额外信息,包括以下信息:
    • Using index:表示查询中使用了覆盖索引。
    • Using where:表示 MySQL 使用了 WHERE 子句来过滤数据。
    • Using temporary:表示 MySQL 使用了临时表来存储结果集,通常是 GROUP BY 和 ORDER BY 操作的结果。
    • Using filesort:表示 MySQL 使用了文件排序来排序结果集。
    • Using join buffer:表示
    • Using join buffer:表示 MySQL 使用了 join buffer 来处理连接操作。
    • Using sort_union:表示 MySQL 使用了 UNION 查询中的排序优化。
    • Using intersect:表示 MySQL 使用了 UNION 查询中的交集优化。
    • Using index condition:表示 MySQL 使用了索引中的条件进行过滤,这意味着 MySQL 能够在索引中解决查询条件,而无需查找表中的行。
    • Using where with pushed condition:表示 MySQL 将过滤条件下推到了联接前的表中,这可能会更有效地利用索引。
    • Using index for group-by:表示 MySQL 使用了索引来处理 GROUP BY 操作,这通常是一种优化。
    • Using filesort for group-by:表示 MySQL 使用了文件排序来处理 GROUP BY 操作,这通常是不太理想的。
    • Using temporary for filesort:表示 MySQL 使用了临时表来处理 ORDER BY 或 GROUP BY 操作的结果。
    • Using filesort for order by:表示 MySQL 使用了文件排序来处理 ORDER BY 操作,这通常是不太理想的。

下面是一个使用 EXPLAIN 进行查询优化的例子:

EXPLAIN SELECT *
FROM users
JOIN orders ON users.id = orders.user_id
WHERE users.age > 18
ORDER BY orders.created_at DESC
LIMIT 10;

执行上面的语句后,会返回类似如下的输出:

sql
Copy code
+----+-------------+--------+------------+--------+---------------------+---------+---------+------------------------+------+----------+--------------------------+
| id | select_type | table | partitions | type | possible_keys | key | key_len | ref | rows | filtered | Extra |
+----+-------------+--------+------------+--------+---------------------+---------+---------+------------------------+------+----------+--------------------------+
| 1 | SIMPLE | users | NULL | range | PRIMARY,age | age | 4 | NULL | 4 | 100.00 | Using where; Using index |
| 1 | SIMPLE | orders | NULL | ref | user_id,created_at | user_id | 4 | test_db.users.id | 199 | 100.00 | Using index |
+----+-------------+--------+------------+--------+---------------------+---------+---------+------------------------+------+----------+--------------------------+

这个查询通过 JOIN 将用户表和订单表连接起来,只返回年龄大于 18 岁的用户的前 10 个订单,按照订单创建时间倒序排序。通过分析输出结果,我们可以看到 MySQL 使用了用户表的 age 列上的索引来过滤数据,然后使用了订单表的 user_id 列上的索引来查找订单,这个查询使用了索引优化的方法,可以更高效地执行。

MySQL profiling

# 查看是否开启了 profiling
show variables like '%profiling%';
# 开启 profiling
set profiling = 1;
# 执行查询

select * from big_tables where id >= (
    select id from big_tables limit 10000000, 1
) limit 0, 1;

# 查看所有查询的性能数据
show profiles;
# 查看某条查询的详细性能数据
show profile for query 1;
# 查看 cpu, io, memory, block io 等性能数据
show profile cpu, io, memory, block io for query 1;

# 关闭 profiling
set profiling = 0;

使用示例:

mysql> # 查看所有查询的性能数据
show profiles;
+----------+------------+---------------------------------------------------------------------------------------------------+
| Query_ID | Duration   | Query                                                                                             |
+----------+------------+---------------------------------------------------------------------------------------------------+
|        1 | 0.00568250 | show variables like '%profiling%'                                                                 |
|        2 | 1.41488150 | select * from big_tables where id >= (
    select id from big_tables limit 10000000, 1
) limit 0, 1 |
|        3 | 0.00040300 | purge profiles                                                                                    |
|        4 | 0.00016575 | # 清理所有profiling 数据
FLUSH STATEMENT ANALYSIS                                                  |
|        5 | 0.00014875 | FLUSH STATEMENT ANALYSIS                                                                          |
|        6 | 1.41070725 | select * from big_tables where id >= (
    select id from big_tables limit 10000000, 1
) limit 0, 1 |
+----------+------------+---------------------------------------------------------------------------------------------------+
6 rows in set (0.10 sec)
mysql> # 查看某条查询的详细性能数据
show profile for query 6;
+--------------------------------+----------+
| Status                         | Duration |
+--------------------------------+----------+
| starting                       | 0.000098 |
| Executing hook on transaction  | 0.000034 |
| starting                       | 0.000030 |
| checking permissions           | 0.000009 |
| checking permissions           | 0.000005 |
| Opening tables                 | 0.000059 |
| init                           | 0.000027 |
| System lock                    | 0.000015 |
| optimizing                     | 0.000010 |
| statistics                     | 0.000024 |
| optimizing                     | 0.000004 |
| statistics                     | 0.000008 |
| preparing                      | 0.000016 |
| executing                      | 1.410089 |
| preparing                      | 0.000041 |
| executing                      | 0.000037 |
| end                            | 0.000006 |
| query end                      | 0.000042 |
| waiting for handler commit     | 0.000016 |
| closing tables                 | 0.000014 |
| freeing items                  | 0.000110 |
| cleaning up                    | 0.000019 |
+--------------------------------+----------+
mysql> # 查看 cpu, io, memory, block io 等性能数据
show profile cpu, block io for query 6;
+--------------------------------+----------+----------+------------+--------------+---------------+
| Status                         | Duration | CPU_user | CPU_system | Block_ops_in | Block_ops_out |
+--------------------------------+----------+----------+------------+--------------+---------------+
| starting                       | 0.000098 | 0.000072 | 0.000025   |            0 |             0 |
| Executing hook on transaction  | 0.000034 | 0.000026 | 0.000009   |            0 |             0 |
| starting                       | 0.000030 | 0.000022 | 0.000007   |            0 |             0 |
| checking permissions           | 0.000009 | 0.000006 | 0.000002   |            0 |             0 |
| checking permissions           | 0.000005 | 0.000004 | 0.000002   |            0 |             0 |
| Opening tables                 | 0.000059 | 0.000044 | 0.000015   |            0 |             0 |
| init                           | 0.000027 | 0.000020 | 0.000007   |            0 |             0 |
| System lock                    | 0.000015 | 0.000010 | 0.000003   |            0 |             0 |
| optimizing                     | 0.000010 | 0.000008 | 0.000003   |            0 |             0 |
| statistics                     | 0.000024 | 0.000018 | 0.000006   |            0 |             0 |
| optimizing                     | 0.000004 | 0.000002 | 0.000001   |            0 |             0 |
| statistics                     | 0.000008 | 0.000006 | 0.000002   |            0 |             0 |
| preparing                      | 0.000016 | 0.000012 | 0.000004   |            0 |             0 |
| executing                      | 1.410089 | 1.412984 | 0.000000   |            0 |             0 |
| preparing                      | 0.000041 | 0.000038 | 0.000000   |            0 |             0 |
| executing                      | 0.000037 | 0.000037 | 0.000000   |            0 |             0 |
| end                            | 0.000006 | 0.000005 | 0.000000   |            0 |             0 |
| query end                      | 0.000042 | 0.000042 | 0.000000   |            0 |             0 |
| waiting for handler commit     | 0.000016 | 0.000016 | 0.000000   |            0 |             0 |
| closing tables                 | 0.000014 | 0.000014 | 0.000000   |            0 |             0 |
| freeing items                  | 0.000110 | 0.000109 | 0.000000   |            0 |             0 |
| cleaning up                    | 0.000019 | 0.000019 | 0.000000   |            0 |             0 |
+--------------------------------+----------+----------+------------+--------------+---------------+
22 rows in set (0.17 sec)

拓展: profiling 数据的条数

一般 profiling 只保留最近 15 条查询的性能数据, 如果需要保留更多的数据, 可以修改
profiling_history_size
变量:

mysql> show variables like '%profiling%';
+------------------------+-------+
| Variable_name          | Value |
+------------------------+-------+
| have_profiling         | YES   |
| profiling              | ON    |
| profiling_history_size | 15    |
+------------------------+-------+
3 rows in set (0.10 sec)
mysql> set global profiling_history_size=20;

本文示例代码已上传至我的
Github
仓库
https://github.com/CNFeffery/DataScienceStudyNotes

1 简介

大家好我是费老师,前两天
pandas
正式发布了其
2.0.0
版本,作为一次大版本更新,
pandas
针对底层进行了大量的重构以优化性能和稳定性,其有关这次更新内容的说明文档更是洋洋洒洒非常繁杂。


我们作为日常使用
pandas
的用户,并不需要了解过多底层更新内容,只需要学习如何使用新版
pandas
为自己提质提效就行,今天的文章话不多说,直接带大家速通新版
pandas
干货内容

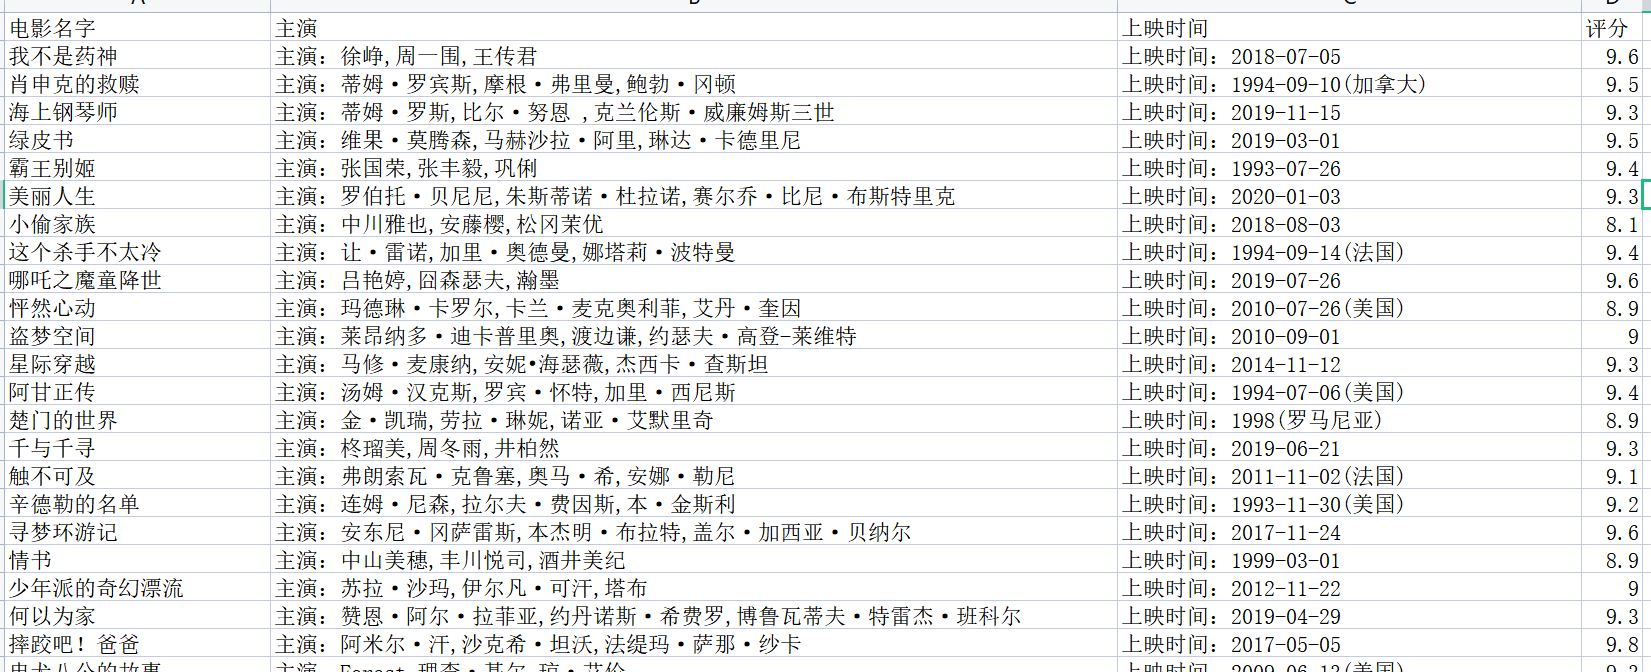
猫眼有一个电影榜单top100,我们将他的榜单电影数据(电影名、主演、上映时间、豆瓣评分)抓下来保存到本地的excle中

本案例使用css方式提取页面数据,所以会用到以下库

importtimeimportrequestsimportparsel#解析库,解析css
importcsv#爬取的数据写入csv

创建csv文件标头信息,也就是表格第一排内容

f = open('book.csv',mode='a',encoding='utf-8',newline='')#表头
csv_writer = csv.DictWriter(f,fieldnames=['电影名字','主演','上映时间','评分'])
csv_writer.writeheader()

分析地址,每一页地址的区别在最后一个“=”号后面的数字,第一页是“10“,第二页是”20“,以此类推到”90“,所以写个循环翻页

https://www.maoyan.com/board/4?timeStamp=1680685769327&channelId=40011&index=8&signKey=6fa9e474efd1ed595c394e9bc497cdaf&sVersion=1&webdriver=false&offset=10

https://www.maoyan.com/board/4?timeStamp=1680685769327&channelId=40011&index=8&signKey=6fa9e474efd1ed595c394e9bc497cdaf&sVersion=1&webdriver=false&offset=20

https://www.maoyan.com/board/4?timeStamp=1680685769327&channelId=40011&index=8&signKey=6fa9e474efd1ed595c394e9bc497cdaf&sVersion=1&webdriver=false&offset=90

for page in range(0,10):
time.sleep(
2)
page
= page *10url= 'https://www.maoyan.com/board/4?timeStamp=1680685769327&channelId=40011&index=8&signKey=6fa9e474efd1ed595c394e9bc497cdaf&sVersion=1&webdriver=false&offset={}'.format(page)print(url)

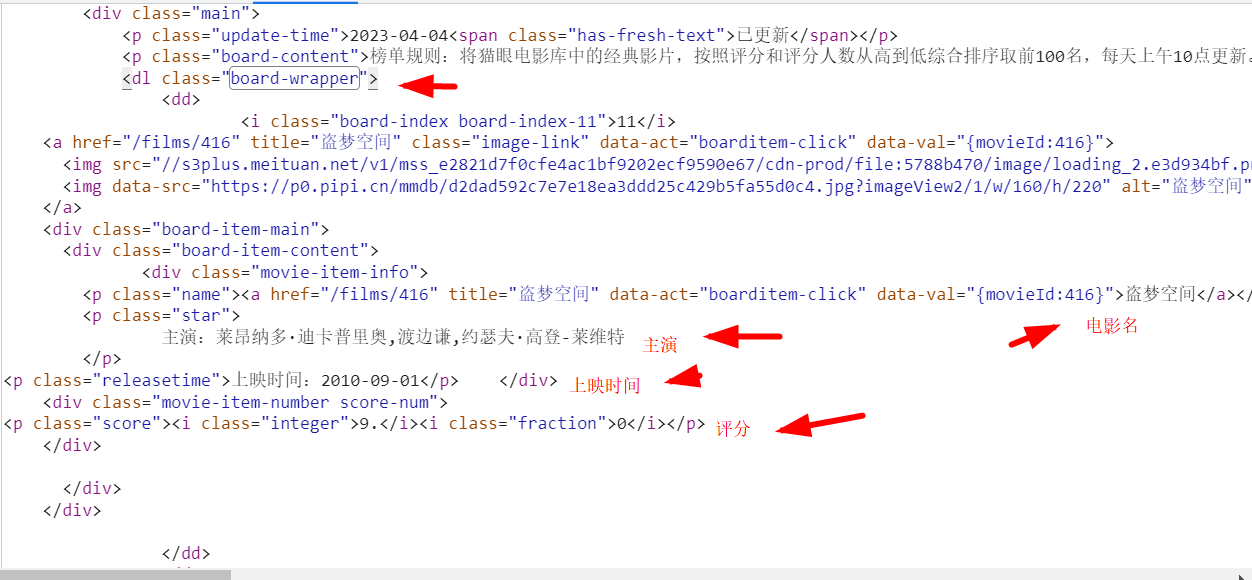
分析页面,找到需要的数据

提取数据脚本如下

    response = requests.get(url, headers=headers)
selector
=parsel.Selector(response.text)
li_s
= selector.css('.board-wrapper dd')for li inli_s:
name
= li.css('.name a::text').get()#电影名称 star = li.css('.star::text').get()#主演 star_string =star.strip()#strip() 方法用于移除字符串头尾指定的字符(默认为空格或换行符)或字符序列 releasetime = li.css('.releasetime::text').get()#上映时间 data_time =releasetime.strip()
follow
= li.css('.score i::text').getall()
score
= ''.join(follow)#join函数将列表内的值连串显示,参考“https://blog.csdn.net/weixin_50853979/article/details/125119368”

最后将获取到的数据字典化后存到csv文件中

   dit ={'电影名字': name,'主演': star_string,'上映时间': data_time,'评分': score,
}
csv_writer.writerow(dit)

执行后csv文件的内容

全部代码

importtimeimportrequestsimportparsel#解析库,解析css
importcsv#爬取的数据写入csv
f= open('book.csv',mode='a',encoding='utf-8',newline='')#表头
csv_writer = csv.DictWriter(f,fieldnames=['电影名字','主演','上映时间','评分'])
csv_writer.writeheader()
for page in range(0,10):
time.sleep(
2)
page
= page *10url= 'https://www.maoyan.com/board/4?timeStamp=1680685769327&channelId=40011&index=8&signKey=6fa9e474efd1ed595c394e9bc497cdaf&sVersion=1&webdriver=false&offset={}'.format(page)print(url)
headers
={'User-Agent': 'Mozilla/5.0 (Windows NT 10.0; Win64; x64) AppleWebKit/537.36 (KHTML, like Gecko) Chrome/108.0.0.0 Safari/537.36','Cookie': '__mta=20345351.1670903159717.1670903413872.1670903436333.5; uuid_n_v=v1; uuid=A8065B807A9811ED82C293D7E110319C9B09821067E1411AB6F4EC82889E1869; _csrf=916b8446658bd722f56f2c092eaae35ea3cd3689ef950542e202b39ddfe7c91e; Hm_lvt_703e94591e87be68cc8da0da7cbd0be2=1670903160; _lxsdk_cuid=1850996db5dc8-07670e36da28-26021151-1fa400-1850996db5d67; _lxsdk=A8065B807A9811ED82C293D7E110319C9B09821067E1411AB6F4EC82889E1869; __mta=213622443.1670903327420.1670903417327.1670903424017.4; Hm_lpvt_703e94591e87be68cc8da0da7cbd0be2=1670903436; _lxsdk_s=1850996db5e-8b2-284-88a%7C%7C18','Host': 'www.maoyan.com','Referer': 'https://www.maoyan.com/films/1200486'}
response
= requests.get(url, headers=headers)
selector
=parsel.Selector(response.text)
li_s
= selector.css('.board-wrapper dd')for li inli_s:
name
= li.css('.name a::text').get()#电影名称 star = li.css('.star::text').get()#主演 star_string =star.strip()#strip() 方法用于移除字符串头尾指定的字符(默认为空格或换行符)或字符序列 releasetime = li.css('.releasetime::text').get()#上映时间 data_time =releasetime.strip()
follow
= li.css('.score i::text').getall()
score
= ''.join(follow)#join函数将列表内的值连串显示,参考“https://blog.csdn.net/weixin_50853979/article/details/125119368” dit ={'电影名字': name,'主演': star_string,'上映时间': data_time,'评分': score,
}
csv_writer.writerow(dit)

本章将继续探索驱动开发中的基础部分,定时器在内核中同样很常用,在内核中定时器可以使用两种,即IO定时器,以及DPC定时器,一般来说IO定时器是DDK中提供的一种,该定时器可以为间隔为N秒做定时,但如果要实现毫秒级别间隔,微秒级别间隔,就需要用到DPC定时器,如果是秒级定时其两者基本上无任何差异,本章将简单介绍
IO/DPC
这两种定时器的使用技巧。

首先来看IO定时器是如何使用的,IO定时器在使用上需要调用
IoInitializeTimer
函数对定时器进行初始化,但需要注意的是此函数每个设备对象只能调用一次,当初始化完成后用户可调用
IoStartTimer
让这个定时器运行,相反的调用
IoStopTimer
则用于关闭定时。

// 初始化定时器
NTSTATUS IoInitializeTimer(
  [in]           PDEVICE_OBJECT         DeviceObject,  // 设备对象
  [in]           PIO_TIMER_ROUTINE      TimerRoutine,  // 回调例程
  [in, optional] __drv_aliasesMem PVOID Context        // 回调例程参数
);
// 启动定时器
VOID IoStartTimer(
  [in] PDEVICE_OBJECT DeviceObject             // 设备对象
);
// 关闭定时器
VOID IoStopTimer(
  [in] PDEVICE_OBJECT DeviceObject             // 设备对象
);

这里我们最关心的其实是
IoInitializeTimer
函数中的第二个参数
TimerRoutine
该参数用于传递一个自定义回调函数地址,其次由于定时器需要依附于一个设备,所以我们还需要调用
IoCreateDevice
创建一个新设备来让定时器线程使用,实现定时器代码如下所示。

// 署名权
// right to sign one's name on a piece of work
// PowerBy: LyShark
// Email: me@lyshark.com

#include <ntifs.h>
#include <wdm.h>
#include <ntstrsafe.h>

LONG count = 0;

// 自定义定时器函数
VOID MyTimerProcess( __in struct _DEVICE_OBJECT *DeviceObject, __in_opt PVOID Context)
{
	InterlockedIncrement(&count);
	DbgPrint("定时器计数 = %d", count);
}

VOID UnDriver(PDRIVER_OBJECT driver)
{
	// 关闭定时器
	IoStopTimer(driver->DeviceObject);

	// 删除设备
	IoDeleteDevice(driver->DeviceObject);

	DbgPrint(("Uninstall Driver Is OK \n"));
}

NTSTATUS DriverEntry(IN PDRIVER_OBJECT Driver, PUNICODE_STRING RegistryPath)
{
	DbgPrint("hello lyshark \n");

	NTSTATUS status = STATUS_UNSUCCESSFUL;

	// 定义设备名以及定时器
	UNICODE_STRING dev_name = RTL_CONSTANT_STRING(L"");
	PDEVICE_OBJECT dev;
	status = IoCreateDevice(Driver, 0, &dev_name, FILE_DEVICE_UNKNOWN, FILE_DEVICE_SECURE_OPEN, FALSE, &dev);
	if (!NT_SUCCESS(status))
	{
		return STATUS_UNSUCCESSFUL;
	}
	else
	{
		// 初始化定时器并开启
		IoInitializeTimer(dev, MyTimerProcess, NULL);
		IoStartTimer(dev);
	}

	Driver->DriverUnload = UnDriver;
	return STATUS_SUCCESS;
}

编译并运行这段代码,那么系统会每隔1秒执行一次
MyTimerProcess
这个自定义函数。

那么如何让其每隔三秒执行一次呢,其实很简单,通过
InterlockedDecrement
函数实现递减(每次调用递减1)当计数器变为0时
InterlockedCompareExchange
会让其继续变为3,以此循环即可完成三秒输出一次的效果。

LONG count = 3;

// 自定义定时器函数
VOID MyTimerProcess(__in struct _DEVICE_OBJECT *DeviceObject, __in_opt PVOID Context)
{
	// 递减计数
	InterlockedDecrement(&count);

	// 当计数减到0之后继续变为3
	LONG preCount = InterlockedCompareExchange(&count, 3, 0);

	//每隔3秒计数器一个循环输出如下信息
	if (preCount == 0)
	{
		DbgPrint("[LyShark] 三秒过去了 \n");
	}
}

程序运行后,你会看到如下输出效果;

相比于
IO定时器
来说,
DPC定时器
则更加灵活,其可对任意间隔时间进行定时,DPC定时器内部使用定时器对象
KTIMER
,当对定时器设定一个时间间隔后,每隔这段时间操作系统会将一个
DPC例程
插入
DPC队列
。当操作系统读取
DPC队列
时,对应的
DPC例程
会被执行,此处所说的DPC例程同样表示回调函数。

DPC定时器中我们所需要使用的函数声明部分如下所示;

// 初始化定时器对象 PKTIMER 指向调用方为其提供存储的计时器对象的指针
void KeInitializeTimer(
  [out] PKTIMER Timer    // 定时器指针
);

// 初始化DPC对象
void KeInitializeDpc(
  [out]          __drv_aliasesMem PRKDPC Dpc,
  [in]           PKDEFERRED_ROUTINE      DeferredRoutine,
  [in, optional] __drv_aliasesMem PVOID  DeferredContext
);

// 设置定时器
BOOLEAN KeSetTimer(
  [in, out]      PKTIMER       Timer,     // 定时器对象的指针
  [in]           LARGE_INTEGER DueTime,   // 时间间隔
  [in, optional] PKDPC         Dpc        // DPC对象
);

// 取消定时器
BOOLEAN KeCancelTimer(
  [in, out] PKTIMER unnamedParam1         // 定时器指针
);

注意;在调用
KeSetTimer
后,只会触发一次
DPC
例程。如果想周期的触发
DPC
例程,需要在
DPC例程
被触发后,再次调用
KeSetTimer
函数,应用DPC定时代码如下所示。

// 署名权
// right to sign one's name on a piece of work
// PowerBy: LyShark
// Email: me@lyshark.com

#include <ntifs.h>
#include <wdm.h>
#include <ntstrsafe.h>

LONG count = 0;
KTIMER g_ktimer;
KDPC g_kdpc;

// 自定义定时器函数
VOID MyTimerProcess(__in struct _KDPC *Dpc,__in_opt PVOID DeferredContext,__in_opt PVOID SystemArgument1,__in_opt PVOID SystemArgument2)
{
	LARGE_INTEGER la_dutime = { 0 };
	la_dutime.QuadPart = 1000 * 1000 * -10;

	// 递增计数器
	InterlockedIncrement(&count);

	DbgPrint("DPC 定时执行 = %d", count);

	// 再次设置定时
	KeSetTimer(&g_ktimer, la_dutime, &g_kdpc);
}

VOID UnDriver(PDRIVER_OBJECT driver)
{
	// 取消计数器
	KeCancelTimer(&g_ktimer);

	DbgPrint(("Uninstall Driver Is OK \n"));
}

NTSTATUS DriverEntry(IN PDRIVER_OBJECT Driver, PUNICODE_STRING RegistryPath)
{
	DbgPrint("hello lyshark \n");

	LARGE_INTEGER la_dutime = { 0 };

	// 每隔1秒执行一次
	la_dutime.QuadPart = 1000 * 1000 * -10;

	// 1.初始化定时器对象
	KeInitializeTimer(&g_ktimer);

	// 2.初始化DPC定时器
	KeInitializeDpc(&g_kdpc, MyTimerProcess, NULL);

	// 3.设置定时器,开始计时
	KeSetTimer(&g_ktimer, la_dutime, &g_kdpc);

	Driver->DriverUnload = UnDriver;
	return STATUS_SUCCESS;
}

编译并运行这段程序,会发现其运行后的定时效果与IO定时器并无太大区别,但是DPC可以控制更精细,通过
la_dutime.QuadPart = 1000 * 1000 * -10
毫秒级别都可被控制。

最后扩展一个知识点,如何得到系统的当前详细时间,获得系统时间。在内核里通过
KeQuerySystemTime
获取的系统时间是标准时间
(GMT+0)
,转换成本地时间还需使用
RtlTimeToTimeFields
函数将其转换为
TIME_FIELDS
结构体格式。

// 署名权
// right to sign one's name on a piece of work
// PowerBy: LyShark
// Email: me@lyshark.com

#include <ntifs.h>
#include <wdm.h>
#include <ntstrsafe.h>

/*
	typedef struct TIME_FIELDS
	{
	CSHORT Year;
	CSHORT Month;
	CSHORT Day;
	CSHORT Hour;
	CSHORT Minute;
	CSHORT Second;
	CSHORT Milliseconds;
	CSHORT Weekday;
	} TIME_FIELDS;
*/

// 内核中获取时间
VOID MyGetCurrentTime()
{
	LARGE_INTEGER CurrentTime;
	LARGE_INTEGER LocalTime;
	TIME_FIELDS   TimeFiled;
	
	// 得到格林威治时间
	KeQuerySystemTime(&CurrentTime);
	
	// 转成本地时间
	ExSystemTimeToLocalTime(&CurrentTime, &LocalTime);
	
	// 转换为TIME_FIELDS格式
	RtlTimeToTimeFields(&LocalTime, &TimeFiled);

	DbgPrint("[时间与日期] %4d年%2d月%2d日 %2d时%2d分%2d秒",
		TimeFiled.Year, TimeFiled.Month, TimeFiled.Day,
		TimeFiled.Hour, TimeFiled.Minute, TimeFiled.Second);
}

VOID UnDriver(PDRIVER_OBJECT driver)
{
	DbgPrint(("Uninstall Driver Is OK \n"));
}

NTSTATUS DriverEntry(IN PDRIVER_OBJECT Driver, PUNICODE_STRING RegistryPath)
{
	MyGetCurrentTime();

	DbgPrint("hello lyshark \n");

	Driver->DriverUnload = UnDriver;
	return STATUS_SUCCESS;
}

运行后即可在内核中得到当前系统的具体时间;