Winform下的地图开发控件(GMap.NET)使用心得之二
在上篇《
Winform下的地图开发控件(GMap.NET)使用心得
》中简单介绍了GMap.NET的控件基本情况,本篇开始介绍一下相关的代码操作。
其实目前GMap.NET提供的功能还不是很多,因此其演示的例子基本上都涉及到了,我在此基础上做了一些改进和运用,总结下功能代码吧。
首先使用控件前,需要初始化一些变量和事件,初始化代码如下所示:

代码
private
void
InitMapControl()
{
this
.gMapControl1.Manager.Mode
=
AccessMode.ServerAndCache;
this
.gMapControl1.MapType
=
MapType.GoogleMapChina;
this
.gMapControl1.MaxZoom
=
18
;
this
.gMapControl1.MinZoom
=
8
;
this
.gMapControl1.Zoom
=
13
;
this
.gMapControl1.MouseMove
+=
new
MouseEventHandler(gMapControl1_MouseMove);
this
.gMapControl1.DoubleClick
+=
new
EventHandler(gMapControl1_DoubleClick);
this
.gMapControl1.MouseDown
+=
new
MouseEventHandler(
this
.MainMap_MouseDown);
this
.gMapControl1.MouseUp
+=
new
MouseEventHandler(
this
.MainMap_MouseUp);
this
.gMapControl1.OnCurrentPositionChanged
+=
new
CurrentPositionChanged(
this
.MainMap_OnCurrentPositionChanged);
this
.gMapControl1.OnTileLoadStart
+=
new
TileLoadStart(
this
.MainMap_OnTileLoadStart);
this
.gMapControl1.OnTileLoadComplete
+=
new
TileLoadComplete(
this
.MainMap_OnTileLoadComplete);
this
.gMapControl1.OnMarkerClick
+=
new
MarkerClick(
this
.MainMap_OnMarkerClick);
this
.gMapControl1.OnMapZoomChanged
+=
new
MapZoomChanged(
this
.MainMap_OnMapZoomChanged);
this
.gMapControl1.OnMapTypeChanged
+=
new
MapTypeChanged(
this
.MainMap_OnMapTypeChanged);
this
.routes
=
new
GMapOverlay(
this
.gMapControl1,
"
routes
"
);
this
.gMapControl1.Overlays.Add(
this
.routes);
this
.objects
=
new
GMapOverlay(
this
.gMapControl1,
"
objects
"
);
this
.gMapControl1.Overlays.Add(
this
.objects);
this
.top
=
new
GMapOverlay(
this
.gMapControl1,
"
top
"
);
this
.gMapControl1.Overlays.Add(
this
.top);
this
.currentMarker
=
new
GMapMarkerGoogleRed(
this
.gMapControl1.CurrentPosition);
this
.top.Markers.Add(
this
.currentMarker);
this
.center
=
new
GMapMarkerCross(
this
.gMapControl1.CurrentPosition);
this
.top.Markers.Add(
this
.center);
this
.myShop
=
new
GMapOverlay(
this
.gMapControl1,
"
myShop
"
);
this
.gMapControl1.Overlays.Add(
this
.myShop);
DisplayMyShop();
SetZoomCenter();
this
.gMapControl1.DragButton
=
MouseButtons.Left;
}
其中的OnMarkerClick好像虽然有相关的事件,但是并不能捕获单击图标的时间操作,估计是没有完成该功能吧。
GMap.NET提供了各种鼠标的操作事件,我们重载即可实现特殊的控制处理了:

鼠标事件操作
void
gMapControl1_DoubleClick(
object
sender, EventArgs e)
{
this
.gMapControl1.Zoom
+=
1
;
this
.gMapControl1.CurrentPosition
=
lastPosition;
}
void
gMapControl1_MouseMove(
object
sender, MouseEventArgs e)
{
PointLatLng latLng
=
this
.gMapControl1.FromLocalToLatLng(e.X, e.Y);
this
.tsslPosition.Text
=
string
.Format(
"
经度:{0}, 纬度:{1}
"
, latLng.Lng, latLng.Lat);
}
private
void
MainMap_MouseDown(
object
sender, MouseEventArgs e)
{
if
(e.Button
==
MouseButtons.Left)
{
this
.isMouseDown
=
true
;
lastPosition
=
this
.gMapControl1.FromLocalToLatLng(e.X, e.Y);
}
}
private
void
MainMap_MouseUp(
object
sender, MouseEventArgs e)
{
if
(e.Button
==
MouseButtons.Left)
{
this
.isMouseDown
=
false
;
}
}
保存截图的操作如下所示
代码
private
void
tsbSavePicture_Click(
object
sender, EventArgs e)
{
try
{
using
(SaveFileDialog dialog
=
new
SaveFileDialog())
{
dialog.Filter
=
"
PNG (*.png)|*.png
"
;
dialog.FileName
=
"
GMap.NET image
"
;
Image image
=
this
.gMapControl1.ToImage();
if
(image
!=
null
)
{
using
(image)
{
if
(dialog.ShowDialog()
==
DialogResult.OK)
{
string
fileName
=
dialog.FileName;
if
(
!
fileName.EndsWith(
"
.png
"
, StringComparison.OrdinalIgnoreCase))
{
fileName
+=
"
.png
"
;
}
image.Save(fileName);
MessageBox.Show(
"
图片已保存:
"
+
dialog.FileName,
"
GMap.NET
"
, MessageBoxButtons.OK, MessageBoxIcon.Asterisk);
}
}
}
}
}
catch
(Exception exception)
{
MessageBox.Show(
"
图片保存失败:
"
+
exception.Message,
"
GMap.NET
"
, MessageBoxButtons.OK, MessageBoxIcon.Hand);
}
地址查询并绘制图标的代码如下:
代码
private
void
btnSearch_Click(
object
sender, EventArgs e)
{
if
(
this
.txtAddress.Text.Length
==
0
)
{
this
.txtAddress.Focus();
MessageBox.Show(
"
请输入查询的地址
"
);
}
string
search
=
string
.Format(
"
{0},{1}
"
,
this
.txtCity.Text,
this
.txtAddress.Text);
GeoCoderStatusCode code
=
this
.gMapControl1.SetCurrentPositionByKeywords(search);
if
(code
!=
GeoCoderStatusCode.G_GEO_SUCCESS)
{
MessageBox.Show(
"
地址没有找到:'
"
+
this
.txtAddress.Text
+
"
', 原因:
"
+
code.ToString(),
"
GMap.NET
"
, MessageBoxButtons.OK, MessageBoxIcon.Exclamation);
}
this
.objects.Markers.Clear();
AddLocation(
this
.txtAddress.Text);
}
private
void
AddLocation(
string
place)
{
GeoCoderStatusCode unknow
=
GeoCoderStatusCode.Unknow;
PointLatLng
?
latLngFromGeocoder
=
Singleton
<
GMaps
>
.Instance.GetLatLngFromGeocoder(place,
out
unknow);
if
(latLngFromGeocoder.HasValue
&&
(unknow
==
GeoCoderStatusCode.G_GEO_SUCCESS))
{
GMapMarker item
=
new
GMapMarkerGoogleGreen(latLngFromGeocoder.Value);
GMapMarkerRect rect
=
new
GMapMarkerRect(latLngFromGeocoder.Value);
rect.Size
=
new
System.Drawing.Size(
100
,
100
);
rect.ToolTipText
=
place;
rect.TooltipMode
=
MarkerTooltipMode.Always;
this
.objects.Markers.Add(item);
this
.objects.Markers.Add(rect);
}
}
void
btnSearch_Click(
object
sender, EventArgs e)
{
if
(
this
.txtAddress.Text.Length
==
0
)
{
this
.txtAddress.Focus();
MessageBox.Show(
"
请输入查询的地址
"
);
}
string
search
=
string
.Format(
"
{0},{1}
"
,
this
.txtCity.Text,
this
.txtAddress.Text);
GeoCoderStatusCode code
=
this
.gMapControl1.SetCurrentPositionByKeywords(search);
if
(code
!=
GeoCoderStatusCode.G_GEO_SUCCESS)
{
MessageBox.Show(
"
地址没有找到:'
"
+
this
.txtAddress.Text
+
"
', 原因:
"
+
code.ToString(),
"
GMap.NET
"
, MessageBoxButtons.OK, MessageBoxIcon.Exclamation);
}
this
.objects.Markers.Clear();
AddLocation(
this
.txtAddress.Text);
}
private
void
AddLocation(
string
place)
{
GeoCoderStatusCode unknow
=
GeoCoderStatusCode.Unknow;
PointLatLng
?
latLngFromGeocoder
=
Singleton
<
GMaps
>
.Instance.GetLatLngFromGeocoder(place,
out
unknow);
if
(latLngFromGeocoder.HasValue
&&
(unknow
==
GeoCoderStatusCode.G_GEO_SUCCESS))
{
GMapMarker item
=
new
GMapMarkerGoogleGreen(latLngFromGeocoder.Value);
GMapMarkerRect rect
=
new
GMapMarkerRect(latLngFromGeocoder.Value);
rect.Size
=
new
System.Drawing.Size(
100
,
100
);
rect.ToolTipText
=
place;
rect.TooltipMode
=
MarkerTooltipMode.Always;
this
.objects.Markers.Add(item);
this
.objects.Markers.Add(rect);
}
}
绘制两地之间的线路图命令如下所示:
代码
private
void
ctxMenu_GetRout_Click(
object
sender, EventArgs e)
{
this
.objects.Markers.Clear();
this
.routes.Routes.Clear();
//
清楚路线
this
.start
=
defaultLocation;
this
.end
=
this
.gMapControl1.FromLocalToLatLng(
this
.contextMenuStrip1.Bounds.X,
this
.contextMenuStrip1.Bounds.Y);
MapRoute route
=
Singleton
<
GMaps
>
.Instance.GetRouteBetweenPoints(
this
.start,
this
.end,
false
, (
int
)
this
.gMapControl1.Zoom);
if
(route
!=
null
)
{
GMapRoute item
=
new
GMapRoute(route.Points, route.Name);
item.Color
=
Color.Blue;
this
.routes.Routes.Add(item);
GMapMarker marker
=
new
GMapMarkerGoogleRed(
this
.start);
//
marker.ToolTipText = "Start: " + route.Name;
marker.TooltipMode
=
MarkerTooltipMode.Always;
//
Placemark place = this.gMapControl1.Manager.GetPlacemarkFromGeocoder(this.end);
//
地标不准确,不用
MapRoute mapRoute
=
this
.gMapControl1.Manager.GetRouteBetweenPoints(
this
.start,
this
.end,
true
, (
int
)
this
.gMapControl1.Zoom);
GMapMarker marker2
=
new
GMapMarkerGoogleGreen(
this
.end);
marker2.ToolTipText
=
string
.Format(
"
目的地距离:{0}公里
"
, Math.Round(mapRoute.Distance,
2
));
marker2.TooltipMode
=
MarkerTooltipMode.Always;
this
.objects.Markers.Add(marker);
this
.objects.Markers.Add(marker2);
this
.gMapControl1.ZoomAndCenterRoute(item);
}
}
放大、缩小、重新加载地图的操作如下:
代码
private
void
ctxMenu_ZoomOut_Click(
object
sender, EventArgs e)
{
this
.gMapControl1.Zoom
+=
1
;
}
private
void
ctxMenu_ZoomIn_Click(
object
sender, EventArgs e)
{
this
.gMapControl1.Zoom
-=
1
;
}
private
void
tsbReload_Click(
object
sender, EventArgs e)
{
this
.gMapControl1.ReloadMap();
}
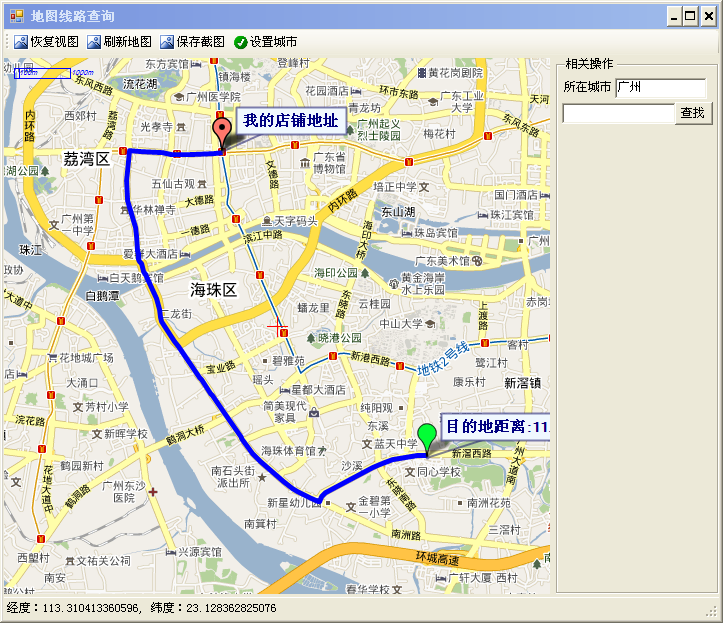
程序截图如下所示: