概览
开门见山先上图

界定一些术语,方便后面说明:
- GMT:格林威治平均时,太阳每天经过位于英国伦敦郊区的皇家格林威治天文台的时间为中午 12 点,1972 年之前使用的国际标准时间,因地球在它的椭圆轨道里的运动速度不均匀,这个时刻可能和实际的太阳时相差16分钟。
- UTC:国际标准时间,相当于本初子午线 (即经度0度) 上的平均太阳时。UTC 时间是经过平均太阳时 (以格林威治时间 GMT 为准)、地轴运动修正后的新时标以及以秒为单位的国际原子时所综合精算而成。
- Epoch:日历时间,自国际标准时间公元 1970 年 1 月 1 日 00:00:00 以来经过的秒数。
Unix 日期时间
获取
unix 通过接口 time 将 Epoch 作为整数返回,自然的包含了日期和时间两部分:
time_t time(time_t *tloc);
其中 time_t 在 64 位系统上是 8 字节整数 (long long):
sizeof (time_t) = 8
在 32 位系统上可能是 4 字节整数,没有试。
time 例程的 tloc 参数如果不为空,则时间值也存放在由 tloc 指向的单元内。
如果想获取更精准的时间,需要借助另外的接口:
int gettimeofday(struct timeval *tv, struct timezone *tz);
时间通过参数 tv 返回:
struct timeval {
    time_t      tv_sec;     /* seconds */
    suseconds_t tv_usec;    /* microseconds */
};
除了代表 UTC 的 tv_sec 外还有代表微秒的 tv_usec,注意如果只需要精确到毫秒,需要将这个值除以 1000。
在 64 位 CentOS 上它是 8 字节整数:
sizeof (suseconds_t) = 8, sizeof (struct timeval) = 16
不过不是所有 64 位系统这个字段都是 long long,在 64 位 Darwin 上它是 4 字节整数:
sizeof (suseconds_t) = 4, sizeof (struct timeval) = 16
但最终 timeval 结构体的长度还是 16,可能是内存对齐的缘故。
tz 参数用来指定时区信息:
struct timezone {
    int tz_minuteswest;     /* minutes west of Greenwich */
    int tz_dsttime;         /* type of DST correction */
};
因为一些原因,tz 在 SUS 标准中唯一合法值是 NULL,某些平台支持使用 tz 说明时区,但完全没有可移植性,例如在 Linux 上,建议这个参数设置为 NULL:
The use of the timezone structure is obsolete; the tz argument should normally be specified as NULL. (See NOTES below.)
不为 NULL 也不会报错,但是不会修改指定参数的内容。Darwin 支持这个参数,下面是它的日常返回:
minuteswest = -480, dsttime = 0
具体可参考时区和夏时制一节。
转换
time_t 类型利于接口返回,但可读性比较差,需要将它转换为人能理解的日期和时间。
struct tm {
    int tm_sec;         /* seconds */
    int tm_min;         /* minutes */
    int tm_hour;        /* hours */
    int tm_mday;        /* day of the month */
    int tm_mon;         /* month */
    int tm_year;        /* year */
    int tm_wday;        /* day of the week */
    int tm_yday;        /* day in the year */
    int tm_isdst;       /* daylight saving time */
};
这就是 struct tm,除了年月日时分秒,还有两个字段 wday / yday 用于方便的展示当前周/年中的天数,另外 isdst 标识了是否为夏时制 (参考夏时制一节)。
int tm_sec;     /* seconds (0 - 60) */
int tm_min;     /* minutes (0 - 59) */
int tm_hour;    /* hours (0 - 23) */
int tm_mday;    /* day of month (1 - 31) */
int tm_mon;     /* month of year (0 - 11) */
int tm_year;    /* year - 1900 */
int tm_wday;    /* day of week (Sunday = 0) */
int tm_yday;    /* day of year (0 - 365) */
int tm_isdst;   /* is summer time in effect? */
char *tm_zone;  /* abbreviation of timezone name */
long tm_gmtoff; /* offset from UTC in seconds */
上面给出了各个字段的取值范围,有几个点值得注意:
- 秒:可取值 60,这是因闰秒的原因 (参考闰秒一节)
- 年:从 1900 开始计数
- mday:从 1 开始计数,设置为 0 表示上月最后一天
- wday:从 0 开始计数,以周日作为第一天,因此 1 就是表示周一,以此类推
- isdst:
- > 0:夏时制生效
- = 0:夏时制不生效
- < 0:此信息不可用
- tm_zone 和 tm_gmtoff 两个字段是 Drawin 独有的,作用有点类似上面介绍过的 timezone,不属于 SUS 标准
如果直接用这个结构体显示给用户,经常会看到以下校正代码:
printf ("%04d/%02d/%02d %02d:%02d:%02d",
        tm.tm_year + 1900, tm.tm_mon + 1, tm.tm_mday,
        tm.tm_hour, tm.tm_min, tm.tm_sec);
对 yday 的处理类似 mon。
再复习一下开始的关系图:
将 time_t 转换为 struct tm 的是 localtime 和 gmtime,反过来是 mktime:
struct tm *gmtime(const time_t *timep);
struct tm *localtime(const time_t *timep);
time_t mktime(struct tm *tm);
localtime 和 gmttime 的区别是,前者将 Epoch 转换为本地时间 (受时区、夏时制影响)、后者将 Epoch 转换为 UTC (不受时区、夏时制影响)。
mktime 只接受本地时间作为参数、将其转换为 Epoch,注意没有 mkgmtime 这类东东。
mktime 并不使用 tm 参数的所有字段,例如 wday 和 yday 就会被忽略,isdst 参数将按如下取值进行解释:
- > 0:启用夏时制
- = 0:禁用夏时制
- < 0:依据系统或环境设置自行决定是否使用夏时制
mktime 还会自动规范化 (normalize) 各个字段,例如 70 秒会被更新为 1 分 10 秒。除此之外,还有以下字段会被更新:
- wday:赋值
- yday:赋值
- isdst:
- 0:不生效
- > 0:生效
- 不再存在 < 0 的情况
极端的情况下,struct tm 中的每个字段都可能被修改,这也是参数 tm 没有加 const 修饰的原因。
利用 mktime 的 normalize 特性,很容易就可以求出 "N 年/月/日/时/分/秒" 前/后的时间,像下面这段代码:
#include "../apue.h"
#include <sys/time.h>
#include <time.h>

void print_tm (struct tm* t)
{
  printf ("%04d-%02d-%02d %02d:%02d:%02d (week day %d) (year day %d) (daylight saving time %d)\n",
    t->tm_year + 1900,
    t->tm_mon + 1,
    t->tm_mday,
    t->tm_hour,
    t->tm_min,
    t->tm_sec,
    t->tm_wday == 0 ? 7 : t->tm_wday,
    t->tm_yday + 1,
    t->tm_isdst);
}

int main (int argc, char *argv[])
{
  if (argc < 2)
  {
    printf ("Usage: %s [+/-] [N[Y/M/D/H/m/S/w/y]]\n", argv[0]);
    return 0;
  }

  int ret = 0;
  time_t now = time (NULL);
  printf ("sizeof (time_t) = %d, now = %ld\n", sizeof(time_t), now);

  struct tm *tm_now = localtime (&now);
  print_tm (tm_now);

  int shift = 0;
  char *endptr = 0;
  shift = strtol (argv[1], &endptr, 10);
  switch (*endptr)
  {
    case 'Y':
      tm_now->tm_year += shift;
      break;
    case 'M':
      tm_now->tm_mon += shift;
      break;
    case 'D':
    case 'd':
      tm_now->tm_mday += shift;
      break;
    case 'H':
    case 'h':
      tm_now->tm_hour += shift;
      break;
    case 'm':
      tm_now->tm_min += shift;
      break;
    case 's':
    case 'S':
      tm_now->tm_sec += shift;
      break;
    /*
     * tm_wday & tm_yday is ignored normally,
     * here just do a test !!
     */
    case 'w':
    case 'W':
      tm_now->tm_wday += shift;
      break;
    case 'y':
      tm_now->tm_yday += shift;
      break;
    default:
      printf ("unkonwn postfix %c", *endptr);
      break;
  }

  print_tm (tm_now);
  time_t tick = mktime (tm_now);
  printf ("tick = %ld\n", tick);
  print_tm (tm_now);
  return 0;
}
运行时随意指定:
> ./timeshift +70s
sizeof (time_t) = 8, now = 1678544442
2023-03-11 22:20:42 (week day 6) (year day 70) (daylight saving time 0)
2023-03-11 22:20:112 (week day 6) (year day 70) (daylight saving time 0)
tick = 1678544512
2023-03-11 22:21:52 (week day 6) (year day 70) (daylight saving time 0)
观察到增加 sec 字段 70 秒后达到 112 秒,经过 mktime 规范化后变为 52 秒并向上进位 1 分钟。
这个 demo 还可以用来验证设置 wday 或 yday 没有效果,例如:
> ./timeshift +100y
sizeof (time_t) = 8, now = 1678544584
2023-03-11 22:23:04 (week day 6) (year day 70) (daylight saving time 0)
2023-03-11 22:23:04 (week day 6) (year day 170) (daylight saving time 0)
tick = 1678544584
2023-03-11 22:23:04 (week day 6) (year day 70) (daylight saving time 0)
直接被忽略了,yday 根据其它字段推导,恢复了 70 的初始值。
同时也可以验证 mday = 0 时其实是指上个月最后一天,例如:
> ./timeshift -11d
sizeof (time_t) = 8, now = 1678544711
2023-03-11 22:25:11 (week day 6) (year day 70) (daylight saving time 0)
2023-03-00 22:25:11 (week day 6) (year day 70) (daylight saving time 0)
tick = 1677594311
2023-02-28 22:25:11 (week day 2) (year day 59) (daylight saving time 0)
观察到 2023-03-00 其实是 2023-02-28。
闰秒
为了减少学习曲线,一些相对零碎的概念将在遇到的时候再行说明,闰秒就属于这种情况。在解释闰秒之前,先介绍两个新的术语:
- TAI:原子时间,基于铯原子的能级跃迁原子秒作为时标,结合了全球 400 个所有的原子钟而得到的时间,它决定了我们每个人的钟表中时间流动的速度
- UT:世界时间,也称天文时间,或太阳时,他的依据是地球的自转,我们用它来确定多少原子时对应于一个地球日的时间长度
在确定 TAI 起点之后,由于地球自转速度有变慢的趋势 (非常小),UT 与 TAI 之间的时差便逐年积累。为弥补这一差距,便采用跳秒 (闰秒) 的方法使 TAI 与 UT 的时刻相接近,其差不超过 1 秒,这样既保持时间尺度的均匀性,又能近似地反映地球自转的变化。一般会在每年的 6 月 30 日、12 月 31 日的最后一秒进行调整。
现在回过头来看 UTC 的定义——UTC 时间是经过平均太阳时、地轴运动修正后的新时标以及以秒为单位的国际原子时所综合精算而成——是不是加深了印象?可以认为 UTC 是参考 TAI 增加闰秒的 UT。
较早的 SUS 标准允许双闰秒,tm_sec 的取值范围是 [0-61],UTC 的正式定义不允许双闰秒,所以后来的 tm_sec 的的范围被定义为 [0-60]。
不过 gmtime / localtime / mktime 都不处理闰秒,以最近的闰秒为例,2016/12/31 23:59:60,通过 linux date 命令来验证:
> date -d "2016/12/31 23:59:59" "+%s"
1483199999
> date -d @1483200000
Sun Jan  1 00:00:00 CST 2017
先反解 2016/12/31 23:59:59 的 Epoch,将其加一秒后再通过 date 展示为直观的时间,发现并没有展示为 23:59:60,而是直接进入 2017 年。
难道是示例中的这个闰秒太"新"了?找个老一点的闰秒试试:
> date -d "1995/12/31 23:59:59" "+%s"
820425599
> date -d @820425600
Mon Jan  1 00:00:00 CST 1996
1995 年这个同样不行。使用 mktime 传递 struct tm 的方式也试了,效果一样。
特别是直接反解闰秒时,date 直接报错:
> date -d "2016/12/31 23:59:60"
date: invalid date ‘2016/12/31 23:59:60’
上面特别强调使用 linux date,因为 mac date 有另外一套语法:
> date -j -f "%Y/%m/%d %H:%M:%S" "2016/12/31 23:59:59" "+%s"
1483199999
> date -r 1483200000 "+%Y/%m/%d %H:%M:%S"
2017/01/01 00:00:00
这一点需要注意。
来看一下闰秒的分布:
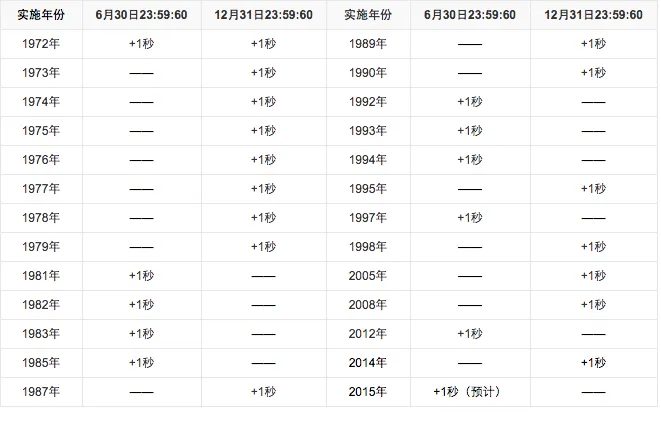
可见是完全没有规律的,
甚至没办法提前把几年之后的闰秒写到系统库里,要让库可以长久的使用,只有不去管它。
想象一下 gmtime 是如何根据 Epoch 计算时间的:
- 首先确定年份
- 平年按 365 天计算一年的秒数,一天固定 86400 秒
- 如果是闰年,则按 366 天计算一年的秒数
- 计算所给的 Epoch 经历了几个闰年,闰年就是年份能被 4 整除却不能被 100 整除
- 再依次计算月、天、时、分、秒,其中计算月、日时仍要考虑闰月的影响
压根不可能处理闰秒这种复杂的东东,反过来看,这个接口叫 gmtime 而不是 utctime 也是有道理的。
总结一下:基于 POSIX 标准的系统不处理闰秒,不过这并不影响它的精度,因为绝大多数时间来讲,GMT 时间和 UTC 给用户展示的字符串是一致的,毕竟 GTC 多出来的闰秒被安插在了 59:59:60 这种时间位置,对后面的时间没有影响。唯一的区别在于,GTC 时间的 time_t 表示会比 GMT 多那么几十秒,除非要精确计算大跨度时间范围内的绝对时间差,才需要用到闰秒。
时区
从格林威治本初子午线起,经度每向东或者向西间隔 15°,就划分一个时区,在这个区域内,大家使用同样的标准时间。
但实际上,为了照顾到行政上的方便,常将一个国家或一个省份划在一起。所以时区并不严格按南北直线来划分,而是按自然条件来划分。
全球共分为24个标准时区,相邻时区的时间相差一个小时。全部的时区定义:
Time Zone Abbreviations – Worldwide List
中国位于东八区 (UTC+8),没有像美国那样划分多个时区,中国一整个都在一个时区:CST。
不过由于幅员辽阔,新疆乌鲁木齐实际位于东六区,早上 9 点才相当于北京早上 7 点,因此如果观察一个国内服务器早高峰,会发现新疆是最后上线的。
时区是导致同一个系统 localtime 和 gmtime 返回值有差异的主要原因。回顾一下开始的关系图:
红色表示接口会受时区影响,以 localtime 为例,man 中是这样解释它如何获取当前时区设置的:
- TZ 环境变量,形如 Asia/Shanghai 的字符串
- 为空:UTC
- 解析成功:设置 tzname、timezone 等全局变量
- 解析不成功:UTC
- 系统时区设置
- CentOS - /etc/localtime -> /usr/share/zoneinfo/Asia/Shanghai
- Darwin - /etc/localtime -> /var/db/timezone/zoneinfo/Asia/Shanghai
- Ubuntu - /etc/timezone: Asia/Shanghai
- ...
TZ 环境变量
优先检查 TZ 环境变量,如果存在,不论是否有效,都不再检查系统设置。
void tzset (void);

extern char *tzname[2];
extern long timezone;
extern int daylight;
tzset 接口用于将 TZ 中的信息解析到全局变量 tzname / timezone / daylight 字段,红色接口通过调用它来设置正确的时区、夏时制等信息,用于后期时间转换。
下面的程序片段演示了各个调用对 tzset 的调用情况:
#include "../apue.h"
#include <sys/time.h>
#include <time.h>

struct timezone
{
    int     tz_minuteswest; /* of Greenwich */
    int     tz_dsttime;     /* type of dst correction to apply */
};

void print_tm (struct tm* t)
{
  printf ("%04d-%02d-%02d %02d:%02d:%02d (week day %d) (year day %d) (daylight saving time %d)\n",
    t->tm_year + 1900,
    t->tm_mon + 1,
    t->tm_mday,
    t->tm_hour,
    t->tm_min,
    t->tm_sec,
    t->tm_wday == 0 ? 7 : t->tm_wday,
    t->tm_yday + 1,
    t->tm_isdst);
}

void print_tz ()
{
  printf ("tzname[0] = %s, tzname[1] = %s, timezone = %d, daylight = %d\n", tzname[0], tzname[1], timezone, daylight);
}

int main (int argc, char *argv[])
{
  int ret = 0;
  time_t t1, t2;
  print_tz ();
  t1 = time (&t2);
  printf ("t1 = %ld, t2 = %ld\n", t1, t2);
  print_tz ();

  struct timeval tv;
  struct timezone tzp;
  ret = gettimeofday (&tv, (void*) &tzp);
  if (ret == -1)
    perror("gettimeofday");

  printf ("sizeof (suseconds_t) = %d, sizeof (struct timeval) = %d, ret %d, tv.sec = %ld, tv.usec = %ld\n",
          sizeof (suseconds_t), sizeof (struct timeval), ret, tv.tv_sec, tv.tv_usec);
  printf ("minuteswest = %d, dsttime = %d\n", tzp.tz_minuteswest, tzp.tz_dsttime);
  print_tz ();

  struct tm *tm1 = gmtime (&t1);
  print_tm (tm1);
  print_tz ();

  struct tm *tm2 = localtime (&t2);
  print_tm (tm2);
  print_tz ();

  time_t t3 = mktime (tm1);
  printf ("t3 = %ld\n", t3);
  print_tz ();

  printf ("from asctime: %s", asctime (tm1));
  print_tz ();

  printf ("from ctime: %s", ctime (&t1));
  print_tz ();
  return 0;
}
上面的 demo 演示了在各个时间例程调用后的时区信息 (print_tz),以便观察是否间接调用了 tzset,先来看 Darwin 上运行的结果:
> ./time
tzname[0] =    , tzname[1] =    , timezone = 0, daylight = 0
t1 = 1679811210, t2 = 1679811210
tzname[0] =    , tzname[1] =    , timezone = 0, daylight = 0
sizeof (suseconds_t) = 4, sizeof (struct timeval) = 16, ret 0, tv.sec = 1679811210, tv.usec = 909062
minuteswest = -480, dsttime = 0
tzname[0] = CST, tzname[1] = CDT, timezone = -28800, daylight = 1
2023-03-26 06:13:30 (week day 7) (year day 85) (daylight saving time 0)
tzname[0] = CST, tzname[1] = CDT, timezone = -28800, daylight = 1
2023-03-26 14:13:30 (week day 7) (year day 85) (daylight saving time 0)
tzname[0] = CST, tzname[1] = CDT, timezone = -28800, daylight = 1
t3 = 1679782410
tzname[0] = CST, tzname[1] = CDT, timezone = -28800, daylight = 1
from asctime: Sun Mar 26 06:13:30 2023
tzname[0] = CST, tzname[1] = CDT, timezone = -28800, daylight = 1
from ctime: Sun Mar 26 14:13:30 2023
tzname[0] = CST, tzname[1] = CDT, timezone = -28800, daylight = 1
从输出中可以看到:
- 时区默认为空,timezone 时间偏移为 0,daylight 为 false
- 调用 time 对时区没有影响
- 调用 gettimeofday 并传递时区信息,在 Darwin 上有时区信息返回并更改了它们:时区 CST:CDT, timezone 为 +8 小时,daylight 为 true
- 调用 gmtime/localtime/mktime/asctime/ctime 后时区信息不变
由于后五个输出一致,为防止相互干扰,可以通过调整调用顺序,或手动屏蔽其它调用来观察输出,结论是一致的。
需要注意的一点是,mktime 和 asctime 的结果是正确的,这是因为它们使用了 gmtime 的返回值,将其作为本地时间处理了,这直接导致 t3 比 t1 小了 28800 秒。
> ./time
tzname[0] = GMT, tzname[1] = GMT, timezone = 0, daylight = 0
t1 = 1679810748, t2 = 1679810748
tzname[0] = GMT, tzname[1] = GMT, timezone = 0, daylight = 0
sizeof (suseconds_t) = 8, sizeof (struct timeval) = 16, ret 0, tv.sec = 1679810748, tv.usec = 451237
minuteswest = 0, dsttime = 0
tzname[0] = GMT, tzname[1] = GMT, timezone = 0, daylight = 0
2023-03-26 06:05:48 (week day 7) (year day 85) (daylight saving time 0)
tzname[0] = CST, tzname[1] = CDT, timezone = -28800, daylight = 1
2023-03-26 14:05:48 (week day 7) (year day 85) (daylight saving time 0)
tzname[0] = CST, tzname[1] = CST, timezone = -28800, daylight = 0
t3 = 1679810748
tzname[0] = CST, tzname[1] = CST, timezone = -28800, daylight = 0
from asctime: Sun Mar 26 14:05:48 2023
tzname[0] = CST, tzname[1] = CST, timezone = -28800, daylight = 0
from ctime: Sun Mar 26 14:05:48 2023
tzname[0] = CST, tzname[1] = CST, timezone = -28800, daylight = 0
上面是在 linux 系统上运行的结果,和 Darwin 有以下不同:
- 时区默认为 GMT:GMT
- 调用 gettimeofday 并传递时区信息的情况下没有返回信息,也没有更改它们,也就是说和调用 time 效果一致
- 调用 gmtime 后时区变为 CST:CDT,timezone 为 +8 小时,daylight 为 true,这和书上讲的有出入,理应不变才对。不过并没有影响接口返回的结果
- 调用 localtime/mktime/asctime/ctime 后时区变为 CST:CST,timezone +8 小时,daylight 为 false, 但是 mktime 和 asctime 结果不正确
其中 mktime 在使用 gmtime 的结果作为输入后,居然得到了和 time 一样的结果,实在是匪夷所思,导致后面的 asctime 结果也跟着出错。转念一想,是否是因为 gmtime 和 localtime 返回了同一块静态存储区呢?加入下面的一行代码印证:
printf ("gmt %p, local %p\n", tm1, tm2);
新日志显示果然如此:
gmt 0x7f2206a8cda0, local 0x7f2206a8cda0
而在 Darwin 上则不同:
gmt 0x7facbce04330, local 0x7facbcc058d0
看来 Darwin 确实做的要稍好一些,不同接口返回了不同静态缓冲区。不过对于这种静态对象,能不缓存还是不要缓存了,免的同类型的相互覆盖,下面是 linux 改进后的输出:
> ./time
tzname[0] = GMT, tzname[1] = GMT, timezone = 0, daylight = 0
t1 = 1679814314, t2 = 1679814314
tzname[0] = GMT, tzname[1] = GMT, timezone = 0, daylight = 0
sizeof (suseconds_t) = 8, sizeof (struct timeval) = 16, ret 0, tv.sec = 1679814314, tv.usec = 70725
minuteswest = 0, dsttime = 0
tzname[0] = GMT, tzname[1] = GMT, timezone = 0, daylight = 0
2023-03-26 07:05:14 (week day 7) (year day 85) (daylight saving time 0)
tzname[0] = CST, tzname[1] = CDT, timezone = -28800, daylight = 1
2023-03-26 15:05:14 (week day 7) (year day 85) (daylight saving time 0)
tzname[0] = CST, tzname[1] = CST, timezone = -28800, daylight = 0
t3 = 1679785514
tzname[0] = CST, tzname[1] = CST, timezone = -28800, daylight = 0
from asctime: Sun Mar 26 07:05:14 2023
tzname[0] = CST, tzname[1] = CST, timezone = -28800, daylight = 0
from ctime: Sun Mar 26 15:05:14 2023
tzname[0] = CST, tzname[1] = CST, timezone = -28800, daylight = 0
mktime 终于正常了。至于 linux gmtime 是否调用了 tzset 的问题,留待以后浏览 glibc 源码再行确认。
系统时区设置
在没有定义 TZ 环境变量时,会查找当前的系统时区设置。系统时区表示方式随系统不同而不同:
- CentOS 是文件 /etc/localtime 链接到 /usr/share/zoneinfo 目录下的一个时区文件
- Ubuntu 则是在 /etc/timezone 文件中直接记录了时区信息
- Darwin 和 CentOS 类似,只是链接目标不同,到了 /var/db/timezone/zoneinfo 目录下面
时区一般在安装系统时进行设置,也可以在系统设置面板中更改。在某些没有 GUI 的场景中 (远程 ssh),也可以通过 tzselect 来更改时区:
查看代码
 > tzselect
Please identify a location so that time zone rules can be set correctly.
Please select a continent or ocean.
 1) Africa
 2) Americas
 3) Antarctica
 4) Arctic Ocean
 5) Asia
 6) Atlantic Ocean
 7) Australia
 8) Europe
 9) Indian Ocean
10) Pacific Ocean
11) none - I want to specify the time zone using the Posix TZ format.
#? 5
Please select a country.
 1) Afghanistan		  18) Israel		    35) Palestine
 2) Armenia		  19) Japan		    36) Philippines
 3) Azerbaijan		  20) Jordan		    37) Qatar
 4) Bahrain		  21) Kazakhstan	    38) Russia
 5) Bangladesh		  22) Korea (North)	    39) Saudi Arabia
 6) Bhutan		  23) Korea (South)	    40) Singapore
 7) Brunei		  24) Kuwait		    41) Sri Lanka
 8) Cambodia		  25) Kyrgyzstan	    42) Syria
 9) China		  26) Laos		    43) Taiwan
10) Cyprus		  27) Lebanon		    44) Tajikistan
11) East Timor		  28) Macau		    45) Thailand
12) Georgia		  29) Malaysia		    46) Turkmenistan
13) Hong Kong		  30) Mongolia		    47) United Arab Emirates
14) India		  31) Myanmar (Burma)	    48) Uzbekistan
15) Indonesia		  32) Nepal		    49) Vietnam
16) Iran		  33) Oman		    50) Yemen
17) Iraq		  34) Pakistan
#? 9
Please select one of the following time zone regions.
1) Beijing Time
2) Xinjiang Time
#? 1

The following information has been given:

	China
	Beijing Time

Therefore TZ='Asia/Shanghai' will be used.
Local time is now:	Sun Mar 12 17:37:12 CST 2023.
Universal Time is now:	Sun Mar 12 09:37:12 UTC 2023.
Is the above information OK?
1) Yes
2) No
#? 1

You can make this change permanent for yourself by appending the line
	TZ='Asia/Shanghai'; export TZ
to the file '.profile' in your home directory; then log out and log in again.

Here is that TZ value again, this time on standard output so that you
can use the /usr/bin/tzselect command in shell scripts:
Asia/Shanghai
根据提示一步步选择就可以了,注意这个命令执行后时区并没有变更,它只是根据用户选择的地区提供了 TZ 环境变量的内容,后续还需要用户手动设置一下,最终还是走的环境变量的方式,毕竟这种方式有优先级,能影响最终的结果。如果不想设置环境变量,也直接更改系统文件内容 (Ubuntu) 或软链接指向 (CentOS/Darwin),这种需要提权,必需有管理员权限才可以。
CentOS 和 Darwin 上的时区文件为二进制,可以通过 zdump 查看:
查看代码
 > zdump -v /usr/share/zoneinfo/Asia/Shanghai
/usr/share/zoneinfo/Asia/Shanghai  -9223372036854775808 = NULL
/usr/share/zoneinfo/Asia/Shanghai  -9223372036854689408 = NULL
/usr/share/zoneinfo/Asia/Shanghai  Mon Dec 31 15:54:16 1900 UTC = Mon Dec 31 23:59:59 1900 LMT isdst=0 gmtoff=29143
/usr/share/zoneinfo/Asia/Shanghai  Mon Dec 31 15:54:17 1900 UTC = Mon Dec 31 23:54:17 1900 CST isdst=0 gmtoff=28800
/usr/share/zoneinfo/Asia/Shanghai  Sat Apr 12 15:59:59 1919 UTC = Sat Apr 12 23:59:59 1919 CST isdst=0 gmtoff=28800
/usr/share/zoneinfo/Asia/Shanghai  Sat Apr 12 16:00:00 1919 UTC = Sun Apr 13 01:00:00 1919 CDT isdst=1 gmtoff=32400
/usr/share/zoneinfo/Asia/Shanghai  Tue Sep 30 14:59:59 1919 UTC = Tue Sep 30 23:59:59 1919 CDT isdst=1 gmtoff=32400
/usr/share/zoneinfo/Asia/Shanghai  Tue Sep 30 15:00:00 1919 UTC = Tue Sep 30 23:00:00 1919 CST isdst=0 gmtoff=28800
/usr/share/zoneinfo/Asia/Shanghai  Fri May 31 15:59:59 1940 UTC = Fri May 31 23:59:59 1940 CST isdst=0 gmtoff=28800
/usr/share/zoneinfo/Asia/Shanghai  Fri May 31 16:00:00 1940 UTC = Sat Jun  1 01:00:00 1940 CDT isdst=1 gmtoff=32400
/usr/share/zoneinfo/Asia/Shanghai  Sat Oct 12 14:59:59 1940 UTC = Sat Oct 12 23:59:59 1940 CDT isdst=1 gmtoff=32400
/usr/share/zoneinfo/Asia/Shanghai  Sat Oct 12 15:00:00 1940 UTC = Sat Oct 12 23:00:00 1940 CST isdst=0 gmtoff=28800
/usr/share/zoneinfo/Asia/Shanghai  Fri Mar 14 15:59:59 1941 UTC = Fri Mar 14 23:59:59 1941 CST isdst=0 gmtoff=28800
/usr/share/zoneinfo/Asia/Shanghai  Fri Mar 14 16:00:00 1941 UTC = Sat Mar 15 01:00:00 1941 CDT isdst=1 gmtoff=32400
/usr/share/zoneinfo/Asia/Shanghai  Sat Nov  1 14:59:59 1941 UTC = Sat Nov  1 23:59:59 1941 CDT isdst=1 gmtoff=32400
/usr/share/zoneinfo/Asia/Shanghai  Sat Nov  1 15:00:00 1941 UTC = Sat Nov  1 23:00:00 1941 CST isdst=0 gmtoff=28800
/usr/share/zoneinfo/Asia/Shanghai  Fri Jan 30 15:59:59 1942 UTC = Fri Jan 30 23:59:59 1942 CST isdst=0 gmtoff=28800
/usr/share/zoneinfo/Asia/Shanghai  Fri Jan 30 16:00:00 1942 UTC = Sat Jan 31 01:00:00 1942 CDT isdst=1 gmtoff=32400
/usr/share/zoneinfo/Asia/Shanghai  Sat Sep  1 14:59:59 1945 UTC = Sat Sep  1 23:59:59 1945 CDT isdst=1 gmtoff=32400
/usr/share/zoneinfo/Asia/Shanghai  Sat Sep  1 15:00:00 1945 UTC = Sat Sep  1 23:00:00 1945 CST isdst=0 gmtoff=28800
/usr/share/zoneinfo/Asia/Shanghai  Tue May 14 15:59:59 1946 UTC = Tue May 14 23:59:59 1946 CST isdst=0 gmtoff=28800
/usr/share/zoneinfo/Asia/Shanghai  Tue May 14 16:00:00 1946 UTC = Wed May 15 01:00:00 1946 CDT isdst=1 gmtoff=32400
/usr/share/zoneinfo/Asia/Shanghai  Mon Sep 30 14:59:59 1946 UTC = Mon Sep 30 23:59:59 1946 CDT isdst=1 gmtoff=32400
/usr/share/zoneinfo/Asia/Shanghai  Mon Sep 30 15:00:00 1946 UTC = Mon Sep 30 23:00:00 1946 CST isdst=0 gmtoff=28800
/usr/share/zoneinfo/Asia/Shanghai  Mon Apr 14 15:59:59 1947 UTC = Mon Apr 14 23:59:59 1947 CST isdst=0 gmtoff=28800
/usr/share/zoneinfo/Asia/Shanghai  Mon Apr 14 16:00:00 1947 UTC = Tue Apr 15 01:00:00 1947 CDT isdst=1 gmtoff=32400
/usr/share/zoneinfo/Asia/Shanghai  Fri Oct 31 14:59:59 1947 UTC = Fri Oct 31 23:59:59 1947 CDT isdst=1 gmtoff=32400
/usr/share/zoneinfo/Asia/Shanghai  Fri Oct 31 15:00:00 1947 UTC = Fri Oct 31 23:00:00 1947 CST isdst=0 gmtoff=28800
/usr/share/zoneinfo/Asia/Shanghai  Fri Apr 30 15:59:59 1948 UTC = Fri Apr 30 23:59:59 1948 CST isdst=0 gmtoff=28800
/usr/share/zoneinfo/Asia/Shanghai  Fri Apr 30 16:00:00 1948 UTC = Sat May  1 01:00:00 1948 CDT isdst=1 gmtoff=32400
/usr/share/zoneinfo/Asia/Shanghai  Thu Sep 30 14:59:59 1948 UTC = Thu Sep 30 23:59:59 1948 CDT isdst=1 gmtoff=32400
/usr/share/zoneinfo/Asia/Shanghai  Thu Sep 30 15:00:00 1948 UTC = Thu Sep 30 23:00:00 1948 CST isdst=0 gmtoff=28800
/usr/share/zoneinfo/Asia/Shanghai  Sat Apr 30 15:59:59 1949 UTC = Sat Apr 30 23:59:59 1949 CST isdst=0 gmtoff=28800
/usr/share/zoneinfo/Asia/Shanghai  Sat Apr 30 16:00:00 1949 UTC = Sun May  1 01:00:00 1949 CDT isdst=1 gmtoff=32400
/usr/share/zoneinfo/Asia/Shanghai  Fri May 27 14:59:59 1949 UTC = Fri May 27 23:59:59 1949 CDT isdst=1 gmtoff=32400
/usr/share/zoneinfo/Asia/Shanghai  Fri May 27 15:00:00 1949 UTC = Fri May 27 23:00:00 1949 CST isdst=0 gmtoff=28800
/usr/share/zoneinfo/Asia/Shanghai  Sat May  3 17:59:59 1986 UTC = Sun May  4 01:59:59 1986 CST isdst=0 gmtoff=28800
/usr/share/zoneinfo/Asia/Shanghai  Sat May  3 18:00:00 1986 UTC = Sun May  4 03:00:00 1986 CDT isdst=1 gmtoff=32400
/usr/share/zoneinfo/Asia/Shanghai  Sat Sep 13 16:59:59 1986 UTC = Sun Sep 14 01:59:59 1986 CDT isdst=1 gmtoff=32400
/usr/share/zoneinfo/Asia/Shanghai  Sat Sep 13 17:00:00 1986 UTC = Sun Sep 14 01:00:00 1986 CST isdst=0 gmtoff=28800
/usr/share/zoneinfo/Asia/Shanghai  Sat Apr 11 17:59:59 1987 UTC = Sun Apr 12 01:59:59 1987 CST isdst=0 gmtoff=28800
/usr/share/zoneinfo/Asia/Shanghai  Sat Apr 11 18:00:00 1987 UTC = Sun Apr 12 03:00:00 1987 CDT isdst=1 gmtoff=32400
/usr/share/zoneinfo/Asia/Shanghai  Sat Sep 12 16:59:59 1987 UTC = Sun Sep 13 01:59:59 1987 CDT isdst=1 gmtoff=32400
/usr/share/zoneinfo/Asia/Shanghai  Sat Sep 12 17:00:00 1987 UTC = Sun Sep 13 01:00:00 1987 CST isdst=0 gmtoff=28800
/usr/share/zoneinfo/Asia/Shanghai  Sat Apr 16 17:59:59 1988 UTC = Sun Apr 17 01:59:59 1988 CST isdst=0 gmtoff=28800
/usr/share/zoneinfo/Asia/Shanghai  Sat Apr 16 18:00:00 1988 UTC = Sun Apr 17 03:00:00 1988 CDT isdst=1 gmtoff=32400
/usr/share/zoneinfo/Asia/Shanghai  Sat Sep 10 16:59:59 1988 UTC = Sun Sep 11 01:59:59 1988 CDT isdst=1 gmtoff=32400
/usr/share/zoneinfo/Asia/Shanghai  Sat Sep 10 17:00:00 1988 UTC = Sun Sep 11 01:00:00 1988 CST isdst=0 gmtoff=28800
/usr/share/zoneinfo/Asia/Shanghai  Sat Apr 15 17:59:59 1989 UTC = Sun Apr 16 01:59:59 1989 CST isdst=0 gmtoff=28800
/usr/share/zoneinfo/Asia/Shanghai  Sat Apr 15 18:00:00 1989 UTC = Sun Apr 16 03:00:00 1989 CDT isdst=1 gmtoff=32400
/usr/share/zoneinfo/Asia/Shanghai  Sat Sep 16 16:59:59 1989 UTC = Sun Sep 17 01:59:59 1989 CDT isdst=1 gmtoff=32400
/usr/share/zoneinfo/Asia/Shanghai  Sat Sep 16 17:00:00 1989 UTC = Sun Sep 17 01:00:00 1989 CST isdst=0 gmtoff=28800
/usr/share/zoneinfo/Asia/Shanghai  Sat Apr 14 17:59:59 1990 UTC = Sun Apr 15 01:59:59 1990 CST isdst=0 gmtoff=28800
/usr/share/zoneinfo/Asia/Shanghai  Sat Apr 14 18:00:00 1990 UTC = Sun Apr 15 03:00:00 1990 CDT isdst=1 gmtoff=32400
/usr/share/zoneinfo/Asia/Shanghai  Sat Sep 15 16:59:59 1990 UTC = Sun Sep 16 01:59:59 1990 CDT isdst=1 gmtoff=32400
/usr/share/zoneinfo/Asia/Shanghai  Sat Sep 15 17:00:00 1990 UTC = Sun Sep 16 01:00:00 1990 CST isdst=0 gmtoff=28800
/usr/share/zoneinfo/Asia/Shanghai  Sat Apr 13 17:59:59 1991 UTC = Sun Apr 14 01:59:59 1991 CST isdst=0 gmtoff=28800
/usr/share/zoneinfo/Asia/Shanghai  Sat Apr 13 18:00:00 1991 UTC = Sun Apr 14 03:00:00 1991 CDT isdst=1 gmtoff=32400
/usr/share/zoneinfo/Asia/Shanghai  Sat Sep 14 16:59:59 1991 UTC = Sun Sep 15 01:59:59 1991 CDT isdst=1 gmtoff=32400
/usr/share/zoneinfo/Asia/Shanghai  Sat Sep 14 17:00:00 1991 UTC = Sun Sep 15 01:00:00 1991 CST isdst=0 gmtoff=28800
/usr/share/zoneinfo/Asia/Shanghai  9223372036854689407 = NULL
/usr/share/zoneinfo/Asia/Shanghai  9223372036854775807 = NULL
也可以指定相对路径或国家缩写,如
zdump -v Asia/Shanghai
或
zdump -v PRC
,输出信息一致。看起来文件内容中包含了该时区对应的夏时制起始时间,怪不得文件尺寸各不相等。这或许就是 Darwin 中 gettimeofday 返回当前时间是否处于夏时制的依据,关于夏时制,请参考下节。
不加 -v 选项调用 zdump,会返回时区的当前时间:
> zdump America/New_York
America/New_York  Sun Mar 26 03:31:01 2023 EDT
> zdump PRC
PRC  Sun Mar 26 15:31:05 2023 CST
> date
Sun Mar 26 15:31:10 CST 2023
可以看到和 date 命令的输出有些许差别。如果时区不合法或没找到,通通返回 GMT 时间。
夏时制
夏时制也称夏令时 (Daylight Saving Time),直译过来就是日光节约时间制。这是因为北半球夏季时白天变长、夜晚变短,有人认为通过推行夏时制可以有效利用天光,节约晚上能源消耗。
具体操作就是,在进入夏季某天后,统一将时钟调快一小时,此时早上七点将变为早上八点,提早开始上班上学,晚上五点将变为晚上六点,提早开始下班放学。即通过让人早起早睡来达到多利用天光的目的,而且统一调整时间制后,学校、公司都不用调整了,省去了很多不一致的地方。到某个夏季结束的一天,再统一将时钟调慢一小时,人们又可以晚起晚睡了,自此时间恢复到往常一样。
我国曾实行过六年的夏时制 (1986-1991),发现对社会节约用电效果有限,另外还有其它弊端,例如切换夏时制后睡眠不足导致的车祸、列车时刻表的调整、全国一个时区带来的偏远地区时差更大等等问题,最终放弃了这一做法。欧盟也在 2021 年投票废弃了夏时制,目前在执行夏时制的比较大的国家就剩美国、加拿大、澳大利亚等。
再来复习一下文章开关的关系图:
其中虚线部分表示受夏时制影响,POSIX 时间例程中的 time、gettimeofday 不考虑夏时制,否则 Epoch 凭空多了 3600 或少了 3600 是什么鬼。下面举个例子:
> date
Sun Mar 26 16:00:40 CST 2023
> export TZ=America/New_York
> date
Sun Mar 26 04:00:51 EDT 2023
> zdump America/New_York
America/New_York  Sun Mar 26 04:00:55 2023 EDT
已知美国纽约在 2023-03-12 已进入夏时制,持续直到 11-05:
> zdump -v America/New_York | grep 2023
...
America/New_York  Sun Mar 12 06:59:59 2023 UTC = Sun Mar 12 01:59:59 2023 EST isdst=0
America/New_York  Sun Mar 12 07:00:00 2023 UTC = Sun Mar 12 03:00:00 2023 EDT isdst=1
America/New_York  Sun Nov  5 05:59:59 2023 UTC = Sun Nov  5 01:59:59 2023 EDT isdst=1
America/New_York  Sun Nov  5 06:00:00 2023 UTC = Sun Nov  5 01:00:00 2023 EST isdst=0
...
那日期 2023-03-26 应该处于夏时制期间,时间理应调慢一小时,即中国东 8 区与美国西 4 区之差再加一小时——13 小时时差才对,而实际仍只有 12 小时时差 (16:00 vs 4:00)。上面的 demo 在 linux 和 Darwin 上运行结果一致。
下面再来考虑一下其它日期例程是否夏时制敏感,为了说明问题,保留上例中
export TZ=America/New_York
设置,注意运行这个例子和当前系统时间也有关系 (必需是在所在区域的夏时制范围内):
> ./time
tzname[0] = GMT, tzname[1] = GMT, timezone = 0, daylight = 0
t1 = 1679819691, t2 = 1679819691
tzname[0] = GMT, tzname[1] = GMT, timezone = 0, daylight = 0
sizeof (suseconds_t) = 8, sizeof (struct timeval) = 16, ret 0, tv.sec = 1679819691, tv.usec = 695922
minuteswest = 0, dsttime = 0
tzname[0] = GMT, tzname[1] = GMT, timezone = 0, daylight = 0
2023-03-26 08:34:51 (week day 7) (year day 85) (daylight saving time 0)
tzname[0] = EST, tzname[1] = EDT, timezone = 18000, daylight = 1
2023-03-26 04:34:51 (week day 7) (year day 85) (daylight saving time 1)
tzname[0] = EST, tzname[1] = EDT, timezone = 18000, daylight = 1
t3 = 1679837691
tzname[0] = EST, tzname[1] = EDT, timezone = 18000, daylight = 1
from asctime: Sun Mar 26 09:34:51 2023
tzname[0] = EST, tzname[1] = EDT, timezone = 18000, daylight = 1
from ctime: Sun Mar 26 04:34:51 2023
tzname[0] = EST, tzname[1] = EDT, timezone = 18000, daylight = 1
发现几点有趣的变化:
- 根据 TZ 环境变量的设置解析出了美国纽约所在的西 4 区 (timezone = 18000)
- gmttime 和 localtime 返回的 tm_isdst 不同
- asctime 的输出表明它在 gmtime 的返回结果之上加了 1 个小时,看起来是受夏时制影响了
好好分析一下第三条现象,asctime 打印的 tm1 结构体是 gmtime 返回的,不应该受夏时制影响才对,那将 asctime 和 ctime 的输入参数替换为 localtime 返回的 tm2 和 t2 会如何呢?
from asctime: Sun Mar 26 05:03:16 2023
tzname[0] = EST, tzname[1] = EDT, timezone = 18000, daylight = 1
from ctime: Sun Mar 26 05:03:16 2023
tzname[0] = EST, tzname[1] = EDT, timezone = 18000, daylight = 1
结论是完全没影响。那上面突然增加的 1 小时怎么解释呢?难不成是 mktime 修改了 tm 结构体?增加下面的代码用于验证:
  time_t t3 = mktime (&tm1);
  printf ("t3 = %ld\n", t3);
  print_tm (&tm1);
  print_tz ();

  printf ("from asctime: %s", asctime (&tm1));
  print_tz ();

  printf ("from ctime: %s", ctime (&t3));
  print_tz ();
  return 0;
在 mktime 后打印 tm1 的内容,并将 asctime 和 ctime 的参数指向 mktime 的结果,新的日志如下:
> ./time
tzname[0] = GMT, tzname[1] = GMT, timezone = 0, daylight = 0
t1 = 1679821804, t2 = 1679821804
tzname[0] = GMT, tzname[1] = GMT, timezone = 0, daylight = 0
sizeof (suseconds_t) = 8, sizeof (struct timeval) = 16, ret 0, tv.sec = 1679821804, tv.usec = 289229
minuteswest = 0, dsttime = 0
tzname[0] = GMT, tzname[1] = GMT, timezone = 0, daylight = 0
2023-03-26 09:10:04 (week day 7) (year day 85) (daylight saving time 0)
tzname[0] = EST, tzname[1] = EDT, timezone = 18000, daylight = 1
2023-03-26 05:10:04 (week day 7) (year day 85) (daylight saving time 1)
tzname[0] = EST, tzname[1] = EDT, timezone = 18000, daylight = 1
t3 = 1679839804
2023-03-26 10:10:04 (week day 7) (year day 85) (daylight saving time 1)
tzname[0] = EST, tzname[1] = EDT, timezone = 18000, daylight = 1
from asctime: Sun Mar 26 10:10:04 2023
tzname[0] = EST, tzname[1] = EDT, timezone = 18000, daylight = 1
from ctime: Sun Mar 26 10:10:04 2023
tzname[0] = EST, tzname[1] = EDT, timezone = 18000, daylight = 1
果然是 mktime 做的手脚!将 tm1 结构体中的 tm_hour 增加了 1 小时,看起来是受 tm_isdst 影响了。然而 tm1 的 tm_isdst 值为 0,不应该影响 mktime 的结果,神奇,怀疑是有 tzset 在内部被调用了。下面是另外一些尝试:
- 将 tm1 的内容复制一份传递给 mktime,那么 asctime 的结果将不再增加 1 小时,可见 asctime 是对夏时制不敏感的
- ctime 是比较神奇的,它会根据不同的 time_t 做出不同的反应:
- 解释 mktime 返回的 t3 时它增加了 1 个小时,为了排除 mktime 的影响,直接将 t3 设置为 t1 + 18000,仍然能加 1 小时
- 解释 time 和 gettimeofday 返回的 t1/t2 时它却不增加时间
对于 ctime 的神奇表现简直是匪夷所思,一个小小的 time_t 中无法包含任何关于夏时制的信息;如果通过全局变量,那么将 mktime 都注释掉了仍能增加 1 小时,这让人上哪讲理去。
同样的现象出在 mktime 身上,如果传递的是 localtime 的结果,则 mktime 不会增加 1 小时,后续的 ctime 也不会增加,可见他们的问题是一致的——传递 gmtime 的结果到 mktime 可能会有意想不到的结果,最好不要这样做。
最终结论是,当正常使用时间例程时,它们都不受夏时制影响;如果错误的将 gmtime 结果传递给 mktime,则
mktime 和 ctime 会受夏时制影响自动增加 1 小时。
后者受影响的规律还没有摸清楚,留待后面浏览 mktime / ctime 源码时给出解释。
以上现象在 Darwin 上也能复现。最后上一张 linux 上 strace 的输出:
> strace ./time |& less
...
brk(NULL)                               = 0x257d000
brk(0x259e000)                          = 0x259e000
brk(NULL)                               = 0x259e000
open("/usr/share/zoneinfo/America/New_York", O_RDONLY|O_CLOEXEC) = 3
fstat(3, {st_mode=S_IFREG|0644, st_size=3535, ...}) = 0
fstat(3, {st_mode=S_IFREG|0644, st_size=3535, ...}) = 0
mmap(NULL, 4096, PROT_READ|PROT_WRITE, MAP_PRIVATE|MAP_ANONYMOUS, -1, 0) = 0x7fa3b07b7000
read(3, "TZif2\0\0\0\0\0\0\0\0\0\0\0\0\0\0\0\0\0\0\5\0\0\0\5\0\0\0\0"..., 4096) = 3535
lseek(3, -2260, SEEK_CUR)               = 1275
read(3, "TZif2\0\0\0\0\0\0\0\0\0\0\0\0\0\0\0\0\0\0\6\0\0\0\6\0\0\0\0"..., 4096) = 2260
close(3)                                = 0
munmap(0x7fa3b07b7000, 4096)            = 0
write(1, "tzname[0] = GMT, tzname[1] = GMT"..., 979tzname[0] = GMT, tzname[1] = GMT, timezone = 0, daylight = 0
t1 = 1679823212, t2 = 1679823212
tzname[0] = GMT, tzname[1] = GMT, timezone = 0, daylight = 0
sizeof (suseconds_t) = 8, sizeof (struct timeval) = 16, ret 0, tv.sec = 1679823212, tv.usec = 189083
minuteswest = 0, dsttime = 0
...
可以看到在设置了 TZ 环境变量的情况下,时区文件仍被打开以确认夏时制的起始结束范围。
可读性
time_t 表示的 Epoch 适合计算机存储、计算,但对人并不友好。将它们转换为人能理解的日期时间需要借助于以下例程:
char *asctime(const struct tm *tm);
char *ctime(const time_t *timep);
size_t strftime(char *s, size_t max, const char *format, const struct tm *tm);
其中 asctime 和 ctime 前面已经介绍过,它们分别将 strut tm 和 time_t 转换为固定的时间格式。strftime 用于将 strut tm 转换为任意用户指定的格式,类似于 printf 做的工作。
其中 s 和 max 参数指定了输出缓存区,如果生成的字符串长度 (包含结尾 null) 大于 max,则返回 0;否则返回生成的字符串长度 (不包含结尾 null)。
让我们再回顾一下开头的关系图:
strftime 和 strptme 互逆,asctime 生成的 string 也可以通过 strptime 转换回 struct tm,但没有直接从 string 转换到 time_t 的途径,也没有直接从 time_t 生成格式化字符串的路径。
下面是对 format 参数的说明:
| 格式 |
说明 |
实例 |
| %Y |
年 |
2023 |
| %C |
年/100 |
20 |
| %y |
年%100: [00-99] |
23 |
| %G |
ISO 基于周的年 |
2023 |
| %g |
ISO 基于周的年%100 |
23 |
| %m |
月: [01-12] |
04 |
| %b / %h |
月名缩写 |
Apr |
| %B |
月名全写 |
April |
| %w |
日in周: [0-6],周日: 0 |
6 |
| %u |
ISO 日in周: [1-7],周日: 7 |
7 |
| %a |
日in周缩写 |
Sun |
| %A |
日in周全写 |
Sunday |
| %d |
日in月: [01-31],前导零 |
02 |
| %e |
日in月: [1-31],前导空格 |
2 |
| %j |
日in年: [001-366] |
092 |
| %U |
星期日周数: [00-53] |
14 |
| %W |
星期一周数: [01-53] |
13 |
| %V |
ISO 周数: [01-53] |
13 |
| %D / %x |
%m/%d/%y |
04/02/23 |
| %F |
%Y-%m-%d |
2023-04-02 |
| %H |
24 时制小时: [00-23] |
17 |
| %I |
12 时制小时: [01-12] |
05 |
| %M |
分: [00-59] |
38 |
| %S |
秒: [00-60] |
31 |
| %T / %X |
24 时制时间: %H:%M:%S |
17:38:31 |
| %R |
%H:%M |
17:38 |
| %p |
AM/PM |
PM |
| %r |
12 时制时间: %I:%M:%S %p |
05:38:31 PM |
| %c |
日期和时间 |
Sun Apr 2 17:38:31 2023 |
| %z |
ISO UTC 偏移量 |
+0800 |
| %Z |
时区名 |
CST |
| %n |
换行符 |
|
| %t |
水平制表符 |
|
| %% |
百分号 |
% |
大部分选项是直接明了的,有几个需要单独解释下:
- %g/%G: 当前周所在的年,这里一周是从周一到周日,例如 2023-01-01 (周日) 对应的年却是 2022
- %U:日期在该年中所属的周数,包含该年中第一个星期日的周是第一周 (即星期日周数),例如 2023-01-01 (周日) 对应的周是 1
- %W:同上,不同点在于包含该年中第一个星期一的周数是第一周 (即星期一周数),例如 2023-01-01 (周日) 对应的周是 0
- %V:同上,不同点在于确定第一周的算法更复杂了:若某周包含了 1 月 1 日,而且至少包含了其后的另外 3 天,那么该周才被视为这年的第一周;否则该周为上一年的最后一周。还是以 2023-01-01 (周日) 为例,它对应的周是 52,即上一年最后一周
下面的代码可以用来测试任何格式化选项:
#include "../apue.h"
#include <sys/time.h>
#include <time.h>

void print_tm (struct tm* t)
{
  printf ("%04d-%02d-%02d %02d:%02d:%02d (week day %d) (year day %d) (daylight saving time %d)\n",
    t->tm_year + 1900,
    t->tm_mon + 1,
    t->tm_mday,
    t->tm_hour,
    t->tm_min,
    t->tm_sec,
    t->tm_wday,
    t->tm_yday + 1,
    t->tm_isdst);
}

void my_strftime (char const* fmt, struct tm* t)
{
  char buf[64] = { 0 };
  int ret = strftime (buf, sizeof (buf), fmt, t);
  printf ("[%02d] '%s': %s\n", ret, fmt, buf);
}

int main (int argc, char *argv[])
{
  int ret = 0;
  time_t now = time (NULL);
  printf ("now = %ld\n", now);

  struct tm *t = localtime (&now);
  print_tm (t);
  printf ("year group:\n");
  my_strftime ("%Y", t);
  my_strftime ("%C", t);
  my_strftime ("%y", t);
  my_strftime ("%G", t);
  my_strftime ("%g", t);

  printf ("month group:\n");
  my_strftime ("%m", t);
  my_strftime ("%b", t);
  my_strftime ("%h", t);
  my_strftime ("%B", t);

  printf ("day group:\n");
  my_strftime ("%w", t);
  my_strftime ("%u", t);
  my_strftime ("%a", t);
  my_strftime ("%A", t);
  my_strftime ("%d", t);
  my_strftime ("%e", t);
  my_strftime ("%j", t);

  printf ("week group:\n");
  my_strftime ("%U", t);
  my_strftime ("%W", t);
  my_strftime ("%V", t);

  printf ("date group\n");
  my_strftime ("%D", t);
  my_strftime ("%x", t);
  my_strftime ("%F", t);

  printf ("time group\n");
  my_strftime ("%H", t);
  my_strftime ("%k", t);
  my_strftime ("%I", t);
  my_strftime ("%l", t);
  my_strftime ("%M", t);
  my_strftime ("%S", t);
  my_strftime ("%T", t);
  my_strftime ("%X", t);
  my_strftime ("%R", t);
  my_strftime ("%p", t);
  my_strftime ("%P", t);
  my_strftime ("%r", t);
  my_strftime ("%c", t);
  my_strftime ("%s", t);

  printf ("timezone group\n");
  my_strftime ("%z", t);
  my_strftime ("%Z", t);

  printf ("common group\n");
  my_strftime ("%n", t);
  my_strftime ("%t", t);
  my_strftime ("%%", t);
  return 0;
}
下面是代码的典型输出:
> ./timeprintf
now = 1680431880
2023-04-02 18:38:00 (week day 0) (year day 92) (daylight saving time 0)
year group:
[04] '%Y': 2023
[02] '%C': 20
[02] '%y': 23
[04] '%G': 2023
[02] '%g': 23
month group:
[02] '%m': 04
[03] '%b': Apr
[03] '%h': Apr
[05] '%B': April
day group:
[01] '%w': 0
[01] '%u': 7
[03] '%a': Sun
[06] '%A': Sunday
[02] '%d': 02
[02] '%e':  2
[03] '%j': 092
week group:
[02] '%U': 14
[02] '%W': 13
[02] '%V': 13
date group
[08] '%D': 04/02/23
[08] '%x': 04/02/23
[10] '%F': 2023-04-02
time group
[02] '%H': 18
[02] '%k': 18
[02] '%I': 06
[02] '%l':  6
[02] '%M': 38
[02] '%S': 00
[08] '%T': 18:38:00
[08] '%X': 18:38:00
[05] '%R': 18:38
[02] '%p': PM
[02] '%P': pm
[11] '%r': 06:38:00 PM
[24] '%c': Sun Apr  2 18:38:00 2023
[10] '%s': 1680431880
timezone group
[05] '%z': +0800
[03] '%Z': CST
common group
[01] '%n':

[01] '%t':
[01] '%%': %
示例中演示了另外一些非标准扩展,例如 %s 展示时间对应的 Epoch 值,在 linux 和 darwin 上都是被支持的。
回顾上面的关系图,strftime 是受时区和夏时制影响的 (标红部分),下面通过导出 TZ 环境变量来验证:
> date
Wed Apr  5 16:28:12 CST 2023
> export TZ=America/New_York
> date
Wed Apr  5 03:28:17 EDT 2023
> ./timeprintf
now = 1680679740
2023-04-05 03:29:00 (week day 3) (year day 95) (daylight saving time 1)
year group:
[04] '%Y': 2023
[02] '%C': 20
[02] '%y': 23
[04] '%G': 2023
[02] '%g': 23
month group:
[02] '%m': 04
[03] '%b': Apr
[03] '%h': Apr
[05] '%B': April
day group:
[01] '%w': 3
[01] '%u': 3
[03] '%a': Wed
[09] '%A': Wednesday
[02] '%d': 05
[02] '%e':  5
[03] '%j': 095
week group:
[02] '%U': 14
[02] '%W': 14
[02] '%V': 14
date group
[08] '%D': 04/05/23
[08] '%x': 04/05/23
[10] '%F': 2023-04-05
time group
[02] '%H': 03
[02] '%k':  3
[02] '%I': 03
[02] '%l':  3
[02] '%M': 29
[02] '%S': 00
[08] '%T': 03:29:00
[08] '%X': 03:29:00
[05] '%R': 03:29
[02] '%p': AM
[02] '%P': am
[11] '%r': 03:29:00 AM
[24] '%c': Wed Apr  5 03:29:00 2023
[10] '%s': 1680679740
timezone group
[05] '%z': -0400
[03] '%Z': EDT
common group
[01] '%n':

[01] '%t':
[01] '%%': %
添加纽约时区后,strftime 生成的时间与北京时间差了 13 个小时,除去时区跨度 12 个小时 (+8 & -4),还有 1 小时是夏时制引发的。通过 %z 和 %Z 的输出可以观察到时区的变量。对于夏时制,strftime 没有提供对应的 format 参数,所以不好直接确认,只能通过时间差值来间接确认。
char *strptime(const char *s, const char *format, struct tm *tm);
strptime 是 strftime 的逆操作,借助 format 参数解析输入字符串 s,并将结果保存在参数 tm 中,它的返回值有如下几种场景:
- 解析了部分 format 或一个也没有解析出来,返回 NULL
- 解析了全部 format,将最后解析位置返回给调用者 (如果恰好为末尾 null,则表示完全匹配)
它的 format 参数和 strftime 几乎完全一致,除以下几点:
- %t / %n:匹配任意空白
- %y:69-99 将匹配到 19xx 年,00-68 将匹配到 20xx 年
- 可添加 E / 0 前缀指定使用当前 locale 使用的日期时间符号
仍以上面的代码为例,如果想查看任意时间的 format 参数效果,可以增加时间参数并通过 strptime 做解析:
int main (int argc, char *argv[])
{
  int ret = 0;
  struct tm *t = NULL;
  if (argc == 1)
  {
    time_t now = time (NULL);
    printf ("now = %ld\n", now);
    t = localtime (&now);
  }
  else if (argc == 2)
  {
    static struct tm tmp = { 0};
    char const* ptr = strptime (argv[1], "%F %T", &tmp);
    if (ptr == NULL)
    {
        printf ("parse time %s failed\n", argv[1]);
        return -1;
    }

    if (*ptr != NULL)
    {
        printf ("strptime ret:[%d] %s\n", ptr-argv[1], ptr);
    }

    t = &tmp;
  }
  else
  {
      printf ("Usage: ./timeprintf [YYYY-MM-DD HH:MM:SS]\n");
      exit (1);
  }
...
}
和之前的区别在于,当用户给定一个额外参数时,尝试使用 strptime 进行解析,如果成功,将解析结果用于后续的 strftime 时间参数。默认按 YYYY-MM-DD HH:MM:SS 格式解析:
> ./timeprintf "2023-01-01 10:00:00"
2023-01-01 10:00:00 (week day 0) (year day 1) (daylight saving time 0)
year group:
[04] '%Y': 2023
[02] '%C': 20
[02] '%y': 23
[04] '%G': 2022
[02] '%g': 22
...
注意需要将整个日期时间参数用引号括起来,不然会被 shell 解析为两个参数。
这里使用今年第一天来验证 %g / %G 的输出,可以看到,因为这天仍属于 2022 的最后一周,所以它们都返回了 2022。
有的人或许有疑问,经 strptime 解析的时间和 localtime 返回的完全一致吗?下面做个试验:
> ./timeprintf > out.1
> ./timeprintf "2023-04-05 16:31:00" > out.2
> diff out.1 out.2
1d0
< now = 1680683460
46c45
< [05] '%z': +0800
---
> [05] '%z': +0000
可以看到,除时区偏移没解析成功外,其它字段确实相符 (没带参数的 timeprintf 使用的时间也是 16:31;00),这也比较好理解,毕竟提供给 strptime 的字符串没带时区信息,如果修改 format 信息带上时区呢?
char const* ptr = strptime (argv[1], "%F %T %Z", &tmp);
下面就来试一试:
> ./timeprintf "2023-04-05 16:31:00 CST" > out.2
> diff out.1 out.2
1c1
< now = 1680683460
---
> strptime ret:[20] CST
46c46
< [05] '%z': +0800
---
> [05] '%z': +0000
看起来是没什么改善,特别是额外增加的时区名称 (%Z) 没有被解析。换 %z 试试:
> ./timeprintf "2023-04-05 16:31:00 +0800" > out.2
> diff out.1 out.2
1d0
< now = 1680683460
这次成功了!再次切换到纽约时间:
> ./timeprintf "2023-04-05 16:31:00 -0400" > out.2
> diff out.1 out.2
1d0
< now = 1680683460
46c45
< [05] '%z': +0800
---
> [05] '%z': -0400
除了 %z 字段受影响,其它都没变,特别是 %s 字段一点影响也没有,不应该啊。改用 TZ 环境变量尝试:
> export TZ=America/New_York
> ./timeprintf "2023-04-05 16:31:00 -0400" > out.2
> diff out.1 out.2
1d0
< now = 1680683460
44c43
< [10] '%s': 1680683460
---
> [10] '%s': 1680730260
46,47c45,46
< [05] '%z': +0800
< [03] '%Z': CST
---
> [05] '%z': -0400
> [03] '%Z': EST
这回正常了,看来 strptime 也受时区影响,那它受不受夏时制影响呢?很简单,将上面 %s 输出的 Epoch 用当前时区查看一下就明了:
> unset TZ
> date --date=@1680730260
Thu Apr  6 05:31:00 CST 2023
两者相差 13 小时 (0405 16:31 -> 0406 05:31),中间有夏时制 1 小时的差值,因此受夏时制影响。
最后补充一下,date 命令使用的 format 与 strftime 也基本相同,除以下几点:
- %z,可添加 : 前缀
- %z : +hhmm
- %:z : +hh:mm
- %::z : +hh:mm:ss
- %:::z : 适当的精度 (去掉全零后缀)
- 前缀修饰
- - :不增加填充字符
- _ :使用空格填充
- 0 : 使用零填充
- ^ : 使用大写
- # : 使用相反的大小写
例如:
> date +%z
+0800
> date +%:z
+08:00
> date +%::z
+08:00:00
> date +%:::z
+08
> date +%-z
+800
> date +%_z
 +800
> date +%0z
+0800
另外 mac date 与 unix date 语法差异较大,可能考之前在"闰秒"一节末尾的说明。
其它
前面介绍的都是时间的获取与展示,如果想要设置时间,需要使用另外的例程:
int settimeofday(const struct timeval *tv, const struct timezone *tz);
参数与 gettimeofday 一致。
另外如果只是想计算时间差,尽量不要使用 time 或 gettimeofday,因为它们都会受到用户对系统时间设置的影响。
int clock_getres(clockid_t clk_id, struct timespec *res);
int clock_gettime(clockid_t clk_id, struct timespec *tp);
int clock_settime(clockid_t clk_id, const struct timespec *tp);
这种场景应当使用 clock_gettime 来获取相对时间,clk_id 通常有以下几种选择:
- CLOCK_REALTIME:系统范围的实时时钟。所有用户所有程序都使用,这和 gettimeofday 函数获取的系统时间是相同的
- CLOCK_MONOTONIC:单调递增时间,不能被人为修改,需要注意的是并没有指定起始时间,有些系统取了 Epoch 时间,有些系统 (比如Linux) 取 boot 时间
- CLOCK_BOOTTIME: 同 CLOCK_MONOTONIC一样,只是当系统被挂起时一样会计时 (Linux系统特有)
- CLOCK_PROCESS_CPUTIME_ID: 进程使用的 CPU 时间,该进程的所有线程的 CPU 时间都会被统计进来
- CLOCK_THREAD_CPUTIME_ID: 线程使用的 CPU 时间
CLOCK_BOOTTIME 为 linux 拓展,Darwin 上也有其它拓展,为保持可移植性,一般选取 CLOCK_MONOTONIC。clock_getres 是用来获取对应时钟类型能够提供的时间精确度,res 参数保存其精确度。在设置或休眠的时候,时间值也应该是这个精确度的倍数。clock_settime 是用来设置对应时钟的时间,不过有些时钟是不能被设置的。
clock_gettime 返回的 timespec 与 gettimeofday 返回的 timeval 有所不同:
struct timespec {
    time_t   tv_sec;        /* seconds */
    long     tv_nsec;       /* nanoseconds */
};
第一个字段都是 Epoch,第二个字段为纳秒,比 timeval 的毫秒精度要高不少。
针对 timeval,linux 系统提供了一系列例程来支持时间的计算:
void timeradd(struct timeval *a, struct timeval *b,  struct timeval *res);
void timersub(struct timeval *a, struct timeval *b, struct timeval *res);
void timerclear(struct timeval *tvp);
int timerisset(struct timeval *tvp);
int timercmp(struct timeval *a, struct timeval *b, CMP);
比直接手动处理进位、借位方便了不少,不过它们不属于 POSIX 标准。
最后本文介绍的大多例程需要返回一个内部的静态内存的指针,不是可重入的,既不线程安全,也不信号安全,在"时区->TZ 环境变量"一节的例子中已经体验过了。为此,POSIX 提供了可重入版本的时间例程:
char *asctime_r(const struct tm *tm, char *buf);
char *ctime_r(const time_t *timep, char *buf);
struct tm *gmtime_r(const time_t *timep, struct tm *result);
struct tm *localtime_r(const time_t *timep, struct tm *result);
将使用用户提供的参数 (buf/result) 代替内部的静态内存区,如果给定的参数为 NULL,则回退到不带 _r 后缀的版本;如果不为 NULL,则返回这个参数,以便与非重入版本兼容。
参考
[1].
彻底弄懂GMT、UTC、时区和夏令时
[2].
格林尼治标准时间
[3].
协调世界时
[4].
国家授时中心闰秒公告
[5].
应对linux下的闰秒
[6].
聊聊闰秒以及模拟闰秒
[7].
「闰秒」会对 IT 行业造成多大影响?有什么好的解决方法?
[8].
mac date命令
[9].
linux系统date命令(时间戳与日期相互转换)
[10].
修改系统时区 /etc/localtime
[11].
[Linux] 设置系统时区
[12].
Linux 系统设置 : zdump 命令详解
[13].
那些年,我国也实行过夏时制
[14].
tzset 的作用
[15].
自顶向下地聊聊C++的时间处理和chrono库
[16].
双时制为何在欧洲仍难废除?
[17].
gettimeofday、clockgettime 以及不同时钟源的影响
[18].
Linux时间类型、函数和休眠函数