Aware依赖注入管理
1.Aware介绍
在Spring当中有一些内置的对象是未开放给我们使用的,例如Spring的上下文ApplicationContext、环境属性Environment,BeanFactory等等其他的一些内置对象,而在我们可以通过实现对应的Aware接口去拿到我们想要的一些属性,一般命名都是xxxAware,在创建对象的时候, 会调用接口规定的方法注入到相关组件:Aware。
Bean生命周期内常见的:BeanNameAware、ApplicationContextAware、BeanFactoryAware 。
- BeanNameAware
接口只有一个方法 setBeanName()。实现 BeanNameAware 接口的 bean,在 bean 加载的过程中可以获取到该 bean 的 id。 - ApplicationContextAware
接口只有一个方法 setApplicationContext()。实现 ApplicationContextAware 接口的 bean,可以在 bean 加载的过程中可以获取到 Spring 的 ApplicationContext,从而能够获取任意 bean 及大量 IOC 容器信息 - BeanFactoryAware
接口只有一个方法 setBeanFactory()。实现 BeanFactoryAware 接口的 bean,可以在 bean 加载的过程中可以获取到加载该 bean 的 BeanFactory
public class TestBean implementsBeanNameAware, ApplicationContextAware, BeanFactoryAware{
  //获取当前bean的name

    @Overridepublic voidsetBeanName(String name) {

        System.out.println("setBeanName()...beanName=" +name);

    }
  //获取当前ApplicationContext

    @Overridepublic void setApplicationContext(ApplicationContext applicationContext) throwsBeansException {

        System.out.println("setApplicationContext()...applicationContext=" +applicationContext);

    }
  //获取当前BeanFactory

    @Overridepublic void setBeanFactory(BeanFactory beanFactory) throwsBeansException {

        System.out.println("setBeanFactory()...beanFactory=" +beanFactory);

    }

}
测试类:
@SpringBootApplication

@EnableAspectJAutoProxypublic classDemoApplication{public static voidmain(String[] args) {//创建一个AnnotationConfigApplicationContext容器
        AnnotationConfigApplicationContext context = newAnnotationConfigApplicationContext();//注册TestBean02到容器中
        context.register(TestBean02.class);//刷新容器,启动应用上下文
context.refresh();//关闭容器,销毁应用上下文
context.close();

    }

}
结果:

总结:这些接口提供了一种在Bean中与Spring容器交互的机制,但需要注意的是,过度使用 Aware 接口可能导致代码与Spring框架的紧耦合。在实际应用中,更推荐使用依赖注入的方式来获取所需的资源,以保持代码的灵活性和清晰性。 Aware 接口通常在一些特定场景下使用,例如需要在Bean初始化时获取容器信息的情况。
2.通过自定义Aware来实现数据源的自动注入
目标:完成不使用比如@Autowired和@Resource来实现自动注入 主要实现是通过自定义Aware接口搭配BeanPostProcessor接口实现功能。
- 1.创建数据源对象DataBaseConfig:
public classDataBaseConfig {//数据库url
    privateString url;//数据库名称
    privateString name;publicString getUrl() {returnurl;

    }public voidsetUrl(String url) {this.url =url;

    }publicString getName() {returnname;

    }public voidsetName(String name) {this.name =name;

    }

    @OverridepublicString toString() {return "DataBaseConfig{" + "url='" + url + '\'' + ", name='" + name + '\'' + '}';

    }

}
- 2.创建自定义Aware接口:DataBaseAware负责自动注入DataBase对象
public interface DataBaseAware extends Aware { //仅标记//自动注入DataBase对象
    voidsetDataBase(DataBaseConfig dataBaseConfig);

}
- 3.核心内容就是通过自定义BeanPostProcessor来实现对DataBase对象的自动注入:DataBaseConfigBeanPostProcessor
public class DataBaseConfigBeanPostProcessor implementsBeanPostProcessor, ApplicationContextAware {
  //实现ApplicationContextAware只为获取BeanprivateApplicationContext applicationContext;

    @Overridepublic void setApplicationContext(ApplicationContext applicationContext) throwsBeansException {//获取当前容器
        this.applicationContext=applicationContext;

    }


    @Overridepublic Object postProcessBeforeInitialization(Object bean, String beanName) throwsBeansException {//获取database对象
        Object config = applicationContext.getBean("dataBaseConfig");if (bean==null){ //已经注入bean了
            return bean; //直接返回
}if (config instanceof DataBaseConfig &&bean instanceofDataBaseAware){

            ((DataBaseAware) bean).setDataBase((DataBaseConfig) config);

        }returnbean;

    }

}
- 4.通过实现
DataBaseAware
接口并实现相关方法,来接收并访问
DataBaseConfig
对象的依赖:MyDataBase
public class MyDataBase implements DataBaseAware{ //定义接口实现子类
    privateDataBaseConfig config;

    @Overridepublic voidsetDataBase(DataBaseConfig dataBaseConfig) {this.config=dataBaseConfig;

    }publicDataBaseConfig getConfig() {returnconfig;

    }

}
- 5.测试配置类:对所有bean进行注册,AwareDataBaseConfig
@Configurationpublic classAwareDataBaseConfig {

    @BeanpublicDataBaseConfig dataBaseConfig(){

        DataBaseConfig dataBaseConfig= newDataBaseConfig();

        dataBaseConfig.setName("测试数据库");

        dataBaseConfig.setUrl("jdbc:mysql://localhost:3306/test");returndataBaseConfig;

    }

    @BeanpublicDataBaseConfigBeanPostProcessor dataBaseConfigBeanPostProcessor(){return newDataBaseConfigBeanPostProcessor();

    }

    @BeanpublicMyDataBase myDataBase(){return newMyDataBase();

    }

}
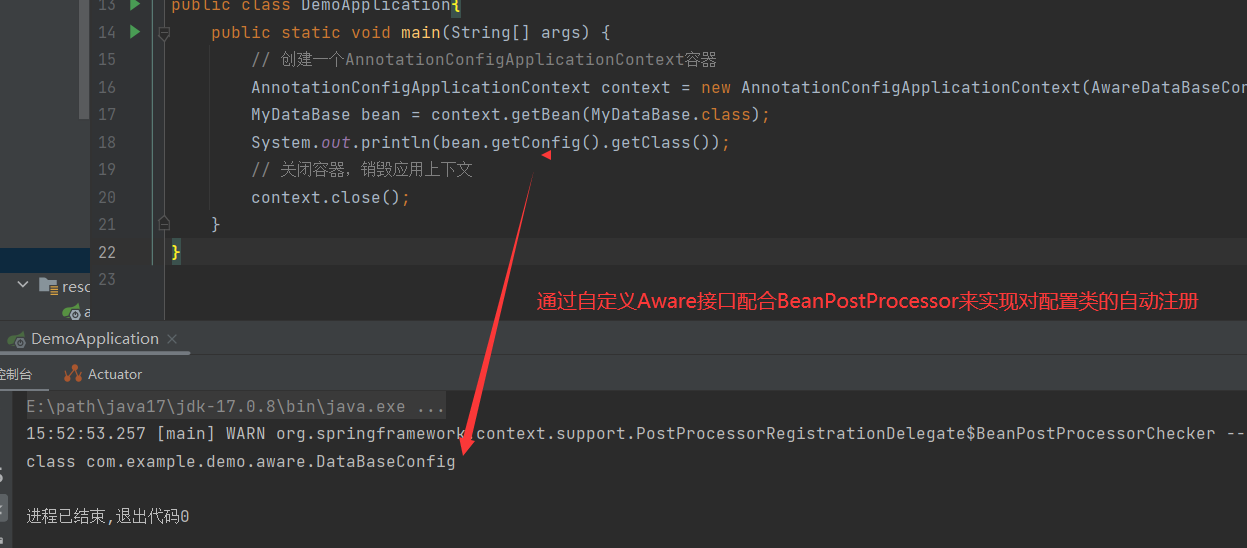
- 6.启动类测试效果:
@SpringBootApplication

@ComponentScan("com.example.demo.aware")public classDemoApplication{public static voidmain(String[] args) {//创建一个AnnotationConfigApplicationContext容器
        AnnotationConfigApplicationContext context = new AnnotationConfigApplicationContext(AwareDataBaseConfig.class);

        MyDataBase bean= context.getBean(MyDataBase.class);

        System.out.println(bean.getConfig().getClass());//关闭容器,销毁应用上下文
context.close();

    }

}
最终效果图:
总结:
为什么不使用@Autowired` 和 `@Resource` 来用于实现自动依赖注入。这两者通常用于将其他组件或配置信息注入到一个类中,而不需要手动编写大量的依赖注入代码。相比之下,`Aware` 接口是一种更为灵活和手动的依赖注入方式 但代码量要大的多 如果对于已经提供了BeanPostProcessor实现类是一种方便的做法。
- 更灵活的自定义逻辑:** 使用 `Aware` 接口,你可以在对象初始化的不同阶段执行自定义的逻辑。这对于需要更复杂的依赖注入场景或特定的初始化逻辑非常有用。
- 特定场景的定制化:** 有时候,你可能需要在对象创建或初始化的过程中执行一些特定的逻辑,而不仅仅是简单的属性注入。`Aware` 接口允许你在需要的时候执行这些逻辑。
- 不依赖于注解:** 某些项目或团队可能更喜欢避免使用过多的注解,而更倾向于在代码中显式地表达依赖关系。这种情况下,使用 `Aware` 接口可以更符合团队的编码风格。
- 更细粒度的控制:** `Aware` 接口提供了更细粒度的控制,允许你手动管理依赖注入的过程。这对于一些复杂的业务逻辑可能更容易实现。
总的来说,选择使用 `Aware` 接口还是注解方式取决于项目的需求和开发团队的偏好。注解方式通常更简洁和方便,而 `Aware` 接口提供了更多的自定义和控制的能力。在实际项目中,根据具体情况选择最适合的方式是很重要的。