2024年1月

做国际化一个很头疼的坑就是,你不知道项目里到底还有哪些中文词条没有国际化处理

纯靠人工去检查不现实,也不靠谱,而且浪费资源

所以还是得通过脚本工具来检查,思路是:

  1. 先保存好本地代码变更,准备好一个无文件变更的本地环境
  2. 再通过脚本把代码里的非展示性中文移除掉
    • 注释里的中文、console 里的中文,已经国际化处理过的中文
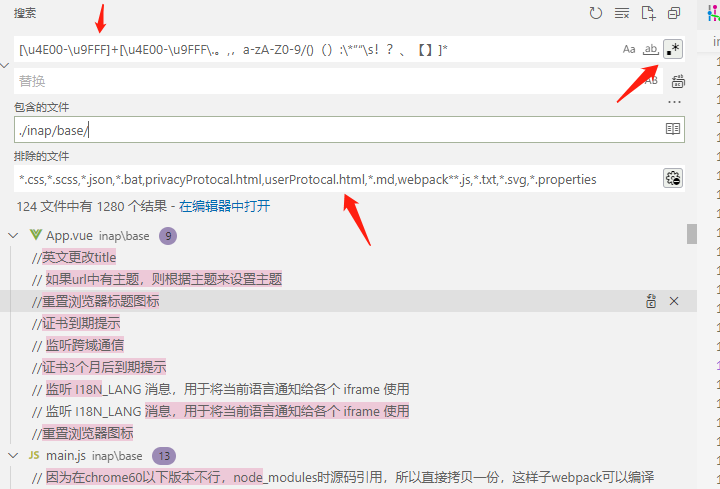
  3. 再用中文正则在 vscode 的全局搜索里匹配,捞出来的就是未国际化处理的中文词条
  4. 最后需要回退本地的更改,毕竟脚本是直接改动本地文件

脚本仅仅是检查用,用完记得回退代码

匹配中文词条的正则

  • 单个中文:
    • [\u4E00-\u9FFF]
  • 连续中文:
    • [\u4E00-\u9FFF]+
  • 掺杂了各种符号、字母的中文句子:
    • [a-zA-Z0-9、:]*[\u4E00-\u9FFF]+[\u4E00-\u9FFF\.\-\*。,,a-zA-Z0-9/()()::”“!?、%_【】《》>~~ ]*
    • (这里不建议把 : : - ' " 这几个特殊符号也列到正则里,因为这些符号比较特殊,有的语法层面也支持,列进来反而会引出新问题,所以宁愿这种场景的句子被截成多断)
  • 最好再加上文件的排除:
    • *.css,*.scss,*.less,*.json,*.bat,privacyProtocal.html,userProtocal.html,*.md,webpack**.js,*.txt,*.svg,*.properties,*.npmrc,vve-i18n-cli.config.js,baas,config,*.art,demo_index.html,*.sh,*.xml,*.java

脚本

移除非展示性中文的脚本

// index.js

#!/usr/bin/env node

/**
 * 用来移除掉指定项目里的以下几类场景的中文:
 * - 注释里的中文
 * - 被国际化全局函数包裹的中文 $t
 *
 * 这样子方便借助 vs code 的全局正则搜索中文功能,来快速 review 未国际化的中文
 * 正则: [\u4E00-\u9FA5]+
 */

"use strict";
const program = require("commander");
const { loadConfig } = require("../configuration");
const core = require("./core");
const vfs = require("vinyl-fs");
const map = require("map-stream");
const path = require("path");
const fs = require("fs");

function commaSeparatedList(value, split = ",") {
  return value.split(split).filter((item) => item);
}

program
  .version(require("../../package.json").version)
  .option("--cwd <path>", "工作目录")
  .option("--root-dir <path>", "国际文本所在的根目录")
  .option(
    "--config <path>",
    "配置文件的路径,没有配置,默认路径是在${cwd}/vve-i18n-cli.config.js"
  )
  .option("--no-config", "是否取配置文件")
  .option(
    "--i18n-file-rules <items>",
    "匹配含有国际化文本的文件规则",
    commaSeparatedList
  )
  .option(
    "--ignore-i18n-file-rules <items>",
    "不匹配含有国际化文本的文件规则",
    commaSeparatedList
  )
  .parse(process.argv);

const config = {
  // 工作目录
  cwd: ".",
  // 根目录,国际文本所在的根目录
  rootDir: "src",
  // 配置文件的路径,没有配置,默认路径是在${cwd}/vve-i18n-cli.config.js
  config: undefined,
  // 是否取配置文件
  noConfig: false,
  // 匹配含有国际化文本的文件规则
  i18nFileRules: ["**/*.+(vue|js|html|htm)"],
  // 不匹配含有国际化文本的文件规则
  ignoreI18nFileRules: ["**/node_modules/**"],
};

Object.assign(config, program);

const CONFIG_JS_FILENAME = "vve-i18n-cli.config.js";

let absoluteCwd = path.resolve(config.cwd);

// 优先判断是否需要读取文件
if (!config.noConfig) {
  let configFilePath = path.join(absoluteCwd, CONFIG_JS_FILENAME);
  if (config.config) {
    configFilePath = path.resolve(config.config);
  }
  if (fs.existsSync(configFilePath)) {
    const conf = loadConfig(configFilePath);
    if (conf && conf.options && conf.options.zhCheck) {
      Object.assign(config, conf.options.zhCheck, program);
    }
  }
}

// 制定配置文件后,cwd在配置文件中定义,则cwd就需要重新获取
if (!program.cwd) {
  absoluteCwd = path.resolve(config.cwd);
}

const absoluteRootDir = path.resolve(absoluteCwd, config.rootDir);

function run() {
  console.log("================================>start");
  vfs
    .src(
      config.i18nFileRules.map((item) => path.resolve(absoluteRootDir, item)),
      {
        ignore: config.ignoreI18nFileRules.map((item) =>
          path.resolve(absoluteRootDir, item)
        ),
        dot: false,
      }
    )
    .pipe(
      map((file, cb) => {
        console.log("开始解析 =========================>", file.path);
        const extname = path.extname(file.path);
        let fileContent = file.contents.toString();
        let newFileContent = fileContent;
        if (extname.toLowerCase() === ".vue") {
          newFileContent = core.removeUnusedZhInVue(fileContent);
        } else if (extname.toLowerCase() === ".js") {
          newFileContent = core.removeUnusedZhInJs(fileContent);
        } else if ([".html", ".htm"].includes(extname.toLowerCase())) {
          newFileContent = core.removeUnusedZhInHtml(fileContent);
        }
        if (newFileContent !== fileContent) {
          console.log("发现无用的中文,正在移除中...");
          fs.writeFileSync(file.path, newFileContent);
        }
        console.log("解析结束 =========================>", file.path);
        cb();
      })
    )
    .on("end", () => {
      console.log("================================>end");
    });
}

run();

// core.js

// 包含中文
const zhReg = new RegExp("[\\u4E00-\\u9FFF]+", "");

// 处理 vue 文件
function removeUnusedZhInVue(fileContent) {
  return removeUnusedZh(fileContent);
}
exports.removeUnusedZhInVue = removeUnusedZhInVue;

// 处理 js 文件
function removeUnusedZhInJs(fileContent) {
  return removeUnusedZh(fileContent);
}
exports.removeUnusedZhInJs = removeUnusedZhInJs;

// 处理 html 文件
// 处理 js 文件
function removeUnusedZhInHtml(fileContent) {
  return removeUnusedZh(fileContent);
}
exports.removeUnusedZhInHtml = removeUnusedZhInHtml;

function removeUnusedZh(fileContent) {
  const hasAnnotation = {
    "/*": false,
    "<!--": false,
  };

  // 逐行处理
  fileContent = fileContent
    .split("\n")
    .map((line) => {
      // 移除无用中文
      if (line.match(zhReg)) {
        const regs = [
          new RegExp("//(.*[\\u4E00-\\u9FFF]+)", ""), // 移除 // xx
          new RegExp("console.log\\(['\"](.*[\\u4E00-\\u9FFF]+)", ""), // 移除 console.log(xxx)
          new RegExp("console.info\\(['\"](.*[\\u4E00-\\u9FFF]+)", ""), // 移除 console.info(xxx)
          new RegExp(
            "\\$t\\([ ]*['\"`](.*?[\\u4E00-\\u9FFF]+.*?)['\"`]\\)",
            ""
          ), // 移除 $t("xxx")
        ];
        regs.forEach((reg) => {
          let match = line.match(reg);
          while (match && match[1]) {
            line = line.replace(match[1], "");
            match = line.match(reg);
          }
        });
      }
      if (!hasAnnotation["/*"] && line.indexOf("/*") > -1) {
        hasAnnotation["/*"] = true;
      }
      if (!hasAnnotation["<!--"] && line.indexOf("<!--") > -1) {
        hasAnnotation["<!--"] = true;
      }
      return line;
    })
    .join("\n");

  if (hasAnnotation["/*"]) {
    // 移除 /* xxx */
    const reg = new RegExp("/\\*([\\s\\S]*?)\\*/", "g");
    fileContent = fileContent.replace(reg, function (match, key, index) {
      // console.log("[/**/] ==1 >", { match, key, index });
      let newKey = key;
      while (newKey.match(zhReg)) {
        newKey = newKey.replace(zhReg, "");
      }
      return match.replace(key, newKey);
    });
  }
  // 移除 <!--  xxx -->
  if (hasAnnotation["<!--"]) {
    const reg = new RegExp("<!--([\\s\\S]*?)-->", "g");
    fileContent = fileContent.replace(reg, function (match, key, index) {
      let newKey = key;
      while (newKey.match(zhReg)) {
        newKey = newKey.replace(zhReg, "");
      }
      return match.replace(key, newKey);
    });
  }
  return fileContent;
}
// configuration.js
const buildDebug = require("debug");
const path = require("path");

const debug = buildDebug("files:configuration");

function loadConfig(filepath) {
  try {
    const conf = readConfig(filepath);
    return conf;
  } catch (e) {
    debug("error", e);
    return null;
  }
}

function readConfig(filepath) {
  let options;
  try {
    const configModule = require(filepath);
    options =
      configModule && configModule.__esModule
        ? configModule.default || undefined
        : configModule;
  } catch (err) {
    throw err;
  } finally {
  }
  return {
    filepath,
    dirname: path.dirname(filepath),
    options,
  };
}

module.exports = {
  loadConfig,
  readConfig,
};
{
  "dependencies": {
    "commander": "^3.0.2",
    "debug": "^4.1.1",
    "jsonfile": "^5.0.0",
    "lodash.uniq": "^4.5.0",
    "map-stream": "0.0.7",
    "pinyin-pro": "^3.11.0",
    "translation.js": "^0.7.9",
    "vinyl-fs": "^3.0.3",
    "xlsx": "^0.18.5"
  },
  "devDependencies": {
    "chai": "^4.2.0",
    "mocha": "^6.2.1",
    "nyc": "^14.1.1",
    "shelljs": "^0.8.3",
    "standard-version": "^7.0.0"
  },
  "version": "3.2.3"
}
// vve-i18n-cli.config.js
module.exports = {
  // 工作目录
  cwd: ".",
  // 根目录,国际文本所在的根目录
  rootDir: "demo",
  // 默认所有模块,如果有传module参数,就只处理某个模块
  // '**/module-**/**/index.js'
  moduleIndexRules: ["*/pro.properties"],
  // 匹配含有国际化文本的文件规则
  i18nFileRules: ["**/*.+(vue|js)"],
  // 国际化文本的正则表达式,正则中第一个捕获对象当做国际化文本
  i18nTextRules: [/(?:[\$.])t\(['"](.+?)['"]/g],
  // 模块的国际化的json文件需要被保留下的key,即使这些组件在项目中没有被引用
  // key可以是一个字符串,正则,或者是函数
  keepKeyRules: [
    /^G\/+/, // G/开头的会被保留
  ],
  ignoreKeyRules: [/^el/],
  // 生成的国际化资源包的输出目录
  outDir: "i18n",
  // 生成的国际化的语言
  i18nLanguages: [
    "zh", // 中文
    "en", // 英文
  ],
  // 是否翻译
  translate: false,
  // 翻译的基础语言,默认是用中文翻译
  translateFromLang: "zh",
  // 是否强制翻译,即已翻译修改的内容,也重新用翻译生成
  forceTranslate: false,
  // 翻译的语言
  translateLanguage: ["zh", "en"],
  // 模块下${outDir}/index.js文件不存在才拷贝index.js
  copyIndex: true,
  // 是否强制拷贝最新index.js
  forceCopyIndex: false,
  // 国际化文本包裹相关
  zhWrap: {
    cwd: ".",
    // 根目录,国际文本所在的根目录
    rootDir: ".",
    i18nFileRules: [
      "!(node_modules|config)/**/*.+(vue)",
      // "base/components/login.vue",
      "base/common/js/httpHandle.js",
    ],
    ignorePreReg: [
      /t\s*\(\s*$/,
      /tl\s*\(\s*$/,
      /console\.(?:log|error|warn|info|debug)\s*\(\s*$/,
      new RegExp("//.+"),
    ],
    // js相关文件需要引入的国际化文件
    i18nImportForJs: "import i18n from '@inap_base/i18n/core'",
    // js相关文件需要使用国际化方法
    jsI18nFuncName: "i18n.t",
    // vue相关文件需要使用的国际化方法
    vueI18nFuncName: "$t",
  },
};

硬替换脚本

具体查看 zh-i18n.zip

马某在视频
计算机主流开发语言的现状和未来3-5年的发展前景——Java、Golang、Python、C\C#\C++、JS、前端、AI、大数据、测试、运维、网络安全
点评各种语言,其中说到C# 的时候,居然说C# 是不开源的,而且还说局限于微软平台。

一个不蠢的人深刻的理解什么叫“屁股决定脑袋”,也即立场决定观点。他在那嚷嚷说一个观点,这是因为这个观点对他有好处。如果他换个立场,比如不在这工作了,不是那个职位了,他的观点也随之改变。 这就很好解释他为啥在哪里瞎说C# 不开源了, 现在是2024年了, 从C# 在2014年开源算起已经有了10年时间了,如果他的知识不是停留在2010年,肯定知道C# 是开源的,如今C#语言连同编译器、工具集、标准库目前全部以MIT协议开源在github上面。

我们在这里和大家说说龙芯中科的 .NET编译器团队这几年的努力都被吃了,以 C#、F#、VB 等编程语言为代表的 .NET 一站式多平台 & 多框架的软件开发生态圈,可广泛应用于各种生产环境中,其应用范围包括网页应用、桌面办公系统、编程框架、数据库、区块链、机器学习等。龙芯 .NET 团队为了更好的支持 LoongArch64 架构特点,对整个后端指令构建系统进行了创新重构设计,同时,也从字节码加载、JIT 语法树、ABI 规范、函数栈帧设计、GC、异常处理等重要模块,都做了适应 LoongArch 架构特点的优化,在 2021 年完成社区 .NET6-LoongArch64 研发后,龙芯团队逐步开始从 C# 语言编译器、中间字节码、JIT编译优化技术、AOT、GC、异常处理等方面,系统的做 LoongArch64 平台的深度适配优化。更多的信息可以参考龙芯.NET 网站:
http://www.loongnix.cn/zh/api/dotnet/

在国内的使用案例来说,在2023年Linux 桌面开发领域Avalonia UI 有非常多的案例,特别是龙芯.NET 平台上对Avalonia UI的重点支持。 Avalonia 在社区的发展都是排在第一位:

b753abddc45093d80af49aaa51e939a

引言

最近小伙伴告诉我一种新的方法,可以使用wasm来使浏览器网页能够运行Python代码。这一下子激起了我的兴趣,因为这意味着用户无需安装Python环境就能直接运行我的demo,这真是太方便了。所以,我们的主要目标今天就是让网页能够直接运行我的贪吃蛇游戏。贪吃蛇游戏其实很简单,因为Python有一个很棒的pygame库可以供我们使用。所以编写起来也不会太复杂。废话不多说,让我们开始吧。

何为wasm

全称为WebAssembly ,简称为Wasm,是一种能够在web上加载非常快速的一种格式。它可以被视为HTML、JS等其他表达形式的一种补充。对于我来说,这就是它的简单定义。然而,我们今天的任务并不是去介绍Wasm,而是探讨如何实现Python在web中直接运行的方法。

当然有兴趣的同学可以直接去看官方网站:
https://webassembly.org/

emscripten

我们现在已经了解到,WebAssembly可以在web上运行,但我想知道如何将我的Python代码转换成WebAssembly。当然,肯定有相应的工具可供使用。在网上,最常被提及的工具就是emscripten,可以说是WebAssembly的核心工具。它的主要功能是将其他高级语言编译成WebAssembly。然而,我在本地尝试过后发现,emscripten无法直接将Python代码转换成WebAssembly格式。你需要使用其他工具先将Python转换成其他高级语言如C语言,然后再使用emscripten将其转换成WebAssembly。如果你知道其他更好的方法,可以在下方提出来,非常感谢。

我就不实验了,毕竟后台报错,如果你有兴趣可以看看emscripten官方网站:
https://emscripten.org/

在网站的顶部导航栏中,找到并点击 "Get Started"(开始使用)。

pyodide

如果你尝试过在Web上运行Python代码,那你肯定了解到pyodide方案,它确实是一个功能强大的工具。然而,它也存在明显的缺点,例如它所支持的第三方库非常有限,而且加载速度也很慢。尽管如此,它仍然是最便捷的选择,因为你可以直接在HTML中编写代码,而不需要额外的工具。唯一需要注意的是需要引用它的JavaScript文件。
test.html
代码示例如下:

<script src="https://cdn.jsdelivr.net/pyodide/v0.18.1/full/pyodide.js"></script>
<script type="text/javascript">
    loadPyodide({ indexURL : "https://cdn.jsdelivr.net/pyodide/v0.18.1/full/" }).then((pyodide) => {
        pyodide.runPython(`
            def hello_world():
                return "Hello, World!"
            print(hello_world())
        `);
    });
</script>

对于我们来说,使用pyodide是相对简单的。只需点击文件后,浏览器就能正常运行其中的Python代码。但是要直接使用Python的pygame库是不可能的。不过,一些简单的代码还是可以运行的。那么,是否还有其他解决方案呢?答案是肯定的。

image

pygbag

开发人员在寻找解决方案时,最好的资源就是Github了。几乎所有开源的代码仓库都可以在那里找到,只要你能想到的,几乎都能找到。我也是通过搜索找到了一个解决方案,真的有一个开源的第三方库叫做pygbag。虽然这个库很新,但它是由Python官方支持的。只是要依靠官方文档和浏览器去寻找示例代码。连gpt这样的人工智能模型都不知道有这么一个东西存在。此外,pygbag专门集成了pygame,可以直接将Python代码编译成wasm,在浏览器中运行。它还有官方开发人员制作的游戏可供参考,当然如果你也制作了游戏,也可以上传到这里。

官方Github地址:
https://github.com/pygame-web/pygbag

官方游戏首页:
https://itch.io/games/tag-roguelike

他的宗旨也很简单:Python WebAssembly for everyone ( packager + test server ),但是他也有一些编码要求,我们先来实现一个贪吃蛇游戏吧。

贪吃蛇游戏

在开始使用pygbag三方库之前,我们需要确保已经在本地实现了贪吃蛇游戏。现在,请跟着我一起按照以下步骤进行操作。

安装 Pygame

命令如下:
pip install pygame

Pygame是一套专门用于编写游戏的Python模组,它在SDL库的基础上添加了各种游戏功能的实现。借助Python语言的灵活性,你可以快速、轻松地创建各种类型的游戏。正如之前所提到的,Python拥有丰富的库和模组,我们只需直接使用它们,而不必重复造轮子。

我已经为你写好了贪吃蛇游戏的代码,你可以直接使用。这是一个大家都很熟悉的游戏,所以没有太多需要解释的。

import pygame
import random

pygame.init()
screen = pygame.display.set_mode((1280, 720))
clock = pygame.time.Clock()
running = True
dt = 0

player_pos = [pygame.Vector2(screen.get_width() / 2, screen.get_height() / 2)]
player_speed = 300
player_radius = 30

food_pos = pygame.Vector2(random.randint(0, screen.get_width()), random.randint(0, screen.get_height()))
food_radius = 15

direction = pygame.Vector2(0, 0)
while running:
    for event in pygame.event.get():
        if event.type == pygame.QUIT:
            running = False

    screen.fill("black")

    keys = pygame.key.get_pressed()
    if keys[pygame.K_w] or keys[pygame.K_UP]:
        direction = pygame.Vector2(0, -1)
    if keys[pygame.K_s] or keys[pygame.K_DOWN]:
        direction = pygame.Vector2(0, 1)
    if keys[pygame.K_a] or keys[pygame.K_LEFT]:
        direction = pygame.Vector2(-1, 0)
    if keys[pygame.K_d] or keys[pygame.K_RIGHT]:
        direction = pygame.Vector2(1, 0)

    # Move the player's head
    player_pos[0] += direction * player_speed * dt

    # Check if player eats the food
    if player_pos[0].distance_to(food_pos) < player_radius + food_radius:
        player_pos.append(player_pos[-1].copy())  # Add new segment to the player
        food_pos = pygame.Vector2(random.randint(0, screen.get_width()), random.randint(0, screen.get_height()))  # Generate new food

    # Move the player's body
    for i in range(len(player_pos)-1, 0, -1):
        player_pos[i] = player_pos[i-1].copy()

    pygame.draw.circle(screen, "white", food_pos, food_radius)  # Draw the food
    for pos in player_pos:
        pygame.draw.circle(screen, "red", pos, player_radius)  # Draw the player

    pygame.display.flip()
    dt = clock.tick(60) / 1000

pygame.quit()

启动命令就是
python main.py
。运行效果如下:我想要说明的是,我只是简单地实现了一下,并没有进行太多的校验。另外,值得注意的是,尽管我吃完食物后,并没有在身体上感受到太大的变化,但当我吃了很多食物之后,你就可以看到明显的变化了。

image

pygbag改造

使用 pygbag 将 pygame 制作的游戏打包,使游戏可在浏览器中直接运行。 pygbag 的使用可参考 Pygbag Wiki。官方文档:
https://pygame-web.github.io/

使用 pip 安装 pygbag:
pip install pygbag

使用 pygbag 打包游戏前,待打包的目录下的游戏代码文件须名为 main.py。 然后仅需对游戏代码做简易修改,修改后代码如下:

import pygame
import random
import asyncio

pygame.init()
screen = pygame.display.set_mode((1280, 720))
clock = pygame.time.Clock()
running = True
dt = 0

player_pos = [pygame.Vector2(screen.get_width() / 2, screen.get_height() / 2)]
player_speed = 300
player_radius = 30

food_pos = pygame.Vector2(random.randint(0, screen.get_width()), random.randint(0, screen.get_height()))
food_radius = 15

direction = pygame.Vector2(0, 0)
async def main():
    global screen, clock, running, dt ,player_pos ,player_speed,player_radius,food_pos,food_radius,direction
    while running:
        for event in pygame.event.get():
            if event.type == pygame.QUIT:
                running = False

        screen.fill("black")

        keys = pygame.key.get_pressed()
        if keys[pygame.K_w] or keys[pygame.K_UP]:
            direction = pygame.Vector2(0, -1)
        if keys[pygame.K_s] or keys[pygame.K_DOWN]:
            direction = pygame.Vector2(0, 1)
        if keys[pygame.K_a] or keys[pygame.K_LEFT]:
            direction = pygame.Vector2(-1, 0)
        if keys[pygame.K_d] or keys[pygame.K_RIGHT]:
            direction = pygame.Vector2(1, 0)

        # Move the player's head
        player_pos[0] += direction * player_speed * dt

        # Check if player eats the food
        if player_pos[0].distance_to(food_pos) < player_radius + food_radius:
            player_pos.append(player_pos[-1].copy())  # Add new segment to the player
            food_pos = pygame.Vector2(random.randint(0, screen.get_width()), random.randint(0, screen.get_height()))  # Generate new food

        # Move the player's body
        for i in range(len(player_pos)-1, 0, -1):
            player_pos[i] = player_pos[i-1].copy()

        pygame.draw.circle(screen, "white", food_pos, food_radius)  # Draw the food
        for pos in player_pos:
            pygame.draw.circle(screen, "red", pos, player_radius)  # Draw the player

        pygame.display.flip()
        dt = clock.tick(60) / 1000
        await asyncio.sleep(0)
    pygame.quit()


if __name__ == '__main__':
	# 使用 asyncio.run() 调用主函数 main()
	asyncio.run(main())

可以看到,基本上必须引入另一个包:导入 asyncio。剩下的就没啥了。我们再来启动下。

启动命令需要修改下:
python -m pygbag pyGame
,这里注意下,pygbag打包的是整个目录,所以不能像Python那样启动,所以我基本上都是回退到父级目录后,在进行终端控制台打包。命令会直接在本地启动游戏服务。你稍等片刻。

image

然后直接字啊浏览器查看URL地址:
http://localhost:8000/,仍然是稍等片刻,让他加载一下。这时候,你就可以看到浏览器的游戏界面了,如下:

image

总结

经过努力,我成功完成了任务。如果你有兴趣,也可以将你的游戏上传到官方网站,但作为示例,我并不打算上传。不过,我已经提供了源代码给你,所以你可以直接复制粘贴并运行它。虽然Python现在可以直接在web端使用,但我个人不太喜欢这种方式。

本文分享自华为云社区《
当创建一个ingress后,kubernetes会发什么?
》,作者:可以交个朋友。

一、Ingress概述

Ingress是一组路由转发规则合集,将集群内部服务通过7层协议暴露给用户,是一种k8s默认的资源。Ingress资源对象用于定义来自外网的HTTP和HTTPS规则,流量路由由Ingress资源上定义的规则控制。从而达到管理控制进入集群内部流量的目的。

二、Ingress 相关定义

Ingress资源:Ingress是一个API对象,一般通过yaml进行配置,其作用是定义请求如何转发到service的规则,可以理解为配置模板。

Ingress-controller组件:入口控制器(ingress-controller)管理L4层和L7层请求的南北向流量,也就是指从集群外部进入或离开集群的流量。是具体实现反向代理及负载均衡的程序,对Ingress定义的规则进行解析,根据配置的规则来实现请求转发。

三、Ingress Controller 百花齐放

目前Ingress暴露集群内服务的行内被公认为是最好的方式,由于其重要地位,世面上有非常多的Ingress Controller,常见的有:

  • Kubernetes Ingress Nginx

    Kubernetes Ingress的官方推荐的Ingress控制器,它基于nginx Web服务器,并补充了一组用于实现额外功能的Lua插件。由于Nginx的普及使用,在将应用迁移到K8S后,该Ingress控制器是最容易上手的控制器,而且学习成本相对较低,建议使用。不过当配置文件太多的时候,Reload会很慢。

  • Nginx Ingress

    Nginx Ingress是NGINX开发的官方版本,它基于NGINX Plus商业版本,NGINX控制器具有很高的稳定性,持续的向后兼容性,没有任何第三方模块,并且由于消除了Lua代码而保证了较高的速度(与官方控制器相比)。它支持TCP/UDP的流量转发,付费版有很广泛的附加功能,主要缺点就是缺失了鉴权方式、流量调度等其他功能。

  • Kong Ingress

    Kong Ingress建立在NGINX之上,并增加了扩展其功能的Lua模块。kong之前是专注于API网关,现在已经成为了成熟的Ingress控制器,相较于官方控制器,在路由匹配规则、upstream探针、鉴权上做了提升,并且支持大量的模块插件,便与配置。它提供了一些 API、服务的定义,可以抽象成 Kubernetes 的 CRD,通过Kubernetes Ingress 配置便可完成同步状态至 Kong 集群。

  • Traefik Ingress

    traefik Ingress是一个功能很全面的Ingress,官方称其为:Traefik is an Edge Router that makes publishing your services a fun and easy experience。它具有许多有用的功能:连续更新配置(不重新启动),支持多种负载平衡算法,Web UI,指标导出,支持各种协议,REST API,Canary版本等。开箱即用的“Let'sEncrypt”支持是另一个不错的功能。而且在2.0版本已经支持了TCP / SSL,金丝雀部署和流量镜像/阴影等功能,社区非常活跃。

  • HAProxy Ingress

    HAProxy作为王牌的负载均衡器,在众多控制器中最大的优势还在负载均衡上。它提供了“软”配置更新(无流量丢失),基于DNS的服务发现,通过API的动态配置。HAProxy还支持完全自定义配置文件模板(通过替换ConfigMap)以及在其中使用Spring Boot函数。

  • APISIX Ingress

    ApiSix Ingress是一个新兴的Ingress Controller,它主要对标Kong Ingress。它具有非常强大的路由能力、灵活的插件拓展能力,在性能上表现也非常优秀。同时,它的缺点也非常明显,尽管APISIX开源后有非常多的功能,但是缺少落地案例,没有相关的文档指引大家如何使用这些功能。

四、ingress nginx 原理解析

nginx-ingress 模块在运行时主要包括三个主体:NginxController、Store、SyncQueue。

Store 主要负责从 kubernetes APIServer 收集运行时信息,感知各类资源(如 ingress、service等)的变化,并及时将更新事件消息(event)写入一个环形管道;

NginxController 作为中间的联系者,监听 updateChannel,一旦收到配置更新事件,就向同步队列 syncQueue 里写入一个更新请求。

SyncQueue :

  1. 协程定期扫描 syncQueue 队列,发现有任务就执行更新操作
  2. 借助 Store 完成最新运行数据的拉取(一般为新写入信息)

然后根据一定的规则产生新的 nginx 配置,(有些更新必须 reload,就本地写入新配置,执行 reload),然后执行动态更新操作,即构造 POST 数据,向本地 Nginx Lua 服务模块发送 post 请求,实现配置更新;

Lua 是一种轻量小巧的脚本语言,用标准C语言编写并以源代码形式开放,其设计目的是为了嵌入应用程序中,从而为应用程序提供灵活的扩展和定制功能。ingress nginx controller 嵌入多个lua脚本。下面对整个lua脚本处理过程做个简单梳理。

  • init_by_lua*:初始化 nginx 和预加载 lua(nginx 启动和 reload 时执行);

  • init_worker_by_lua*:每个工作进程(worker_processes)被创建时执行,用于启动一些定时任务,

    比如心跳检查,后端服务的健康检查,定时拉取服务器配置等;

  • ssl_certificate_by_lua*:对 https 请求的处理,即将启动下游 SSL(https)连接的 SSL 握手时执行,用例:按照每个请求设置 SSL 证书链和相应的私钥,按照 SSL 协议有选择的拒绝请求等;

  • set_by_lua*:设置 nginx 变量;

  • rewrite_by_lua*:重写请求(从原生 nginx 的 rewrite 阶段进入),执行内部 URL 重写或者外部重定向,典型的如伪静态化的 URL 重写;

  • access_by_lua*:处理请求(和 rewrite_by_lua 可以实现相同的功能,从原生 nginx 的 access阶段进入);

  • content_by_lua*:执行业务逻辑并产生响应,类似于 jsp 中的 servlet;

  • balancer_by_lua*:负载均衡;

  • header_filter_by_lua*:处理响应头;

  • body_filter_by_lua*:处理响应体;

  • log_by_lua*:记录访问日志

点击关注,第一时间了解华为云新鲜技术~

MinIO FTP 断点续传

对于minio来说,使用minio官方的Java SDK和开启FTP都是不支持断点续传的。对于要实现http接口的断点续传,可以通过调用Amazon S3 REST API来实现,可以参考开源项目:
https://gitee.com/Gary2016/minio-upload

本文是关于FTP断点续传。

FTP断点续传方案

启动一个FTP服务器,此FTP支持断点续传。然后将FTP上传的文件同步到MinIO

同步的方式有两种:

  • 通过定时任务扫描指定目录(ftp上传时也上传到指定目录),如果有更新时间大于Minio中最新对象的上传时间的,那么就说明应该将他同步到Minio上
  • 提供一个按钮,给用户可以手动刷新,触发ftp指定文件夹下的“符合条件的”文件同步到Minio

实现

下面给出定时任务的代码,基本流程是:

  1. 每一个minio object的信息我都在数据库中记录。我先从数据库中查询最新上传的minio的object的date
  2. Java扫描ftp约定好上传的目录,如果文件的modify time 大于 minio object最新上传的 time,那么说明此文件应该同步到上传到minio上
  3. 拿到这些应该上传到minio 的file,for循环以此上传即可。

代码如下:

    @Value("${ftpDirPath}")
    private String ftpDirPath;

    MinioClient minioClient;
    @PostConstruct
    void init() {
        minioClient = MinioClient.builder()
                .endpoint("http://" + minioAddress)
                .credentials(minioAccessKey, minioSecretKey)
                .build();
    }

	@SneakyThrows
    @Scheduled(fixedDelay = 60 * 60 * 1000, initialDelay = 10 * 60 * 1000)
    public void checkFtpServer() {
        log.info("Check ftp server /opt/ftp directory have new file upload.");
        // get latest time form minio_object table. if file update time is bigger than minio_object latest time.
        // then we should upload the file to minio.
        // notice: if i use update time, I should ensure linux date is same as database date (notice same timezone!!)
        MinioObjectDO latestDateDO = minioObjectDao.getLatestDate();
        long latestTime;
        if (latestDateDO == null) {
            latestTime = 0L;
        } else {
            latestTime = latestDateDO.getUploadTime().getTime();
        }
        LinkedList<File> needUploadToMinioFile = getDirAllFileFilterWithLastModify(ftpDirPath, latestTime);

        // upload file to minio
        for (File file : needUploadToMinioFile) {
            InputStream initialStream = Files.newInputStream(file.toPath());
            minioClient.putObject(
                    PutObjectArgs.builder().bucket("cogent").object(removeFtpPath(file.getAbsolutePath())).stream(
                                    initialStream, -1, 10485760)
                            .build());

            initialStream.close();
            log.info("upload file: {} successfully", file.getName());
        }
    }

    private String removeFtpPath(String absolutePath) {
        return absolutePath.substring(ftpDirPath.length() + 1);
    }

    private LinkedList<File> getDirAllFileFilterWithLastModify(String ftpDirPath,long latestTime) {
        File dirPath = new File(ftpDirPath);
        // 2023-12-01 时间戳
        long time = latestTime;
        LinkedList<File> filteredFiles = new LinkedList<>();
        process(dirPath, filteredFiles, time);
        return filteredFiles;
    }

    private void process(File dirPath, LinkedList<File> filteredFiles, long time) {
        File[] files = dirPath.listFiles();
        for (File file : files) {
            if (file.isDirectory()) {
                process(file, filteredFiles, time);
            } else {
                if (file.lastModified() >= time) {
                    filteredFiles.add(file);
                }
            }
        }
    }

这里只放定时任务的。

issue

关于断点续传只上传了部分文件

ftp断点续传只上传了部分文件,然后这部分文件被同步到了minio上。这其实没有问题,如果ftp接着上传剩下的文件,那么文件的updateTime就会修改,那么下次再同步时会再次上传此文件,对于同名的object,minio进行覆盖。