2024年2月

全新研发
flutter3+dart3+photo_view
跨多端
仿微信App
界面聊天
Flutter3-Chat

flutter3-chat
基于最新跨全平台技术
flutter3+dart3+material-design+shared_preferences+easy_refresh
构建的仿微信APP界面聊天实例项目。实现
发送图文表情消息/gif大图、长按仿微信语音操作面板、图片预览、红包及朋友圈
等功能。

技术架构

  • 编辑器:Vscode
  • 框架技术:Flutter3.16.5+Dart3.2.3
  • UI组件库:material-design3
  • 弹窗组件:showDialog/SimpleDialog/showModalBottomSheet/AlertDialog
  • 图片预览:photo_view^0.14.0
  • 本地缓存:shared_preferences^2.2.2
  • 下拉刷新:easy_refresh^3.3.4
  • toast提示:toast^0.3.0
  • 网址预览组件:url_launcher^6.2.4

Flutter3.x开发跨平台项目,性能有了大幅度提升,官方支持编译到android/ios/macos/windows/linux/web等多平台,未来可期!
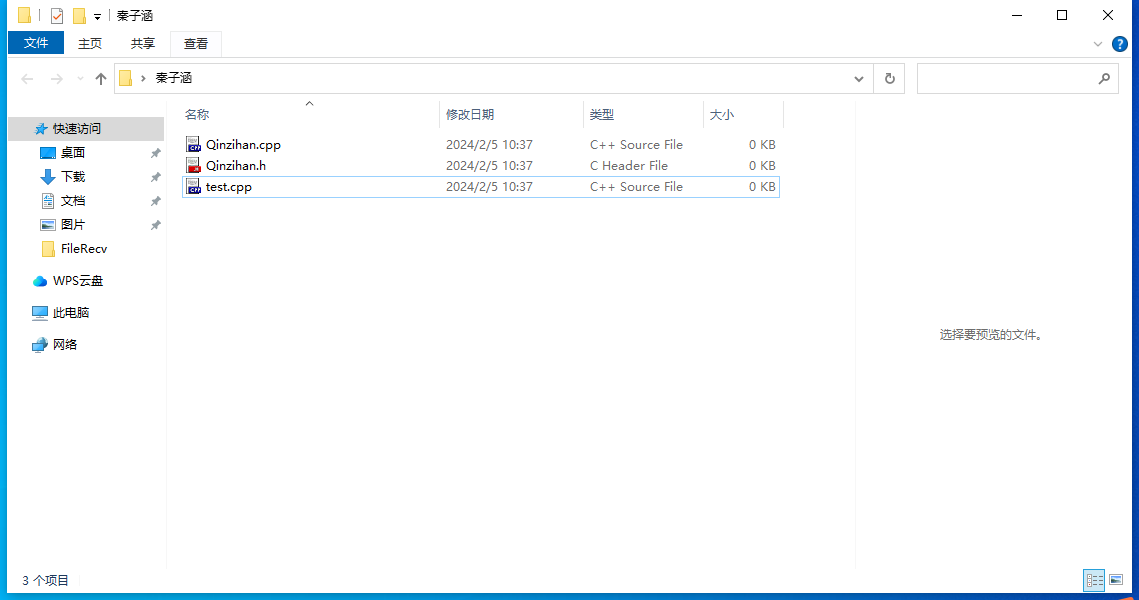
项目构建目录

通过
flutter create app_project
命令即可快速创建一个跨平台初始化项目。

通过命令创建项目后,项目结构就如上图所示。

需要注意:flutter项目基于dart语音开发,需要首先配置Dart SDK和Flutter SDK开发环境,大家可以去官网查看配置文档。

https://flutter.dev/

https://flutter.cn/

https://pub.flutter-io.cn/

https://www.dartcn.com/

另外使用VScode编辑器开发项目,可自行安装Flutter / Dart扩展插件。

由于flutter3支持编译到windows,大家可以开发初期在windows上面调试,后期release apk到手机上。

通过如下命令即可运行到windows平台

flutter run -d windows

运行后默认窗口大小为1280x720,可以修改
windows/runner/main.cpp
文件里面的窗口尺寸。

同样,可以通过
flutter run -d chrome
命令运行到web上预览。

假如在没有真机的情况下,我们可以选择模拟器调试。目前市面上有很多类型模拟器,他们使用adb连接时都会有不同的默认端口,下面列出了一些常用的模拟器及端口号。通过adb connect连接上指定模拟器之后,执行flutter run命令即可运行项目到模拟器上面。

flutter3实现圆角文本框及渐变按钮

Container(
height:
40.0,
margin:
const EdgeInsets.symmetric(vertical: 5.0, horizontal: 30.0),
decoration: BoxDecoration(
color: Colors.white,
border: Border.all(color:
const Color(0xffdddddd)),
borderRadius: BorderRadius.circular(
15.0),
),
child: Row(
children: [
Expanded(
child: TextField(
keyboardType: TextInputType.phone,
controller: fieldController,
decoration: InputDecoration(
hintText:
'输入手机号',
suffixIcon: Visibility(
visible: authObj[
'tel'].isNotEmpty,
child: InkWell(
hoverColor: Colors.transparent,
highlightColor: Colors.transparent,
splashColor: Colors.transparent,
onTap: handleClear,
child:
const Icon(Icons.clear, size: 16.0,),
)
),
contentPadding:
const EdgeInsets.symmetric(vertical: 0, horizontal: 12.0),
border:
constOutlineInputBorder(borderSide: BorderSide.none),
),
onChanged: (value) {
setState(() {
authObj[
'tel'] =value;
});
},
),
)
],
),
),

按钮渐变则是通过Container组件的decotaion里面的
gradient
属性设置渐变效果。

Container(
margin:
const EdgeInsets.symmetric(vertical: 10.0, horizontal: 30.0),
decoration: BoxDecoration(
borderRadius: BorderRadius.circular(
15.0),//自定义按钮渐变色 gradient: constLinearGradient(
begin: Alignment.topLeft,
end: Alignment.bottomRight,
colors: [
Color(
0xFF0091EA), Color(0xFF07C160)
],
)
),
child: SizedBox(
width:
double.infinity,
height:
45.0,
child: FilledButton(
style: ButtonStyle(
backgroundColor: MaterialStateProperty.all(Colors.transparent),
shadowColor: MaterialStateProperty.all(Colors.transparent),
shape: MaterialStatePropertyAll(
RoundedRectangleBorder(borderRadius: BorderRadius.circular(
15.0))
)
),
onPressed: handleSubmit,
child:
const Text('登录', style: TextStyle(fontSize: 18.0),),
),
)
),

flutter实现60s倒计时发送验证码功能。

Timer?timer;
String vcodeText
= '获取验证码';bool disabled = false;int time = 60;//60s倒计时 voidhandleVcode() {if(authObj['tel'] == '') {
snackbar(
'手机号不能为空');
}
else if(!Utils.checkTel(authObj['tel'])) {
snackbar(
'手机号格式不正确');
}
else{
setState(() {
disabled
= true;
});
startTimer();
}
}
startTimer() {
timer
= Timer.periodic(const Duration(seconds: 1), (timer) {
setState(() {
if(time > 0) {
vcodeText
= '获取验证码(${time--})';
}
else{
vcodeText
= '获取验证码';
time
= 60;
disabled
= false;
timer.cancel();
}
});
});
snackbar(
'短信验证码已发送,请注意查收', color: Colors.green);
}

Flutter3沉浸式渐变状态导航栏

要实现如上图渐变AppBar也非常简单,只需要配置AppBar提供的可伸缩灵活区域属性
flexibleSpace
配合gradient即可快速实现渐变导航栏。

AppBar(
title: Text(
'Flutter3-Chat'),
flexibleSpace: Container(
decoration:
constBoxDecoration(
gradient: LinearGradient(
begin: Alignment.topLeft,
end: Alignment.bottomRight,
colors: [
Color(
0xFF0091EA), Color(0xFF07C160)
],
)
),
)
),

Flutter3字体图标/自定义badge

flutter内置了丰富的字体图标,通过图标组件
Icon(Icons.add)
引入即可使用。

https://api.flutter-io.cn/flutter/material/Icons-class.html

另外还支持通过自定义IconData方式自定义图标,如使用阿里iconfont图表库图标。

Icon(IconData(
0xe666
, fontFamily:
'
iconfont
'
), size:
18.0
)

把下载的字体文件放到assets目录,


pubspec.yaml
中引入字体文件。

classFStyle {//自定义iconfont图标
  static iconfont(int codePoint, {double size = 16.0, Color?color}) {returnIcon(
IconData(codePoint, fontFamily:
'iconfont', matchTextDirection: true),
size: size,
color: color,
);
}
//自定义Badge红点 static badge(intcount, {
Color color
=Colors.redAccent,bool isdot = false,double height = 18.0,double width = 18.0}) {
final num
= count > 99 ? '99+': count;returnContainer(
alignment: Alignment.center,
height: isdot
? height / 2: height,
width: isdot
? width / 2: width,
decoration: BoxDecoration(color: color, borderRadius: BorderRadius.circular(
100.00)),
child: isdot
? null : Text('$num', style: const TextStyle(color: Colors.white, fontSize: 12.0)),
);
}
}

FStyle.badge(23)
FStyle.badge(
2, color: Colors.pink, height: 10.0, width: 10.0)
FStyle.badge(
0, isdot: true)

Flutter仿微信PopupMenu下拉菜单/下拉刷新

通过flutter提供的
PopupMenuButton
组件实现下拉菜单功能。

PopupMenuButton(
icon: FStyle.iconfont(
0xe62d, size: 17.0),
offset:
const Offset(0, 50.0),
tooltip:
'',
color:
const Color(0xFF353535),
itemBuilder: (BuildContext context) {
return <PopupMenuItem>[
popupMenuItem(
0xe666, '发起群聊', 0),
popupMenuItem(
0xe75c, '添加朋友', 1),
popupMenuItem(
0xe603, '扫一扫', 2),
popupMenuItem(
0xe6ab, '收付款', 3),
];
},
onSelected: (value) {
switch(value) {case 0:
print(
'发起群聊');break;case 1:
Navigator.pushNamed(context,
'/addfriends');break;case 2:
print(
'扫一扫');break;case 3:
print(
'收付款');break;
}
},
)
//下拉菜单项
static popupMenuItem(intcodePoint, String title, value) {returnPopupMenuItem(
value: value,
child: Row(
mainAxisAlignment: MainAxisAlignment.start,
children: [
const SizedBox(width: 10.0,),
FStyle.iconfont(codePoint, size:
21.0, color: Colors.white),const SizedBox(width: 10.0,),
Text(title, style:
const TextStyle(fontSize: 16.0, color: Colors.white),),
],
),
);
}

如上图:下拉刷新、上拉加载更多是通过
easy_refresh
组件实现功能。

EasyRefresh(//下拉加载提示
  header: constClassicHeader(//showMessage: false,
),//加载更多提示
footer: ClassicFooter(),//下拉刷新逻辑
onRefresh: () async {//...下拉逻辑
    await Future.delayed(const Duration(seconds: 2));
},
//上拉加载逻辑 onLoad: () async {//... },
child: ListView.builder(
itemCount: chatList.length,
itemBuilder: (context, index) {
returnInk(//... );
},
),
)

如上图:弹窗功能均是自定义AlertDialog实现效果。通过
无限制容器UnconstrainedBox配合SizedBox组件实现自定义窗口大小。

//关于弹窗
voidaboutAlertDialog(BuildContext context) {
showDialog(
context: context,
builder: (context) {
returnUnconstrainedBox(
constrainedAxis: Axis.vertical,
child: SizedBox(
width:
320.0,
child: AlertDialog(
contentPadding:
const EdgeInsets.symmetric(horizontal: 10.0, vertical: 20.0),
backgroundColor: Colors.white,
surfaceTintColor: Colors.white,
shape: RoundedRectangleBorder(borderRadius: BorderRadius.circular(
12.0)),
content: Padding(
padding:
const EdgeInsets.symmetric(horizontal: 10.0),
child: Column(
mainAxisSize: MainAxisSize.min,
children: [
Image.asset(
'assets/images/logo.png', width: 90.0, height: 90.0, fit: BoxFit.cover,),const SizedBox(height: 10.0),const Text('Flutter3-WChat', style: TextStyle(color: Color(0xFF0091EA), fontSize: 22.0),),const SizedBox(height: 5.0),const Text('基于flutter3+dart3开发跨平台仿微信App聊天实例。', style: TextStyle(color: Colors.black45),),const SizedBox(height: 20.0),
Text(
'©2024/01 Andy Q: 282310962', style: TextStyle(color: Colors.grey[400], fontSize: 12.0),),
],
),
),
),
),
);
}
);
}
//二维码名片弹窗 voidqrcodeAlertDialog(BuildContext context) {
showDialog(
context: context,
builder: (context) {
returnUnconstrainedBox(
constrainedAxis: Axis.vertical,
child: SizedBox(
width:
320.0,
child: AlertDialog(
contentPadding:
const EdgeInsets.symmetric(horizontal: 10.0, vertical: 20.0),
backgroundColor:
const Color(0xFF07C160),
surfaceTintColor:
const Color(0xFF07C160),
shape: RoundedRectangleBorder(borderRadius: BorderRadius.circular(
3.0)),
content: Padding(
padding:
const EdgeInsets.symmetric(horizontal: 10.0),
child: Column(
mainAxisSize: MainAxisSize.min,
children: [
Image.asset(
'assets/images/qrcode.png', width: 250.0, fit: BoxFit.cover,),const SizedBox(height: 15.0),const Text('扫一扫,加我公众号', style: TextStyle(color: Colors.white60, fontSize: 14.0,),),
],
),
),
),
),
);
}
);
}
//退出登录弹窗 voidlogoutAlertDialog(BuildContext context) {
showDialog(
context: context,
builder: (context) {
returnAlertDialog(
content:
const Text('确定要退出登录吗?', style: TextStyle(fontSize: 16.0),),
backgroundColor: Colors.white,
surfaceTintColor: Colors.white,
shape: RoundedRectangleBorder(borderRadius: BorderRadius.circular(
12.0)),
elevation:
2.0,
actionsPadding:
const EdgeInsets.all(15.0),
actions: [
TextButton(
onPressed: () {Navigator.of(context).pop();},
child:
const Text('取消', style: TextStyle(color: Colors.black54),)
),
TextButton(
onPressed: handleLogout,
child:
const Text('退出登录', style: TextStyle(color: Colors.red),)
),
],
);
}
);
}

flutter实现微信朋友圈九宫格

GroupZone(images: item['images']),

GroupZone(
images: uploadList,
album:
true,
onChoose: () async {
Toast.show(
'选择手机相册图片', duration: 2, gravity: 1);
},
),

//创建可点击预览图片
createImage(BuildContext context, String img, intkey) {returnGestureDetector(
child: Hero(
tag: img,
//放大缩小动画效果标识 child: img == '+' ?Container(color: Colors.transparent, child:const Icon(Icons.add, size: 30.0, color: Colors.black45),)
:
Image.asset(
img,
width: width,
fit: BoxFit.contain,
),
),
onTap: () {
//选择图片 if(img == '+') {
onChoose
!();
}
else{
Navigator.of(context).push(FadeRoute(route: ImageViewer(
images: album
? imgList!.sublist(0, imgList!.length - 1) : imgList,
index: key,
)));
}
},
);
}

使用
photo_view
插件实现预览大图功能,支持预览单张及多张大图。

import 'package:flutter/material.dart';
import
'package:photo_view/photo_view.dart';
import
'package:photo_view/photo_view_gallery.dart';classImageViewer extends StatefulWidget {constImageViewer({
super.key,
this.images,this.index = 0,
});

final List
? images; //预览图列表 final int index; //当前预览图索引 @override
State
<ImageViewer> createState() =>_ImageViewerState();
}
class _ImageViewerState extends State<ImageViewer>{int currentIndex = 0;

@override
voidinitState() {
super.initState();
currentIndex
=widget.index;
}

@override
Widget build(BuildContext context) {
var imgCount = widget.images?.length;returnScaffold(
body: Stack(
children: [
Positioned(
top:
0,
left:
0,
bottom:
0,
right:
0,
child: GestureDetector(
child: imgCount
== 1 ?PhotoView(
imageProvider: AssetImage(widget.images
![0]),
backgroundDecoration:
constBoxDecoration(
color: Colors.black,
),
minScale: PhotoViewComputedScale.contained,
maxScale: PhotoViewComputedScale.covered
* 2,
heroAttributes: PhotoViewHeroAttributes(tag: widget.images
![0]),
enableRotation:
true,
)
:
PhotoViewGallery.builder(
itemCount: widget.images
?.length,
builder: (context, index) {
returnPhotoViewGalleryPageOptions(
imageProvider: AssetImage(widget.images
![index]),
minScale: PhotoViewComputedScale.contained,
maxScale: PhotoViewComputedScale.covered
* 2,
heroAttributes: PhotoViewHeroAttributes(tag: widget.images
![index]),
);
},
scrollPhysics:
constBouncingScrollPhysics(),
backgroundDecoration:
constBoxDecoration(
color: Colors.black,
),
pageController: PageController(initialPage: widget.index),
enableRotation:
true,
onPageChanged: (index) {
setState(() {
currentIndex
=index;
});
},
),
onTap: () {
Navigator.of(context).pop();
},
),
),
//图片索引index Positioned(
top: MediaQuery.of(context).padding.top
+ 15,
width: MediaQuery.of(context).size.width,
child: Center(
child: Visibility(
visible: imgCount
! > 1 ? true : false,
child: Text(
'${currentIndex+1} / ${widget.images?.length}', style: const TextStyle(color: Colors.white)),
)
),
),
],
),
);
}
}

flutter3聊天模块

文本框TextField设置maxLines: null即可实现多行文本输入,支持图文emoj混排,网址连接识别等功能。

//输入框
Offstage(
offstage: voiceBtnEnable,
child: TextField(
decoration:
constInputDecoration(
isDense:
true,
hoverColor: Colors.transparent,
contentPadding: EdgeInsets.all(
8.0),
border: OutlineInputBorder(borderSide: BorderSide.none),
),
style:
const TextStyle(fontSize: 16.0,),
maxLines:
null,
controller: editorController,
focusNode: editorFocusNode,
cursorColor:
const Color(0xFF07C160),
onChanged: (value) {},
),
),

支持仿微信语音按住说话,左滑取消发送、右滑转换语音功能。

//语音
Offstage(
offstage:
!voiceBtnEnable,
child: GestureDetector(
child: Container(
decoration: BoxDecoration(
color: Colors.white,
borderRadius: BorderRadius.circular(
5),
),
alignment: Alignment.center,
height:
40.0,
width:
double.infinity,
child: Text(voiceTypeMap[voiceType], style:
const TextStyle(fontSize: 15.0),),
),
onPanStart: (details) {
setState(() {
voiceType
= 1;
voicePanelEnable
= true;
});
},
onPanUpdate: (details) {
Offset pos
=details.globalPosition;double swipeY = MediaQuery.of(context).size.height - 120;double swipeX = MediaQuery.of(context).size.width / 2 + 50;
setState(() {
if(pos.dy >=swipeY) {
voiceType
= 1; //松开发送 }else if (pos.dy < swipeY && pos.dx <swipeX) {
voiceType
= 2; //左滑松开取消 }else if (pos.dy < swipeY && pos.dx >=swipeX) {
voiceType
= 3; //右滑语音转文字 }
});
},
onPanEnd: (details) {
//print('停止录音'); setState(() {switch(voiceType) {case 1:
Toast.show(
'发送录音文件', duration: 1, gravity: 1);
voicePanelEnable
= false;break;case 2:
Toast.show(
'取消发送', duration: 1, gravity: 1);
voicePanelEnable
= false;break;case 3:
Toast.show(
'语音转文字', duration: 1, gravity: 1);
voicePanelEnable
= true;
voiceToTransfer
= true;break;
}
voiceType
= 0;
});
},
),
),

按住录音显示面板

//录音主体(按住说话/松开取消/语音转文本)
Visibility(
visible: voicePanelEnable,
child: Material(
color:
const Color(0xDD1B1B1B),
child: Stack(
children: [
//取消发送+语音转文字 Positioned(
bottom:
120,
left:
30,
right:
30,
child: Visibility(
visible:
!voiceToTransfer,
child: Column(
children: [
//语音动画层 Stack(
children: [
Container(
height:
70.0,
margin:
const EdgeInsets.symmetric(horizontal: 50.0),
decoration: BoxDecoration(
color: Colors.white,
borderRadius: BorderRadius.circular(
15.0),
),
child: Row(
mainAxisAlignment: MainAxisAlignment.center,
children: [
Image.asset(
'assets/images/voice_record.gif', height: 30.0,)
],
),
),
Positioned(
right: (MediaQuery.of(context).size.width
- 60) / 2,
bottom:
1,
child: RotatedBox(
quarterTurns:
0,
child: CustomPaint(painter: ArrowShape(arrowColor: Colors.white, arrowSize:
10.0)),
)
),
],
),
const SizedBox(height: 50.0,),//操作项 Row(
mainAxisAlignment: MainAxisAlignment.spaceBetween,
children: [
//取消发送 Container(
height:
60.0,
width:
60.0,
decoration: BoxDecoration(
borderRadius: BorderRadius.circular(
50.0),
color: voiceType
== 2 ?Colors.red : Colors.black38,
),
child:
constIcon(Icons.close, color: Colors.white54,),
),
//语音转文字 Container(
height:
60.0,
width:
60.0,
decoration: BoxDecoration(
borderRadius: BorderRadius.circular(
50.0),
color: voiceType
== 3 ?Colors.green : Colors.black38,
),
child:
constIcon(Icons.translate, color: Colors.white54,),
),
],
),
],
),
),
),
//语音转文字(识别结果状态) Positioned(
bottom:
120,
left:
30,
right:
30,
child: Visibility(
visible: voiceToTransfer,
child: Column(
children: [
//提示结果 Stack(
children: [
Container(
height:
100.0,
decoration: BoxDecoration(
color: Colors.red,
borderRadius: BorderRadius.circular(
15.0),
),
child:
constRow(
mainAxisAlignment: MainAxisAlignment.center,
children: [
Icon(Icons.info, color: Colors.white,),
Text(
'未识别到文字。', style: TextStyle(color: Colors.white),),
],
),
),
Positioned(
right:
35.0,
bottom:
1,
child: RotatedBox(
quarterTurns:
0,
child: CustomPaint(painter: ArrowShape(arrowColor: Colors.red, arrowSize:
10.0)),
)
),
],
),
const SizedBox(height: 50.0,),//操作项 Row(
mainAxisAlignment: MainAxisAlignment.spaceBetween,
children: [
GestureDetector(
child: Container(
height:
60.0,
width:
60.0,
decoration:
constBoxDecoration(
color: Colors.transparent,
),
child:
constColumn(
mainAxisAlignment: MainAxisAlignment.center,
children: [
Icon(Icons.undo, color: Colors.white54,),
Text(
'取消', style: TextStyle(color: Colors.white70),)
],
),
),
onTap: () {
setState(() {
voicePanelEnable
= false;
voiceToTransfer
= false;
});
},
),
GestureDetector(
child: Container(
height:
60.0,
width:
100.0,
decoration:
constBoxDecoration(
color: Colors.transparent,
),
child:
constColumn(
mainAxisAlignment: MainAxisAlignment.center,
children: [
Icon(Icons.graphic_eq_rounded, color: Colors.white54,),
Text(
'发送原语音', style: TextStyle(color: Colors.white70),)
],
),
),
onTap: () {},
),
GestureDetector(
child: Container(
height:
60.0,
width:
60.0,
decoration: BoxDecoration(
borderRadius: BorderRadius.circular(
50.0),
color: Colors.white12,
),
child:
constIcon(Icons.check, color: Colors.white12,),
),
onTap: () {},
),
],
),
],
),
),
),
//提示文字(操作状态) Positioned(
bottom:
120,
left:
0,
width: MediaQuery.of(context).size.width,
child: Visibility(
visible:
!voiceToTransfer,
child: Align(
child: Text(voiceTypeMap[voiceType], style:
constTextStyle(color: Colors.white70),),
),
),
),
//背景 Align(
alignment: Alignment.bottomCenter,
child: Visibility(
visible:
!voiceToTransfer,
child: Image.asset(
'assets/images/voice_record_bg.webp', width: double.infinity, height: 100.0, fit: BoxFit.fill),
),
),
//背景图标 Positioned(
bottom:
25,
left:
0,
width: MediaQuery.of(context).size.width,
child: Visibility(
visible:
!voiceToTransfer,
child:
constAlign(
child: Icon(Icons.graphic_eq_rounded, color: Colors.black54,),
),
),
),
],
),
),
)

flutter3绘制箭头

聊天模块消息及各种箭头展示,通过flutter提供的画板功能绘制箭头。

//绘制气泡箭头
classArrowShape extends CustomPainter {
ArrowShape({
required
this.arrowColor,this.arrowSize = 7,
});

final Color arrowColor;
//箭头颜色 final double arrowSize; //箭头大小 @overridevoidpaint(Canvas canvas, Size size) {var paint = Paint()..color =arrowColor;var path =Path();
path.lineTo(
-arrowSize, 0);
path.lineTo(
0, arrowSize);
path.lineTo(arrowSize,
0);
canvas.drawPath(path, paint);
}

@override
boolshouldRepaint(CustomPainter oldDelegate) {return false;
}
}


Okay,以上就是Flutter3+Dart3开发全平台聊天App实例的一些知识分享,希望对大家有所帮助哈~~

Redis的Java客户端-Jedis


Redis官网
中提供了各种语言的客户端,地址:
https://redis.io/docs/clients/

其中Java客户端也包含很多:

标记为

的就是推荐使用的java客户端,包括:

  • Jedis和Lettuce:这两个主要是提供了Redis命令对应的API,方便我们操作Redis,而SpringDataRedis是对这两种做了抽象和封装。
  • Redisson:是在Redis基础上实现了分布式的可伸缩的java数据结构,例如Map.Queue等,而且支持跨进程的同步机制:Lock.Semaphore等待,比较适合用来实现特殊的功能需求。

Jedis快速入门

入门案例详细步骤

案例分析:

0)创建工程:

1)引入依赖:

<!--jedis-->
<dependency>
    <groupId>redis.clients</groupId>
    <artifactId>jedis</artifactId>
    <version>3.7.0</version>
</dependency>
<!--单元测试-->
<dependency>
    <groupId>org.junit.jupiter</groupId>
    <artifactId>junit-jupiter</artifactId>
    <version>5.7.0</version>
    <scope>test</scope>
</dependency>

2)建立连接

新建一个单元测试类,内容如下:

private Jedis jedis;

@BeforeEach
void setUp() {
    // 1.建立连接
    // jedis = new Jedis("192.168.150.101", 6379);
    jedis = JedisConnectionFactory.getJedis();
    // 2.设置密码
    jedis.auth("123321");
    // 3.选择库
    jedis.select(0);
}

3)测试:

@Test
void testString() {
    // 存入数据
    String result = jedis.set("name", "虎哥");
    System.out.println("result = " + result);
    // 获取数据
    String name = jedis.get("name");
    System.out.println("name = " + name);
}

@Test
void testHash() {
    // 插入hash数据
    jedis.hset("user:1", "name", "Jack");
    jedis.hset("user:1", "age", "21");

    // 获取
    Map<String, String> map = jedis.hgetAll("user:1");
    System.out.println(map);
}

4)释放资源

@AfterEach
void tearDown() {
    if (jedis != null) {
        jedis.close();
    }
}

Jedis连接池

Jedis本身是线程不安全的,并且频繁的创建和销毁连接会有性能损耗,因此推荐大家使用Jedis连接池代替Jedis的直连方式

有关池化思想,并不仅仅是这里会使用,很多地方都有,比如说我们的数据库连接池,比如我们tomcat中的线程池,这些都是池化思想的体现。

创建Jedis的连接池

public class JedisConnectionFacotry {

     private static final JedisPool jedisPool;

     static {
         //配置连接池
         JedisPoolConfig poolConfig = new JedisPoolConfig();
         poolConfig.setMaxTotal(8);
         poolConfig.setMaxIdle(8);
         poolConfig.setMinIdle(0);
         poolConfig.setMaxWaitMillis(1000);
         //创建连接池对象
         jedisPool = new JedisPool(poolConfig,
                 "192.168.150.101",6379,1000,"123321");
     }

     public static Jedis getJedis(){
          return jedisPool.getResource();
     }
}

代码说明:

  • 1) JedisConnectionFacotry:工厂设计模式是实际开发中非常常用的一种设计模式,我们可以使用工厂,去降低代的耦合,比如Spring中的Bean的创建,就用到了工厂设计模式

  • 2)静态代码块:随着类的加载而加载,确保只能执行一次,在加载当前工厂类的时候,就可以执行static的操作完成对 连接池的初始化

  • 3)最后提供返回连接池中连接的方法.

改造原始代码

代码说明:

1.在完成了使用工厂设计模式来完成代码的编写之后,获得连接时,就可以通过工厂来获得。

而不用直接去new对象,降低耦合,并且使用的还是连接池对象。

2.当我们使用了连接池后,当我们关闭连接其实并不是关闭,而是将Jedis还回连接池的。

    @BeforeEach
    void setUp(){
        //建立连接
        /*jedis = new Jedis("127.0.0.1",6379);*/
        jedis = JedisConnectionFacotry.getJedis();
         //选择库
        jedis.select(0);
    }

   @AfterEach
    void tearDown() {
        if (jedis != null) {
            jedis.close();
        }
    }

Redis的Java客户端-SpringDataRedis

SpringData是Spring中数据操作的模块,包含对各种数据库的集成,其中对Redis的集成模块就叫做SpringDataRedis,

官网地址

https://spring.io/projects/spring-data-redis

  • 提供了对不同Redis客户端的整合(Lettuce和Jedis)
  • 提供了RedisTemplate统一API来操作Redis
  • 支持Redis的发布订阅模型
  • 支持Redis哨兵和Redis集群
  • 支持基于Lettuce的响应式编程
  • 支持基于JDK.JSON.字符串.Spring对象的数据序列化及反序列化
  • 支持基于Redis的JDKCollection实现

SpringDataRedis中提供了RedisTemplate工具类,其中封装了各种对Redis的操作。并且将不同数据类型的操作API封装到了不同的类型中:

快速入门

SpringBoot已经提供了对SpringDataRedis的支持,使用非常简单:

  • 导入pom坐标
<?xml version="1.0" encoding="UTF-8"?>
<project xmlns="http://maven.apache.org/POM/4.0.0" xmlns:xsi="http://www.w3.org/2001/XMLSchema-instance"
         xsi:schemaLocation="http://maven.apache.org/POM/4.0.0 https://maven.apache.org/xsd/maven-4.0.0.xsd">
    <modelVersion>4.0.0</modelVersion>
    <parent>
        <groupId>org.springframework.boot</groupId>
        <artifactId>spring-boot-starter-parent</artifactId>
        <version>2.5.7</version>
        <relativePath/> <!-- lookup parent from repository -->
    </parent>
    <groupId>com.zhangsan</groupId>
    <artifactId>redis-demo</artifactId>
    <version>0.0.1-SNAPSHOT</version>
    <name>redis-demo</name>
    <description>Demo project for Spring Boot</description>
    <properties>
        <java.version>1.8</java.version>
    </properties>
    <dependencies>
        <!--redis依赖-->
        <dependency>
            <groupId>org.springframework.boot</groupId>
            <artifactId>spring-boot-starter-data-redis</artifactId>
        </dependency>
        <!--common-pool-->
        <dependency>
            <groupId>org.apache.commons</groupId>
            <artifactId>commons-pool2</artifactId>
        </dependency>
        <!--Jackson依赖-->
        <dependency>
            <groupId>com.fasterxml.jackson.core</groupId>
            <artifactId>jackson-databind</artifactId>
        </dependency>
        <dependency>
            <groupId>org.projectlombok</groupId>
            <artifactId>lombok</artifactId>
            <optional>true</optional>
        </dependency>
        <dependency>
            <groupId>org.springframework.boot</groupId>
            <artifactId>spring-boot-starter-test</artifactId>
            <scope>test</scope>
        </dependency>
    </dependencies>

    <build>
        <plugins>
            <plugin>
                <groupId>org.springframework.boot</groupId>
                <artifactId>spring-boot-maven-plugin</artifactId>
                <configuration>
                    <excludes>
                        <exclude>
                            <groupId>org.projectlombok</groupId>
                            <artifactId>lombok</artifactId>
                        </exclude>
                    </excludes>
                </configuration>
            </plugin>
        </plugins>
    </build>

</project>

配置文件

spring:
  redis:
    host: 192.168.150.101
    port: 6379
    password: 123321
    lettuce:
      pool:
        max-active: 8  #最大连接
        max-idle: 8   #最大空闲连接
        min-idle: 0   #最小空闲连接
        max-wait: 100ms #连接等待时间

测试代码

@SpringBootTest
class RedisDemoApplicationTests {

    @Autowired
    private RedisTemplate<String, Object> redisTemplate;

    @Test
    void testString() {
        // 写入一条String数据
        redisTemplate.opsForValue().set("name", "虎哥");
        // 获取string数据
        Object name = redisTemplate.opsForValue().get("name");
        System.out.println("name = " + name);
    }
}

贴心小提示:SpringDataJpa使用起来非常简单,记住如下几个步骤即可

SpringDataRedis的使用步骤:

  • 引入spring-boot-starter-data-redis依赖
  • 在application.yml配置Redis信息
  • 注入RedisTemplate

数据序列化器

RedisTemplate可以接收任意Object作为值写入Redis:

只不过写入前会把Object序列化为字节形式,默认是采用JDK序列化,得到的结果是这样的:

缺点:

  • 可读性差
  • 内存占用较大

可以自定义RedisTemplate的序列化方式,代码如下:

@Configuration
public class RedisConfig {

    @Bean
    public RedisTemplate<String, Object> redisTemplate(RedisConnectionFactory connectionFactory){
        // 创建RedisTemplate对象
        RedisTemplate<String, Object> template = new RedisTemplate<>();
        // 设置连接工厂
        template.setConnectionFactory(connectionFactory);
        // 创建JSON序列化工具
        GenericJackson2JsonRedisSerializer jsonRedisSerializer = 
            							new GenericJackson2JsonRedisSerializer();
        // 设置Key的序列化
        template.setKeySerializer(RedisSerializer.string());
        template.setHashKeySerializer(RedisSerializer.string());
        // 设置Value的序列化
        template.setValueSerializer(jsonRedisSerializer);
        template.setHashValueSerializer(jsonRedisSerializer);
        // 返回
        return template;
    }
}

这里采用了JSON序列化来代替默认的JDK序列化方式。最终结果如图:

整体可读性有了很大提升,并且能将Java对象自动的序列化为JSON字符串,并且查询时能自动把JSON反序列化为Java对象。不过,其中记录了序列化时对应的class名称,目的是为了查询时实现自动反序列化。这会带来额外的内存开销。

StringRedisTemplate

尽管JSON的序列化方式可以满足需求,但依然存在一些问题,如图:

为了在反序列化时知道对象的类型,JSON序列化器会将类的class类型写入json结果中,存入Redis,会带来额外的内存开销。

为了减少内存的消耗,可以采用手动序列化的方式,换句话说,就是不借助默认的序列化器,而是控制序列化的动作,同时,只采用

String的序列化器,这样,在存储value时,就不需要在内存中就不用多存储数据,从而节约内存空间

这种用法比较普遍,因此SpringDataRedis就提供了RedisTemplate的子类:StringRedisTemplate,它的key和value的序列化方式默认就是String方式。

省去了自定义RedisTemplate的序列化方式的步骤,而是直接使用:

@SpringBootTest
class RedisStringTests {

    @Autowired
    private StringRedisTemplate stringRedisTemplate;

    @Test
    void testString() {
        // 写入一条String数据
        stringRedisTemplate.opsForValue().set("verify:phone:13600527634", "124143");
        // 获取string数据
        Object name = stringRedisTemplate.opsForValue().get("name");
        System.out.println("name = " + name);
    }

    private static final ObjectMapper mapper = new ObjectMapper();

    @Test
    void testSaveUser() throws JsonProcessingException {
        // 创建对象
        User user = new User("虎哥", 21);
        // 手动序列化
        String json = mapper.writeValueAsString(user);
        // 写入数据
        stringRedisTemplate.opsForValue().set("user:200", json);

        // 获取数据
        String jsonUser = stringRedisTemplate.opsForValue().get("user:200");
        // 手动反序列化
        User user1 = mapper.readValue(jsonUser, User.class);
        System.out.println("user1 = " + user1);
    }

}

此时再来看一看存储的数据,会发现那个class数据已经不在了,节约了空间

最后小总结:

RedisTemplate的两种序列化实践方案:

  • 方案一:


    • 自定义RedisTemplate
    • 修改RedisTemplate的序列化器为GenericJackson2JsonRedisSerializer
  • 方案二:


    • 使用StringRedisTemplate
    • 写入Redis时,手动把对象序列化为JSON
    • 读取Redis时,手动把读取到的JSON反序列化为对象

Hash结构操作

@SpringBootTest
class RedisStringTests {

    @Autowired
    private StringRedisTemplate stringRedisTemplate;


    @Test
    void testHash() {
        stringRedisTemplate.opsForHash().put("user:400", "name", "虎哥");
        stringRedisTemplate.opsForHash().put("user:400", "age", "21");

        Map<Object, Object> entries = stringRedisTemplate.opsForHash().entries("user:400");
        System.out.println("entries = " + entries);
    }
}

一句话总结:Docker只是容器的一种,它面向的是单体,K8S可以管理多种容器,它面向的是集群,Docker可以作为一种容器方案被K8S管理。下文继续具体介绍。

1、容器的核心概念

介绍这几个核心概念:OCI、CR、Runc、Containerd、CRI。

1.1、容器运行规范

容器运行规范OCI(Open Container Initiative)即开放的容器运行时规范,定义了镜像和容器运行时的规范。

容器镜像规范:该规范的目标是创建可互操作的工具,用于构建、传输和准备运行的容器镜像。

容器运行时规范:该规范用于定义容器的配置、执行环境和生命周期。

1.2、容器运行时

容器运行时(Container Runtime)负责以下工作:拉取镜像、提取镜像到文件系统、为容器准备挂载点、从容器镜像中设置元数据以确保容器按预期运行、提醒内核为该容器分配某种隔离、提醒内核为该容器分配资源限制、调用系统指令启动容器等。

容器运行时的有如下方案:Containerd、CRI-O 、Kata、Virtlet等等。

1.3、RunC

RunC (Run Container)是从 Docker 的 libcontainer 中迁移而来的,实现了容器启停、资源隔离等功能。Docker将RunC捐赠给 OCI 作为OCI 容器运行时标准的参考实现。

RunC是一个基于OCI标准实现的一个轻量级容器运行工具,用来创建和运行容器。纯从系统角度,Runc才是底层的容器运行时 。

1.4、Containerd

Containerd是用来维持通过RunC创建的容器的运行状态。即RunC用来创建和运行容器,containerd作为常驻进程用来管理容器。
containerd(container daemon)
是一个daemon进程用来管理和运行容器,可以用来拉取/推送镜像和管理容器的存储和网络。其中可以调用runc来创建和运行容器。

很早之前的 Docker Engine 中就有了 Containerd,只不过现在是将 Containerd 从 Docker Engine 里分离出来,作为一个独立的开源项目,目标是提供一个更加开放、稳定的容器运行基础设施。分离出来的Containerd 将具有更多的功能,涵盖整个容器运行时管理的所有需求,提供更强大的支持。

Containerd 是一个工业级标准的容器运行时,它强调
简单性

健壮性

可移植性
,Containerd 可以负责干下面这些事情:

  • 管理容器的生命周期(从创建容器到销毁容器)
  • 拉取/推送容器镜像
  • 存储管理(管理镜像及容器数据的存储)
  • 调用 runc 运行容器(与 runc 等容器运行时交互)
  • 管理容器网络接口及网络

K8S自v1.24 起,已经删除了Dockershim
,使用Containerd作为容器运行时。选择 Containerd原因是,它的调用链更短,组件更少,更稳定,占用节点资源更少。

1.5、Docker、Containerd、RunC的关系

三者关系,见下图:

1.6、CRI

容器运行时是 Kubernetes(K8S) 最重要的组件之一,负责管理镜像和容器的生命周期。Kubelet 通过
Container Runtime Interface (CRI)
与容器运行时交互,以管理镜像和容器。

CRI即容器运行时接口,主要用来定义K8S与容器运行时的API调用
,kubelet通过CRI来调用容器运行时,只要实现了CRI接口的容器运行时就可以对接到K8S的kubelet组件。

2、Docker和K8S的关系

Docker和K8S本质上都是创建容器的工具,Docker作用与单机,K8S作用与集群。

在单机的容器解决方案,首选Docker。随着时代的发展,对系统的性能有了更高的要求,高可用、高并发都是基本要求。随着要求变高的的同时,单机显然性能就跟不上了,服务器集群管理就是发展趋势,所以 Kubernetes 为代表的云原生技术强势发展。

2.1、容器创建调用链路

Docker、Kubernetes、OCI、CRI-O、containerd、runc,他们是如何一起协作的呢,见下图。

上图所示为容器的调用链路。如图我们看到的,只要是实现了CRI的容器运行时就能够被K8S采用。Containerd是通过CRI Plugin 来适配CRI的,而CRI-O则是为CRI量生打造。

我们还可以看到包括了Docker和K8S两条主线,其中Docker主要是在面向单体应用,K8S是用于集群。

2.2、关系

从上面的容器调用链路可以看到,对于Containerd 和 CRI-O我们非常清楚他们是干嘛的,但是对于Docker和K8S间的联系我们还需要再来理一下。

如图为K8S与Docker之间的联系(包含K8S1.23版本在内以及之前的版本),从K8S-1.24版本开始将移除docker-shim模块。下面继续看看他们之间的小故事。

3、Dockershim的小故事

3.1、dockershim的由来

自 K8S - v1.24 起,Dockershim 已被删除,这对K8S项目来说是一个积极的举措。

在 K8S 的早期,只支持一个容器运行时,那个容器运行时就是 Docker Engine。 那时并没有其他的选择。

随着时间推移,我们开始添加更多的容器运行时,比如 rkt 和 hypernetes,很明显 K8S 用户希望选择最适合他们的运行时。因此,K8S 需要一种方法来允许K8S集群灵活地使用任何容器运行时。

于是有了容器运行时接口 (CRI) 的发布,CRI 的引入对K8S项目和K8S用户来说都很棒,但它引入了一个问题:Docker Engine 作为容器运行时的使用早于 CRI,所以Docker Engine 不兼容 CRI。

为了解决这个问题,在 kubelet 组件中引入了一个小型软件 shim (dockershim),专门用于填补 Docker Engine 和 CRI 之间的空白, 允许集群继续使用 Docker Engine 作为容器运行时。

3.2、dockershim的宿命

然而,这个小软件 shim 从来没有打算成为一个永久的解决方案。 多年来,它的存在给 kubelet 本身带来了许多不必要的复杂性。由于这个 shim,Docker 的一些集成实现不一致,导致维护人员的负担增加。

总之,这样的方式不但带来了更高的复杂度,而且由于部件的增加也增加了不稳定的因素,同时还增加了维护负担,所以弃用dockershim是迟早的事。

总结

dockershim
一直都是 K8S 社区为了能让 Docker 成为其支持的容器运行时,所维护的一个兼容程序。 现在**所谓的废弃,**也仅仅是 K8S 要放弃对现在代码仓库中的 dockershim 的维护支持。以便K8S可以像刚开始时计划的那样,仅负责维护其 CRI ,任何兼容 CRI 的容器运行时,都可以作为 K8S 的 runtime。

3.3、流转图:

总结
:本文讲了
容器的核心概念、Docker和K8S的关系、Dockershim的小故事
,希望对你有帮助!

本篇完结!感谢你的阅读,欢迎点赞 关注 收藏 私信!!!

原文链接:
https://mp.weixin.qq.com/s/jmoxfDJxYKK7sLQLylaS8w

热点随笔:

·
发个阿里云广告,对园子脱困很重要:阿里云上部署幻兽帕鲁
(
博客园团队
)
·
谁说后端不能画出美丽的动图?让我来给大家拜个年!
(
努力的小雨
)
·
【深度思考】一线开发大头兵对于工作的感悟分享
(
Apluemxa
)
·
C#/.NET/.NET Core优秀项目和框架2024年1月简报
(
追逐时光者
)
·
苹果支付有哪些坑,为什么苹果支付比支付宝和微信容易丢单?
(
ZhanLi
)
·
Yarp 与 Nginx性能大比拼不出所料它胜利了!
(
tokengo
)
·
新来的一个同事,把SpringBoot参数校验玩的那叫一个优雅
(
码农Academy
)
·
来了!HelloGitHub 年度热门开源项目
(
削微寒
)
·
历时8年,自建站最终改版
(
ZepheryWen
)
·
.NET NativeAOT 指南
(
hez2010
)
·
5个.NET开源且强大的快速开发框架(帮助你提高生产效率)
(
追逐时光者
)
·
忍不了,客户让我在一个接口里兼容多种业务逻辑
(
程序员老猫
)

热点新闻:

·
Linus 发飙,批评谷歌内核贡献者的代码是垃圾
·
德国铁路公司招聘 Windows 3.1 管理员
·
马化腾2023年年会演讲:点评业务板块,重点提到了信心
·
AI正在使全球代码质量下降!1.53亿行代码深度分析报告出炉
·
Linus新年首骂:和谷歌大佬大吵4天,“你的代码就是垃圾”
·
范伟主演的苹果新春大片怎么拍的?我们和导演挖出了这些幕后细节
·
第三方开源社区“Linux 中国” 官宣停止运营,主网、公众号、视频号将停更
·
刘强东为宿迁光明村1300多户村民送京东年货节礼包
·
Vision Pro开卖炸出各种显眼包!开车/健身/过马路操作秀翻天,AI大牛Karpathy发千字亲测体验
·
12306 新招,应对恶意抢票软件
·
马斯克Neuralink首个芯片植入人脑,意念操控手机成真!人类进入「义体」时代
·
被裁的中年大厂人先享受世界

关于头文件的使用

这里写一下这个东西,毕竟我在使用的时候还是有不少的疑问

一、头文件

头文件就是在写 C++ 代码的时候,在最开头几行引用的文件,这里比如说:

# include <iostream>

我们就是引用了一个名称为
iostream
的头文件

这里这个文件为什么没有后缀名呢,这我就不是很清楚了,据说是取巧,或者是为了统一 C++ 头文件的格式

这里我把
iostream
的文件放在这里:

// Standard iostream objects -*- C++ -*-

// Copyright (C) 1997-2014 Free Software Foundation, Inc.
//
// This file is part of the GNU ISO C++ Library.  This library is free
// software; you can redistribute it and/or modify it under the
// terms of the GNU General Public License as published by the
// Free Software Foundation; either version 3, or (at your option)
// any later version.

// This library is distributed in the hope that it will be useful,
// but WITHOUT ANY WARRANTY; without even the implied warranty of
// MERCHANTABILITY or FITNESS FOR A PARTICULAR PURPOSE.  See the
// GNU General Public License for more details.

// Under Section 7 of GPL version 3, you are granted additional
// permissions described in the GCC Runtime Library Exception, version
// 3.1, as published by the Free Software Foundation.

// You should have received a copy of the GNU General Public License and
// a copy of the GCC Runtime Library Exception along with this program;
// see the files COPYING3 and COPYING.RUNTIME respectively.  If not, see
// <http://www.gnu.org/licenses/>.

/** @file include/iostream
 *  This is a Standard C++ Library header.
 */

//
// ISO C++ 14882: 27.3  Standard iostream objects
//

#ifndef _GLIBCXX_IOSTREAM
#define _GLIBCXX_IOSTREAM 1

#pragma GCC system_header

#include <bits/c++config.h>
#include <ostream>
#include <istream>

namespace std _GLIBCXX_VISIBILITY(default)
{
_GLIBCXX_BEGIN_NAMESPACE_VERSION

  /**
   *  @name Standard Stream Objects
   *
   *  The &lt;iostream&gt; header declares the eight <em>standard stream
   *  objects</em>.  For other declarations, see
   *  http://gcc.gnu.org/onlinedocs/libstdc++/manual/io.html
   *  and the @link iosfwd I/O forward declarations @endlink
   *
   *  They are required by default to cooperate with the global C
   *  library's @c FILE streams, and to be available during program
   *  startup and termination. For more information, see the section of the
   *  manual linked to above.
  */
  //@{
  extern istream cin;		/// Linked to standard input
  extern ostream cout;		/// Linked to standard output
  extern ostream cerr;		/// Linked to standard error (unbuffered)
  extern ostream clog;		/// Linked to standard error (buffered)

#ifdef _GLIBCXX_USE_WCHAR_T
  extern wistream wcin;		/// Linked to standard input
  extern wostream wcout;	/// Linked to standard output
  extern wostream wcerr;	/// Linked to standard error (unbuffered)
  extern wostream wclog;	/// Linked to standard error (buffered)
#endif
  //@}

  // For construction of filebuffers for cout, cin, cerr, clog et. al.
  static ios_base::Init __ioinit;

_GLIBCXX_END_NAMESPACE_VERSION
} // namespace

#endif /* _GLIBCXX_IOSTREAM */

你会发现,我们在这个头文件中定义了一些东西,所以我们在引用这个头文件的时候就可以用这些定义过的东西

但是说的再准确一点,这又不叫定义,而是叫做声明

具体一点说,我们先看一下头文件的格式:

# ifndef _NAME_H_

# define _NAME_H_

// 在这里定义一些东西

# endif

这里我们的第一行的
_NAME_H_
是你自己起的名字,但是最好和头文件的名字一样

保存,后缀名
.h

然后中间定义的格式是这样的:

# include <bits/stdc++.h> // 引用你需要的头文件,可以是自定义的

using namespace std;

inline void Afunction () ;

class A {

    public :

        inline void init () ;

} ;

这就是头文件,而具体函数的定义,我们放在源文件里

二、源文件

源文件的后缀名是
.cpp
,用于写
C++
代码,这里我们把一组头文件和源文件配对,名称的话最好是一样的

然后我们在源文件里引用头文件,在源文件里面定义头文件中声明而没有定义的函数即可

具体格式见下:

# include <bits/stdc++.h>

# include "..." // 你的头文件的地址

using namespace std;

void Afuncion () {

    return ;

}

void A :: init () {

    if (1 + 1 == 2) return ;

}

三、实战

为了让大家更透彻的理解,我们写一个有关秦子涵的文件

首先,我们这样拜访我们的文件:

image

然后我们在
Qinzihan.h
里面这样写:

# ifndef _QINZIHAN_H_

# define _QINZIHAN_H_

# include <bits/stdc++.h>

using namespace std;

class Qinzihan {

    public :

        long long Weight = 2147483647; // 体重

        bool Dead = false; // 解脱了没

        void Init (long long w) ; // 初始化/创造一个秦子涵

        void Eat (long long food) ; // 本能:吃东西

} ;

Qinzihan ReadQinzihan () ; // 读入一个秦子涵

# endif

然后我们在
Qinzihan.cpp
里写这些:

# include <bits/stdc++.h>

# include "Qinzihan.h" // 引用我们的头文件

using namespace std;

// 把声明的函数定义一下

void Qinzihan :: Init (long long w) {

    this -> Weight = w * 10; // 初始天赋,10 倍体重

}

void Qinzihan :: Eat (long long food) {

    if (this -> Dead) return ;

    this -> Weight += food;

    if (this -> Weight < 0) Dead = true;

}

Qinzihan ReadQinzihan () {

    long long w = scanf ("%lld", &w);

    Qinzihan nw = init (w);

    return Qinzihan;

}

// 若是不运行这个程序,就不用写 main 函数

接下来我们在新文件
test.cpp
里试试:

# include <bits/stdc++.h>

# include "Qinzihan.h"

using namespace std;

signed main () {

    Qinzihan qinzh = ReadQinzihan ();

    while (! qinzh.Dead) qinzh.Eat (100000);

    return 0;

}

四、结语

这里提前祝大家龙年大吉啦