2024年3月

​ 前两天想要把连续的不同帧的静态图片拼成一个GIF图片,但是原来的图片需要裁剪,而且存在很多张,幸好这么多张的图片裁剪的位置是一样的,于是我便尝试用Python优雅地批量裁剪这些图片。

​ 首先介绍一下Python裁剪照片的原理。代码的输入是图片的地址和两个点的坐标,这两个点的坐标分别表示一个矩形的左上角顶点和右下角顶点,这个矩形就是你的裁剪区域。

​ 写代码前,先引入一下所需要的库。

from PIL import Image, ImageDraw, ImageFont

​ 那么你一定会有个疑问,怎么确定图片矩形区域的顶点位置呢?下面贴出一个
在原图像上绘制边界框
的代码。

def draw_bbox(image_path, bbox, output_path):
    """
    Draw bounding box on the image.

    Parameters:
        image_path (str): Path to the input image file.
        bbox (tuple): Bounding box coordinates (left, upper, right, lower).
        output_path (str): Path to save the image with bounding box.

    Returns:
        None
    """
    # Open image
    img = Image.open(image_path)

    # Draw bounding box
    draw = ImageDraw.Draw(img)
    draw.rectangle(bbox, outline="red", width=3)

    # Add text with coordinates
    font = ImageFont.truetype("arial.ttf", 20)
    draw.text((bbox[0], bbox[1]), f"{bbox}", fill="red", font=font)

    # Save image with bounding box
    img.save(output_path)

input_image_path = r"F:\Desktop\woman.jpg"
output_image_path = r"F:\Desktop\woman.jpg"
crop_box = (700, 550, 1850, 1000)  # Define crop box (left, upper, right, lower)
draw_bbox(input_image_path, crop_box, output_image_path)

​ crop_box(x1, y1, x2, y2),其中左上角顶点表示为(x1, y1),右下角顶点表示为(x2, y2)。但是你只能通过不断摸索crop_box的取值,根据原图像上绘制的边界框,逐渐确定你最后的裁剪区域。下面给出运行draw_bbox代码的可视化例子。

​ 用draw_bbox拿到合适的crop_box以后,下面给出
裁剪图片
的代码。

def crop_image(input_image_path, output_image_path, crop_box):
    """
    Crop an image using the specified crop box.

    Parameters:
        input_image_path (str): Path to the input image file.
        output_image_path (str): Path to save the cropped image.
        crop_box (tuple): Crop box coordinates (left, upper, right, lower).

    Returns:
        None
    """
    # Open image
    img = Image.open(input_image_path)

    # Crop image
    cropped_img = img.crop(crop_box)

    # Save cropped image
    cropped_img.save(output_image_path)

    print("Image cropped and saved successfully.")

​ 最后给出裁剪以后的可视化例子。

​ 如果想要批量裁剪图片的话,就在外面套一个循环就可以了。

复现环境

Ubuntu 20.04

CPU: 32G

GPU: 11G 2080ti

Source2slice: clang-6.0 + llvm + dg (dg:
https://github.com/mchalupa/dg
)、gcc-9.5,g++-9.5

Data preprocess and Model training: python3.6 + tensorflow1.6 + keras2.1.2 + gensim3.4

建议用conda配置环境,包括cuda9.0,cudnn7.3,tensorflow-gpu-base-1.6(安装pytorch1.1.0会一起安装),nvidia driver-535

1. llvm,clang-6.0安装

参考:
https://askubuntu.com/questions/1058534/installing-clang-6-0-on-ubuntu-18-04-lts-bionic

wget -O - https://apt.llvm.org/llvm-snapshot.gpg.key | sudo apt-key add -

sudo apt-add-repository "deb http://apt.llvm.org/bionic/ llvm-toolchain-bionic-6.0 main"

sudo apt update && sudo apt install clang-6.0

安装失败无果再考虑源码编译安装(并不容易),安装成功直接跳过下一节

ubuntu clang6.0源代码编译安装

文件资源下载

安装总共需要三个tar包,将其全部拖入到Linux环境下。其中cfe-6.0.0.src.tar.xz是clang的源码,compiler-rt-6.0.0.src.tar.xz是动态测试工具,llvm-6.0.0.src.tar是llvm的源码

curl -L -C - "https://d.pcs.baidu.com/file/ca2f32029rb0f579d86a18435f3b612a?fid=3580935171-250528-214634233489673&dstime=1710208818&rt=sh&sign=FDtAERVJouK-DCb740ccc5511e5e8fedcff06b081203-0EsKsUXkXhEWjG9fPhnStkiYz%2Bw%3D&expires=8h&chkv=1&chkbd=0&chkpc=&dp-logid=503437474518640837&dp-callid=0&shareid=3950100901&r=731328302&resvsflag=1-12-0-1-1-1&vuk=3360598225&file_type=0" -o "cfe-6.0.0.src.tar.xz" -A "pan.baidu.com" -b "BDUSS=FZXR2xPaWdwVlRKZXktbUlTVThWVFRHZGRFdjRaUXFVYUFKby1DSVpzTFM3N1ZsRVFBQUFBJCQAAAAAAAAAAAEAAADmyA5KUWlxaV9DbGlmZgAAAAAAAAAAAAAAAAAAAAAAAAAAAAAAAAAAAAAAAAAAAAAAAAAAAAAAAAAAAAAAAAAAAAAAANJijmXSYo5lN"
curl -L -C - "https://d.pcs.baidu.com/file/959617e93jc8a5079ca676a1dbd64b49?fid=3580935171-250528-711933849979721&dstime=1710208818&rt=sh&sign=FDtAERVJouK-DCb740ccc5511e5e8fedcff06b081203-zYRnYqUenQ4cpO%2B%2BMLMzIZOBxao%3D&expires=8h&chkv=1&chkbd=0&chkpc=&dp-logid=503437474518640837&dp-callid=0&shareid=3950100901&r=502521574&resvsflag=1-12-0-1-1-1&vuk=3360598225&file_type=0" -o "compiler-rt-6.0.0.src.tar.xz" -A "pan.baidu.com" -b "BDUSS=FZXR2xPaWdwVlRKZXktbUlTVThWVFRHZGRFdjRaUXFVYUFKby1DSVpzTFM3N1ZsRVFBQUFBJCQAAAAAAAAAAAEAAADmyA5KUWlxaV9DbGlmZgAAAAAAAAAAAAAAAAAAAAAAAAAAAAAAAAAAAAAAAAAAAAAAAAAAAAAAAAAAAAAAAAAAAAAAANJijmXSYo5lN"
curl -L -C - "https://d.pcs.baidu.com/file/6532a5a6en72a72e58bae082b68ccca4?fid=3580935171-250528-783078331849335&dstime=1710208818&rt=sh&sign=FDtAERVJouK-DCb740ccc5511e5e8fedcff06b081203-%2BpKHwQMhRNXZhmFxLpGalRO0gw4%3D&expires=8h&chkv=1&chkbd=0&chkpc=&dp-logid=503437474518640837&dp-callid=0&shareid=3950100901&r=109145561&resvsflag=1-12-0-1-1-1&vuk=3360598225&file_type=0" -o "llvm-6.0.0.src.tar" -A "pan.baidu.com" -b "BDUSS=FZXR2xPaWdwVlRKZXktbUlTVThWVFRHZGRFdjRaUXFVYUFKby1DSVpzTFM3N1ZsRVFBQUFBJCQAAAAAAAAAAAEAAADmyA5KUWlxaV9DbGlmZgAAAAAAAAAAAAAAAAAAAAAAAAAAAAAAAAAAAAAAAAAAAAAAAAAAAAAAAAAAAAAAAAAAAAAAANJijmXSYo5lN"

# 下载链接:https://pan.baidu.com/s/1pGTDJd7rGxD5vIxChNPP3Q
# 提取码:cbm1

安装clang-6.0

参考:
https://blog.csdn.net/qq_42570601/article/details/107146407

1解压llvm-6.0.0.src.tar

在root权限的根目录下,创建一个名为llvmtest目录:
将llvm-6.0.0.src.tar移到llvmtest目录下,使用tar -xvf llvm-6.0.0.src.tar命令解压文件到当前目录,并将解压好的文件重命名为llvm

2解压cfe-6.0.0.src.tar.xz

步骤1.1中被解压出来命名为llvm的文件下有一个tools目录,将cfe-6.0.0.src.tar.xz移到其中,使用tar -xvf cfe-6.0.0.src.tar.xz解压,并将解压后的文件重命名为clang

3解压compiler-rt-6.0.0.src.tar.xz

步骤1.1中被解压出来命名为llvm的文件下有一个projects目录,将compiler-rt-6.0.0.src.tar.xz移动到其中,使用tar -xvf compiler-rt-6.0.0.src.tar.xz命令解压,并重命名为compiler-rt

编译安装

确保你的Linux中有安装cmake。输入cmake -version指令,查看你本机cmake的版本号
没有的话就安装,3.15验证可行
wget
https://cmake.org/files/v3.15/cmake-3.15.1.tar.gz
然后参考下面链接完成安装即可:
https://www.cnblogs.com/cxscode/p/10980101.html

确保已经安装gcc和g++
tar -xvzf cmake-3.6.1.tar.gz
cd cmake-3.6.1/

然后执行安装过程

./bootstrap

执行完之后,一般就是执行make编译,但是根据命令行的提示是接下来请运行gmake,所以应该执行下面命令编译并安装:

gmake
gmake install

正式编译安装llvm
在步骤1.1中被解压出来命名为llvm的文件下新建一个名为llvm-build的目录,然后cd到该目录下,输入下面指令对llvm源码进行编译:
cmake -G "Unix Makefiles" -DLLVM_ENABLE_ASSERTIONS=On -DCMAKE_BUILD_TYPE=Release ../


编译完成后输入make install指令进行安装,这个过程比较久,可能要两三个小时;

2. SARD files

(1). getVulLineForCounting.py

python getVulLineForCounting.py ../../000 ../../xxx.xml

This file is used to get the line numbers of vulnerable lines in the source code file. The input is the source code file and xxx.xml file. The output is xxx.txt file, which is renamed as SARD-hole_line.txt.


就是从xml文件中定位到漏洞的具体行数。

(2). multiFileCompile.py

python multiFileCompile.py ../../000/ ../../xxx.xml

跑之前需要注意,multiFileCompile.py中构造编译命令的代码如下:

            if noFlawFile.endswith('.c'):
                cmd1 = 'clang -emit-llvm -w -g -c ' + os.path.join(rawPathHead,noFlawFile) + ' -o ' + os.path.join(rawPathHead,noFlawFile)[:-2] + '.bc'
                cmd1 += ' -I /home/king/aproSARD/testcaseLib/' 
            elif noFlawFile.endswith('.cpp'):
                cmd1 = 'clang++ -emit-llvm -w -g -c ' + os.path.join(rawPathHead,noFlawFile) + ' -o ' + os.path.join(rawPathHead,noFlawFile)[:-4] + '.bc'
                cmd1 += ' -I /home/king/aproSARD/testcaseLib/'
  • 1.上面的clang和clang++我安装的时候是clang-6.0和clang++-6.0,所以要和源码统一。
  • 2.还有头文件
    std_testcase.h
    ,代码中是作者的绝对路径,需要改成自己的。
  • 3.作者构造cmd的时候字符串用的单引号,注意将synthetic and academic programs改为synthetic_and_academic_programs

This file is used to compile the source code file to .bc file.

使用clang6.0和clang++-6.0将000/下的c文件都编译成.bc文件,.bc 文件是 LLVM 项目中使用的中间表示文件,它们包含了从源代码生成的低级、平台无关的代码。
这个过程我在虚拟机上跑了17分钟。

(3). get-llvmwithline.cpp

./get-llvmwithline SARD-hole_line.txt

This file is used to extract four kinds of focuses. The output file is in the directory of "000".

可能会遇到ubuntu 缺少 libtinfo.so.5 问题

sudo apt-get install libncurses5

然后就等待他跑完,放一段单个文件的中间输出:

/home/key/Work/2024/VulDeeLocator/data_pre/data_pre_proces/synthetic_and_academic_programs/000/080/513/CWE134_Uncontrolled_Format_String__char_listen_socket_w32_vsnprintf_34.c//输出文件名称是我修改了get-llvmwithline.cpp文件.
./llvm-slicer -c 71:data,124:data,129:data,152:data,154:data,154:data -entry CWE134_Uncontrolled_Format_String__char_listen_socket_w32_vsnprintf_34_bad -annotate slicer /home/key/Work/2024/VulDeeLocator/data_pre/data_pre_proces/synthetic_and_academic_programs/000/080/513/CWE134_Uncontrolled_Format_String__char_listen_socket_w32_vsnprintf_34.bc
Matched line 71 with variable data to:
  store i8* %12, i8** %1, align 8, !dbg !81
Matched line 124 with variable data to:
  %68 = load i8*, i8** %1, align 8, !dbg !187
Matched line 129 with variable data to:
  %75 = load i8*, i8** %1, align 8, !dbg !197
Matched line 152 with variable data to:
  %95 = load i8*, i8** %1, align 8, !dbg !227
Matched line 154 with variable data to:
  %97 = load i8*, i8** %10, align 8, !dbg !231
Matched line 154 with variable data to:
  %98 = load i8*, i8** %10, align 8, !dbg !232
[llvm-slicer] CPU time of pointer analysis: 3.329000e-03 s
[llvm-slicer] CPU time of reaching definitions analysis: 4.249000e-03 s
[llvm-slicer] CPU time of control dependence analysis: 2.780000e-04 s
[llvm-slicer] Finding dependent nodes took 0 sec 0 ms
[llvm-slicer] Saving IR with annotations to /home/key/Work/2024/VulDeeLocator/data_pre/data_pre_proces/synthetic_and_academic_programs/000/080/513/CWE134_Uncontrolled_Format_String__char_listen_socket_w32_vsnprintf_34-debug.ll
[llvm-slicer] Slicing dependence graph took 0 sec 0 ms
[llvm-slicer] Sliced away 57 from 151 nodes in DG
[llvm-slicer] saving sliced module to: /home/key/Work/2024/VulDeeLocator/data_pre/data_pre_proces/synthetic_and_academic_programs/000/080/513/CWE134_Uncontrolled_Format_String__char_listen_socket_w32_vsnprintf_34.sliced

holefuncname: CWE134_Uncontrolled_Format_String__char_listen_socket_w32_vsnprintf_34_bad
funcname:badVaSink

·································


./llvm-slicer -c 237:service,237:service,241:service,241:service -entry goodB2G -annotate slicer /home/key/Work/2024/VulDeeLocator/data_pre/data_pre_proces/synthetic_and_academic_programs/000/080/513/CWE134_Uncontrolled_Format_String__char_listen_socket_w32_vsnprintf_34.bc
Did not find slicing criteria: '237:service,237:service,241:service,241:service'
[llvm-slicer] CPU time of pointer analysis: 4.581000e-03 s
[llvm-slicer] CPU time of reaching definitions analysis: 4.114000e-03 s
[llvm-slicer] CPU time of control dependence analysis: 2.430000e-04 s
[llvm-slicer] Saving IR with annotations to /home/key/Work/2024/VulDeeLocator/data_pre/data_pre_proces/synthetic_and_academic_programs/000/080/513/CWE134_Uncontrolled_Format_String__char_listen_socket_w32_vsnprintf_34-debug.ll
[llvm-slicer] saving sliced module to: /home/key/Work/2024/VulDeeLocator/data_pre/data_pre_proces/synthetic_and_academic_programs/000/080/513/CWE134_Uncontrolled_Format_String__char_listen_socket_w32_vsnprintf_34.sliced

holefuncname: goodB2G
funcname:badVaSink


api over

执行完毕

让GPT为我们解答一下:

; 定义一个名为 CWE121_Stack_Based_Buffer_Overflow__CWE805_char_alloca_memcpy_32_bad 的函数,
; 该函数模拟了一个栈基础的缓冲区溢出漏洞。
define void @CWE121_Stack_Based_Buffer_Overflow__CWE805_char_alloca_memcpy_32_bad() #0 !dbg !11 {
  ; 在栈上分配一个指针的空间(8字节对齐)
  %1 = alloca i8*, align 8
  ; 在栈上分配另一个指针的空间(8字节对齐)
  %2 = alloca i8**, align 8
  ; 在栈上分配另一个指针的空间(8字节对齐)
  %3 = alloca i8**, align 8
  ; 在栈上分配一个指针的空间(8字节对齐)
  %4 = alloca i8*, align 8
  ; 在栈上分配一个大小为100字节的数组的空间(16字节对齐)
  %8 = alloca [100 x i8], align 16
  ; 将数组的地址存储到为其分配的指针中(%9)
  %9 = alloca i8, i64 50, align 16, !dbg !23
  store i8* %9, i8** %4, align 8, !dbg !22

  ; 加载 %4 指针指向的地址到新指针中(%13),准备进行 memcpy 操作
  %13 = load i8*, i8** %4, align 8, !dbg !32
  ; 将加载的地址存储到用于 memcpy 操作的指针中(%6)
  store i8* %13, i8** %6, align 8, !dbg !33

  ; 加载 %2 指针指向的地址到 %17,并将未初始化的指针存储到 %7 中
  %17 = load i8**, i8*** %2, align 8, !dbg !37
  store i8* %16, i8** %17, align 8, !dbg !38

  ; 加载 %7 指针的值
  %24 = load i8*, i8** %7, align 8, !dbg !53
  ; 准备 memcpy 操作的目标指针
  %23 = getelementptr inbounds [100 x i8], [100 x i8]* %8, i32 0, i32 0, !dbg !54
  ; 执行 memcpy 操作,从源数组复制100字节到目标缓冲区
  ; 这将导致栈溢出,因为目标缓冲区只有99字节
  call void @llvm.memcpy.p0i8.p0i8.i64(i8* %22, i8* %23, i64 100, i32 1, i1 false), !dbg !54

  ; 加载目标指针
  %26 = load i8*, i8** %7, align 8, !dbg !57
  ; 获取目标缓冲区最后一字节的地址
  %25 = getelementptr inbounds i8, i8* %24, i64 99, !dbg !55
  ; 在最后一个地址存储一个空字符以结束复制的数据
  store i8 0, i8* %25, align 1, !dbg !56

  ; 调用一个打印缓冲区内容的函数(这个函数调用可能是一个漏洞)
  call void @printLine(i8* %26), !dbg !58

  ; 函数返回,无返回值
  ret void, !dbg !59
}

(4). autoReorder.py

python2 autoRecorder.py ../../000/

此文件用于对从源代码文件中提取的语句进行重新排序。输出是 newslice 目录下的 .final.ll 文件,这是一个 llvm 切片。

修改源代码中
autoReorder
.py 为
autoRecorder
.py

(5). getFlawLoc.py

python2 getFlawLoc.py ../../000/

此文件用于获取 slice2flawline.pkl,其中包含易受攻击的行号。

(6). addFlawtag.py

python addFlawtag.py SARD-hole_line.txt

此文件用于获取 newslice 目录下 llvm 切片对应的源代码切片 (.slicer.c)

(7). getSourceLine.py

python getSourceLine.py ../../000/

此文件用于 slice2flawline.pkl,其中包含对应于 .slicer.c 文件的易受攻击行的行号

Step 2: Data preprocess

  1. process_dataflow.py: Get the corpus of slices generated from the systhetic and academic dataset.
    process_dataflow_NVD.py: Get the corpus of slices generated from the real-world dataset.
    The input is slices generated from the systhetic and academic dataset and the real-world dataset and the output is corpus files.
    获取从系统和学术数据集生成的切片语料库。 process_dataflow_NVD.py:获取从真实数据集生成的切片语料库。 输入是从系统和学术数据集以及真实世界数据集生成的切片,输出是语料库文件。

这里需要修改很多地方
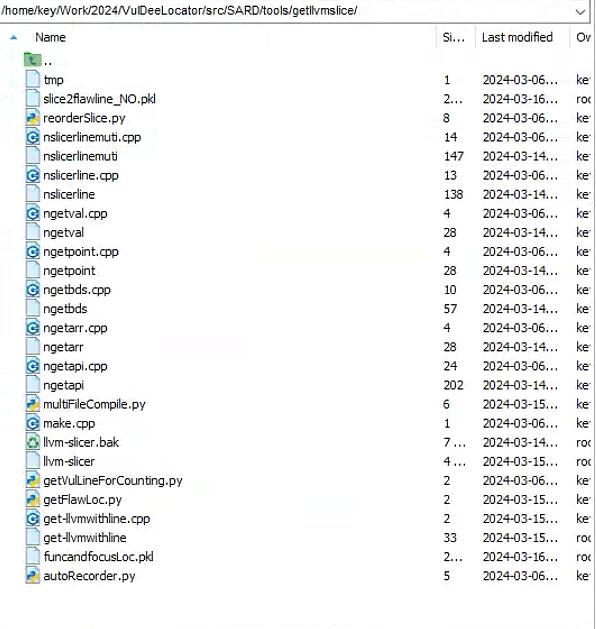

将000文件夹移动到\src\data_preprocess\data\SARD\data_source\xxx下,这里的xxx自己取。

将getllvm..目录下的slice2flawline_NO.pkl移动到src\data_preprocess\data\SARD\label_source目录下,并修改文件名为xxx_Flawline.pkl,主要原因如下:


然后corpus目录下就出现了
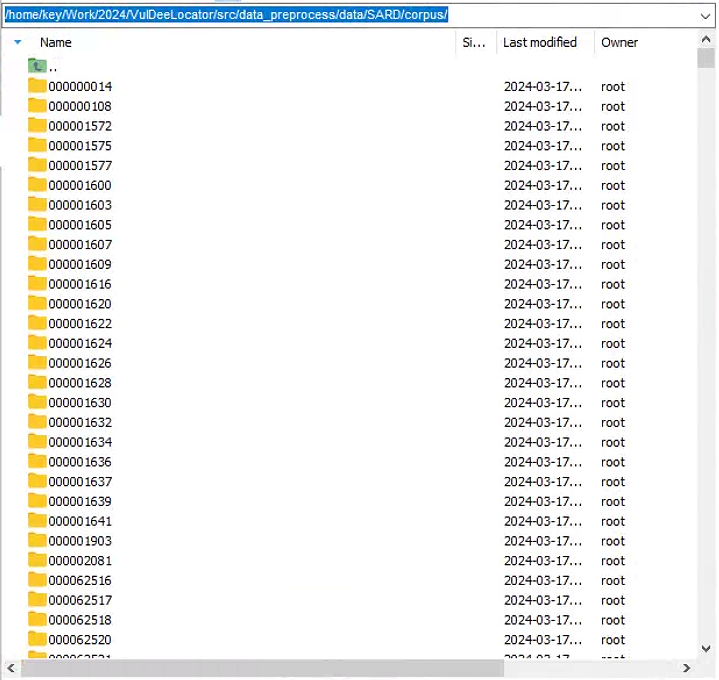
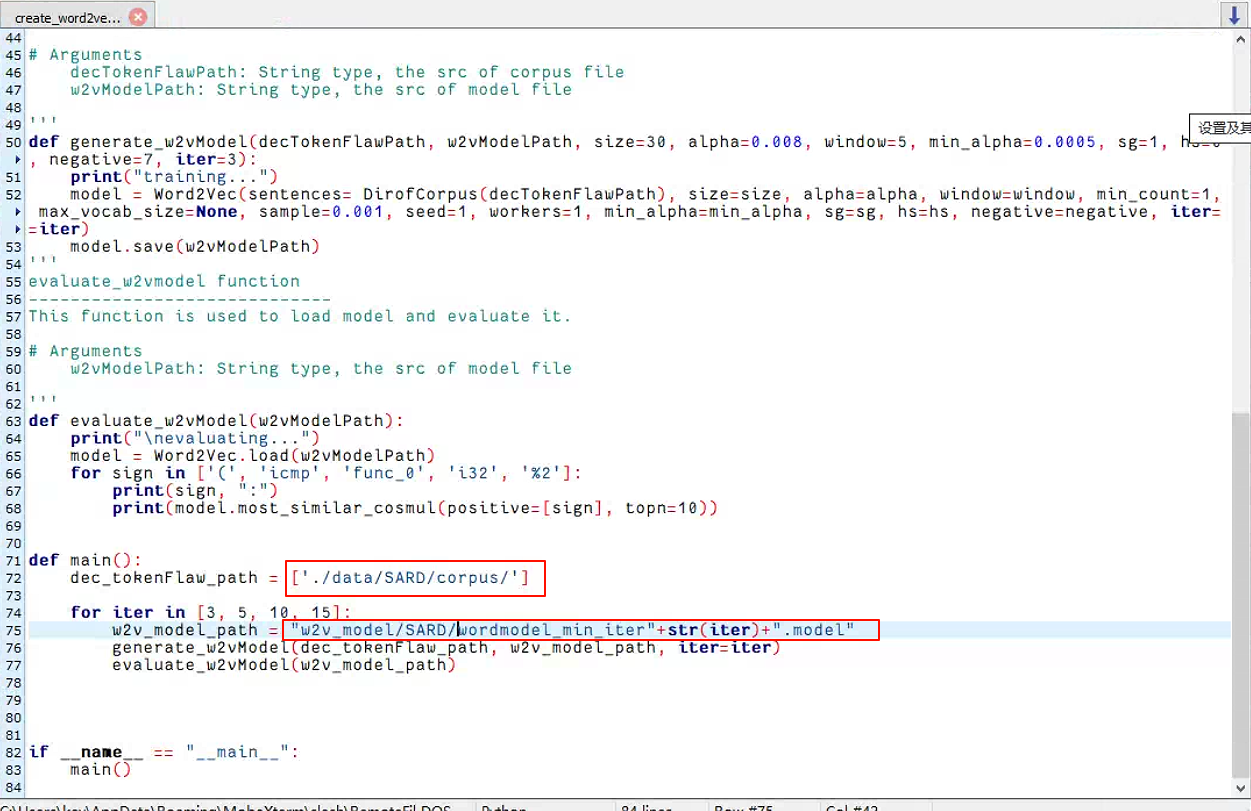
  1. create_word2vecmodel.py: Train the word2vec model. The input is the corpus files and the output is the trained model.
    训练 word2vec 模型。输入是语料库文件,输出是经过训练的模型。
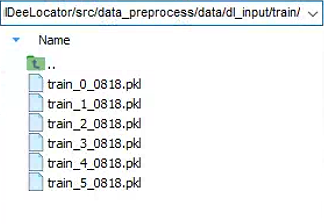
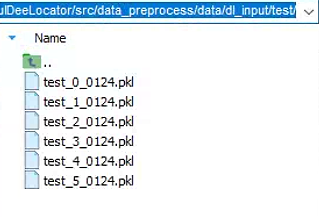
  1. get_dl_input.py. Get the vectors of tokens in the corpus files. The input is the corpus file and the trained word2vec model and the output is the vector file.
    获取语料库文件中标记的向量。输入是语料库文件和经过训练的 word2vec 模型,输出是向量文件。

要注意修改py文件缩进要用空格,因为源代码用的就是空格spqce

train
test
Step 3: Model training

  1. bgru_threshold.py: Train the BGRU model which can locate the vulnerabilities and evaluate it. The input is the training dataset and the test dataset, and the output is the trained BGRU model.
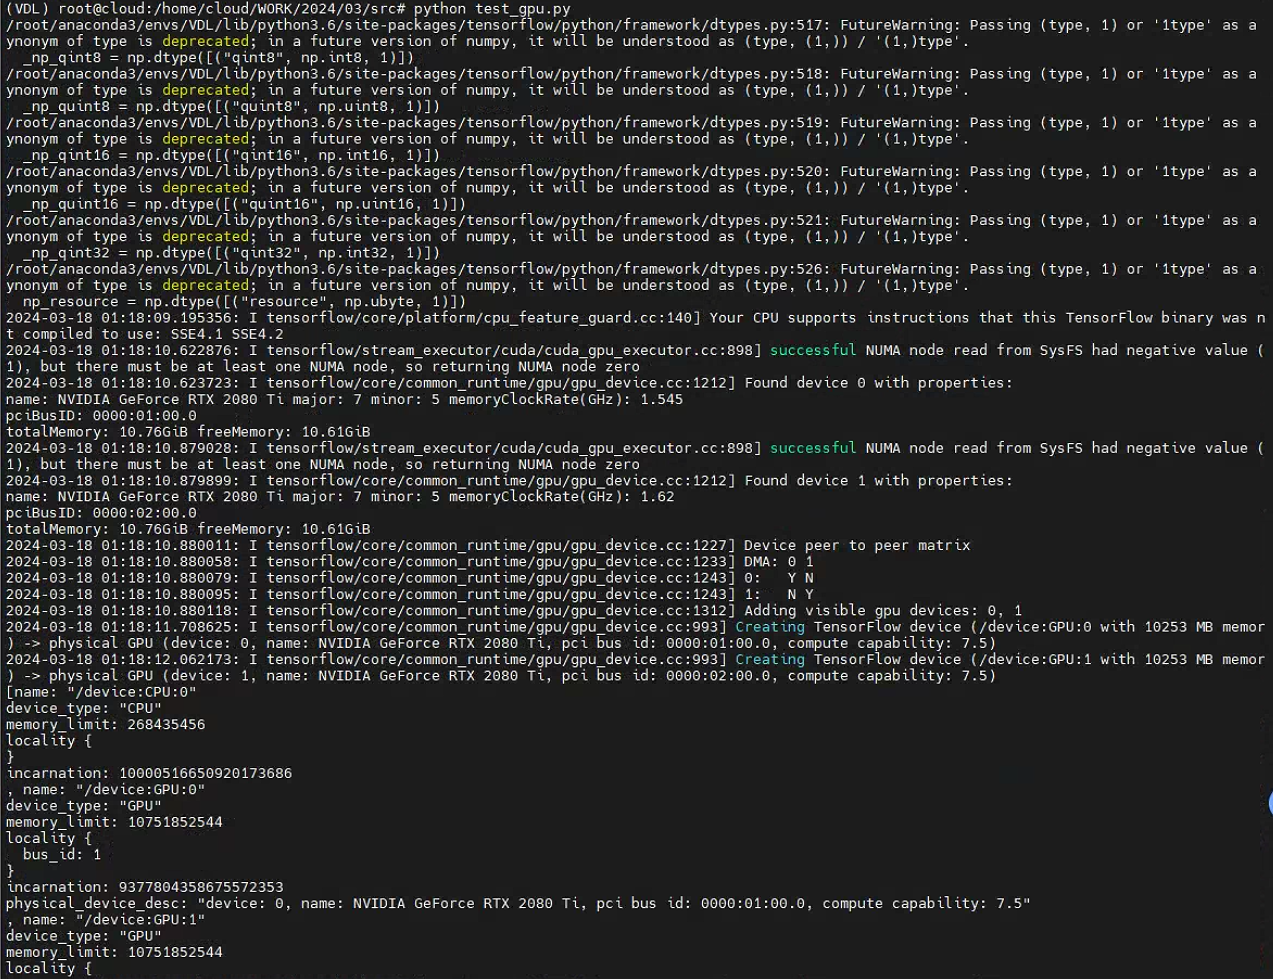
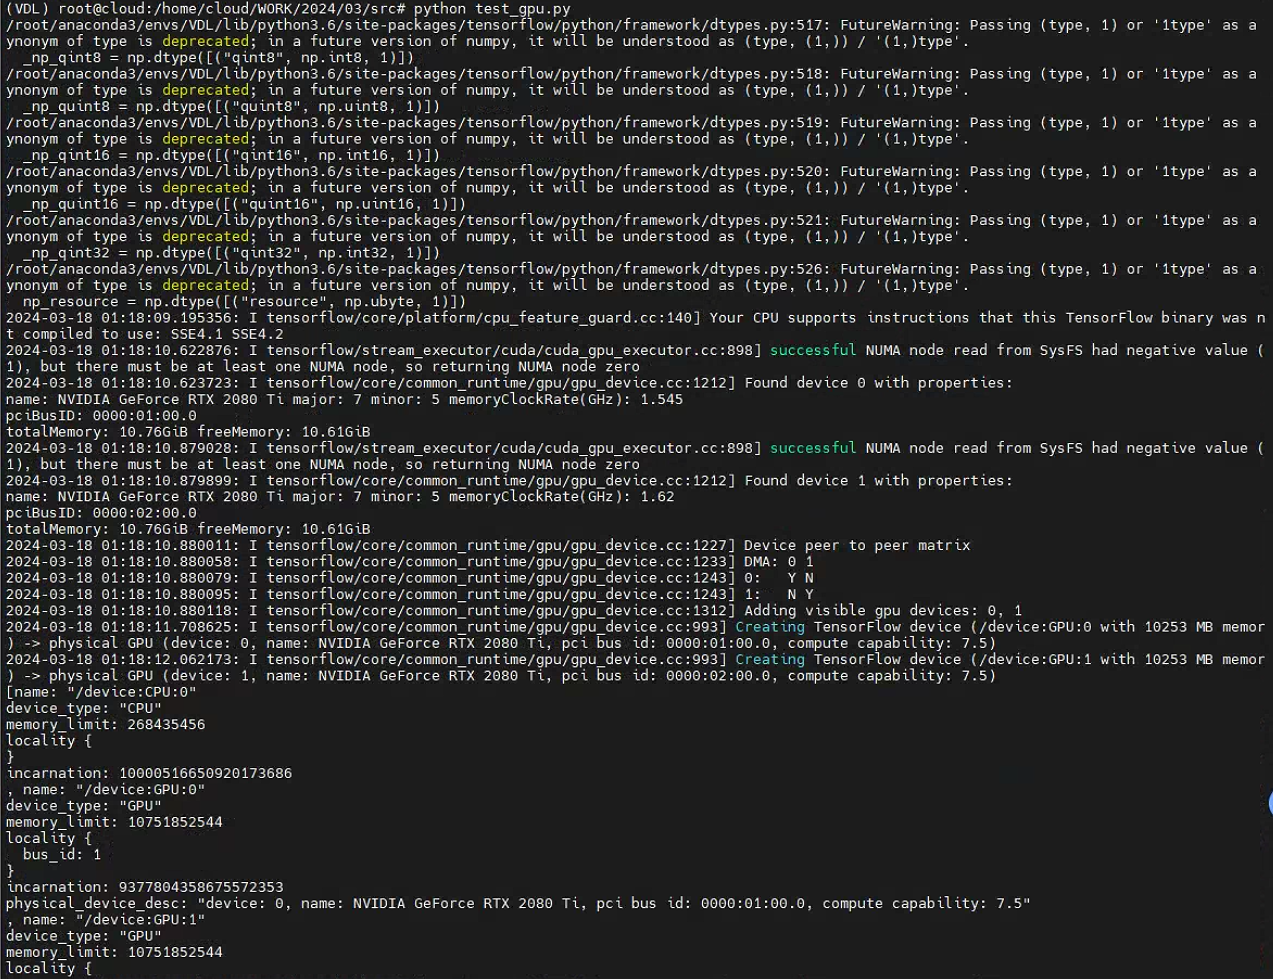
conda安装cuda-cudnn-pytorch参考:

gpu调用成功
  1. bgru_raw.py: Train the original BGRU model.

process_dataflow.py:获取从系统和学术数据集生成的切片语料库。

注意程序中


这里是有s的


但是github的源码文件夹没有s,需要在synthetic and academic dataset后面加个s。

结果

第一次

(VDL) root@cloud:/home/cloud/WORK/2024/03/src# python bgru_threshold.py
Using TensorFlow backend.
/root/anaconda3/envs/VDL/lib/python3.6/site-packages/tensorflow/python/framework/dtypes.py:517: FutureWarning: Passing (type, 1) or '1type' as a synonym of type is deprecated; in a future version of numpy, it will be understood as (type, (1,)) / '(1,)type'.
  _np_qint8 = np.dtype([("qint8", np.int8, 1)])
/root/anaconda3/envs/VDL/lib/python3.6/site-packages/tensorflow/python/framework/dtypes.py:518: FutureWarning: Passing (type, 1) or '1type' as a synonym of type is deprecated; in a future version of numpy, it will be understood as (type, (1,)) / '(1,)type'.
  _np_quint8 = np.dtype([("quint8", np.uint8, 1)])
/root/anaconda3/envs/VDL/lib/python3.6/site-packages/tensorflow/python/framework/dtypes.py:519: FutureWarning: Passing (type, 1) or '1type' as a synonym of type is deprecated; in a future version of numpy, it will be understood as (type, (1,)) / '(1,)type'.
  _np_qint16 = np.dtype([("qint16", np.int16, 1)])
/root/anaconda3/envs/VDL/lib/python3.6/site-packages/tensorflow/python/framework/dtypes.py:520: FutureWarning: Passing (type, 1) or '1type' as a synonym of type is deprecated; in a future version of numpy, it will be understood as (type, (1,)) / '(1,)type'.
  _np_quint16 = np.dtype([("quint16", np.uint16, 1)])
/root/anaconda3/envs/VDL/lib/python3.6/site-packages/tensorflow/python/framework/dtypes.py:521: FutureWarning: Passing (type, 1) or '1type' as a synonym of type is deprecated; in a future version of numpy, it will be understood as (type, (1,)) / '(1,)type'.
  _np_qint32 = np.dtype([("qint32", np.int32, 1)])
/root/anaconda3/envs/VDL/lib/python3.6/site-packages/tensorflow/python/framework/dtypes.py:526: FutureWarning: Passing (type, 1) or '1type' as a synonym of type is deprecated; in a future version of numpy, it will be understood as (type, (1,)) / '(1,)type'.
  np_resource = np.dtype([("resource", np.ubyte, 1)])
Build model...
WARNING:tensorflow:From /home/cloud/WORK/2024/03/src/keras/backend/tensorflow_backend.py:1364: calling reduce_any (from tensorflow.python.ops.math_ops) with keep_dims is deprecated and will be removed in a future version.
Instructions for updating:
keep_dims is deprecated, use keepdims instead
WARNING:tensorflow:From /home/cloud/WORK/2024/03/src/keras/backend/tensorflow_backend.py:1247: calling reduce_sum (from tensorflow.python.ops.math_ops) with keep_dims is deprecated and will be removed in a future version.
Instructions for updating:
keep_dims is deprecated, use keepdims instead
WARNING:tensorflow:From /home/cloud/WORK/2024/03/src/keras/backend/tensorflow_backend.py:1349: calling reduce_mean (from tensorflow.python.ops.math_ops) with keep_dims is deprecated and will be removed in a future version.
Instructions for updating:
keep_dims is deprecated, use keepdims instead
begin compile
__________________________________________________________________________________________________
Layer (type)                    Output Shape         Param #     Connected to
==================================================================================================
input_1 (InputLayer)            (None, 900, 30)      0
__________________________________________________________________________________________________
mask_1 (Masking)                (None, 900, 30)      0           input_1[0][0]
__________________________________________________________________________________________________
bgru_1 (Bidirectional)          (None, 900, 1024)    1668096     mask_1[0][0]
__________________________________________________________________________________________________
dropout_1 (Dropout)             (None, 900, 1024)    0           bgru_1[0][0]
__________________________________________________________________________________________________
bgru_2 (Bidirectional)          (None, 900, 1024)    4721664     dropout_1[0][0]
__________________________________________________________________________________________________
dropout_2 (Dropout)             (None, 900, 1024)    0           bgru_2[0][0]
__________________________________________________________________________________________________
dense1 (TimeDistributed)        (None, 900, 1)       1025        dropout_2[0][0]
__________________________________________________________________________________________________
activation_1 (Activation)       (None, 900, 1)       0           dense1[0][0]
__________________________________________________________________________________________________
vulner_mask_input (InputLayer)  (None, 900, 900)     0
__________________________________________________________________________________________________
non_masking_1 (NonMasking)      (None, 900, 1)       0           activation_1[0][0]
__________________________________________________________________________________________________
multiply_1 (Multiply)           (None, 900, 900)     0           vulner_mask_input[0][0]
                                                                 non_masking_1[0][0]
__________________________________________________________________________________________________
reshape_1 (Reshape)             (None, 1, 810000)    0           multiply_1[0][0]
__________________________________________________________________________________________________
k_max_1 (KMaxPooling)           (None, 1, 1)         0           reshape_1[0][0]
__________________________________________________________________________________________________
average_1 (GlobalAveragePooling (None, 1)            0           k_max_1[0][0]
==================================================================================================
Total params: 6,390,785
Trainable params: 6,390,785
Non-trainable params: 0
__________________________________________________________________________________________________
Loading data...
train_1_0818.pkl
train_3_0818.pkl
train_2_0818.pkl
train_0_0818.pkl
train_4_0818.pkl
train_5_0818.pkl
60859
Train...
Epoch 1/4
2024-03-18 01:20:28.271197: I tensorflow/core/platform/cpu_feature_guard.cc:140] Your CPU supports instructions that this TensorFlow binary was not compiled to use: SSE4.1 SSE4.2
2024-03-18 01:20:29.666666945: I tensorflow/stream_executor/cuda/cuda_gpu_executor.cc:898] successful NUMA node read from SysFS had negative value (-1), but there must be at least one NUMA node, so returning NUMA node zero
2024-03-18 01:20:29.556830: I tensorflow/core/common_runtime/gpu/gpu_device.cc:1212] Found device 0 with properties:
name: NVIDIA GeForce RTX 2080 Ti major: 7 minor: 5 memoryClockRate(GHz): 1.545
pciBusID: 0000:01:00.0
totalMemory: 10.76GiB freeMemory: 10.61GiB
2024-03-18 01:20:29.556877: I tensorflow/core/common_runtime/gpu/gpu_device.cc:1312] Adding visible gpu devices: 0
2024-03-18 01:20:29.862770: I tensorflow/core/common_runtime/gpu/gpu_device.cc:993] Creating TensorFlow device (/job:localhost/replica:0/task:0/device:GPU:0 with 10253 MB memory) -> physical GPU (device: 0, name: NVIDIA GeForce RTX 2080 Ti, pci bus id: 0000:01:00.0, compute capability: 7.5
950/950 [==============================] - 5091s 5s/step - loss: 0.2346 - TP_count: 1.9284 - FP_count: 0.8095 - FN_count: 5.3253 - precision: 0.3146 - recall: 0.2630 - fbeta_score: 0.2694 ETA: 14:17 - loss: 0.2581 - TP_count: 1.2494 - FP_count: 0.7025 - FN_count: 6.0241 - precision: 0.2162Epoch 2/41675 - fbeta_score: 0.17431499
950/950 [==============================] - 5087s 5s/step - loss: 0.0941 - TP_count: 5.8947 - FP_count: 1.1053 - FN_count: 1.3589 - precision: 0.8- recall: 0.8083 - fbeta_score: 0.8045657
950/950 [==============================] - 5089s 5s/step - loss: 0.0652 - TP_count: 6.3674 - FP_count: 0.8021 - FN_count: 0.8863 - precision: 0.8- recall: 0.8735 - fbeta_score: 0.86686  - ETA: 1:06:26 - loss: 0.0760 - TP_count: 6.4433 - FP_count: 0.9212 - FN_count: 1.0837 - precision: 0.88
950/950 [==============================] - 5087s 5s/step - loss: 0.0445 - TP_count: 6.7379 - FP_count: 0.5611 - FN_count: 0.5158 - precision: 0.9209 - recall: 0.9220 - fbeta_score: 0.9116 ETA: 9:37 - loss: 0.0453 - TP_count: 6.7530 - FP_count: 0.5831 - FN_count: 0.5238 - precision: 0.9180 Test....9202 - fbeta_score: 0.9091
test_5_0124.pkl
test_0_0124.pkl
test_1_0124.pkl
test_3_0124.pkl
test_2_0124.pkl
test_4_0124.pkl
17959 17959
 0 / 280Traceback (most recent call last):
  File "bgru_threshold.py", line 437, in <module>
    main(traindataSetPath, testdataSetPath, weightPath, resultPath, batchSize, maxLen, vectorDim, dropout=dropout)
  File "bgru_threshold.py", line 288, in main
    with open("result_analyze/TP/"+str(index)+".pkl","wb") as f:
FileNotFoundError: [Errno 2] No such file or directory: 'result_analyze/TP/0.pkl'

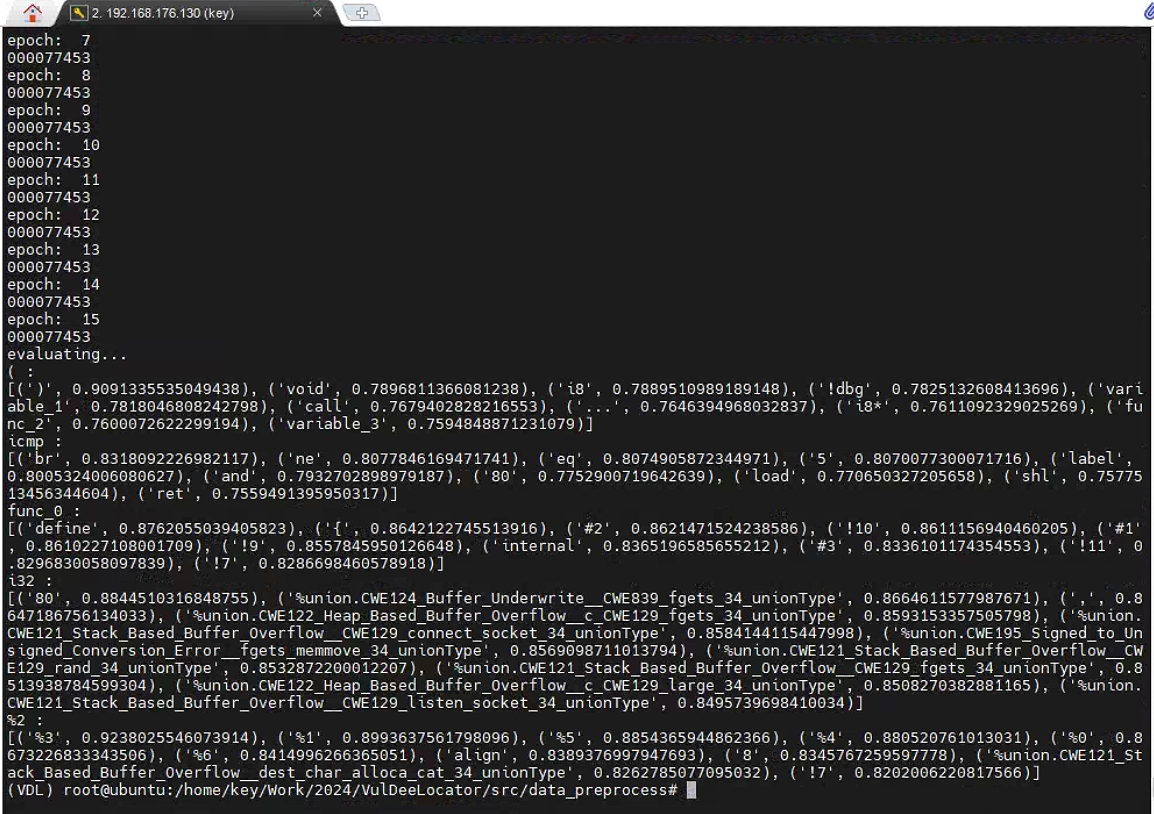
这里的报错是因为没有TP目录,创建目录后重新训练和测试。

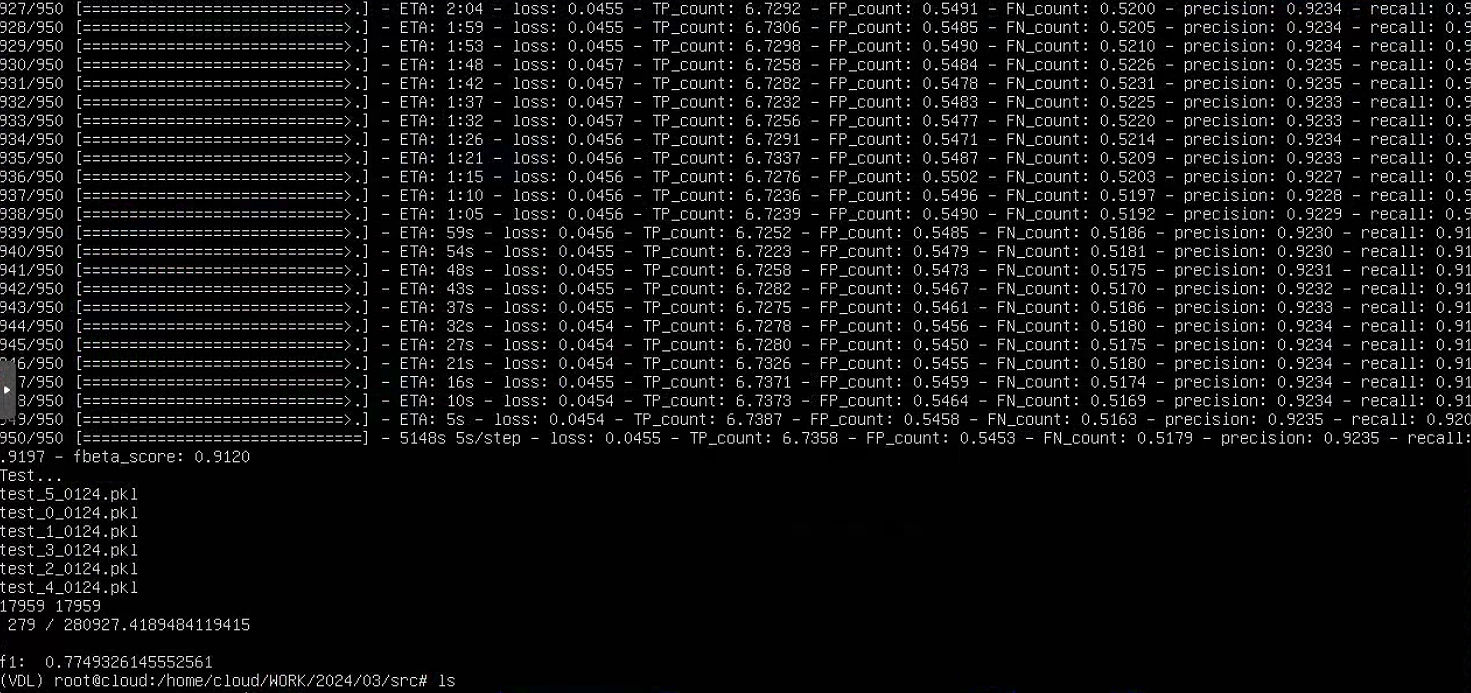
最终结果

- END -


::: block-2
一个只记录最真实学习网络安全历程的小木屋,最新文章会在公众号更新,欢迎各位师傅关注!

公众号名称:奇怪小木屋


图片名称

博客园主页:
博客园-我记得
https://www.cnblogs.com/Zyecho/
:::

前言

.NET Feature Management
是一个用于管理应用程序功能的库,它可以帮助开发人员在应用程序中轻松地添加、移除和管理功能。使用
Feature Management
,开发人员可以根据不同用户、环境或其他条件来动态地控制应用程序中的功能。这使得开发人员可以更灵活地管理应用程序的功能,并根据需要快速调整和部署新功能。
Feature Management
还提供了一些方便的工具和
API
,帮助开发人员更轻松地实现功能管理和控制。

安装

  • .Net CLI
dotnet add package Microsoft.FeatureManagement.AspNetCore --version 4.0.0-preview2
  • Package Manager
NuGet\Install-Package Microsoft.FeatureManagement.AspNetCore -Version 4.0.0-preview2

或者
Vs
Nuget
包管理 管理工具安装等

依赖注入

.Net
功能管理器是通过框架的本机配置系统配置的,简单来说只要是.Net 的配置系统支持的数据源都可以用做功能管理(
FeatureManagement
)的配置源

.NET
中的配置是使用一个或多个配置提供程序执行的。 配置提供程序使用各种配置源从键值对读取配置数据:
  • 设置文件,例如
    appsettings.json
  • 环境变量
  • Azure Key Vault
  • Azure
    应用配置
  • 命令行参数
  • 已安装或已创建的自定义提供程序
  • 目录文件
  • 内存中的
    .NET
    对象
  • 第三方提供程序

.NET 中的配置提供程序

依赖注入:

service.AddFeatureManagement();

默认情况下,功能管理器从
.NET
appsettings.json
配置数据的
FeatureManagement
Section
来获取数据

  // Define feature flags in config file
  "FeatureManagement": {
    "sayHello": true, // On feature
    "todo": false // Off feature
  }

当然也可以自定义
Section

service.AddFeatureManagement(builder.Configuration.GetSection("CustomFeatureManagement"));
  // Define feature flags in config file
  "CustomFeatureManagement": {
    "sayHello": true, // On feature
    "todo": false // Off feature
  }

功能开关注册成 Scoped

AddFeatureManagement
方法将特性管理服务作为单例添加到应用程序中,但有些情况下可能需要将特性管理服务添加为
Scoped
(作用域服务)。例如,我们可能希望使用
Scoped
以获取上下文信息的功能过滤器。在这种情况下,应该使用
AddScopedFeatureManagement
方法, 这将确保功能管理服务(包括功能过滤器)被添加为
Scoped
服务。

//功能管理注册 Scoped 作用域
service.AddScopedFeatureManagement();

功能管理的基本形式是检查功能标志是否已启用,然后根据结果执行操作。这通过
IFeatureManager

IsEnabledAsync
方法来实现。

对我们上面的
FeatureManager
的配置来做一个验证

  • sayhello 功能开关标志测试
app.MapGet("/sayHello", async Task<IResult> ([FromServices] IFeatureManager manager, string name) =>
{
    if (await manager.IsEnabledAsync("sayHello"))
    {
        return TypedResults.Ok($"hello {name}");
    }
    return TypedResults.NotFound();

}).WithSummary("sayHello");

调用接口查看一下结果,在配置中我们的
sayHello
设置为
true

状态码为 200,返回信息"hello Ruipeng",符合预期,功能开启正常。

  • todo 功能开关标志测试
app.MapGet("/todo", async Task<IResult> ([FromServices] IFeatureManager manager) =>
{
    if (await manager.IsEnabledAsync("todo"))
    {
        return TypedResults.Ok($"todo is enabled !");
    }
    return TypedResults.NotFound();

}).WithSummary("todo");

调用接口查看一下结果,状态码 404,返回信息 Not Found,符合预期,功能未开启。

上面的示例简单讲解了一下功能开关的使用,接下来深入了解功能开关的配置

功能开关的定义

功能开关的标志由两部分组成:名称和用于启用功能的过滤器列表。

功能过滤器(
Feature filters
)定义了功能应何时启用的场景。在评估特性是开启还是关闭时,会遍历其功能过滤器列表,直到其中一个过滤器决定启用该特性。如果一个过滤器都没有标识改功能应该开启,那此功能标志是关闭的状态。

内置过滤器

  • AlwaysOn
    : 总是开启
  • PercentageFilter
    :根据百分比随机启用/禁用功能。这个过滤器允许您基于一个百分比值来决定功能被启用的概率,提供了一种简单而灵活的机制来控制特性的曝光范围。
  • TimeWindowFilter
    :在预定义的时间窗口内启用特性。这个过滤器允许您指定特性的开始和结束时间,确保特性只在特定的时间段内可用。这对于限时活动或测试场景非常有用。
  • TargetingFilter
    :(这个主要是在
    Azure
    用为
    目标受众启用功能的分阶段推出
    针对特定用户或用户组启用特性。这个过滤器允许您根据用户属性或标识来启用特性,例如基于用户 ID、角色、地区等。此外,对于此过滤器,您还可以设置一个百分比值,以进一步控制特性在目标用户中的启用概率。

详细信息可以参考
注册功能筛选器 Docs

过滤器的配置指南

需要注意的是在功能标志名称中禁止使用冒号
:
,这是为了遵循一定的命名规范,避免与现有的或未来的功能管理系统产生冲突或造成解析错误。在定义功能标志名称时,请确保使用合法和合适的字符组合,以确保系统的稳定性和可维护性。
功能使用
EnabledFor
属性来定义它们的功能过滤器


AlwaysOn
过滤器

  // Define feature flags in config file
  "FeatureManagement": {
    //始终启用该功能
    "featureAlwaysOn": {
      "EnabledFor": [
        {
          "Name": "AlwaysOn"
        }
      ]
    }
  }
app.MapGet("/featureAlwaysOn", async Task<IResult> (IFeatureManager manager) =>
{
    if (await manager.IsEnabledAsync("featureAlwaysOn"))
    {
        return TypedResults.Ok($"featureAlwaysOn is enabled !");
    }
    return TypedResults.NotFound();
}).WithSummary("featureAlwaysOn");

调用接口查看测试结果,返回 200,符合预期


TimeWindow
过滤器

  "FeatureManagement": {
    "featureTimeWindow": {
      "EnabledFor": [
        {
          "Name": "TimeWindow",
          "Parameters": {
            "Start": "2024-03-26 13:30:00",
            "End": "2024-03-27 13:30:00"
          }
        }
      ]
    }
  }

指定了一个名为
TimeWindow
的功能过滤器。这是一个可配置的功能过滤,具有
Parameters
属性,配置了功能活动的开始和结束时间 。

app.MapGet("/featureTimeWindow", async Task<IResult> (IFeatureManager manager) =>
{
    if (await manager.IsEnabledAsync("featureTimeWindow"))
    {
        return TypedResults.Ok($"featureTimeWindow is enabled !");
    }
    return TypedResults.NotFound();
}).WithSummary("TimeWindow 过滤器测试");

调用接口测试:返回 200 符合预期


Percentage
过滤器
百分比过滤器(Percentage Filter)它根据指定的百分比值随机启用或禁用某个特性。这种过滤器允许您控制特性的曝光率,以便在不同的用户群体中测试特性的效果,或者在逐步推广新特性时控制其影响范围。

  "FeatureManagement": {
    "featurePercentage": {
      "EnabledFor": [
        {
          "Name": "Percentage",
          "Parameters": {
            "Value": "50"
          }
        }
      ]
    }
  },

app.MapGet("/featurePercentage", async Task<IResult> (IFeatureManager manager) =>
{
    if (await manager.IsEnabledAsync("featurePercentage"))
    {
        return TypedResults.Ok($"featurePercentage is enabled !");
    }
    return TypedResults.NotFound();
}).WithSummary("Percentage 过滤器测试");

连续测两次

第一次测试结果: 返回 200

第二次测试结果:返回 404

通过测试结果可以看出有百分之五十的几率成功,符合预期。

RequirementType

功能标志的
RequirementType
属性用于确定在评估功能状态时,过滤器应该使用任何(
Any
)还是全部(
All
)逻辑。如果未指定
RequirementType
,则默认值为
Any

  • Any
    表示只需一个过滤器评估为
    true
    ,特性就会被启用。
  • All
    表示每个过滤器都必须评估为
    true
    ,特性才会被启用。
    RequirementType

    All
    会改变遍历方式。首先,如果没有过滤器,则功能将被禁用。然后,遍历特性过滤器,直到其中一个过滤器决定应将功能禁用。如果没有过滤器指示应禁用功能,则该功能将被视为已启用。
  "FeatureManagement": {
    "featureRequirementTypeAll": {
      "RequirementType": "All",
      "EnabledFor": [
        {
          "Name": "TimeWindow",
          "Parameters": {
            "Start": "2024-03-27 13:00:00",
            "End": "2024-05-01 13:00:00"
          }
        },
        {
          "Name": "Percentage",
          "Parameters": {
            "Value": "50"
          }
        }
      ]
    }
  },
app.MapGet("/featureRequirementTypeAll", async Task<IResult> (IFeatureManager manager) =>
{
    if (await manager.IsEnabledAsync("featureRequirementTypeAll"))
    {
        return TypedResults.Ok($"featureRequirementTypeAll is enabled !");
    }
    return TypedResults.NotFound();
}).WithSummary("RequirementTypeAll 多过滤器测试");

上面的实例设置为
all
之后此功能标志的过滤器列表必须全部符合要求才能调用成功。

比如上面我设置的开始日期是
2024-03-27 13:00:00
当前时间小于这个日期

无论调用几次还是还是 404,结果符合我们的预期。

自定义过滤器

要实现一个功能过滤器,必须要实现的是一个
IFeatureFilter
接口,接口包含了一个
EvaluateAsync
的方法。当功能标志指定启用该过滤器时,将调用
EvaluateAsync
方法,如果方法返回的是
true
,则表示应该启用功能。

定义一个中间件接口只对某个用户组做开放,这个场景在 C 端的产品上比较常见,比如说部分功能的内测。

[FilterAlias("AuthenticatedGroup")]
public class AuthenticatedGroupFilter : IFeatureFilter, IFeatureFilterMetadata, IFilterParametersBinder
{
    public object BindParameters(IConfiguration parameters)
    {
        return parameters.Get<GroupSetting>() ?? new GroupSetting();
    }

    public Task<bool> EvaluateAsync(FeatureFilterEvaluationContext featureFilterContext)
    {
        GroupSetting filterSettings = ((GroupSetting)featureFilterContext.Settings) ?? ((GroupSetting)BindParameters(featureFilterContext.Parameters));
        // 假设您有一个方法来检查用户是否已通过身份验证
        // 例如,这可能是一个从身份验证服务或中间件中获得的属性或方法
        bool isAuthenticated = IsGroupAuthenticated(filterSettings);
        return Task.FromResult(isAuthenticated);
    }


    private bool IsGroupAuthenticated(GroupSetting groupSetting)
    {
        // 在这里编写您的身份验证检查逻辑
        // 这可能涉及到检查HTTP请求的上下文、会话状态、令牌等
        // 具体的实现将取决于您使用的身份验证机制

        // 示例:返回一个硬编码的值,表示用户是否已通过身份验证
        // 在实际应用中,您应该实现实际的检查逻辑
        return true; // 或者 false,取决于用户是否已通过身份验证
    }
}

FilterAlias
是定义过滤器的别名,我们在配置文件中指定时需要用别名,
IFeatureFilter
接口返回的信息决定功能是否启用,
IFeatureFilterMetadata
是一个空的标记接口,用于评估功能状态的特征过滤器的标记接口,
IFilterParametersBinder
接口用于参数绑定。

  • json 配置
  "FeatureManagement": {
    "featureAuthencatedGroup": {
      "EnabledFor": [
        {
          "Name": "AuthenticatedGroup",
          "Parameters": {
            "Groups": [ "AdminGroup", "GroupOne" ]
          }
        }
      ]
    }
  }
  • 依赖注入
services.AddFeatureManagement()
    .AddFeatureFilter<AuthenticatedGroupFilter>();

调用
AddFeatureFilter
方法可把自定义的过滤器注册到功能管理器中。

app.MapGet("/featureAuthencatedGroup", async Task<IResult> (IFeatureManager manager) =>
{
    if (await manager.IsEnabledAsync("featureAuthencatedGroup"))
    {
        return TypedResults.Ok($"featureAuthencatedGroup is enabled !");
    }
    return TypedResults.NotFound();
}).WithSummary("AuthencatedGroup 自定义过滤器测试");

测试一下,返回 200 ,符合预期

一个小 tips;如果多个过滤器有同一个别名是,可以用命名空间加别名的方式来定义唯一一个过滤器,例如,
Microsoft.Percentage
是一个完全限定的别名,它明确指出了
Percentage
过滤器位于
Microsoft
命名空间下

自定义开启中间件

  "FeatureManagement": {
    "featureMiddleWare": {
      "EnabledFor": [
        {
          "Name": "Percentage",
          "Parameters": {
            "Value": "50"
          }
        }
      ]
    }
  }

自定义中间件

public class FeatureMiddleWare(RequestDelegate next)
{
    public async Task Invoke(HttpContext context)
    {
        Console.WriteLine("FeatureMiddleWare管道执行之前~");
        await next(context);
        Console.WriteLine("FeatureMiddleWare管道执行之后~");
    }
}

添加扩展方法

//测试中间件的功能开启
app.UseMiddlewareForFeature<FeatureMiddleWare>("featureMiddleWare");

随便调用一个接口测试一下,可以看到管道根据百分比触发成功

通过上述调用,应用程序添加了一个中间件组件,只有在特性“featureMiddleWare”被启用时才会出现在请求管道中。如果在运行时启用/禁用特性,中间件管道可以动态更改。

这是建立在基于特性对整个应用程序进行分支的更通用能力之上。

app.UseForFeature(featureName, appBuilder =>
{
appBuilder.UseMiddleware<T>();
});

MinimalApis 集成

在我们的 MVC 或者 Razor Pages 中有如下方案来启用工农的开关,不过多介绍大家可以官方浏览学习。

FeatureManagement-Dotnet

services.AddMvc(o =>
{
    o.Filters.AddForFeature<SomeMvcFilter>("FeatureX");
});
[FeatureGate("FeatureX")]
public class IndexModel : PageModel
{
    public void OnGet()
    {
    }
}


MinimalAps
中可以利用
endpoint filter
来简化公功能的开关,

  • 第一步创建最小 Api 的基类,所有的 MinimalApis 过滤器都要继承它
public abstract class FeatureFlagEndpointFilter(IFeatureManager featureManager) : IEndpointFilter
{
    protected abstract string FeatureFlag { get; }

    private readonly IFeatureManager _featureManager = featureManager;

    public async ValueTask<object?> InvokeAsync(EndpointFilterInvocationContext context,
        EndpointFilterDelegate next)
    {
        var isEnabled = await _featureManager.IsEnabledAsync(FeatureFlag);
        if (!isEnabled)
        {
            return TypedResults.NotFound();
        }
        return await next(context);
    }
}
  • 定义目标 Json 配置
  "FeatureManagement": {
    "featureUserApi": {
      "EnabledFor": [
        {
          "Name": "Percentage",
          "Parameters": {
            "Value": "50"
          }
        }
      ]
    }
  • 定义最小 Api 过滤器
public class UserApiFeatureFilter(IFeatureManager featureManager) : FeatureFlagEndpointFilter(featureManager)
{
    protected override string FeatureFlag => "featureUserApi";
}

  • 定义 Api 接口测试
//最小Api分组功能添加
{
    var userGroup = app.MapGroup("User").WithTags("User").AddEndpointFilter<UserApiFeatureFilter>(); ;

    userGroup.MapGet("/featureUserApi", IResult (IFeatureManager manager) =>
    {
        return TypedResults.Ok($"featureUserApi is enabled !");

    }).WithSummary("featureUserApi 最小Api过滤器测试");
}

调用测试,可以看出我们配置的百分比过滤器成功。

通过对
IEndpointFilter
的封装借助
最小 Api

MapGroup
可以对一组相关的 Api 进行功能管理,简化了我们一个个 Api 注册。

最后

在本文中,我们深入探讨了
.NET Feature Management
库的安装、配置和使用方法,以及如何利用功能开关来动态管理应用程序的功能。以下是关键点的总结和提炼:

  • 安装与依赖注入:通过
    .NET CLI

    NuGet Package Manager
    安装等方式
    Microsoft.FeatureManagement.AspNetCore
    库,并在应用程序中添加功能管理服务的依赖注入。

  • 功能定义与配置:通过
    .NET
    的配置系统,在
    appsettings.json
    中定义功能标志,指定功能的启用和禁用状态,以及可选的功能过滤器配置。

  • 自定义功能过滤器:实现
    IFeatureFilter
    接口来定义自定义功能过滤器,根据特定条件决定功能是否启用,例如基于用户组、时间窗口或百分比等条件。

  • 功能开关的使用:利用
    IFeatureManager

    IsEnabledAsync
    方法检查功能是否启用,根据不同的功能状态执行相应的逻辑,实现功能的动态控制。

  • RequirementType
    设置:可以通过
    RequirementType
    属性指定功能过滤器的逻辑要求,是
    Any
    还是
    All
    ,决定多个过滤器的组合逻辑。

  • 自定义中间件的动态切换:通过自定义功能过滤器和中间件,可以根据功能状态动态调整请求管道,实现功能开关对中间件的控制。

  • 最小 API 集成:在
    Minimal APIs
    中,利用
    IEndpointFilter
    接口来简化功能开关的应用,将功能管理应用到最小 API 的端点上,实现对一组相关
    API
    的功能管理。

通过以上总结和提炼,您可以更好地了解和应用
.NET Feature Management
库,实现灵活的功能管理和动态控制应用程序的功能。

有条件的富哥可以体验一下
在 Azure 应用程序配置中管理功能标志

更多详细的内容请浏览
FeatureManagement-Dotnet

本文测试
完整源代码

1.前言

LlamaIndex是一个基于LLM的数据处理框架,在RAG领域非常流行,简单的几行代码就能实现本地的文件的对话功能,对开发者提供了极致的封装,开箱即用。

本文以官方提供的最简单的代理示例为例,分析LlamaIndex在数据解析、向量Embedding、数据存储及召回的整个源码过程。

通过学习框架的源码也能让开发者们在实际的企业大模型应用开发中,对RAG有一个更清晰的了解和认知。

本次选用的技术组件:

  • llm
    :OpenAI
  • Embedding
    :OpenAI
  • VectorDB
    :ElasticSearch

官方代码示例如下:


# 1.构建向量数据库存储对象实例
vector_store = ElasticsearchStore(
    index_name="my_index",
    es_url="http://localhost:9200",
)
storage_context = StorageContext.from_defaults(vector_store=vector_store)
# 加载本地的数据集
documents = SimpleDirectoryReader('data').load_data()
# 构建索引
index = VectorStoreIndex.from_documents(documents,storage_context=storage_context)
# 服务对象,构建query引擎
service_context = ServiceContext.from_defaults(llm=OpenAI())
query_engine = index.as_query_engine(service_context=service_context)
# 问问题
resp=query_engine.query("住院起付线多少钱?")
# 响应答案
print(resp)

2.处理过程

2.1 数据处理过程

在数据处理的过程中,主要包含几个核心的步骤:

  • 初始化向量存储引擎,目前向量数据库类型非常多,笔者本机跑了一个es的docker镜像,这里就选择es了
  • 读取数据,数据格式包括:PDF、WORD、TXT等等文本数据
  • 在数据读取完成后,会对文档内容进行分割,然后Embedding(调用embedding模型)存储入库

2.1.1 处理加载不同的文件类型(构建Document)

SimpleDirectoryReader
是llamaindex提供的一个基于文件夹的读取器类,会根据文件夹中的文件扩展后缀类型自动加载数据

主要支持的文件数据类型如下:

DEFAULT_FILE_READER_CLS: Dict[str, Type[BaseReader]] = {
    ".hwp": HWPReader,
    ".pdf": PDFReader,
    ".docx": DocxReader,
    ".pptx": PptxReader,
    ".ppt": PptxReader,
    ".pptm": PptxReader,
    ".jpg": ImageReader,
    ".png": ImageReader,
    ".jpeg": ImageReader,
    ".mp3": VideoAudioReader,
    ".mp4": VideoAudioReader,
    ".csv": PandasCSVReader,
    ".epub": EpubReader,
    ".md": MarkdownReader,
    ".mbox": MboxReader,
    ".ipynb": IPYNBReader,
}


class SimpleDirectoryReader(BaseReader):
    """Simple directory reader.

    Load files from file directory.
    Automatically select the best file reader given file extensions.

    Args:
        input_dir (str): Path to the directory.
        input_files (List): List of file paths to read
            (Optional; overrides input_dir, exclude)
        exclude (List): glob of python file paths to exclude (Optional)
        exclude_hidden (bool): Whether to exclude hidden files (dotfiles).
        encoding (str): Encoding of the files.
            Default is utf-8.
        errors (str): how encoding and decoding errors are to be handled,
              see https://docs.python.org/3/library/functions.html#open
        recursive (bool): Whether to recursively search in subdirectories.
            False by default.
        filename_as_id (bool): Whether to use the filename as the document id.
            False by default.
        required_exts (Optional[List[str]]): List of required extensions.
            Default is None.
        file_extractor (Optional[Dict[str, BaseReader]]): A mapping of file
            extension to a BaseReader class that specifies how to convert that file
            to text. If not specified, use default from DEFAULT_FILE_READER_CLS.
        num_files_limit (Optional[int]): Maximum number of files to read.
            Default is None.
        file_metadata (Optional[Callable[str, Dict]]): A function that takes
            in a filename and returns a Dict of metadata for the Document.
            Default is None.
    """

    supported_suffix = list(DEFAULT_FILE_READER_CLS.keys())
    //....

总共支持了16个文件数据类型,整理到表格如下:

文件类型 依赖组件 说明
hwp olefile
pdf pypdf
docx docx2txt
pptx、pptm、ppt python-pptx、transformers、torch 用到一些模型,对数据进行理解、提取
jpg、png、jpeg、 sentencepiece、transformers、torch 用到一些模型,对数据进行理解、提取
mp3、mp4 whisper 用到一些模型,对数据进行理解、提取
csv pandas
epub EbookLib、html2text
md 本地流直接open,读取文本
mbox bs4、mailbox
ipynb nbconvert

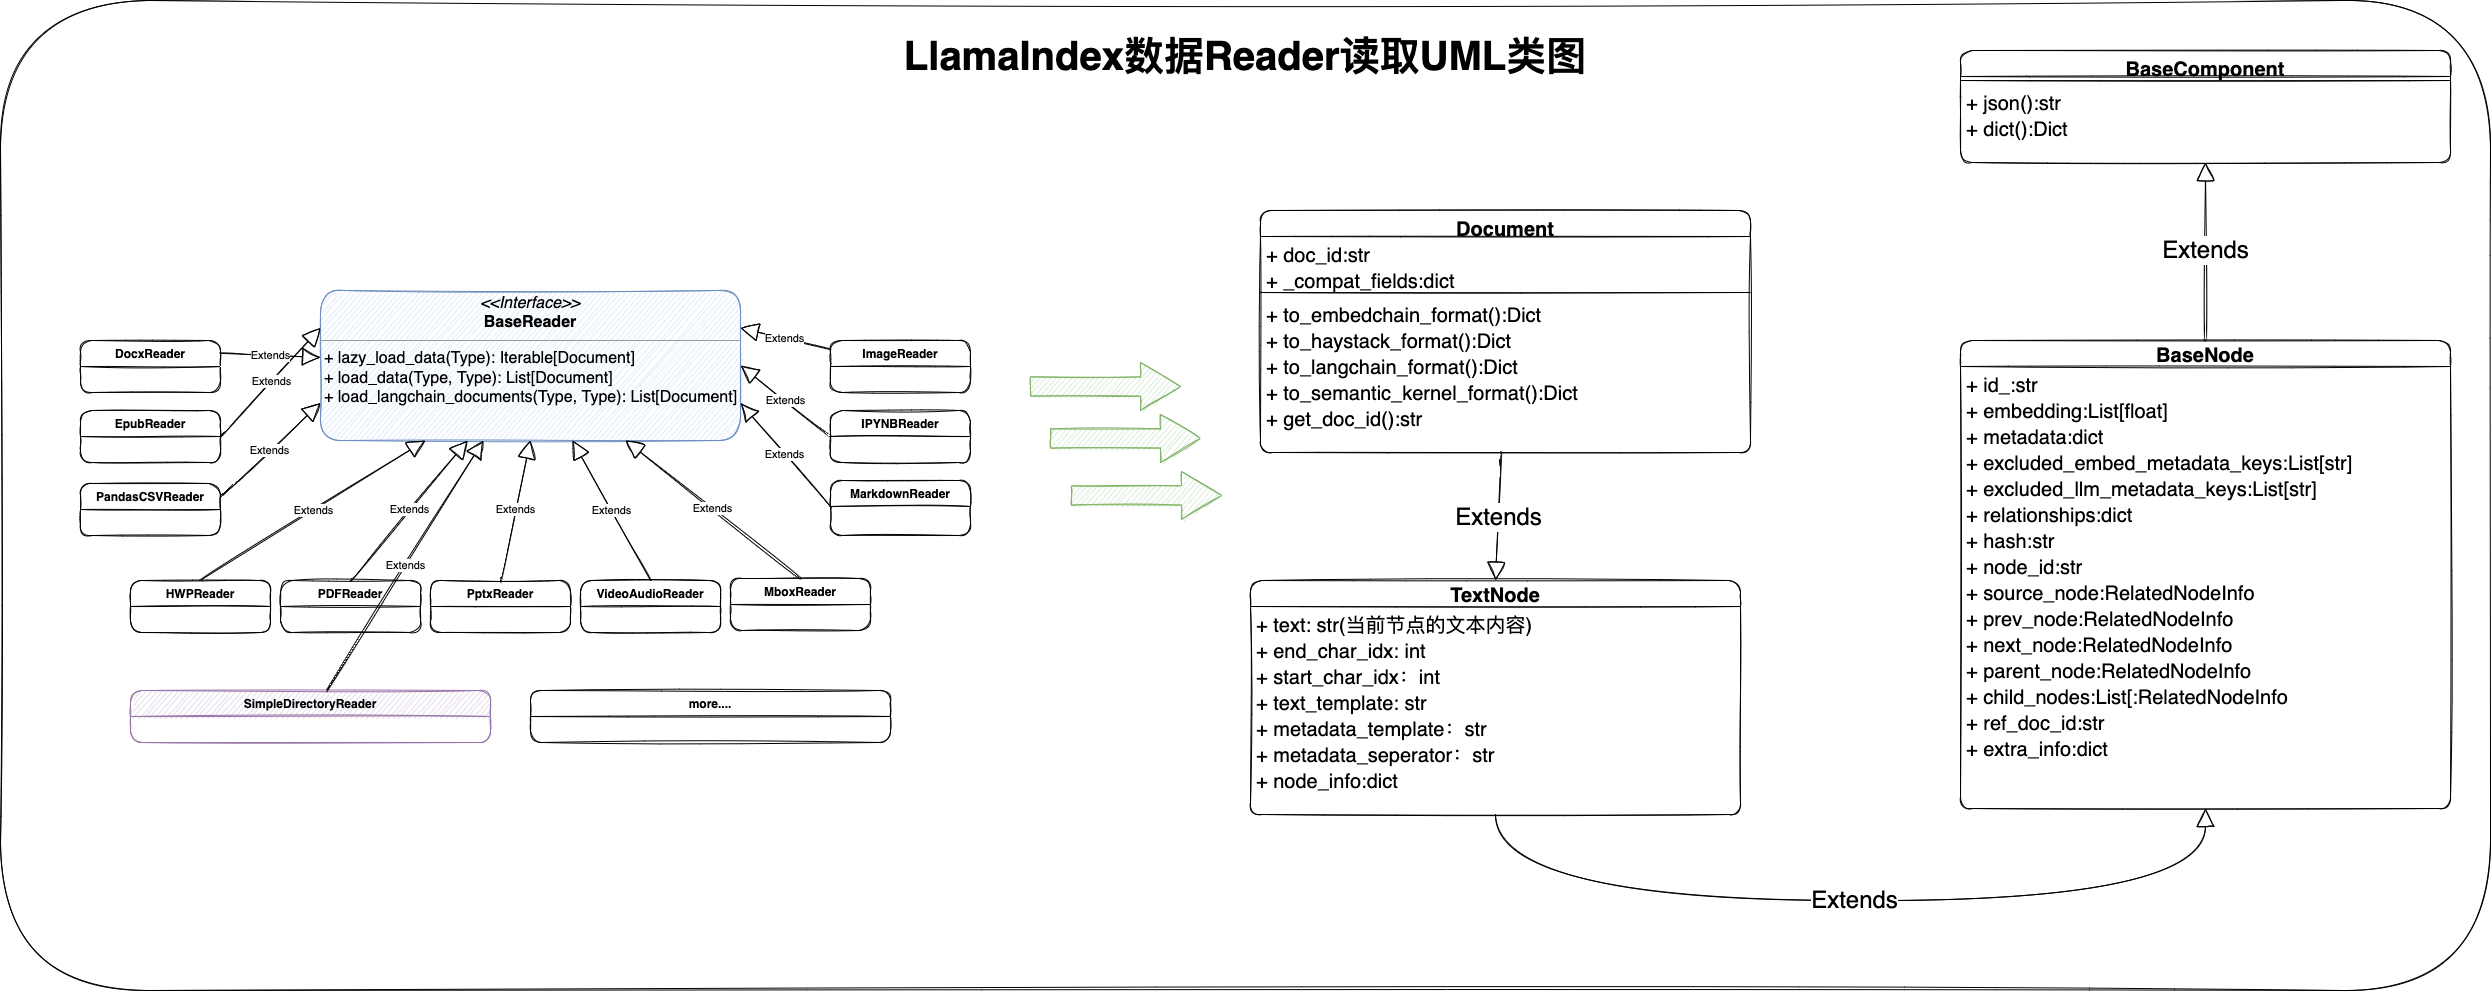
整个Reader类的UML类图设计如下:

所有文件数据类型的Reader,通过
load_data
方法,最终得到该文档的
Document
对象集合,
Document
类是LlamaIndex框架的处理文档的核心类对象,从该类的结构设计来看,我们可以总结一下:

  • 核心字段

    id(文档唯一id)

    text(文本内容)

    embedding(向量float浮点型集合)

    metadata(元数据)
  • BaseNode提供了一个
    树结构
    的设计,对于一篇文档而言,从多级标题划分来看,树结构能更好的描述一篇文档的基础结构
  • Document提供了一些外部应用框架适配的方法,比如:LangChain、EmbedChain等等

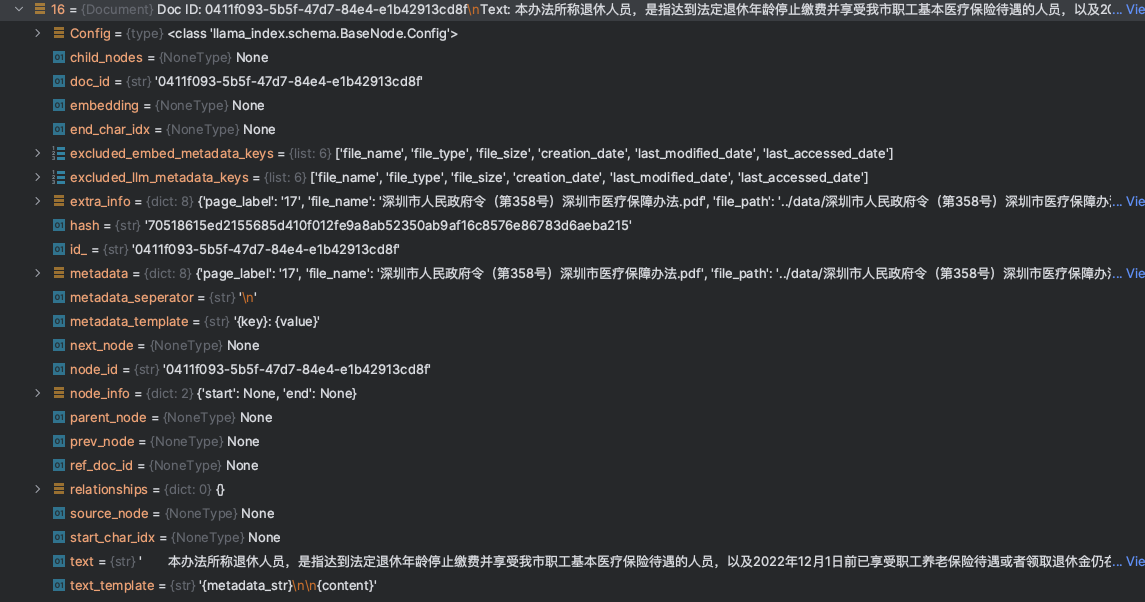
最终构建完成所有的Document信息后,我们可以看到下面一个结构信息

本示例程序,使用的是一个PDF文件,由于我们并未指定分割等策略,LlamaIndex对于PDF文件是以Page为单位,进行切割,最终将所有的Document对象存储进入向量数据库

image-20240114153311229

2.1.2 构建向量数据库索引(Index)

当本地数据集处理完成,得到一个
Document
集合的时候,此时,这需要构建向量数据库的索引,主要是包含几个过程:

  • 调用不同的向量数据库中间件,构建集合索引,对于ES来说,则是创建Index
  • 调用Embedding模型(基于OpenAI提供的
    text-embedding-ada-002
    模型),将Document对象集合中的text文本,进行向量化处理并赋值

  • Document
    集合的对象值(text、embedding、metadata)存储进入向量数据库

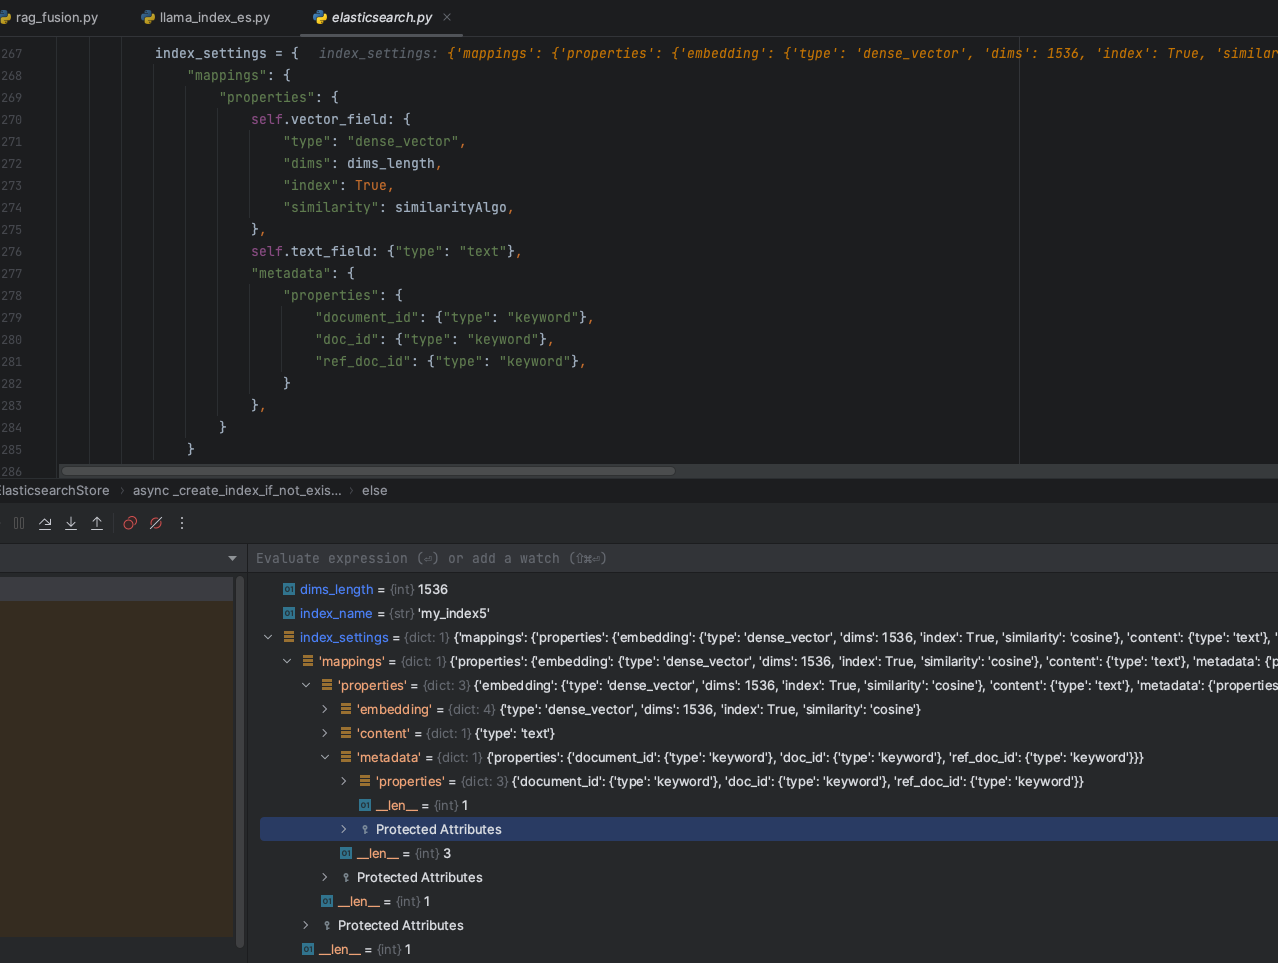
在LlamaIndex创建ES的向量索引结构中,初始情况下,核心字段也是前面我们提到的
Document
类中的几个核心字段(id、embedding、content、metadata),如下图:

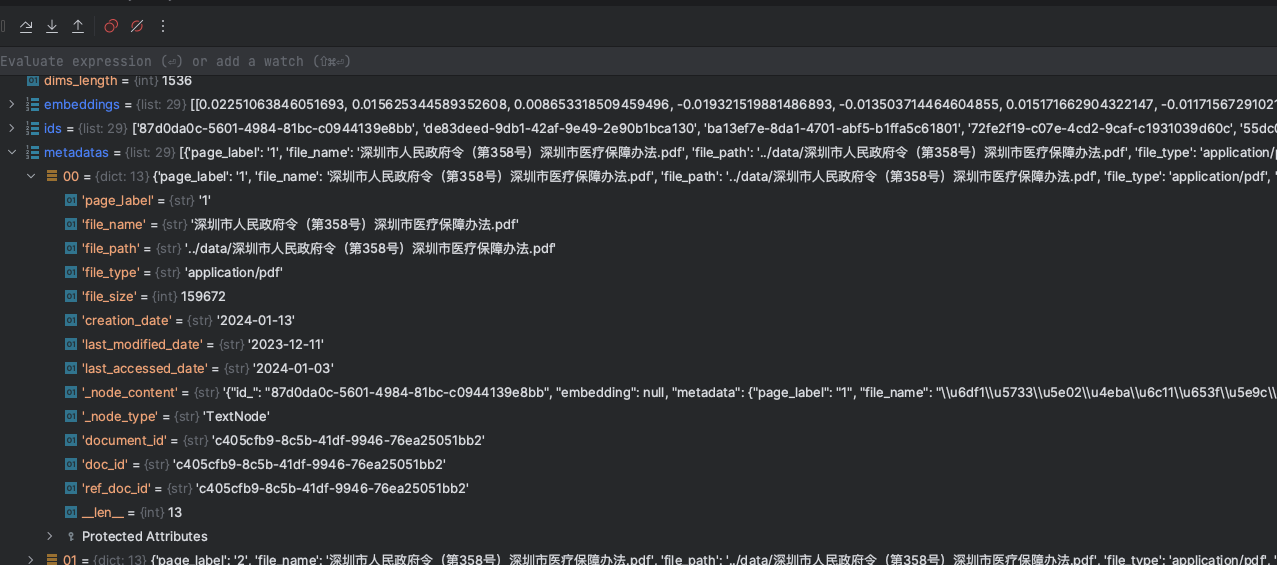
image-20240114164439411

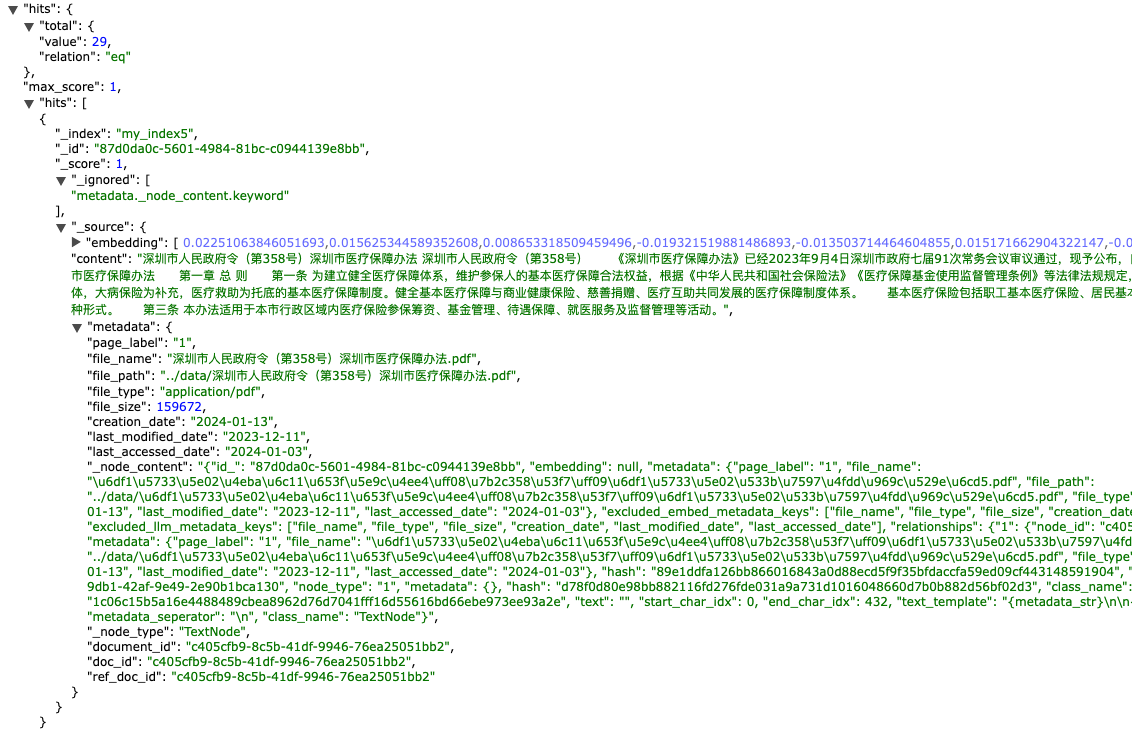
但是在Document对象遍历结束后,在数据存储阶段,考虑到元数据的信息,LlamaIndex会扩充metadata元数据的字段,如下图:

image-20240114164647308

元数据信息会将文档的信息提取出来,包括页码、文件大小、文件名称、创建日期等等信息

最终在本地数据集的情况下,LlamaIndex创建的ES数据索引结构最终就会变成下面这种结构形式:

{
    "mappings": {
        "properties": {
            "content": {
                "type": "text"
            },
            "embedding": {
                "type": "dense_vector",
                "dims": 1536,
                "index": true,
                "similarity": "cosine"
            },
            "metadata": {
                "properties": {
                    "_node_content": {
                        "type": "text",
                        "fields": {
                            "keyword": {
                                "type": "keyword",
                                "ignore_above": 256
                            }
                        }
                    },
                    "_node_type": {
                        "type": "text",
                        "fields": {
                            "keyword": {
                                "type": "keyword",
                                "ignore_above": 256
                            }
                        }
                    },
                    "creation_date": {
                        "type": "date"
                    },
                    "doc_id": {
                        "type": "keyword"
                    },
                    "document_id": {
                        "type": "keyword"
                    },
                    "file_name": {
                        "type": "text",
                        "fields": {
                            "keyword": {
                                "type": "keyword",
                                "ignore_above": 256
                            }
                        }
                    },
                    "file_path": {
                        "type": "text",
                        "fields": {
                            "keyword": {
                                "type": "keyword",
                                "ignore_above": 256
                            }
                        }
                    },
                    "file_size": {
                        "type": "long"
                    },
                    "file_type": {
                        "type": "text",
                        "fields": {
                            "keyword": {
                                "type": "keyword",
                                "ignore_above": 256
                            }
                        }
                    },
                    "last_accessed_date": {
                        "type": "date"
                    },
                    "last_modified_date": {
                        "type": "date"
                    },
                    "page_label": {
                        "type": "text",
                        "fields": {
                            "keyword": {
                                "type": "keyword",
                                "ignore_above": 256
                            }
                        }
                    },
                    "ref_doc_id": {
                        "type": "keyword"
                    }
                }
            }
        }
    }
}

数据Index定义完成,Document对象存储进入向量数据库,此时,我们的数据集结构如下:

image-20240114173127581

2.2 问答获取答案

在获取答案的过程中,主要包含几个核心的步骤:

  • 构建用户查询Query,对query进行Embedding处理,召回Topk的相似片段内容。
  • 组装Prompt工程内容,发送大模型获取答案

2.2.1 召回查询获取TopK

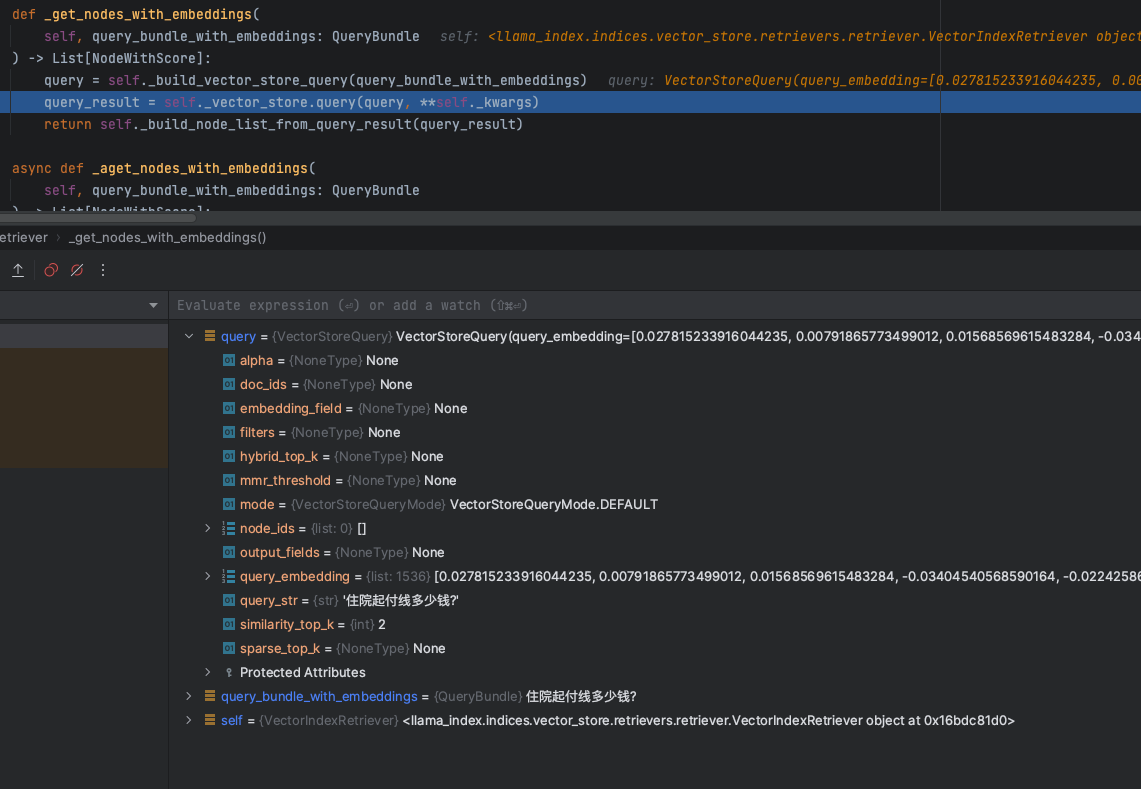
首先,在RAG的查询阶段,不管是使用那个向量数据库,根据数据库的类型,将用户的query语句进行Embedding后,再构建数据库的查询条件,如下图:

image-20240114155247333

这里面会包含几个核心的参数:

  • embedding:knn查询的浮点型向量数组值
  • top_k:根据knn相似度查询获取得到的topk值数量,在这个例子中,LlamaIndex默认值是2
  • filters:过滤条件
  • alpha:语义&关键词混合检索的权重,0代表bm25算法检索,1则代表knn

VectorStoreQuery
类结构定义如下:

@dataclass
class VectorStoreQuery:
    """Vector store query."""
    # knn搜索的查询Embedding浮点型数组
    query_embedding: Optional[List[float]] = None
    # knn搜索的top k取值
    similarity_top_k: int = 1
    doc_ids: Optional[List[str]] = None
    node_ids: Optional[List[str]] = None
    query_str: Optional[str] = None
    output_fields: Optional[List[str]] = None
    embedding_field: Optional[str] = None

    mode: VectorStoreQueryMode = VectorStoreQueryMode.DEFAULT

    # NOTE: only for hybrid search (0 for bm25, 1 for vector search)
    alpha: Optional[float] = None

    # metadata filters
    filters: Optional[MetadataFilters] = None

    # only for mmr
    mmr_threshold: Optional[float] = None

    # NOTE: currently only used by postgres hybrid search
    sparse_top_k: Optional[int] = None
    # NOTE: return top k results from hybrid search. similarity_top_k is used for dense search top k
    hybrid_top_k: Optional[int] = None

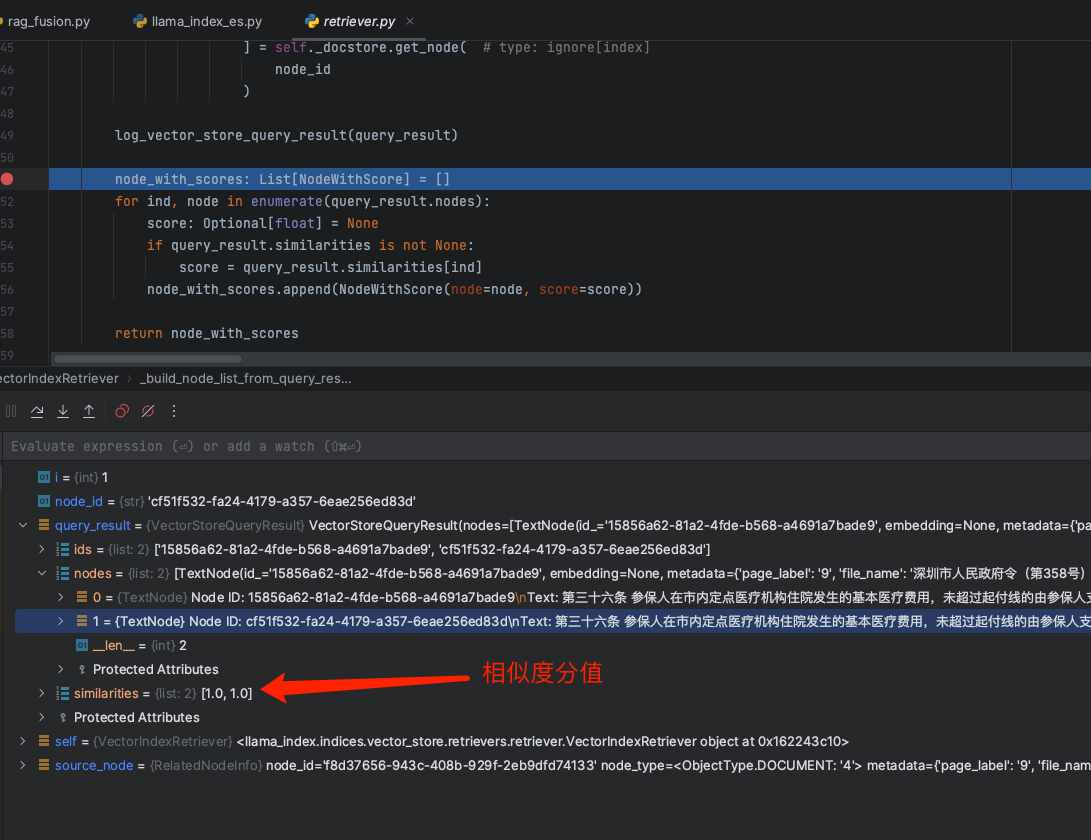
根据query的条件,会从向量数据库中召回获取得到topk的TextNode数组,如下:

image-20240114175533596

2.2.2 构建Prompt发送大模型获取答案

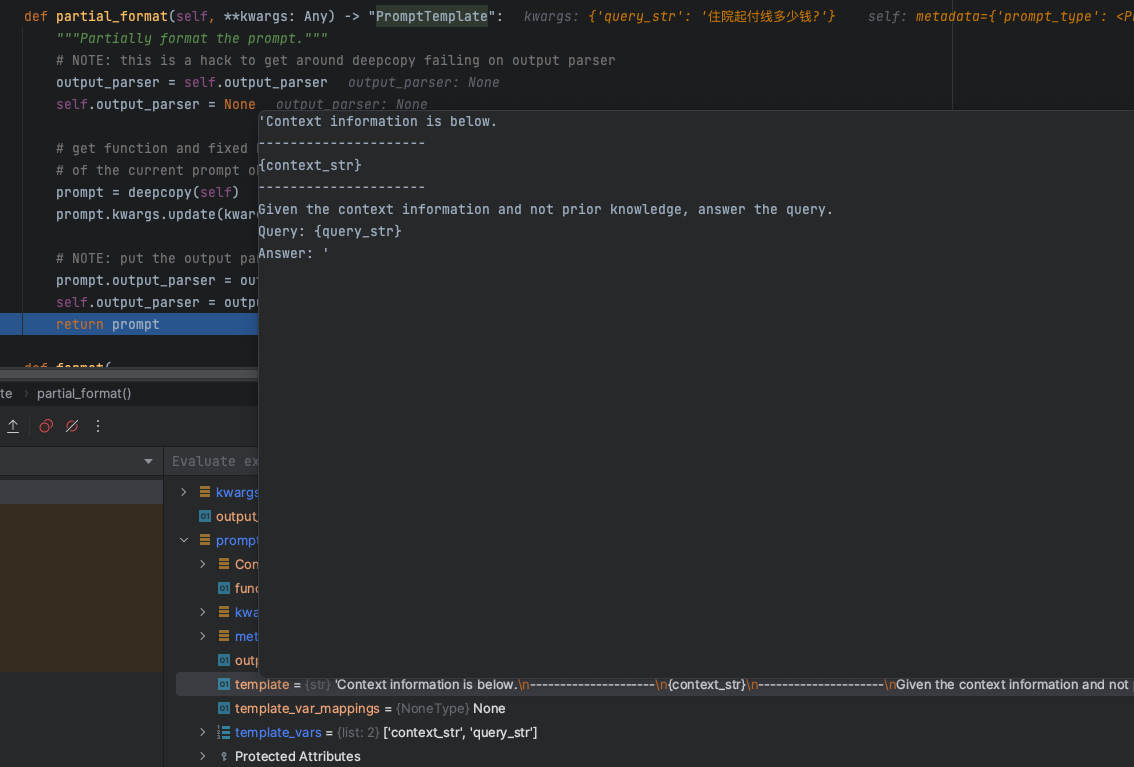
最终召回到引用文档内容后,剩下的就是构建整个大模型对话的Prompt工程,来看看LlamaIndex的基础Prompt是如何构建的

image-20240114160925472

image-20240114180819057

partial_format
方法获取得到一个基础的Prompt模版信息,内容如下:

'Context information is below.
---------------------
{context_str}
---------------------
Given the context information and not prior knowledge, answer the query.
Query: {query_str}
Answer: '

这里有两个核心的参数:

  • context_str
    : 从向量数据库召回查询的知识库引用文本数据上下文信息,从模版的设定也是告诉大模型基于知识信息进行回答
  • query_str
    :用户提问的问题

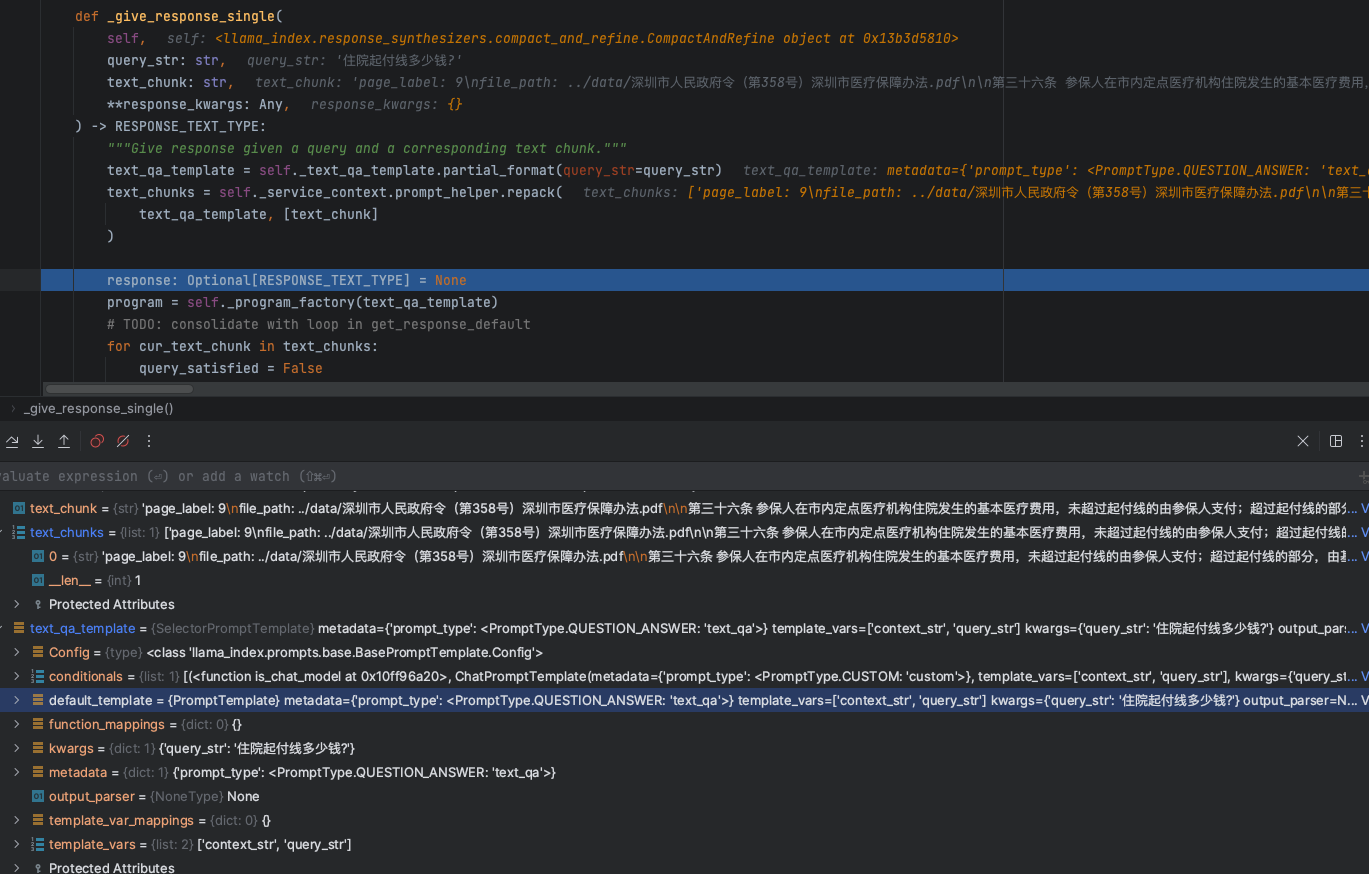
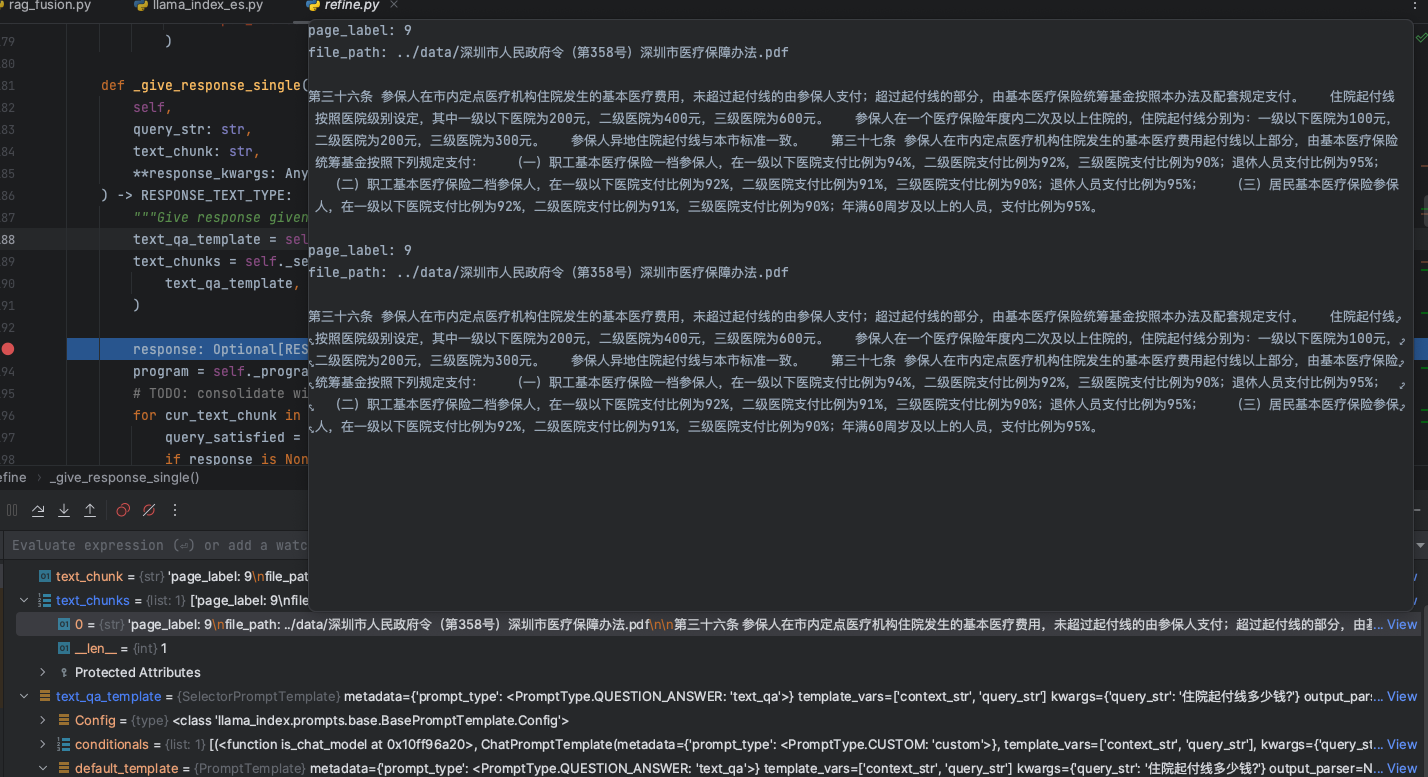
而最终的context_str信息,我们可以看到,如下图:

image-20240114181236770

我们的问题是:
住院起付线多少钱?

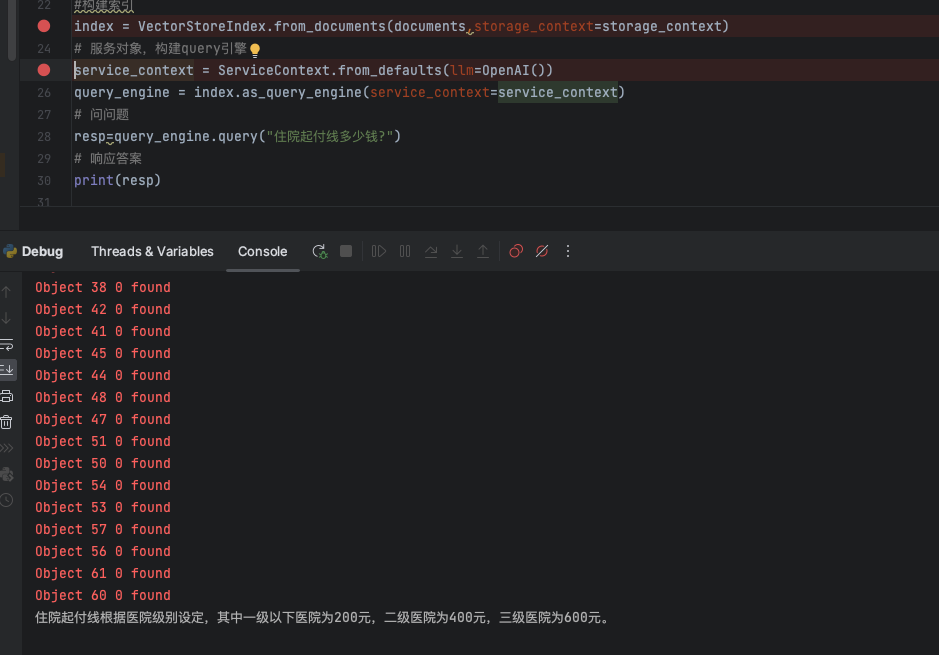
从最终knn检索召回的文档片段来看,精准的找到了知识库的引用内容,此时,交给大模型进行回答,获取我们想要的答案结果。

image-20240114181429648

3.总结

好了,本文从LlamaIndex给我们提供的基础的示例程序,基于Basic RAG的基础架构来分析数据的处理、召回响应等过程,我们可以看到LlamaIndex框架给了我们一个很好的处理流程,从这里我们可以总结如下:

  • 对于基础的RAG架构,有一个很好的认知,让开发者知道RAG是一个怎样的处理过程
  • 底层的向量数据库存储结构设计和中间程序的结构设计,能够给做RAG应用的开发人员一些启发,流行的RAG框架在数据结构设计上是如何做的,这对于企业开发人员来说,架构&数据结构设计是有很重要的参考意义。

前言

今天大姚给大家分享一个基于.NET Core构建的简单、跨平台、模块化、完全开源免费(MIT License)的商城系统:Module Shop。

商城后台管理端功能

  • 商品:分类、品牌、单位、选项(销售属性)、属性、属性模板、属性组。
  • 销售:订单、物流。
  • 内容:首页配置、评论、回复。
  • 配置:国家、用户、仓库、运费、高级设置。
  • 系统:系统信息、样本数据。

商城微信小程序功能

  • 商城首页、搜索功能。
  • 分类首页、分类商品、新品首发、人气推荐、商品页面等、可通过后台配置。
  • 商品详情页面,包含加入购物车、收藏商品、商品评论功能。
  • 完整的购物流程,商品的加入、编辑、删除、批量选择,收货地址的选择,下单支付
  • 会员中心(订单、收藏、足迹、收货地址、意见反馈)等等。

使用技术

前后端

  • 前端框架:Ant Design Pro(基于 Ant Design 和 umi 的封装的一整套企业级中后台前端/设计解决方案)。
  • 后端:.NET Core、RabbitMQ、Serilog、Hangfire、JWT、Redis、Apollo等。

支持数据库

Microsoft SQL Server, PostgreSQL, MySQL, SQLite。

项目源代码

服务端代码

位置:/src/server

后台管理前端代码

位置:/src/client

微信小程序代码

位置:/src/mini-program

商城部分截图

后台管理端

微信小程序

项目源码地址


更多项目实用功能和特性欢迎前往项目开源地址查看