2024年7月

一、序言

最近在写ThinkPHP关联模型的时候一些用法总忘,我就想通过写博客的方式复习和整理下一些用法。

具体版本:

  • topthink/framework:6.1.4
  • topthink/think-orm:2.0.61

二、实例应用

1、一对一关联

1.1、我先设计了两张表,分别为用户表(user),用户扩展表(user_extend)

1.2、分别给两个表建立模型

<?php/**
* Created by PhpStorm
* Author: fengzi
* Date: 2023/12/19
* Time: 14:50
*/namespace app\common\model;/**
* 用户模型
*/ class UserModel extendsComBaseModel
{
protected $name='user';/**
* 关联的用户扩展表
* hasOne的第一个参数是要关联的模型类名,第二个参数是关联的外键名,第三个参数是当前模型(userModel)的主键名
* @return \think\model\relation\HasOne
* @Author: fengzi
* @Date: 2024/6/27 17:38
*/ public functionuserExtend()
{
return $this->hasOne(UserExtendModel::class,'user_id','id');
}
}
<?php/**
* Created by PhpStorm
* Author: fengzi
* Date: 2023/12/19
* Time: 14:50
*/namespace app\common\model;/**
* 用户扩展表
*/ class UserExtendModel extendsComBaseModel
{
protected $name='user_extend';/**
* 用户模型的相对关联
* belongsTo的第一个参数是关联模型类名,第二个参数是当前模型(UserExtendModel)的外键,第三个参数是关联表的主键
* @return \think\model\relation\BelongsTo
* @Author: fengzi
* @Date: 2024/6/27 17:41
*/ public functionuser()
{
return $this->belongsTo(UserModel::class,'user_id','id');
}
}

1.3、with() 关联查询

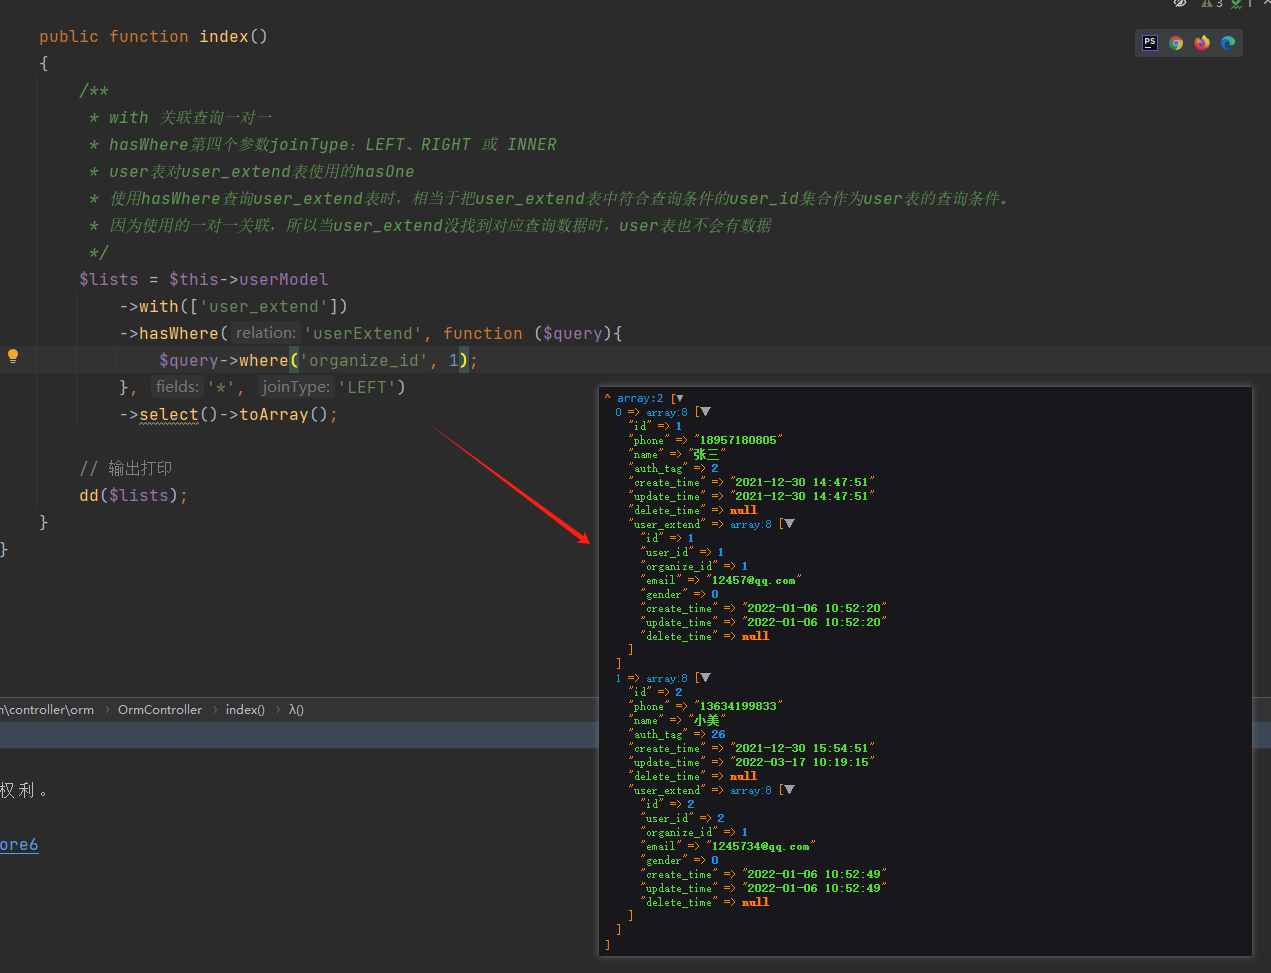
一对一关联查询,user表对user_extend表使用的hasOne,使用hasWhere查询user_extend表时,相当于把user_extend表中符合查询条件的user_id集合作为user表的查询条件。

因为使用的一对一关联,所以当user_extend没找到对应查询数据时,user表也不会有数据。

注意:

  • hasWhere() 的第一个参数一定是user模型中关联用户扩展表的方法名称。
  • with预载入查询中的关联模型中的名称是user模型中关联用户扩展表的方法名称,如果方法名是驼峰写法,也可以转换成下划线。如:userExtend => user_extend
<?php/**
* Created by PhpStorm
* Author: fengzi
* Date: 2024/6/26
* Time: 17:13
*/namespace app\admin\controller\orm;useapp\common\model\UserModel;classOrmController
{
/**
* @var UserModel|object|\think\App
*/ private UserModel $userModel;public function__construct()
{
$this->userModel = app(UserModel::class);
}
public functionindex()
{
/**
* with 关联查询一对一
* hasWhere第四个参数joinType的值:LEFT、RIGHT 或 INNER
* user表对user_extend表使用的hasOne
* 使用hasWhere查询user_extend表时,相当于把user_extend表中符合查询条件的user_id集合作为user表的查询条件。
* 因为使用的一对一关联,所以当user_extend没找到对应查询数据时,user表也不会有数据
*/ $lists = $this->userModel->with(['user_extend'])->hasWhere('userExtend', function ($query){$query->where('organize_id', 1);
}
, '*', 'LEFT')->select()->toArray();//输出打印 dd($lists);
}
}

1.3.1、查询结果展示
1.4、withJoin() 的查询( 我在user模型中定义的user_extend表的关联方法名称为userExtend ):

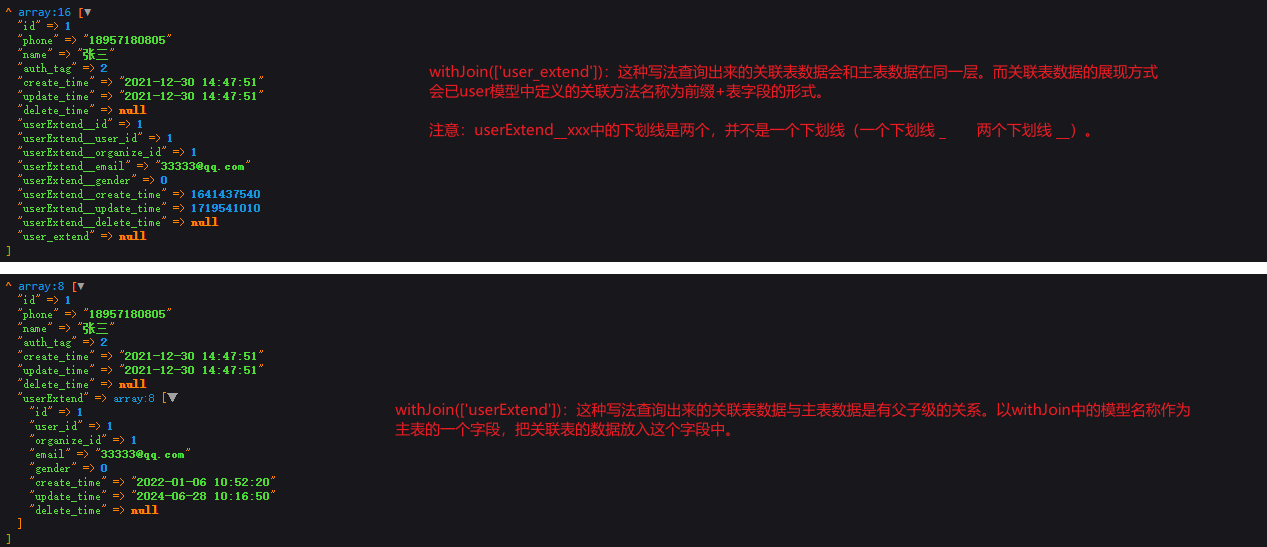
  • withJoin(['user_extend”]):这种写法查询出来的关联表数据会和主表数据在同一层级。而关联表数据的展现方式会以user模型中定义的关联方法名称为前缀+下划线+表字段的形式呈现。
    • 注意:【userExtend__xxx】中的下划线是两个,并不是一个下划线(一个下划线 _      ;两个下划线 __ )。所以在查询结果对象转换成数组后去获取字段数据时要注意,避免报错。
    • 这个写法同级中还多了一个【user_extend】字段,其值为null。这个字段在两个数据表中都是不存在的。
  • withJoin(['userExtend”]):这种写法査询出来的关联表数据与主表数据是有父子级关系。以withJoin中定义的模型名称“userExtend”作为主表的一个字段,把关联表的数据放入这个字段中。
public functionindex()
{
//实例化模型 $userModel = app(UserModel::class);/**
* 联表数据和主表数据在同一级
*/ $info = $userModel->withJoin(['user_extend'])->find(1);
dump(
$info->toArray());/**
* 联表数据是主表数据的一个子级,主/联表数据呈现父子级关系
*/ $info = $userModel->withJoin(['userExtend'])->find(1);

dd(
$info->toArray());
}

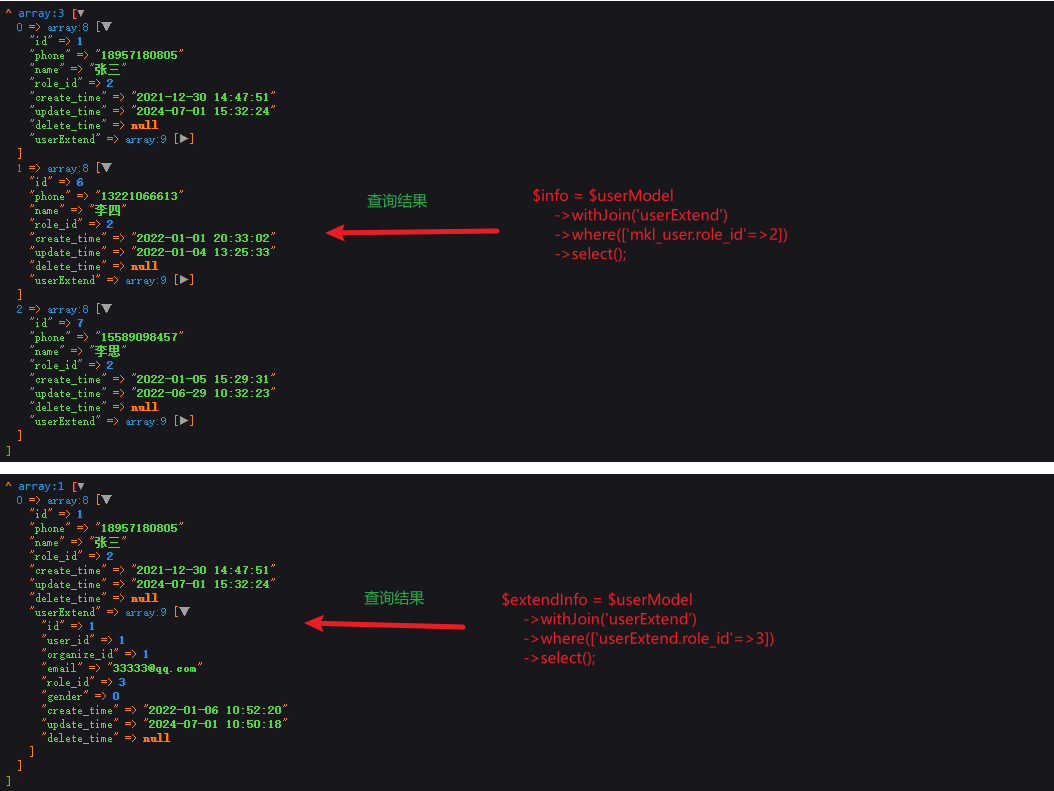
1.4.1、withJoin的条件查询注意事项:

  • 使用 withJoin() 做关联,进行条件查询的时候,只要使用 where() 方法进行条件筛选即可。
  • 如果主/联表中有相同的字段且筛选条件就是相同的字段,使用 hasWhere() 方法进行条件筛选会报错。
  • 如果主/联表中有相同的字段且筛选条件是
    主表
    中的字段,那么where条件应该这么写【where(['mkl_user.role_id'=>2])】。同时参数中的role_id要写明是哪个表,且带上表前缀。
  • 如果主/联表中有相同的字段且筛选条件是
    联表
    中的字段,那么where条件应该这么写【where(['userExtend.role_id'=>3])】。同时参数中的role_id要写明是哪个关联表,关联名称跟【withJoin('userExtend')】的一样。
public functionindex()
{
//实例化模型 $userModel = app(UserModel::class);/**
* where(['organize_id'=>3])
* 可以根据条件查询出结果
*
*
* hasWhere('userExtend', function ($query){
* $query->where('organize_id', 3);
* }, '*', 'LEFT')
* 不能查询出结果,报错“Illegal offset type”
*/ $info = $userModel->withJoin(['user_extend'])->where(['organize_id'=>3])/*->hasWhere('user_extend', function ($query){
$query->where('organize_id', 3);
})
*/ ->select();/*********** 以下是主/联表有相同字段(role_id字段相同)时的查询方式 ***********/

//要筛选主表(user表)中的相同字段时 $info = $userModel ->withJoin('userExtend')->where(['mkl_user.role_id'=>2])->select();//输出打印 dump($info->toArray());//要筛选关联表(user_extend表)中的相同字段时 $extendInfo = $userModel ->withJoin('userExtend')->where(['userExtend.role_id'=>3])->select();//输出打印 dd($extendInfo->toArray());
}
1.5、with 关联修改

关联修改的常见形式有两种:

  • 方式一:把关联表要修改的数据写入一个数组中,使用save方法直接修改。
  • 方式二:单独字段一个个赋值后,最后使用save方法进行修改。

注意:

  • 不管是上面哪种,查询出来的对象不能转换成数组后进行关联表的修改,不然就会报错。
  • with中的关联名称一般要与修改时一致。当然,不一致也可以,写模型中关联方法的名称也行。如:with使用user_extend,修改时使用userExtend也是可以的。
public functionindex()
{
//关联查询 $info = $this->userModel->with(['user_extend'])->find(1);//输出打印 dump($info->toArray());//关联修改:方式一 /*$userExtend = [
'email' => '88888888@qq.com',
'gender' => 1,
];
$info->user_extend->save($userExtend);
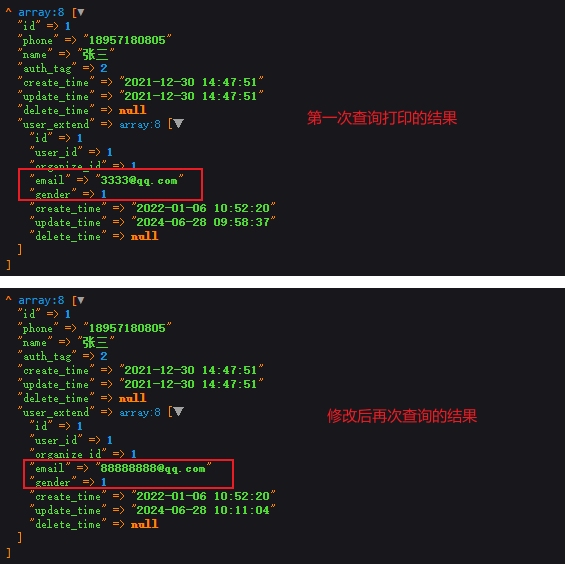
*/ //关联修改:方式二 $info->userExtend->email = '88888888@qq.com';$info->userExtend->gender = 0;$info->userExtend->save();//再次关联查询 $newInfo = $this->userModel->with(['user_extend'])->find(1);//输出打印 dd($newInfo->toArray());
}

1.5.1、with关联修改后的结果
1.6、关联删除

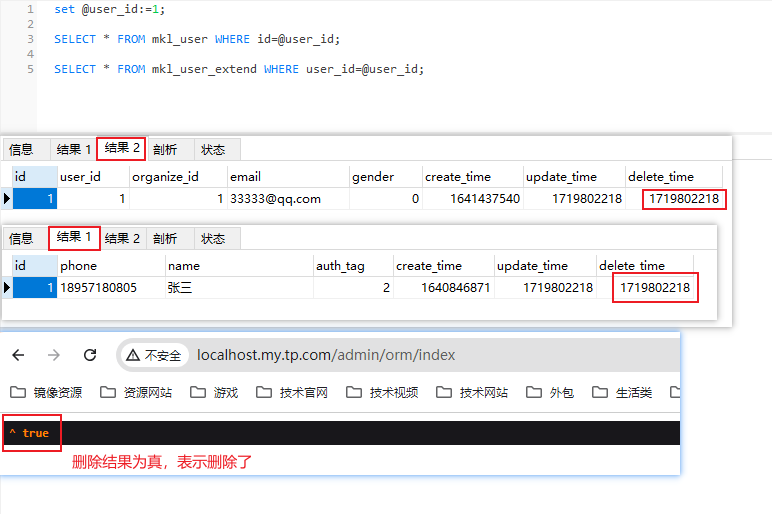
关联删除这里有一些小细节需要注意,下面我们用user_id=1的用户来试验。下图user_id=1的用户数据目前是没有删除的。

1.6.1、with 的关联删除

(1)这种写法能正确的删除主表和关联表的数据,需要注意的是【 with(['userExtend']) 】和【 together(['userExtend']) 】中的参数名称要一样,不能一个驼峰【userExtend】写法,另一个下划线【user_extend】写法。要么都写【userExtend】,要么都写【user_extend】。

public functionindex()
{
//实例化模型 $userModel = app(UserModel::class);//查询用户ID=1的数据 $info = $userModel->with(['userExtend'])->find(1);//删除主表和关联表 $del = $info->together(['userExtend'])->delete();}
(2)这种写法在查询的时候没有带 with() 方法,那么在删除数据的时候,只能删除主表数据,关联表数据不会删除。

public functionindex()
{
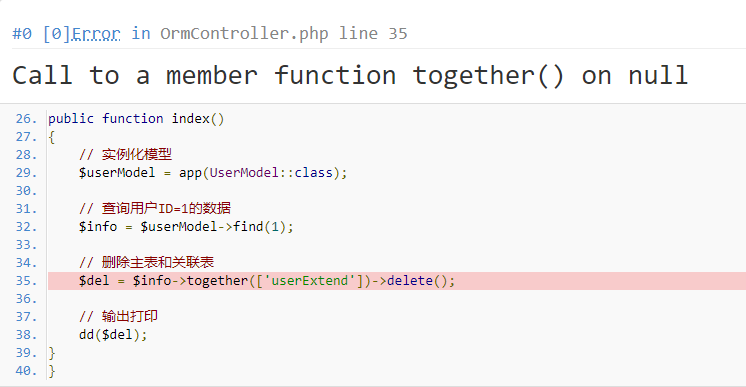
//实例化模型 $userModel = app(UserModel::class); //查询用户ID=1的数据 $info = $userModel->find(1);//删除主表和关联表 $del = $info->together(['userExtend'])->delete();// 输出打印 dd($del);
}
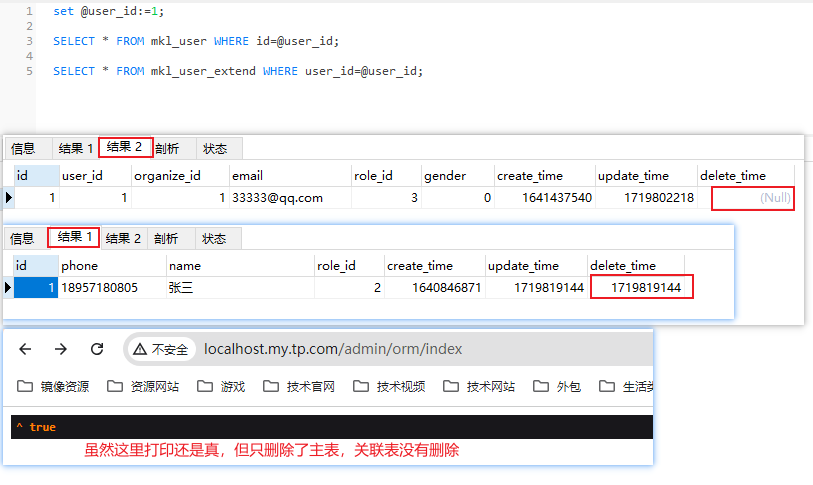
注意:当主表的数据已经被删除后,还调用 together() 进行主/联表的数据删除就会报错。
(3)当前代码中的方式一和方式二其实跟上面介绍的没什么区别,只是上面几个写法的链式操作。

  • 方式一:只能删除主表数据,关联表数据不会删除。
  • 方式二:可以同时删除主表和关联表的数据。
public functionindex()
{
//实例化模型 $userModel = app(UserModel::class);//删除主表和关联表
// 方式一
$del = $userModel->find(1)->together(['userExtend'])->delete();//方式二 $del = $userModel->with(['userExtend'])->find(1)->together(['userExtend'])->delete();
}

1.6.2、withJoin 的关联删除

注意:

  • 如果要主/联表的数据都删除,那么在查询的时候必须带 withJoin() 方法。
  • 带 withJoin() 方法查询后,删除时 together() 和 withJoin() 方法的参数必须是 UserModel 模型中关联的方法名称,即本文1.2处的userExtend() 方法的名称。
  • 如果不带 withJoin() 方法查询后,想要删除主/联表的数据是不可行的,这时删除只会删主表数据,联表数据是不会删除。
public functionindex()
{
//实例化模型 $userModel = app(UserModel::class);/**
* withJoin(['user_extend'])  together(['userExtend'])   主表数据删除,联表数据不会删除
* withJoin(['user_extend'])  together(['user_extend'])  主表数据删除,联表数据不会删除
* withJoin(['userExtend'])  together(['userExtend'])   主表数据删除,联表数据删除
* withJoin(['userExtend'])  together(['user_extend'])   主表数据删除,联表数据不会删除
*/ //查询用户ID=1的数据 $info = $userModel->withJoin(['userExtend'])->find(1);//删除主表和关联表 $del = $info->together(['userExtend'])->delete();
/**
* together(['user_extend'])  主表数据删除,联表数据不会删除
* together(['userExtend'])   主表数据删除,联表数据不会删除
*/ //查询用户ID=1的数据 $info = $userModel->find(1);//删除主表和关联表 $del = $info->together(['userExtend'])->delete();}
elasticdump数据迁移与内外网安装

一、安装node

首先获取安装包

wget https://nodejs.org/dist/v16.14.0/node-v16.14.0-linux-x64.tar.xz
tar axf node-v16.14.0-linux-x64.tar.xz -C /usr/local/
mv /usr/local/node-v16.14.0-linux-x64  /usr/local/node

然后配置环境变量

vim /etc/profile
export NODE_HOME=/usr/local/node
export PATH=$NODE_HOME/bin:$PATH

接下来刷新环境变量,然后测试一下安装是否完成

 source /etc/profile
 node -v
 npm -v

如果是mac 的话可以使用brew 安装

brew install node@16

二、在线安装elasticdump

执行下面的命令安装(如果下载慢的话,使用国产镜像源)

npm config set registry=https://registry.npmmirror.com/
npm install elasticdump -g

使用下面的命令查看安装目录

npm root -g

我的位置在这里/opt/homebrew/lib/node_modules

三、离装elasticdump

这里的原理是将node安装包和elasticdump安装报复制到需要离线安装的服务器。

获取node 的离线安装包进行安装即可,参考第一步
获取elasticdump的安装包安装,所以我们首选需要一个打包工具
npm install -g npm-pack-all

然后我们切换到上面elasticdump的安装路,打包elasticdump,会在当前目录生成elasticdump-6.103.0.tgz 这样一个压缩包,这就是我们离线安装需要的包

cd /opt/homebrew/lib/node_modules/elasticdump/
npm-pack-all

到这里我们看到离线包已经生成好了,接下来我们复制到我们之前已经安装好node 的机器上,执行下面的命令

npm install elasticdump-6.103.0.tgz

后面为了方便使用,我们可以配置一下elasticdump的环境变量

vim ~/.bashrc
# 追加以下内容
#node 
export DUMP_HOME=/opt/homebrew/lib/node_modules/elasticdump/
export PATH=$DUMP_HOME/bin:$PATH
# 刷新
source ~/.bashrc

四、使用elasticdump

这里的使用主要分为两种,一种是数据备份,一种是数据迁移

备份主要指的是生成备份的数据文件,在需要的时候进行还原
数据迁移是指将原来索引里的数据迁移到新的索引
其实数据备份也能达到数据迁移的目的,但是在两个环境的网络不通的时候我们只能使用数据备份

我们安装成功后,在elasticdump的bin目录下其实有两个工具,一个是elasticdump 另外一个是multielasticdump

数据迁移
迁移索引

elasticdump \
  --input=http://192.168.1.140:9200/source_index \
  --output=http://192.168.1.141:9200/target_index \
  --type=mapping

迁移数据

elasticdump \
  --input=http://192.168.1.140:9200/source_index \
  --output=http://192.168.1.141:9200/target_index \
  --type=data \
  --limit=2000

这个命令会将源 Elasticsearch 实例中的 “my_index” 索引的所有数据导出,并保存到 “/path/to/output.json” 的 JSON 文件中。

--input:指定输入的 Elasticsearch 实例和索引。可以是一个 URL,也可以是本地 Elasticsearch 实例的路径。
--output:指定输出的文件路径,数据将保存为一个 JSON 文件。
--type:指定要导出的数据类型,通常为 “data” 表示文档数据。
你还可以使用其他选项来进一步控制导出过程,如 --query, --size, --limit, --filter 等,具体取决于你的需求。可以通过运行 elasticdump --help 命令来

数据备份
导出索引和数据

索引

elasticdump \
 --input=http://192.168.1.140:9200/source_index \
 --output=/data/source_index_mapping.json \
 --type=mapping

数据

elasticdump \
 --input=http://192.168.1.140:9200/source_index \
 --output=/data/source_index.json \
 --type=data \
 --limit=2000

导入索引和数据

导入索引

elasticdump \
 --input=/data/source_index_mapping.json \
 --output=http://192.168.1.141:9200/source_index \
 --type=mapping

导入数据

elasticdump \
 --input=/data/source_index.json \
 --output=http://192.168.1.141:9200/source_index \
 --type=data \
 --limit=2000

#es如果有密码,执行以下语句

elasticdump \ --input=http://username:passowrd@production.es.com:9200/my_index \ --output=http://username:password@staging.es.com:9200/my_index \ --type=data

elasticdump 所有索引

elasticdump --input=./indices.json --output=http://localhost:9201 --all=true 

elasticdump 所有数据

elasticdump --input=http://localhost:9200/ --output=all_data.json --all=true
这里的参数解释如下:
--input:指定 Elasticsearch 实例的地址。
--output:指定导出的文件名。
--all=true:指示 elasticdump 导出所有的数据。

其他用法
还有其他使用的细节,例如压缩,指定query 什么的,我们可以参考下面的例子

#Copy an index from production to staging with analyzer and mapping:
​
elasticdump \
  --input=http://production.es.com:9200/my_index \
  --output=http://staging.es.com:9200/my_index \
  --type=analyzer
elasticdump \
  --input=http://production.es.com:9200/my_index \
  --output=http://staging.es.com:9200/my_index \
  --type=mapping
elasticdump \
  --input=http://production.es.com:9200/my_index \
  --output=http://staging.es.com:9200/my_index \
  --type=data
# Backup index data to a file:
elasticdump \
  --input=http://production.es.com:9200/my_index \
  --output=/data/my_index_mapping.json \
  --type=mapping
elasticdump \
  --input=http://production.es.com:9200/my_index \
  --output=/data/my_index.json \
  --type=data
# Backup and index to a gzip using stdout:
elasticdump \
  --input=http://production.es.com:9200/my_index \
  --output=$ \
  | gzip > /data/my_index.json.gz
# Backup the results of a query to a file
elasticdump \
  --input=http://production.es.com:9200/my_index \
  --output=query.json \
  --searchBody="{\"query\":{\"term\":{\"username\": \"admin\"}}}"
#Specify searchBody from a file
​
elasticdump \
  --input=http://production.es.com:9200/my_index \
  --output=query.json \
  --searchBody=@/data/searchbody.json  

# Copy a single shard data:
​
elasticdump \
  --input=http://es.com:9200/api \
  --output=http://es.com:9200/api2 \
  --input-params="{\"preference\":\"_shards:0\"}"

# Backup aliases to a file
​
elasticdump \
  --input=http://es.com:9200/index-name/alias-filter \
  --output=alias.json \
  --type=alias

# Import aliases into ES
​
elasticdump \
  --input=./alias.json \
  --output=http://es.com:9200 \
  --type=alias

# Backup templates to a file
​
elasticdump \
  --input=http://es.com:9200/template-filter \
  --output=templates.json \
  --type=template

# Import templates into ES
​
elasticdump \
  --input=./templates.json \
  --output=http://es.com:9200 \
  --type=template

# Split files into multiple parts
​
elasticdump \
  --input=http://production.es.com:9200/my_index \
  --output=/data/my_index.json \
  --fileSize=10mb

# Import data from S3 into ES (using s3urls)
​
elasticdump \
  --s3AccessKeyId "${access_key_id}" \
  --s3SecretAccessKey "${access_key_secret}" \
  --input "s3://${bucket_name}/${file_name}.json" \
  --output=http://production.es.com:9200/my_index

# Export ES data to S3 (using s3urls)
​
elasticdump \
  --s3AccessKeyId "${access_key_id}" \
  --s3SecretAccessKey "${access_key_secret}" \
  --input=http://production.es.com:9200/my_index \
  --output "s3://${bucket_name}/${file_name}.json"

# Import data from MINIO (s3 compatible) into ES (using s3urls)
​
elasticdump \
  --s3AccessKeyId "${access_key_id}" \
  --s3SecretAccessKey "${access_key_secret}" \
  --input "s3://${bucket_name}/${file_name}.json" \
  --output=http://production.es.com:9200/my_index
  --s3ForcePathStyle true
  --s3Endpoint https://production.minio.co

# Export ES data to MINIO (s3 compatible) (using s3urls)
​
elasticdump \
  --s3AccessKeyId "${access_key_id}" \
  --s3SecretAccessKey "${access_key_secret}" \
  --input=http://production.es.com:9200/my_index \
  --output "s3://${bucket_name}/${file_name}.json"
  --s3ForcePathStyle true
  --s3Endpoint https://production.minio.co

# Import data from CSV file into ES (using csvurls)
​
elasticdump \

  # csv:// prefix must be included to allow parsing of csv files
​
  # --input "csv://${file_path}.csv" \
​
  --input "csv:///data/cars.csv"
  --output=http://production.es.com:9200/my_index \
  --csvSkipRows 1    # used to skip parsed rows (this does not include the headers row)
  --csvDelimiter ";" # default csvDelimiter is ','

常用参数

--direction  dump/load 导出/导入
--ignoreType  被忽略的类型,data,mapping,analyzer,alias,settings,template
--includeType  包含的类型,data,mapping,analyzer,alias,settings,template
--suffix  加前缀,es6-${index}
--prefix  加后缀,${index}-backup-2018-03-13

总结

elasticdump是ElasticSearch提供的一个工具,我们主要可以用来完成

数据备份
数据迁移
这一节我们主要介绍了elasticdump的安装和使用,还有就是,Elasticdump 是一个第三方工具,不是官方的 Elasticsearch 产品。虽然它对某些用例很有帮助,但在使用之前,确保与你的 Elasticsearch 版本兼容,并查阅工具的文档以了解任何特定的注意事项或限制。

总体来说,elasticdump是一个非常实用的数据迁移和备份工具。它可以帮助我们轻松地在不同Elasticsearch集群之间进行数据迁移,实现集群之间的无缝数据同步。

使用dump迁移索引
拷贝索引

elasticdump 
    --input=http://production.es.com:9200/my_index 
    --output=http://staging.es.com:9200/my_index 
    --type=mapping

拷贝数据

elasticdump 
    --input=http://production.es.com:9200/my_index 
    --output=http://staging.es.com:9200/my_index 
    --type=data

拷贝所有索引

elasticdump  
    --input=http://production.es.com:9200/ 
    --output=http://staging.es.com:9200/ 
    --all=true  

7、迁移实战
为了方便操作写了一个迁移脚本,仅供参考。

#!/bin/bash
echo -n "源ES地址: "
read old
echo -n "目标ES地址: "
read new
echo -n "源索引名: "
read old_index
echo -n "目标索引名: "
read new_index
cd /root/node_modules/elasticdump/bin/
 ./elasticdump --input=$old/$old_index  --output=$new/$new_index  --type=mapping &>> /root/dump.log
 ./elasticdump --input=$old/$old_index  --output=$new/$new_index  --type=data &>> /root/dump.log

建议:有内网的话尽量使用内网IP

八、详细参数

# Copy an index from production to staging with analyzer and mapping:
​
elasticdump \
  --input=http://production.es.com:9200/my_index \
  --output=http://staging.es.com:9200/my_index \
  --type=analyzer
elasticdump \
  --input=http://production.es.com:9200/my_index \
  --output=http://staging.es.com:9200/my_index \
  --type=mapping
elasticdump \
  --input=http://production.es.com:9200/my_index \
  --output=http://staging.es.com:9200/my_index \
  --type=data

# Backup index data to a file:
​
elasticdump \
  --input=http://production.es.com:9200/my_index \
  --output=/data/my_index_mapping.json \
  --type=mapping
elasticdump \
  --input=http://production.es.com:9200/my_index \
  --output=/data/my_index.json \
  --type=data

# Backup and index to a gzip using stdout:
​
elasticdump \
  --input=http://production.es.com:9200/my_index \
  --output=$ \
  | gzip > /data/my_index.json.gz

# Backup the results of a query to a file
​
elasticdump \
  --input=http://production.es.com:9200/my_index \
  --output=query.json \
  --searchBody='{"query":{"term":{"username": "admin"}}}'

# Copy a single shard data:
​
elasticdump \
  --input=http://es.com:9200/api \
  --output=http://es.com:9200/api2 \
  --params='{"preference" : "_shards:0"}'

# Backup aliases to a file
​
elasticdump \
  --input=http://es.com:9200/index-name/alias-filter \
  --output=alias.json \
  --type=alias

# Import aliases into ES
​
elasticdump \
  --input=./alias.json \
  --output=http://es.com:9200 \
  --type=alias

# Backup templates to a file
​
elasticdump \
  --input=http://es.com:9200/template-filter \
  --output=templates.json \
  --type=template

# Import templates into ES
​
elasticdump \
  --input=./templates.json \
  --output=http://es.com:9200 \
  --type=template

# Split files into multiple parts
​
elasticdump \
  --input=http://production.es.com:9200/my_index \
  --output=/data/my_index.json \
  --fileSize=10mb

# Import data from S3 into ES (using s3urls)
​
elasticdump \
  --s3AccessKeyId "${access_key_id}" \
  --s3SecretAccessKey "${access_key_secret}" \
  --input "s3://${bucket_name}/${file_name}.json" \
  --output=http://production.es.com:9200/my_index

# Export ES data to S3 (using s3urls)
​
elasticdump \
  --s3AccessKeyId "${access_key_id}" \
  --s3SecretAccessKey "${access_key_secret}" \
  --input=http://production.es.com:9200/my_index \
  --output "s3://${bucket_name}/${file_name}.json"

参考文档:
https://blog.csdn.net/u010955999/article/details/80814656
https://www.cnblogs.com/mojita/p/12011800.html

介绍

在Spring Boot开发的动态世界中,确保数据完整性和跟踪变化是至关重要的。实现这一目标的一个强大工具是@Audited注解。本文深入探讨了该注解的复杂性、其目的、实现步骤以及如何利用其功能进行有效的实体审计。

理解@Audited

Spring Boot中的@Audited注解用于审计实体,提供对数据随时间变化的详细记录。这在需要跟踪修改、用户操作或合规要求的情况下非常有价值。

实现步骤

1. 依赖项:要包含@Audited,需要在项目中添加spring-data-envers依赖。确保你的pom.xml或build.gradle反映这一添加。

<!-- Maven Dependency -->
<dependency>
  <groupId>org.springframework.boot</groupId>
  <artifactId>spring-boot-starter-data-jpa</artifactId>
</dependency>
<dependency>
  <groupId>org.hibernate</groupId>
  <artifactId>hibernate-envers</artifactId>
</dependency>

spring-boot-starter-data-jpa依赖包含了使用Spring Data JPA进行数据访问所需的组件。然而,如果你特别想在Spring Boot中使用@Audited注解启用实体审计,还需要包含hibernate-envers依赖。该依赖添加了对Hibernate Envers的支持,这是负责实体版本控制和审计的工具。

2. 实体配置:将@Audited注解应用于你想要审计的实体类。

import org.hibernate.envers.Audited;
@Entity
@Audited
public class YourEntity {
  // 你的实体字段和方法
}

3. application.yml配置:确保你的application.yml或application.properties包含Hibernate Envers所需的配置。

spring:
   data:
      jpa:
        repositories:
            enabled: true
        auditing:
            enabled: true

4. 审计表字段:Hibernate Envers生成的审计表通常包括REV(修订号)、REVTYPE(修订类型)、AUDIT_TIMESTAMP(审计时间戳)等字段。这些字段共同存储对审计实体的历史更改。

Spring Boot会自动创建审计表(例如,‘YourEntity_AUD’)以存储元数据。

探索审计表中的字段:
– REV:修订号(递增)
– REVTYPE:修订类型(插入、更新、删除)
– AUDITEDFIELD:审计字段值
– MODIFIEDBY:进行更改的用户
– MODIFIEDDATE:修改日期和时间

5. 检索审计数据:使用Spring Data JPA仓库查询审计历史。

import org.springframework.data.repository.history.RevisionRepository;
import org.springframework.data.history.Revision;
import java.util.List;
public interface YourEntityAuditRepository extends RevisionRepository<YourEntity, Long, Integer> {
    List<Revision<Integer, YourEntity>> findRevisionsById(Long entityId);
}

在这个例子中:
– YourEntityAuditRepository扩展了RevisionRepository,这是一个处理修订的Spring Data JPA接口。
– findRevisionsById方法允许你检索具有指定ID的实体的所有修订。

然后,你可以在服务或控制器中使用此仓库查询审计历史:

import org.springframework.beans.factory.annotation.Autowired;
import org.springframework.stereotype.Service;
import java.util.List;
@Service
public class AuditService {
    
    private final YourEntityAuditRepository entityAuditRepository;
    @Autowired
    public AuditService(YourEntityAuditRepository entityAuditRepository) {
        this.entityAuditRepository = entityAuditRepository;
    }
    public List<Revision<Integer, YourEntity>> getEntityRevisions(Long entityId) {
        return entityAuditRepository.findRevisionsById(entityId);
    }
}

另一个例子

使用Hibernate Envers查询具有给定ID的特定实体的审计历史

List<YourEntity_AUD> revisions = auditReader.findRevisions(YourEntity.class, entityld);

– auditReader:一个AuditReader实例,由Hibernate Envers提供。它允许你与实体的审计历史进行交互。
– findRevisions:Hibernate Envers提供的方法,用于检索具有指定ID的给定实体的所有修订。
– YourEntity.class:你想要检索审计历史的实体类。
– entityId:你想要获取修订的实体的特定ID。
– List<YourEntity_AUD>:结果是一个审计实体(YourEntity_AUD)的列表,列表中的每个条目代表实体的一个修订。

在Hibernate Envers中,当你为一个实体启用审计时,它会生成一个带有“_AUD”后缀的相应审计实体(默认情况下)。这个审计实体会跟踪原始实体随时间变化的所有更改。

因此,这行代码本质上是在查询具有给定ID的实体的所有修订的审计历史,并将结果存储在一个审计实体列表中。然后,可以使用此列表分析或显示实体在不同修订中的更改。

欢迎关注我的公众号:程序猿DD。第一时间了解前沿行业消息、分享深度技术干货、获取优质学习资源

表格是一种常见的数据展示形式,
manim
提供了
Table
模块专门用于显示表格形式的数据。
表格
Table
和上一节介绍的矩阵
Matrix
都是用来显示二维数据的,
不过,
Table
的表现力更强,比如,它可以显示表头信息,列名信息等等。

Table
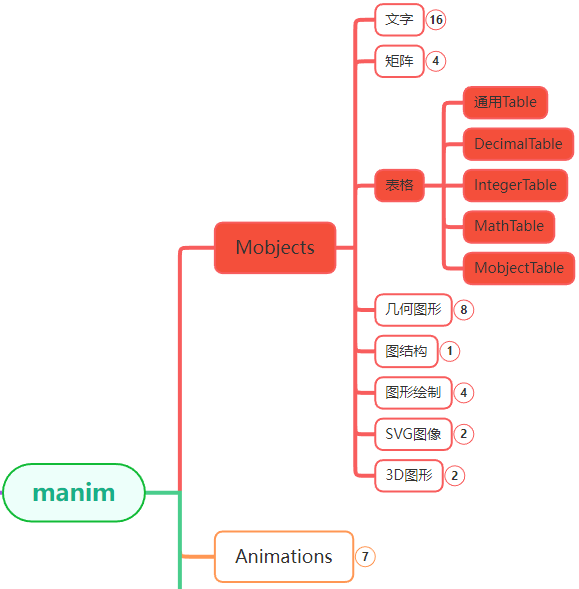
模块也细分了多个对象:

  • 通用
    Table
    :显示任何内容
  • DecimalTable
    :表格内容为数字
  • IntegerTable
    :表格内容为整数
  • MathTable
    :表格内容是公式
  • MobjectTable
    :表格内容是图形

其中,
DecimalTable

IntegerTable

MathTable

MobjectTable
都是继承自
Table
的。
本篇重点介绍
Table
对象,其他对象是
Table
的一个特例。
image.png
Table
系列在
manim
各个模块中的位置大致如上图中所示。

1. 主要参数

主要参数包括:

参数名称 类型 说明
table list[list] 表格中显示的数据
row_labels list[VMobject] 行标签,相当于表格的第一列
col_labels list[VMobject] 列标签,相当于列名,表格的第一行
top_left_entry VMobject 表格左上角显示的内容
v_buff float 表格元素行间距
h_buff float 表格元素列间距
include_outer_lines bool 是否显示表格外边框
add_background_rectangles_to_entries bool 表格背景色是否加到表格元素上
entries_background_color manim color 表格元素的背景色
include_background_rectangle bool 是否添加表格背景色
background_rectangle_color manim color 表格的背景色
arrange_in_grid_config dict 表格对齐方向的配置
line_config dict 表格线条的配置

总的来看,参数主要用于设置表格行列,表格背景,线条等相关的样式。

2. 主要方法

参数
一般是初始化表格时使用,而
方法
则是用来动态的改变表格的内容和样式。
下面罗列了一些常用的方法:

名称 说明
add_background_to_entries 给表格元素添加背景
add_highlighted_cell 高亮某个单元格
get_rows 获取所有行对象
get_columns 获取所有列对象
get_cell 获取单元格
get_row_labels 获取行的标签
get_col_labels 获取列的标签
get_horizontal_lines 获取表格的横线
get_vertical_lines 获取表格的纵线
scale 缩放表格
set_row_colors 设置行颜色
set_column_colors 设置列颜色
get_highlighted_cell 获取高亮的单元格

3. 使用示例

下面通过示例演示常用的参数和方法。

3.1. 行列标签

表格
Table
是默认像
矩阵
Matrix
一样,只显示数据,不过,与之不同的是,
表格可以通过属性
rows_labels

col_labels
添加行列信息的说明。

data = [
    ["90", "100", "60"],
    ["66", "78", "83"],
]


# 默认的表格
Table(data)

cols = [
    Text("小红"),
    Text("小华"),
    Text("小明"),
]
rows = [Text("语文"), Text("数学")]

# 带有行列标签的表格
Table(
    data,
    col_labels=cols,
    row_labels=rows,
)

out.gif
其中
列的标签
就是学生姓名,
行的标签
是科目名称。

3.2. 内容对齐方向

表格中的内容默认是居中对齐的,可以通过参数
arrange_in_grid_config
来调整其对齐方向。

# 左对齐
Table(
    data,
    arrange_in_grid_config={
        "cell_alignment": LEFT,
    },
)

# 右对齐
t = Table(
    data,
    arrange_in_grid_config={
        "cell_alignment": RIGHT,
    },
)

out.gif

3.3. 表格边框

默认表格是没有外边框的,通过
include_outer_lines
参数加上外边框,
此外,line_config参数还可以设置边框的粗细和颜色。

# 外边框
Table(
    data,
    include_outer_lines=True,
)

# 边框颜色和粗细
Table(
    data,
    include_outer_lines=True,
    line_config={
        "stroke_width": 1,
        "color": GREEN,
    },
)

out.gif

3.4. 表格背景

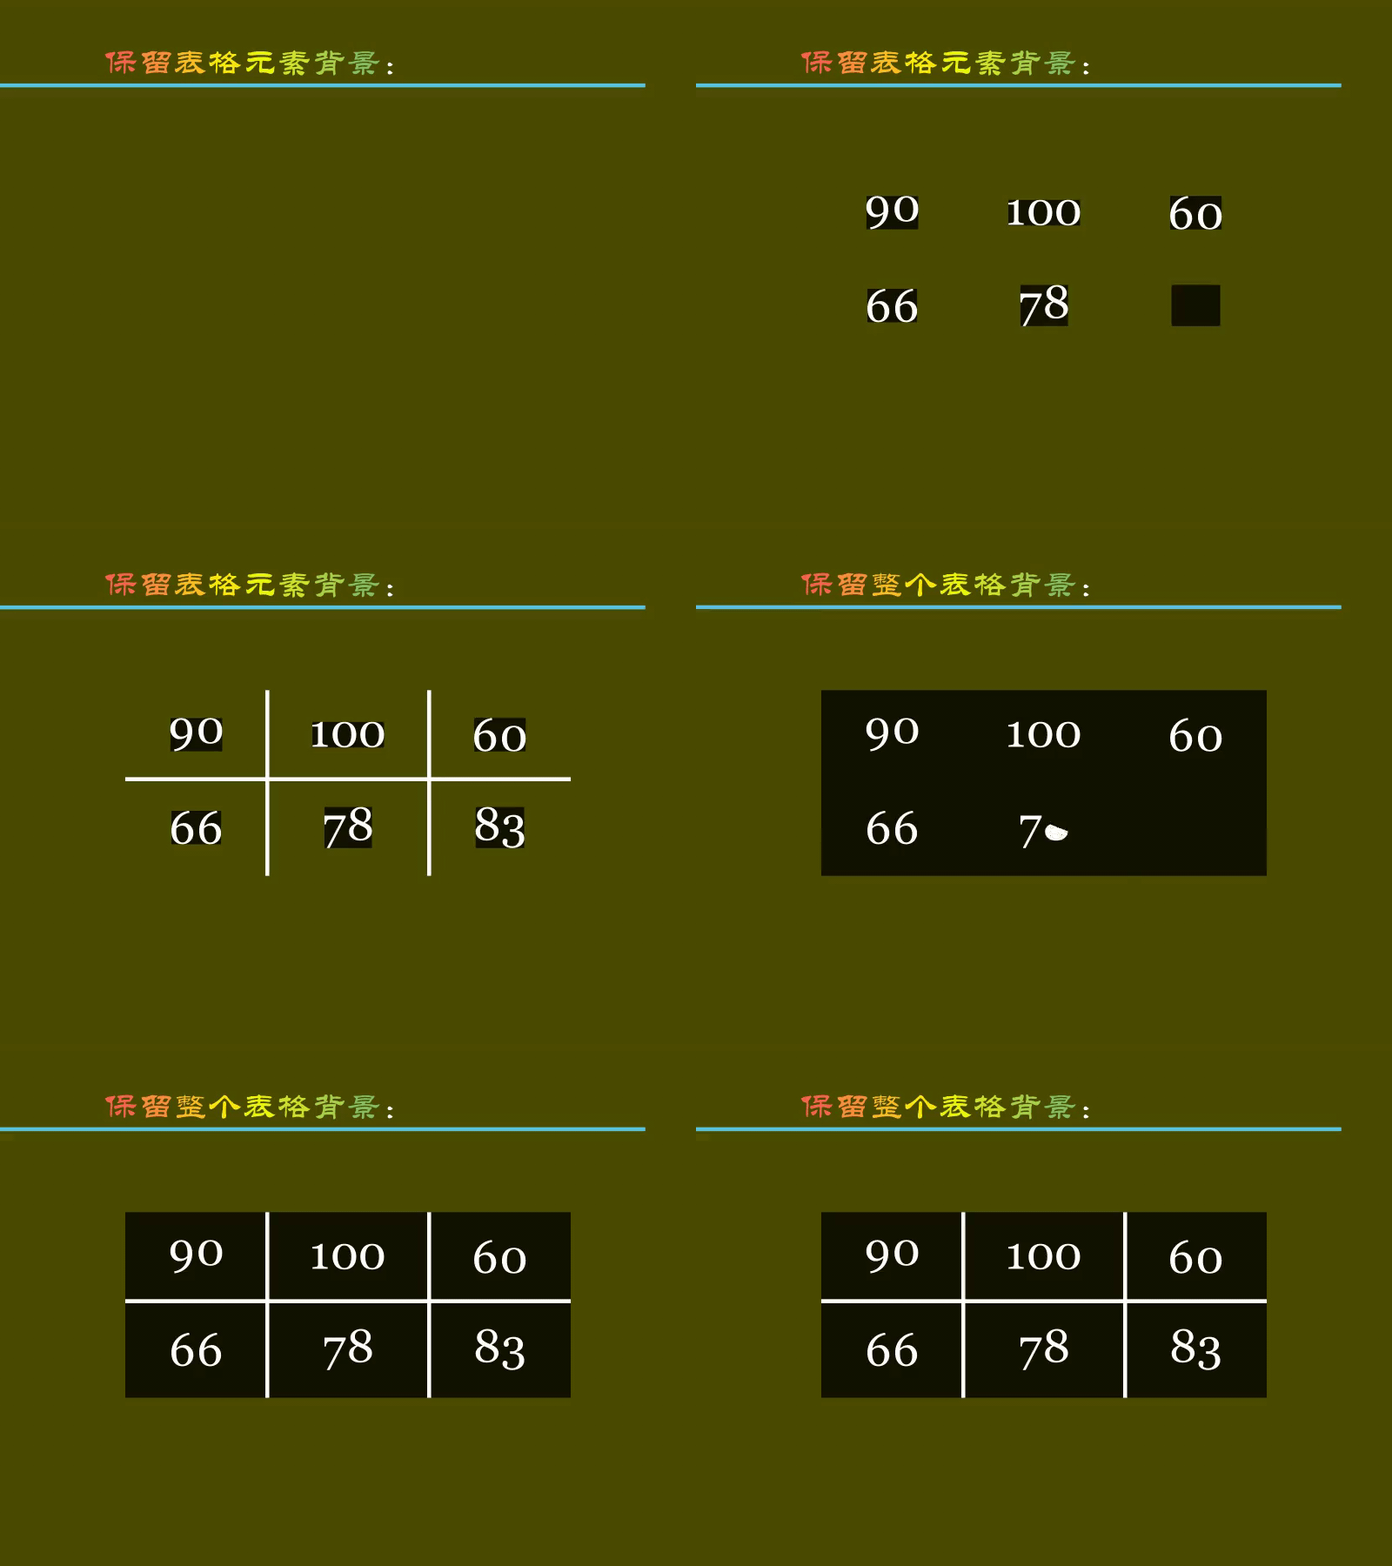
表格的背景默认是透明的,有两个参数
add_background_rectangles_to_entries

include_background_rectangle

可以分别设置表格元素的背景和整个表格的背景。

# 保留表格元素背景
Table(
    data,
    add_background_rectangles_to_entries=True,
)

# 保留整个表格背景
Table(
    data,
    include_background_rectangle=True,
)

out.gif

3.5. 定制左上角元素

表格在设置了行列名称之后,就会多出一个左上角位置,这个位置默认是空的。
可以在表格的左上角填充任意的内容,包括数学公式和图形。

cols = [
    Text("小红"),
    Text("小华"),
    Text("小明"),
]
rows = [Text("语文"), Text("数学")]

# 左上角默认为空
Table(
    data,
    row_labels=rows,
    col_labels=cols,
)

# 左上角填入公式
mt = MathTex("y=\sum x_i", color=RED)
t = Table(
    data,
    row_labels=rows,
    col_labels=cols,
    top_left_entry=mt,
)

# 左上角填入图形
star = Star(color=RED).scale(0.5)
Table(
    data,
    row_labels=rows,
    col_labels=cols,
    top_left_entry=star,
)

out.gif

3.6. 行列操作

通过行列操作方法,可以获取行列对象,添加更多定制化的操作。

cols = [
    Text("小红"),
    Text("小华"),
    Text("小明"),
]
rows = [Text("语文"), Text("数学")]

# 按行 设置颜色
t = Table(
    data,
    row_labels=rows,
    col_labels=cols,
)
t.animate.set_row_colors(
    BLUE, RED, YELLOW
)

# 按列 设置颜色
t = Table(
    data,
    row_labels=rows,
    col_labels=cols,
)
t.animate.set_column_colors(
    BLUE, RED, YELLOW, GREEN
)

# 获取行对象
t = Table(
    data,
    row_labels=rows,
    col_labels=cols,
)
rows = t.get_rows()
t.add(SurroundingRectangle(rows[1]))

# 获取列对象
t = Table(
    data,
    row_labels=rows,
    col_labels=cols,
)
cols = t.get_columns()
t.add(SurroundingRectangle(cols[1]))
t.add(SurroundingRectangle(cols[3]))

out.gif

3.7. 单元格操作

单元格操作是比行列操作更加细致表格操作。

cols = [
    Text("小红"),
    Text("小华"),
    Text("小明"),
]
rows = [Text("语文"), Text("数学")]

# 单元格颜色
t = Table(
    data,
    include_outer_lines=True,
    row_labels=rows,
    col_labels=cols,
)
cell1 = t.get_cell(pos=(2, 2))
cell2 = t.get_cell(pos=(3, 4))
cell1.set_color(RED)
cell2.set_color(BLUE)
t.add(cell1, cell2)

# 高亮 单元格
t = Table(
    data,
    include_outer_lines=True,
    row_labels=rows,
    col_labels=cols,
)
self.play(Create(t), run_time=run_time)
t.add_highlighted_cell(
    pos=(2, 2),
    color=GREEN,
)
t.add_highlighted_cell(
    pos=(3, 4),
    color=YELLOW,
)

out.gif

3.8. 边框操作

最后,还可以对表格的边框进行定制,
get_horizontal_lines

get_vertical_lines
方法为我们提供了获取表格横线和纵线对象的方法。

cols = [
    Text("小红"),
    Text("小华"),
    Text("小明"),
]
rows = [Text("语文"), Text("数学")]

# 设置横线的颜色
t = Table(
    data,
    row_labels=rows,
    col_labels=cols,
)
lines = t.get_horizontal_lines()
lines[0].set_color(RED)
lines[1].set_color(BLUE)

# 设置纵线的颜色
t = Table(
    data,
    row_labels=rows,
    col_labels=cols,
)
lines = t.get_vertical_lines()
lines[0].set_color(RED)
lines[1].set_color(BLUE)
lines[2].set_color(YELLOW)

out.gif

4. 附件

文中完整的代码放在网盘中了(
table.py
),
下载地址:
完整代码
(访问密码: 6872)

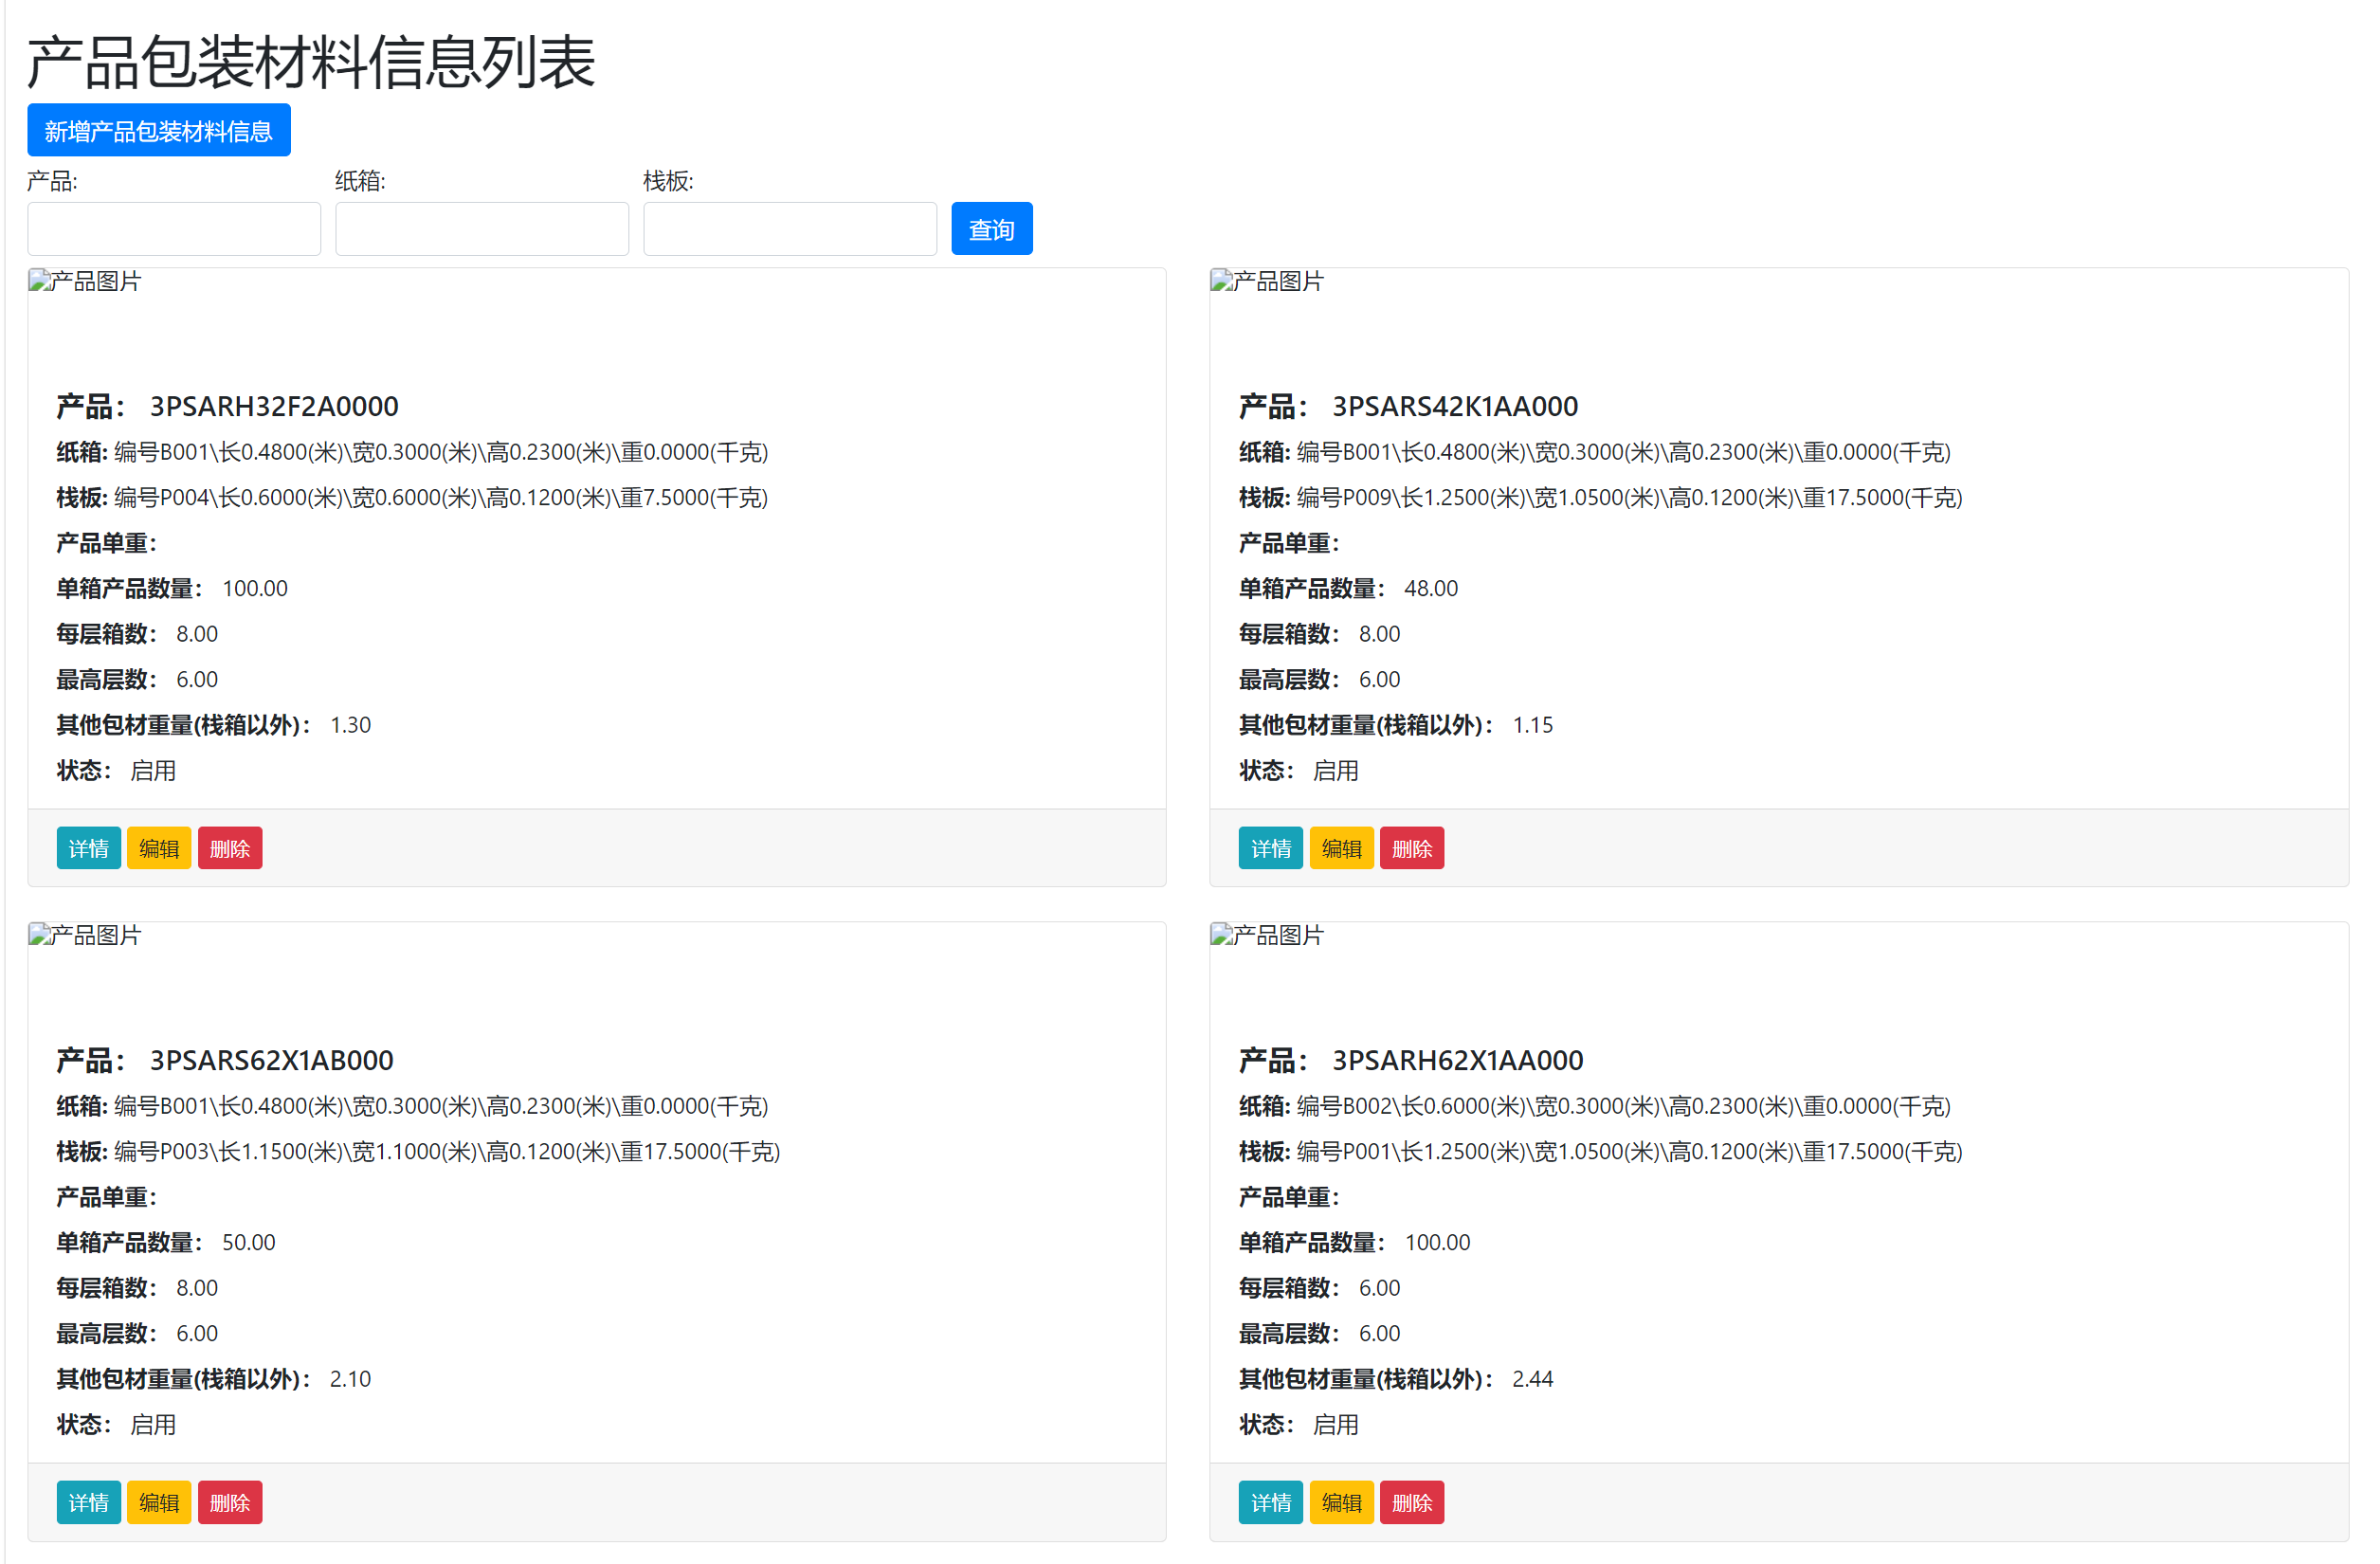
下面是一个完整的卡片模板代码,包含所有元素,并使用Django的模板语言来处理状态字段的条件渲染。同时还包括示例视图和URL配置。

完整的卡片模板

<divclass="card">
    <!--卡片图片-->
    <imgsrc="{{ product_package.image_url }}"class="card-img-top"alt="产品图片">

    <divclass="card-body">
        <!--卡片标题-->
        <h5class="card-title"><strong>产品:</strong> {{ product_package.item_no }}</h5>

        <!--卡片文本内容-->
        <pclass="card-text"><strong>纸箱:</strong> {{ product_package.box_code }}</p>
        <pclass="card-text"><strong>栈板:</strong> {{ product_package.pallet_code }}</p>
        <pclass="card-text"><strong>产品单重:</strong> {{ product_package.product_weight }}</p>
        <pclass="card-text"><strong>单箱产品数量:</strong> {{ product_package.box_product_qty }}</p>
        <pclass="card-text"><strong>每层箱数:</strong> {{ product_package.pallet_boxes_layer }}</p>
        <pclass="card-text"><strong>最高层数:</strong> {{ product_package.pallet_max_layers }}</p>
        <pclass="card-text"><strong>其他包材重量(栈箱以外):</strong> {{ product_package.pallet_other_weight }}</p>

        <!--条件显示状态-->
        <pclass="card-text">
            <strong>状态:</strong>{% if product_package.state %}
启用
{% else %}
未启用
{% endif %}
</p> </div> <!--卡片底部操作按钮--> <divclass="card-footer text-muted"> <ahref="{% url 'edit_product' product_package.id %}"class="btn btn-primary">编辑</a> <ahref="{% url 'delete_product' product_package.id %}"class="btn btn-danger">删除</a> </div> </div>

解释:

  1. 卡片图片


    • <img src="{{ product_package.image_url }}" class="card-img-top" alt="产品图片">
      :在卡片顶部显示产品图片。确保
      image_url
      是你的模型或上下文中提供的图片URL。
  2. 卡片标题


    • <h5 class="card-title"><strong>产品:</strong> {{ product_package.item_no }}</h5>
      :显示产品编号作为卡片标题。
  3. 卡片文本内容


    • <p class="card-text"><strong>纸箱:</strong> {{ product_package.box_code }}</p>
      :显示纸箱代码。
    • 其他字段如
      pallet_code

      product_weight

      box_product_qty
      等,以类似方式显示。
  4. 条件显示状态


    • {% if product_package.state %}
      :检查
      state
      是否为真。
    • 如果
      state
      为真,显示“启用”;否则显示“未启用”。
  5. 卡片底部操作按钮


    • <div class="card-footer text-muted">
      :包含编辑和删除产品的操作按钮。
    • <a href="{% url 'edit_product' product_package.id %}" class="btn btn-primary">编辑</a>
      :链接到编辑页面。
    • <a href="{% url 'delete_product' product_package.id %}" class="btn btn-danger">删除</a>
      :链接到删除操作。

Django视图示例

from django.shortcuts importrender, get_object_or_404defproduct_detail_view(request, product_id):
product_package
= get_object_or_404(ProductPackage, id=product_id)return render(request, 'product_detail.html', {'product_package': product_package})

URL配置示例

from django.urls importpathfrom .views importproduct_detail_view

urlpatterns
=[
path(
'product/<int:product_id>/', product_detail_view, name='product_detail'),
path(
'product/<int:product_id>/edit/', edit_product_view, name='edit_product'),
path(
'product/<int:product_id>/delete/', delete_product_view, name='delete_product'),
]

确保在你的视图中传递
product_package
对象到模板,并定义
edit_product_view

delete_product_view
视图。根据实际情况替换
ProductPackage
为你的实际模型名称。


效果图