2024年7月

反射机制就是通过字节码文件对象获取成员变量、成员方法和构造方法,然后进一步获取它们的具体信息,如名字、修饰符、类型等。

反射机制的性能较低有很多原因,这里详细总结以下4点原因:

(1)JIT优化受限:
JIT 编译器的优化是基于静态分析和预测的。反射是一种在运行时动态解析类型信息的机制,在编译时无法确定反射调用的具体方法,因此编译器无法对这些代码进行静态分析,从而无法进行一些JIT优化,比如:

内联优化受限
:JIT 编译器通常会对频繁调用的方法进行内联优化,将方法调用替换为直接的代码。但是,由于反射调用的方法在运行时才能确定,因此 JIT 编译器无法进行有效的内联优化。

无法进行即时编译
:因为反射调用的方法在运行时才能确定,因此在解释执行阶段,我们无法确定反射调用的方法会被执行多少次,会不会成为热点代码,也就无法对其进行即时编译优化。

(2)反射中频繁的自动拆装箱操作会导致应用性能下降:
在反射中,当你调用一个方法时,由于在编译时不知道具体要调用的方法参数类型,因此需要用最通用的引用类型来处理所有的参数,即
Object
。例如,通过
Method
对象调用方法时,使用的
invoke
方法签名大致如下:

public Object invoke(Object obj, Object... args)

对于基本数据类型的参数,它们必须被装箱成对应的包装类(如
Integer

Double
等),以便它们可以作为对象被传递。在方法实际执行时,如果方法的参数是基本类型,JVM需要基本类型的值,而不是它们的包装类对象。因此,JVM会自动进行拆箱。例如,如果你通过反射调用的方法期望得到一个
int
类型的参数,但你传入的是
Integer
,在调用过程中JVM会自动将
Integer
对象拆箱为
int
类型。装箱和拆箱操作涉及到额外的对象创建(装箱时)和对象值的提取(拆箱时),在高性能要求的场景下,过度的装箱和拆箱可能会导致性能瓶颈。此外,由于装箱操作导致创建了许多短生命周期的对象,这些对象在成为垃圾后,需要通过垃圾回收过程来回收内存资源,当有大量对象需要回收时,GC会占用更多的CPU资源,可能导致应用性能暂时下降。

(3)遍历操作
反射在调用方法时会从方法数组中遍历查找,这对普通的方法调用来说是不需要的。

(4)方法访问检查
每次使用反射调用方法时,JVM都要检查是否允许访问该方法,例如是否为私有方法等。这些访问检查对普通的方法调用来说是不需要的,因为这些检查都是在编译时完成的。

一、背景介绍

在实际的业务开发过程中,我们经常会需要定时任务来帮助我们完成一些工作,例如每天早上 6 点生成销售报表、每晚 23 点清理脏数据等等。

如果你当前使用的是 SpringBoot 来开发项目,那么完成这些任务会非常容易!

SpringBoot 默认已经帮我们完成了相关定时任务组件的配置,我们只需要添加相应的注解
@Scheduled
就可以实现任务调度!

二、方案实践

2.1、pom 包配置

pom
包里面只需要引入
Spring Boot Starter
包即可!

<dependencies>
    <!--spring boot核心-->
    <dependency>
        <groupId>org.springframework.boot</groupId>
        <artifactId>spring-boot-starter</artifactId>
    </dependency>
    <!--spring boot 测试-->
    <dependency>
        <groupId>org.springframework.boot</groupId>
        <artifactId>spring-boot-starter-test</artifactId>
        <scope>test</scope>
    </dependency>
</dependencies>

2.2、启动类启用定时调度

在启动类上面加上
@EnableScheduling
即可开启定时

@SpringBootApplication
@EnableScheduling
public class ScheduleApplication {

    public static void main(String[] args) {
        SpringApplication.run(ScheduleApplication.class, args);
    }
}

2.3、创建定时任务

Spring Scheduler
支持四种形式的任务调度!

  • fixedRate
    :固定速率执行,例如每5秒执行一次
  • fixedDelay
    :固定延迟执行,例如距离上一次调用成功后2秒执行
  • initialDelay
    :初始延迟任务,例如任务开启过5秒后再执行,之后以固定频率或者间隔执行
  • cron
    :使用 Cron 表达式执行定时任务
2.3.1、固定速率执行

你可以通过使用
fixedRate
参数以固定时间间隔来执行任务,示例如下:

@Component
public class SchedulerTask {

    private static final Logger log = LoggerFactory.getLogger(SchedulerTask.class);
    private static final SimpleDateFormat dateFormat = new SimpleDateFormat("yyyy-MM-dd HH:mm:ss");

    /**
     * fixedRate:固定速率执行。每5秒执行一次。
     */
    @Scheduled(fixedRate = 5000)
    public void runWithFixedRate() {
        log.info("Fixed Rate Task,Current Thread : {},The time is now : {}", Thread.currentThread().getName(), dateFormat.format(new Date()));
    }
}

运行
ScheduleApplication
主程序,即可看到控制台输出效果:

Fixed Rate Task,Current Thread : scheduled-thread-1,The time is now : 2020-12-15 11:46:00
Fixed Rate Task,Current Thread : scheduled-thread-1,The time is now : 2020-12-15 11:46:10
...
2.3.2、固定延迟执行

你可以通过使用
fixedDelay
参数来设置上一次任务调用完成与下一次任务调用开始之间的延迟时间,示例如下:

@Component
public class SchedulerTask {

    private static final Logger log = LoggerFactory.getLogger(SchedulerTask.class);
    private static final SimpleDateFormat dateFormat = new SimpleDateFormat("yyyy-MM-dd HH:mm:ss");

    /**
     * fixedDelay:固定延迟执行。距离上一次调用成功后2秒后再执行。
     */
    @Scheduled(fixedDelay = 2000)
    public void runWithFixedDelay() {
        log.info("Fixed Delay Task,Current Thread : {},The time is now : {}", Thread.currentThread().getName(), dateFormat.format(new Date()));
    }
}

控制台输出效果:

Fixed Delay Task,Current Thread : scheduled-thread-1,The time is now : 2020-12-15 11:46:00
Fixed Delay Task,Current Thread : scheduled-thread-1,The time is now : 2020-12-15 11:46:02
...
2.3.3、初始延迟任务

你可以通过使用
initialDelay
参数与
fixedRate
或者
fixedDelay
搭配使用来实现初始延迟任务调度。

@Component
public class SchedulerTask {

    private static final Logger log = LoggerFactory.getLogger(SchedulerTask.class);
    private static final SimpleDateFormat dateFormat = new SimpleDateFormat("yyyy-MM-dd HH:mm:ss");

    /**
     * initialDelay:初始延迟。任务的第一次执行将延迟5秒,然后将以5秒的固定间隔执行。
     */
    @Scheduled(initialDelay = 5000, fixedRate = 5000)
    public void reportCurrentTimeWithInitialDelay() {
        log.info("Fixed Rate Task with Initial Delay,Current Thread : {},The time is now : {}", Thread.currentThread().getName(), dateFormat.format(new Date()));
    }
}

控制台输出效果:

Fixed Rate Task with Initial Delay,Current Thread : scheduled-thread-1,The time is now : 2020-12-15 11:46:05
Fixed Rate Task with Initial Delay,Current Thread : scheduled-thread-1,The time is now : 2020-12-15 11:46:10
...
2.3.4、使用 Cron 表达式

Spring Scheduler
同样支持
Cron
表达式,如果以上简单参数都不能满足现有的需求,可以使用 cron 表达式来定时执行任务。

关于
cron
表达式的具体用法,可以点击参考这里:
https://cron.qqe2.com/

@Component
public class SchedulerTask {

    private static final Logger log = LoggerFactory.getLogger(SchedulerTask.class);
    private static final SimpleDateFormat dateFormat = new SimpleDateFormat("yyyy-MM-dd HH:mm:ss");

    /**
     * cron:使用Cron表达式。每6秒中执行一次
     */
    @Scheduled(cron = "*/6 * * * * ?")
    public void reportCurrentTimeWithCronExpression() {
        log.info("Cron Expression,Current Thread : {},The time is now : {}", Thread.currentThread().getName(), dateFormat.format(new Date()));
    }
}

控制台输出效果:

Cron Expression,Current Thread : scheduled-thread-1,The time is now : 2020-12-15 11:46:06
Cron Expression,Current Thread : scheduled-thread-1,The time is now : 2020-12-15 11:46:12
...

2.4、异步执行定时任务

在介绍
异步执行定时任务
之前,我们先看一个例子!

在下面的示例中,我们创建了一个每隔2秒执行一次的定时任务,在任务里面大概需要花费 3 秒钟,猜猜执行结果如何?

@Component
public class AsyncScheduledTask {

    private static final Logger log = LoggerFactory.getLogger(AsyncScheduledTask.class);
    private static final SimpleDateFormat dateFormat = new SimpleDateFormat("yyyy-MM-dd HH:mm:ss");

    @Scheduled(fixedRate = 2000)
    public void runWithFixedDelay() {
        try {
            TimeUnit.SECONDS.sleep(3);
            log.info("Fixed Delay Task, Current Thread : {} : The time is now {}", Thread.currentThread().getName(), dateFormat.format(new Date()));
        } catch (InterruptedException e) {
            log.error("错误信息",e);
        }
    }
}

控制台输入结果:

Fixed Delay Task, Current Thread : scheduling-1 : The time is now 2020-12-15 17:55:26
Fixed Delay Task, Current Thread : scheduling-1 : The time is now 2020-12-15 17:55:31
Fixed Delay Task, Current Thread : scheduling-1 : The time is now 2020-12-15 17:55:36
Fixed Delay Task, Current Thread : scheduling-1 : The time is now 2020-12-15 17:55:41
...

很清晰的看到,任务调度频率变成了每隔5秒调度一次!

这是为啥呢?


Current Thread : scheduling-1
输出结果可以很看到,任务执行都是同一个线程!默认的情况下,
@Scheduled
任务都在 Spring 创建的大小为 1 的默认线程池中执行!

更直观的结果是,任务都是串行执行!

下面,我们将其改成异步线程来执行,看看效果如何?

@Component
@EnableAsync
public class AsyncScheduledTask {

    private static final Logger log = LoggerFactory.getLogger(AsyncScheduledTask.class);
    private static final SimpleDateFormat dateFormat = new SimpleDateFormat("yyyy-MM-dd HH:mm:ss");


    @Async
    @Scheduled(fixedDelay = 2000)
    public void runWithFixedDelay() {
        try {
            TimeUnit.SECONDS.sleep(3);
            log.info("Fixed Delay Task, Current Thread : {} : The time is now {}", Thread.currentThread().getName(), dateFormat.format(new Date()));
        } catch (InterruptedException e) {
            log.error("错误信息",e);
        }
    }
}

控制台输出结果:

Fixed Delay Task, Current Thread : SimpleAsyncTaskExecutor-1 : The time is now 2020-12-15 18:55:26
Fixed Delay Task, Current Thread : SimpleAsyncTaskExecutor-2 : The time is now 2020-12-15 18:55:28
Fixed Delay Task, Current Thread : SimpleAsyncTaskExecutor-3 : The time is now 2020-12-15 18:55:30
...

任务的执行频率不受方法内的时间影响,以并行方式执行!

2.5、自定义任务线程池

虽然默认的情况下,
@Scheduled
任务都在 Spring 创建的大小为 1 的默认线程池中执行,但是我们也可以自定义线程池,只需要实现
SchedulingConfigurer
类即可!

自定义线程池示例如下:

@Configuration
public class SchedulerConfig implements SchedulingConfigurer {

    @Override
    public void configureTasks(ScheduledTaskRegistrar scheduledTaskRegistrar) {
        ThreadPoolTaskScheduler threadPoolTaskScheduler = new ThreadPoolTaskScheduler();
        //线程池大小为10
        threadPoolTaskScheduler.setPoolSize(10);
        //设置线程名称前缀
        threadPoolTaskScheduler.setThreadNamePrefix("scheduled-thread-");
        //设置线程池关闭的时候等待所有任务都完成再继续销毁其他的Bean
        threadPoolTaskScheduler.setWaitForTasksToCompleteOnShutdown(true);
        //设置线程池中任务的等待时间,如果超过这个时候还没有销毁就强制销毁,以确保应用最后能够被关闭,而不是阻塞住
        threadPoolTaskScheduler.setAwaitTerminationSeconds(60);
        //这里采用了CallerRunsPolicy策略,当线程池没有处理能力的时候,该策略会直接在 execute 方法的调用线程中运行被拒绝的任务;如果执行程序已关闭,则会丢弃该任务
        threadPoolTaskScheduler.setRejectedExecutionHandler(new ThreadPoolExecutor.CallerRunsPolicy());
        threadPoolTaskScheduler.initialize();

        scheduledTaskRegistrar.setTaskScheduler(threadPoolTaskScheduler);
    }
}

我们启动服务,看看
cron
任务示例调度效果:

Cron Expression,Current Thread : scheduled-thread-1,The time is now : 2020-12-15 20:46:00
Cron Expression,Current Thread : scheduled-thread-2,The time is now : 2020-12-15 20:46:06
Cron Expression,Current Thread : scheduled-thread-3,The time is now : 2020-12-15 20:46:12
Cron Expression,Current Thread : scheduled-thread-4,The time is now : 2020-12-15 20:46:18
....

当前线程名称已经被改成自定义
scheduled-thread
的前缀!

三、小结

本文主要围绕
Spring scheduled
应用实践进行分享,如果是单体应用,使用
SpringBoot
内置的
@scheduled
注解可以解决大部分业务需求,上手非常容易!

项目源代码地址:
spring-boot-example-scheduled

四、参考

1、
https://springboot.io/t/topic/2758

一、前言

2024年AI浪潮席卷全球,编程界迎来全新的挑战与机遇。智能编程、自动化测试、代码审查,这一切都得益于AI技术的迅猛发展,它正在重塑开发者的日常,让编写代码变得更加高效、智能。

精选出最受好评、最具实用价值的Visual Studio插件,涵盖代码编辑、调试、测试、版本控制等多个方面,帮助开发者选择出正确的工具,提升开发效率和质量。无论是初出茅庐的编码新手,还是久经沙场的资深码农,总有一款插件能够满足你的需求,激发你的编程灵感。通过本文的介绍,将能够发现那些隐藏在Visual Studio插件市场中的瑰宝,让它们成为我们日常开发工作中的得力助手。

二、
V
isual Studio 插件安装指南

Visual Studio 通过安装插件,可以极大地扩展其功能,提高开发效率。无论是初学者还是经验丰富的开发者,都能轻松上手。

步骤一:启动Visual Studio

1、打开 Visual Studio开发工具。

2、如果尚未创建或打开项目,可以选择"创建新项目”或”打开现有项目”来启动Visual Studio,具体如下图所示:

步骤二:访问扩展和更新
在Visual Studio 顶部菜单中,点击"扩展" > "管理扩展",具体如下图所示:

步骤三:搜索和选择插件

1、点击“管理扩展”标签页,具体如下图所示:2、在搜索框输入你想要安装的插件名称或关键词,例如"Resharper"、"CodeMaid"等。3、浏览搜索结果,查看插件的详细信息,包括描述、评分、评论和版本信息。

步骤四:安装插件

1、找到你需要的插件后,点击右侧的"下载"按钮。

2、下载完成后,按钮会变成"安装",点击以开始安装过程。3、插件的大小和你的网络速度,安装过程可能需要几分钟时间。4、安装完毕后,可能需要重启Visual Studio才能使插件生效。

步骤五:启用插件

1、重启Visual Studio后,插件应该已经自动启用。

2、如果需要手动启用,可以在"工具"> "扩展和更新"中找到已安装的插件,确保其状态为"已启用"。

3、对于一些插件,可能还需要额外的配置,如设置快捷键或调整选项,这些通常可以在"工具" > "选项"中找到。

三、
Visual Studio 如何高效搜索插件

Visual Studio庞大的插件库中提供了一些高效的搜索工具和技巧,可以帮助你快速定位到所需的插件。

1、插件市场

https://marketplace.visualstudio.com

2、使用关键词搜索是最直接的查找方式。在插件市场页面的搜索框中输入关键词,如"TONGYI Lingma"、"Fitten Code"。

3、利用筛选和排序功能,可以根据插件的类型、评级、更新日期等条件进行筛选。

4、点击搜索结果中的插件,可以查看插件的详细信息页面,包括插件的描述、截图、用户评价和版本历史等。

四、
Visual Studio AI插件推荐

在Visual Studio中,有几个AI的插件可以帮助提升开发效率和代码质量,推荐实用的AI插件。

1、Fitten Code(免费)

Fitten Code 是由非十大模型驱动的AI编程助手,支持多种编程语言,支持主流几乎所有的IDE开发工具。包括VS Code、Visual Studio、JetBrains系列IDE(包括IntelliJ IDEA、PyCharm等)等,还适配了上古神器VIM。

  • 自动生成代码,提升开发效率。

  • 调试Bug,节省时间。

  • 对话聊天,解决编程问题。

官网文档:https://code.fittentech.com/tutor_vs_zh

2、CodeGeeX (免费)

CodeGeeX 是一款基于大模型的智能编程助手,它可以实现代码的生成与补全、自动为代码添加注释、自动解释代码、自动编写单元测试、实现代码审查Code Review、自动修复代码fixbug、自动生成commit message完成git提交,以及在不同编程语言的代码间实现互译、针对技术和代码问题的智能问答等丰富的功能。

帮助开发者显著提高工作效率,CodeGeeX支持100+种编程语言,适配多种主流IDE平台,包括Visual Studio Code,JetBrains IDEs,Visual Studio,HBuilderX,DeepIn-IDE等。

  • 代码生成与补全。
  • 自动为代码添加注释和解释。
  • 编写单元测试、代码审查(Code Review)。
  • 自动修复代码(fix bug)。
  • 自动生成commit message完成git提交。
  • 跨语言代码互译和智能问答。

官网文档:https://codegeex.cn/

适用场景:适用于需要快速生成代码原型或进行代码重构的场景。

3、通义灵码(个人版免费)

工具提供了AI代码建议和优化,可以帮助开发者更快地理解和编写代码。它已经在Visual Studio Code、和其他IDE中上线,现在也加入了Visual Studio的插件市场。

  • 智能代码补全

  • 代码风格优化

  • 码审查与错误检测

  • 智能问答与文档生成

  • 跨语言支持

官方文档:https://help.aliyun.com/document_detail/2590613.html

4、GitHub Copilot(付费)

GitHub Copilot是一款AI辅助工具,能够帮助开发者更快速、智能地编写高质量代码。

它支持多种编程语言,如Python、JavaScript、TypeScript、Ruby、Go、C#和C++等。

  • GitHub Copilot 会在你编码时提供建议:有时是当前行的补全,有时是全新的代码块。可以接受全部或部分建议,也可以忽略建议并继续键入。

  • 实时提供代码建议,从单行代码到完整函数。
  • 自动为代码添加注释,提高代码可读性。
  • 支持代码补全、解释和审查等功能。

五、
Visual Studio 必备插件大全

1、ILSpy-2022(免费)

ILSpy 对于.NET开发者来说是一个宝贵的资源,无论是用于学习、逆向工程还是作为开发过程中的辅助工具。由于其开源性质,ILSpy持续得到社区的支持和更新,保持着与最新.NET版本的兼容性。可以集成在Visual Studio 开发工具中,能够十分快捷方便的查看源代码内容。

2、Visual-Studio-Translator (免费)

Visual-Studio-Translator 是一款专为 Visual Studio 开发者设计的强大翻译工具,在提升开发过程中的语言处理效率。

这款工具通过集成在 Visual Studio 编辑器中,使得开发者能够轻松实现代码、注释以及其他文本内容的即时翻译,极大地促进了跨语言编程和文档处理的便利性。

安装完成后,通过简单的配置即可开始使用。在需要翻译的内容上右键点击并选择"Translate"选项,或使用快捷键触发翻译功能,即可获得翻译结果。

快捷键

  • Google 翻译:(Ctrl + Shift + D, Ctrl + Shift + D)
  • 必应翻译:(Ctrl + Shift + D,ctrl + Shift + F)
  • 百度翻译:(Ctrl + Shift + D,ctrl + Shift + C)
  • 有道翻译:(Ctrl + Shift + D,ctrl + Shift + V)

3、CodeMaid(免费)

CodeMaid是一个功能强大的Visual Studio扩展插件,通过提供自动代码清理、格式化、重构等功能,提高代码质量、提升开发效率并减少错误率。

支持Visual Studio版本:从VS 2005至VS 2022(最新版本主要支持 VS 2019和 VS 2022)

  • 代码整理与格式化
    :自动整理白色空间,包括缩进、空格、空行等,提供多种格式化方式,支持批量格式化,可选择"保存时自动清理",实现每次保存代码时自动格式化。
  • 注释整理
    :自动整理注释内容,去除不必要的换行和空格。调整注释样式,使其更加规范和整洁。
  • 代码重构
    :按照Microsoft的Style Copy规范或自定义规则重新排列成员。自动创建匹配的区域,优化代码结构。
  • 代码审查
    :在代码审查过程中,帮助识别潜在的问题和不规范的代码。
  • 其他辅助功能
    :支持多行代码合并为一行,按字母排序代码,删除已选的#region。一键折叠解决方案和快速定义文档在解决方案的位置。

4、CSharpier(免费)

CSharpier 是一个开源、免费且轻量级的 C# 代码格式化工具,它基于 Roslyn 编译器框架来解析和重新格式化 C# 代码。

图片

这个工具的设计目的是使代码风格保持一致,从而提高代码的可读性和可维护性。

  • 智能格式化:
    使用 Roslyn 编译器框架深入理解 C# 语法结构,从而做出更加智能的格式决策。
  • 高度定制化:
    虽然设计哲学倾向于提供有限的选项,但 CSharpier 仍允许一定程度的定制,以满足不同团队的需求。
  • 无缝集成:
    支持多种集成开发环境(IDE),如 Visual Studio(2019和2022版本)、Visual Studio Code 等,可以在这些环境中实现保存时自动格式化代码。

提供有限但关键的选项,确保代码格式的一致性,减少开发者在代码风格上的争论。

5、XAML Styler for Visual Studio 2022(免费)

XAML Styler for Visual Studio 2022 是一款专为Visual Studio 2022设计的免费扩展插件,帮助开发者格式化XAML代码,提升代码的可读性和一致性。

  • 自动化格式化
    :支持多种格式化选项,如属性排序、换行规则、空格处理等。
  • 提高可读性
    :通过格式化,XAML代码变得更加清晰、易于阅读和理解。
  • 灵活配置
    :用户可以根据自己的偏好和需求配置XAML Styler的格式化选项。
  • 集成到Visual Studio
    :XAML Styler无缝集成到开发环境中。
  • 支持多种XAML相关文件
    :不仅限于标准的XAML文件,还可能支持其他与XAML相关的文件类型,如XAML资源字典等。

6、Indent Guides for VS 2022(免费)

Indent Guides 是一个流行的 Visual Studio 插件,用于改善代码阅读性和可维护性。这个插件的主要功能是在代码编辑器中添加垂直引导线,这些引导线帮助开发者视觉上对齐代码块,尤其是那些与大括号 {} 相关的代码块。

以下是 Indent Guides 插件的一些关键特性和优势:

  • 垂直引导线
    :插件在每个代码块的左侧添加细线,这些线与大括号 {} 对齐,帮助开发者直观地看到哪些代码属于同一代码块。这在处理嵌套结构时尤其有用。
  • 增强代码结构的可见性
    :引导线提高了代码结构的清晰度,使开发者能够迅速识别出代码块的开始和结束位置,即使是在长文件中。
  • 提升代码可读性
    :通过视觉辅助,Indent Guides 可以帮助减少代码阅读时的认知负荷,使得代码更容易理解和维护。
  • 适用于多种语言
    :插件支持多种编程语言,包括 C#, VB.NET, C++, JavaScript, TypeScript 等,只要这些语言使用大括号来界定代码块。
  • 自定义选项
    :开发者可以根据个人偏好调整引导线的颜色和可见性。例如,可以选择在代码编辑器中总是显示引导线,或者仅在代码折叠时显示。
  • 安装和使用
    :Indent Guides 可以直接从 Visual Studio 的扩展管理器中搜索并安装。一旦安装,它会自动应用于所有支持的语言项目中,但在某些情况下可能需要重启 Visual Studio 才能使更改生效。
  • 开源性质
    :Indent Guides 是一个开源项目,这意味着它可以免费使用,并且开发者社区可以贡献代码来改进插件。

7、Viasfora(免费)

Viasfora是一个功能强大的工具,既可以作为Visual Studio的免费扩展来改善文本编辑体验,也可以作为Python中的可视化编程库来创建交互式图形和可视化。根据不同的应用场景和需求,Viasfora提供了丰富的功能和自定义选项,以满足开发者的不同需求。

  • 彩虹括号
    :这是Viasfora最为著名的功能之一,它通过使用不同的颜色来区分嵌套的大括号、小括号和方括号,从而帮助开发者更清晰地跟踪代码结构。
  • 关键字高亮
    :Viasfora能够高亮显示编程语言中的关键字,如流程控制关键字(if、for、while等)和LINQ查询关键字,提高代码的可读性。

  • 其他功能
    :包括自动展开折叠的区域、演示模式、转义序列和格式说明符的高亮等。

开发者可以通过Visual Studio的“选项 – 环境 – 字体和颜色”或Viasfora自身的设置界面来自定义关键字的颜色、彩虹括号的颜色深度等。

8、SQL Search(免费)

SQL Search 是由 Redgate 软件公司开发的一款 SQL Server Management Studio (SSMS) 和 Visual Studio 的插件,其主要功能是在 SQL Server 数据库中快速搜索 SQL 代码和文本。

它极大地提高了数据库开发和管理的效率,尤其是在大型项目中,其中可能包含数千个数据库对象和数百万行的 SQL 代码。

以下是 SQL Search 插件的一些关键特点:

  • 快速搜索
    :SQL Search 提供了快速搜索 SQL 代码的能力,能够在数据库、存储过程、函数、视图、触发器以及注释中查找特定的文本或模式。
  • 跨数据库搜索
    :它允许你同时在多个数据库中进行搜索,这在需要跨多个数据库环境查找相似代码或模式时特别有用。
  • 智能搜索
    :插件支持正则表达式和通配符,可以进行更复杂的搜索模式匹配。
  • 即时反馈:在输入搜索条件的同时,搜索结果会立即显示,无需等待完整的搜索过程完成。
  • 结果预览
    :搜索结果中可以直接预览匹配的代码片段,无需打开每一个对象来查看。
  • 结果导航
    :你可以从搜索结果中直接跳转到具体的数据库对象,便于修改和审查代码。
  • 历史记录与书签
    :SQL Search 记录搜索历史,并允许保存常用的搜索项作为书签,以便将来快速重复使用。
  • 轻量级与高性能
    :插件设计得十分轻巧,不会显著影响 SSMS 或 Visual Studio 的性能。
  • 无缝集成
    :它紧密地与 SSMS 和 Visual Studio 集成,提供一致的用户界面和流畅的工作流。
  • 版本控制友好
    :对于版本控制系统中的代码更改,SQL Search 也能提供有效的搜索和比较功能。

9、EFCore.Visualizer(免费)

EFCore.Visualizer 是一个专为 Microsoft Visual Studio 设计的免费插件,用于增强 Entity Framework Core (EF Core) 的开发体验。它的主要功能是提供一个可视化工具,让开发者能够直观地查看和理解 EF Core 查询计划,这对于调试和优化数据库查询性能至关重要,支持SQL Server和PostgreSQL两个数据库。

  • 查询计划可视化
    :这个插件使得在 Visual Studio 中直接查看和分析 EF Core 的 LINQ 查询转换成的 SQL 查询成为可能。通过图形化界面展示查询树,开发者可以更容易地识别查询中的瓶颈或低效部分。
  • 调试支持
    :当你在代码中设置断点并运行调试时,可以在 Watch 窗口中使用此插件来实时观察查询计划的变化。这对于理解运行时的查询行为非常有帮助。
  • 数据库兼容性
    :EFCore.Visualizer 支持多种数据库系统,包括 SQL Server 和 PostgreSQL,这意味着无论你使用哪种数据库,都可以利用该插件进行查询优化。
  • 易于使用
    :插件的安装和使用相对简单,可以通过 Visual Studio 的扩展管理器或者插件市场下载并安装。
  • 性能优化
    :通过识别和优化查询计划,EFCore.Visualizer 可以帮助开发者减少数据库查询的时间,从而提高应用程序的整体性能。

SQL Server

PostgreSQL

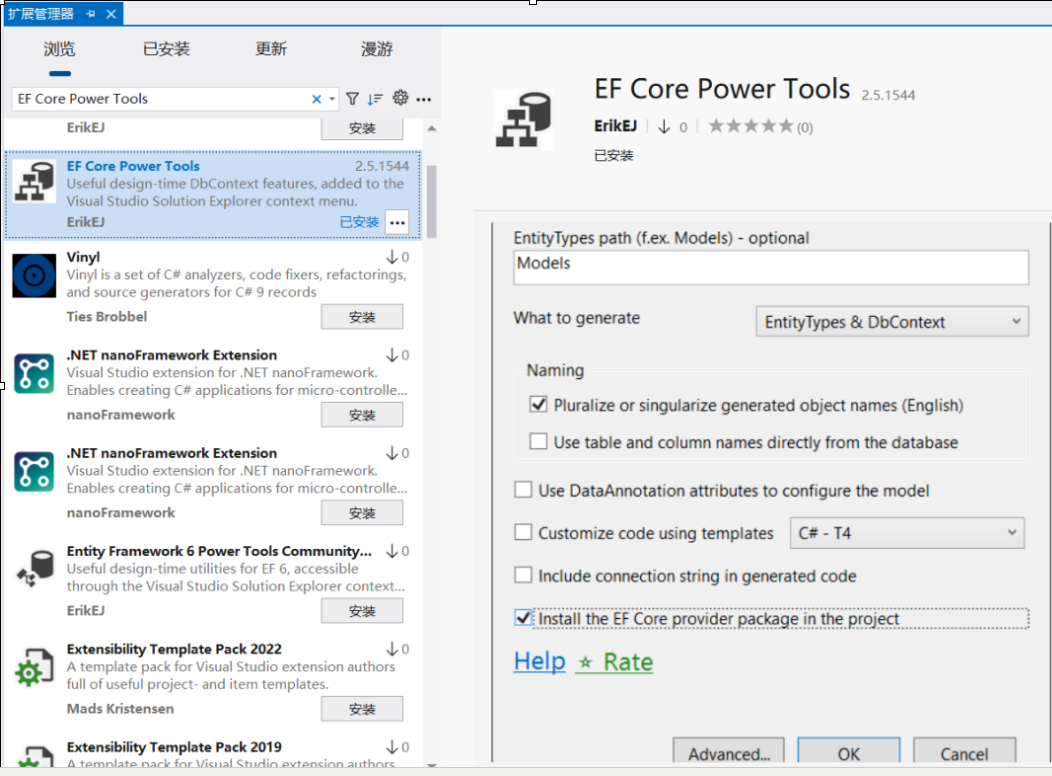
10、EF Core Power Tools(免费)

EF Core Power Tools 是一个非常有用的 Visual Studio 扩展,专为 Entity Framework Core (EF Core) 开发者设计。它提供了丰富的功能来帮助我们在开发过程中更高效地处理数据库和实体模型。

以下是一些主要的功能:

  • 反向工程(Reverse Engineering)
    :EF Core Power Tools 允许你从现有的数据库中生成 EF Core 的数据访问层代码,包括 DbContext 类和实体模型类。这通常被称为“数据库优先”(Database-First)方法。
  • 数据库迁移管理
    :它提供了一个图形界面来管理数据库迁移,使你可以轻松创建、应用和回滚迁移。
  • 模型可视化
    :插件能够生成实体模型的图形表示,这有助于理解模型结构和关系。
  • 代码生成
    :可以生成 CRUD 方法和其他常用操作的代码模板。
  • CLI 工具
    :EF Core Power Tools CLI 是一个命令行工具,允许你在不打开 IDE 的情况下执行上述任务,这对于自动化工作流程和持续集成/持续部署 (CI/CD) 流程非常有用。
  • SQL Server DACPAC 支持
    :如果你使用 SQL Server 并且有 DACPAC 文件,那么你可以直接从 DACPAC 文件生成 EF Core 代码。
  • 连接字符串管理
    :插件简化了设置和管理连接字符串的过程。
  • 兼容性
    :支持 EF Core 的多个版本,包括但不限于 6.x 和 8.x 版本。

六、
总结

本文介绍了Visual Studio插件的安装与搜索技巧,强调其对提升开发效率的价值。通过精确关键词搜索与用户评价筛选,快速锁定优质插件。

特别推荐AI增强型插件,如Fitten Code,智能代码建议加速开发。精选涵盖代码管理至设计优化的必备工具,全方位升级编程体验,打造高效开发环境。

大家好,我是程序猿DD

今天给大家推荐一个日常大概率能用上的开源项目:Stirling PDF

开源地址:
https://github.com/Stirling-Tools/Stirling-PDF

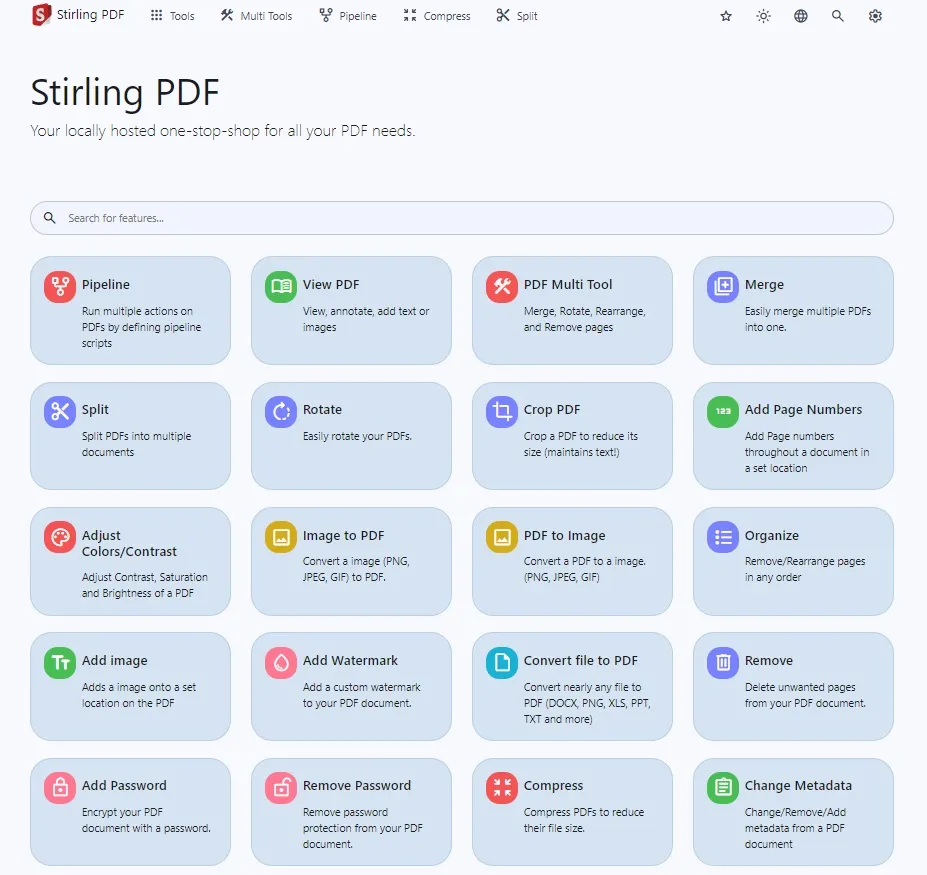
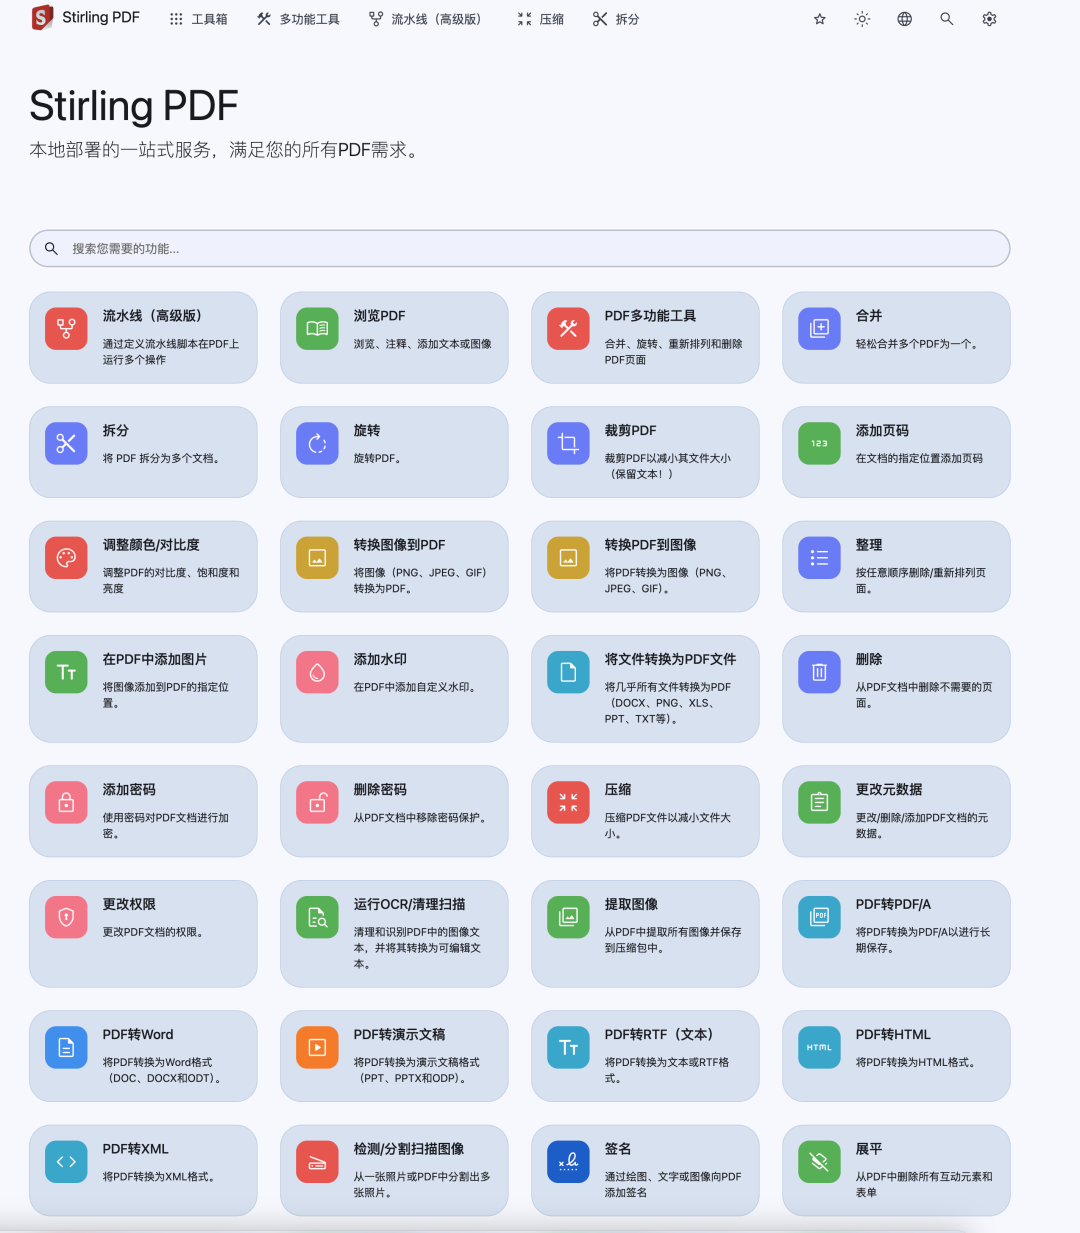
Stirling PDF是一个可以用Docker在本地托管的基于Web的PDF处理工具。它的功能非常强大,你可以用它对PDF文件进行各种操作,包括拆分、合并、转换、重新组织、添加图像、旋转、压缩等。

从官方给的介绍图来看,这个本地托管的Web应用程序可以说是PDF的处理大全,几乎可以满足您所有的PDF需求。

同时,Stirling PDF不会出于记录或跟踪任何出站调用,所有文件和PDF要么仅存在于客户端,要么仅在任务执行期间存在于服务器内存中,或者仅在任务执行期间临时存在于一个文件中,隐私保护也是杠杠的。

所以,如果你平时经常需要处理PDF,那么可以考虑自己在Docker上部署一个。如果不知道如何自己部署一个,那就看下面:

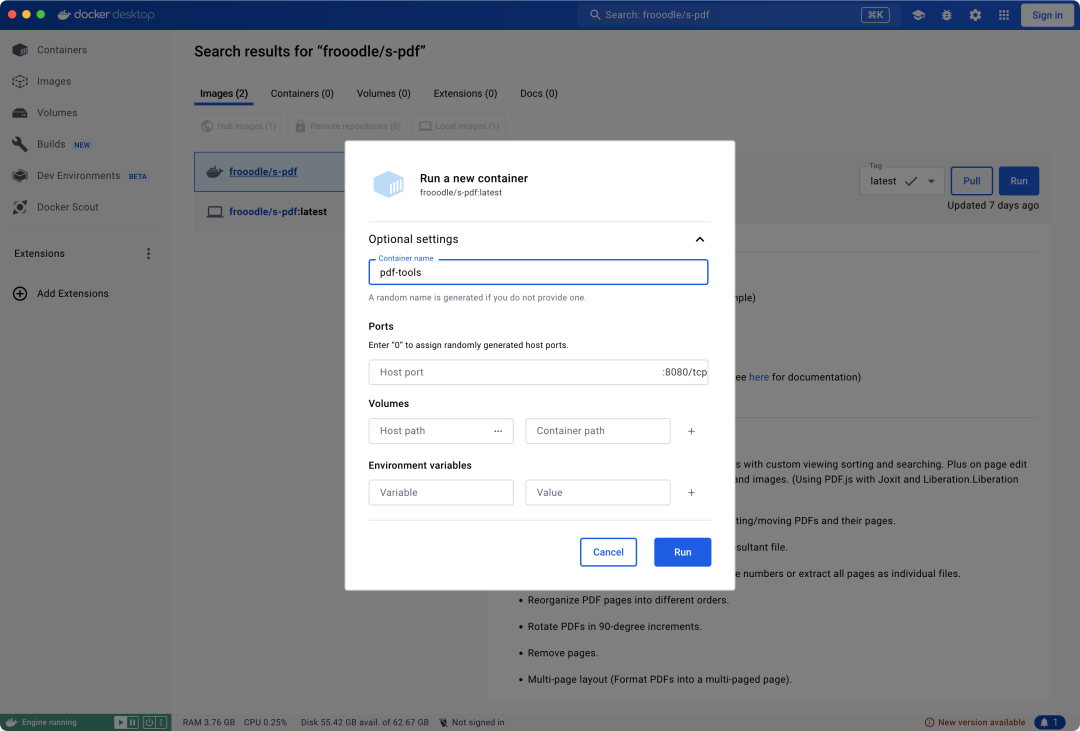
  1. 打开Docker,搜索 frooodle/s-pdf,点击 Pull

  1. Pull 完成之后,点击 Run。根据需要你可以做一些配置,注意记得设置一个端口,比如我设置了:9000

3.启动之后,你就可以通过:
http://localhost:9000
,访问到部署于自己docker上的pdf处理工具了

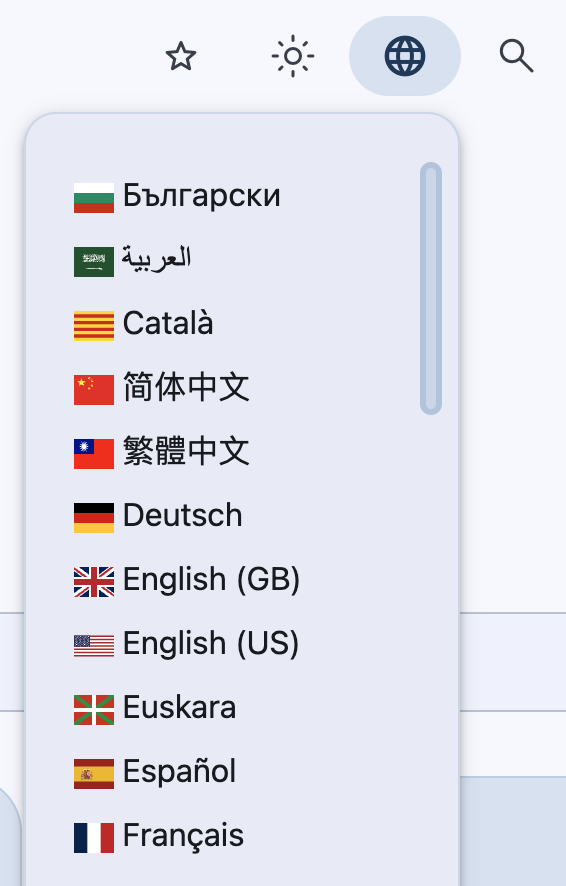
不用担心全英文看不懂,因为右上角可以切换语言:

它的汉化也是做的非常全面,当心大部分人都可以快速上手

好了,今天的分享就到这里,希望这个工具对您有用~

欢迎关注我的公众号:程序猿DD。第一时间了解前沿行业消息、分享深度技术干货、获取优质学习资源

@

Sqlite配置

应用程序里使用Sqlite作为数据库,使用EntityFramworkCore作为ORM,使用CodeFirst方式用EFCore初始化Sqlite数据库文件:
mato.db

在MatoProductivity.Core项目的
appsettings.json
中添加本地sqlite连接字符串

  "ConnectionStrings": {
    "Default": "Data Source=file:{0};"
  },
  ...

这里文件是一个占位符,通过代码hardcode到配置文件

在MatoProductivityCoreModule.cs中,重写PreInitialize并设置Configuration.DefaultNameOrConnectionString:

public override void PreInitialize()
{
    LocalizationConfigurer.Configure(Configuration.Localization);

    Configuration.Settings.Providers.Add<CommonSettingProvider>();

    string documentsPath = Path.Combine(Environment.GetFolderPath(Environment.SpecialFolder.LocalApplicationData), MatoProductivityConsts.LocalizationSourceName);

    var configuration = AppConfigurations.Get(documentsPath, development);
    var connectionString = configuration.GetConnectionString(MatoProductivityConsts.ConnectionStringName);

    var dbName = "mato.db";
    string dbPath = Path.Combine(Environment.GetFolderPath(Environment.SpecialFolder.LocalApplicationData), MatoProductivityConsts.LocalizationSourceName, dbName);

    Configuration.DefaultNameOrConnectionString = String.Format(connectionString, dbPath);
    base.PreInitialize();
}

创建实体

接下来定义实体类

笔记实体类

笔记用于存储实体,在笔记列表中,每个笔记都有标题和内容,创建时间等内容。

定义于
\MatoProductivity.Core\Models\Entities\Note.cs


public class Note : FullAuditedEntity<long>
{
    public Note()
    {

    }
    public Note(string name, bool isHidden, bool isRemovable)
    {
        Title = name;
        IsHidden = isHidden;
        IsRemovable = isRemovable;
    }


    [Key, DatabaseGenerated(DatabaseGeneratedOption.Identity)]
    public override long Id { get; set; }

    public ICollection<NoteSegment> NoteSegments { get; set; }

    public string Title { get; set; }
    public string Type { get; set; }
    public string Status { get; set; }
    public string Desc { get; set; }
    public string Icon { get; set; }
    public string Color { get; set; }
    public string BackgroundColor { get; set; }
    public string BackgroundImage { get; set; }

    public string PreViewContent { get; set; }

    public bool IsEditable { get; set; }

    public bool IsHidden { get; set; }

    public bool IsRemovable { get; set; }
    public bool CanSimplified { get; set; }

}


笔记分组实体

定义于
\MatoProductivity.Core\Models\Entities\NoteGroup.cs

public class NoteGroup : FullAuditedEntity<long>
{
    public NoteGroup()
    {

    }
    public NoteGroup(string name, bool isHidden, bool isRemovable)
    {
        Title = name;
        IsHidden = isHidden;
        IsRemovable = isRemovable;
    }

    [Key, DatabaseGenerated(DatabaseGeneratedOption.Identity)]
    public override long Id { get; set; }
    public string Title { get; set; }

    public bool IsHidden { get; set; }

    public bool IsRemovable { get; set; }

    public ICollection<Note> Notes { get; set; }
}

笔记片段实体

定义于
\MatoProductivity.Core\Models\Entities\NoteSegment.cs

public class NoteSegment : FullAuditedEntity<long>, INoteSegment
{
    public NoteSegment()
    {

    }


    [Key, DatabaseGenerated(DatabaseGeneratedOption.Identity)]
    public override long Id { get; set; }

    [ForeignKey(nameof(NoteId))]
    public Note Note { get; set; }

    public ICollection<NoteSegmentPayload> NoteSegmentPayloads { get; set; }

    public long NoteId { get; set; }

    public string Title { get; set; }
    public string Type { get; set; }
    public string Status { get; set; }
    public string Desc { get; set; }
    public string Icon { get; set; }
    public string Color { get; set; }
    public int Rank { get; set; }

    public bool IsHidden { get; set; }

    public bool IsRemovable { get; set; }


    public INoteSegmentPayload GetNoteSegmentPayload(string key)
    {
        if (NoteSegmentPayloads != null)
        {
            return NoteSegmentPayloads.FirstOrDefault(c => c.Key == key);
        }
        return default;
    }


    public void SetNoteSegmentPayload(INoteSegmentPayload noteSegmentPayload)
    {
        if (NoteSegmentPayloads != null)
        {
            var currentPayload = NoteSegmentPayloads.FirstOrDefault(c => c.Key == noteSegmentPayload.Key);
            if (currentPayload != null)
            {
                NoteSegmentPayloads.Remove(currentPayload);
            }
            if (!this.IsTransient())
            {
                (noteSegmentPayload as NoteSegmentPayload).NoteSegmentId = this.Id;
            }
            NoteSegmentPayloads.Add((noteSegmentPayload as NoteSegmentPayload));
        }
    }

    public INoteSegmentPayload GetOrSetNoteSegmentPayload(string key, INoteSegmentPayload noteSegmentPayload)
    {
        if (NoteSegmentPayloads != null)
        {
            var currentPayload = NoteSegmentPayloads.FirstOrDefault(c => c.Key == key);
            if (currentPayload != null)
            {
                return currentPayload;
            }
            if (noteSegmentPayload != null)
            {
                if (!this.IsTransient())
                {
                    (noteSegmentPayload as NoteSegmentPayload).NoteSegmentId = this.Id;
                }
                NoteSegmentPayloads.Add((noteSegmentPayload as NoteSegmentPayload));
            }
            return noteSegmentPayload;
        }
        return noteSegmentPayload;
    }

}


笔记片段负载实体

笔记片段负载与笔记片段实体为一对多的关系,用于存储笔记片段的详细内容。

定义于
\MatoProductivity.Core\Models\Entities\NoteSegmentPayload.cs

public class NoteSegmentPayload : FullAuditedEntity<long>, INoteSegmentPayload
{
    public NoteSegmentPayload()
    {

    }


    public NoteSegmentPayload(string key, object value, string valuetype = null)
    {
        if (value is string)
        {
            this.SetStringValue((value as string).ToString());
        }
        else if (value is byte[])
        {
            this.Value = value as byte[];
        }
        else if (value is DateTime)
        {
            this.SetStringValue(((DateTime)value).ToString("yyyy-MM-dd HH:mm:ss"));
        }
        else
        {
            this.SetStringValue(value.ToString());
        }
        this.Key = key;
        this.ValueType = valuetype;

    }


    [Key, DatabaseGenerated(DatabaseGeneratedOption.Identity)]
    public override long Id { get; set; }

    [ForeignKey(nameof(NoteSegmentId))]
    public NoteSegment NoteSegment { get; set; }

    public long NoteSegmentId { get; set; }

    public string Key { get; set; }

    public byte[] Value { get; set; }

    public string ValueType { get; set; }

    [NotMapped]
    public string StringValue => GetStringValue();

    public T GetConcreteValue<T>() where T : struct
    {
        var value = Encoding.UTF8.GetString(Value);
        T result = value.To<T>();
        return result;
    }

    public string GetStringValue()
    {
        var value = Encoding.UTF8.GetString(Value);
        return value;
    }

    public void SetStringValue(string value)
    {
        this.Value = Encoding.UTF8.GetBytes(value);
    }
}

笔记片段仓库实体

用于在编辑笔记页面的添加片段菜单中,加载所有可用的片段

定义于
\MatoProductivity.Core\Models\Entities\NoteSegmentStore.cs

public class NoteSegmentStore : Entity<long>
{
    
    [Key, DatabaseGenerated(DatabaseGeneratedOption.Identity)]
    public override long Id { get; set; }
    public string Title { get; set; }
    public string Type { get; set; }
    public string Category { get; set; }
    public string Status { get; set; }
    public string Desc { get; set; }
    public string Icon { get; set; }
    public string Color { get; set; }
    public bool IsHidden { get; set; }

    public bool IsRemovable { get; set; }


}


笔记模板(场景)实体

定义于
\MatoProductivity.Core\Models\Entities\NoteTemplate.cs

public class NoteTemplate : FullAuditedEntity<long>
{
    public NoteTemplate()
    {

    }
    public NoteTemplate(string name, bool isHidden, bool isRemovable)
    {
        Title = name;
        IsHidden = isHidden;
        IsRemovable = isRemovable;
    }
    
    [Key, DatabaseGenerated(DatabaseGeneratedOption.Identity)]
    public override long Id { get; set; }

    public ICollection<NoteSegmentTemplate> NoteSegmentTemplates { get; set; }

    public string Title { get; set; }
    public string Type { get; set; }
    public string Status { get; set; }
    public string Desc { get; set; }
    public string Icon { get; set; }
    public string Color { get; set; }
    public string BackgroundColor { get; set; }
    public string BackgroundImage { get; set; }

    public string PreViewContent { get; set; }

    public bool IsEditable { get; set; }

    public bool IsHidden { get; set; }

    public bool IsRemovable { get; set; }

    public bool CanSimplified { get; set; }


}


笔记片段模板实体

定义于
\MatoProductivity.Core\Models\Entities\NoteSegmentTemplate.cs

public class NoteSegmentTemplate : FullAuditedEntity<long>, INoteSegment
{
    public NoteSegmentTemplate()
    {

    }


    [Key, DatabaseGenerated(DatabaseGeneratedOption.Identity)]
    public override long Id { get; set; }

    [ForeignKey(nameof(NoteTemplateId))]
    public NoteTemplate NoteTemplate { get; set; }

    public ICollection<NoteSegmentTemplatePayload> NoteSegmentTemplatePayloads { get; set; }

    public long NoteTemplateId { get; set; }

    public string Title { get; set; }
    public string Type { get; set; }
    public string Status { get; set; }
    public string Desc { get; set; }
    public string Icon { get; set; }
    public string Color { get; set; }
    public int Rank { get; set; }

    public bool IsHidden { get; set; }

    public bool IsRemovable { get; set; }


    public INoteSegmentPayload GetNoteSegmentPayload(string key)
    {
        if (NoteSegmentTemplatePayloads != null)
        {
            return NoteSegmentTemplatePayloads.FirstOrDefault(c => c.Key == key);
        }
        return default;
    }

    public void SetNoteSegmentPayload(INoteSegmentPayload noteSegmentPayload)
    {
        if (NoteSegmentTemplatePayloads != null)
        {
            var currentPayload = NoteSegmentTemplatePayloads.FirstOrDefault(c => c.Key == noteSegmentPayload.Key);
            if (currentPayload != null)
            {
                NoteSegmentTemplatePayloads.Remove(currentPayload);
            }
            if (!this.IsTransient())
            {
                (noteSegmentPayload as NoteSegmentTemplatePayload).NoteSegmentTemplateId = this.Id;
            }
            NoteSegmentTemplatePayloads.Add((noteSegmentPayload as NoteSegmentTemplatePayload));
        }
    }

    public INoteSegmentPayload GetOrSetNoteSegmentPayload(string key, INoteSegmentPayload noteSegmentPayload)
    {
        if (NoteSegmentTemplatePayloads != null)
        {
            var currentPayload = NoteSegmentTemplatePayloads.FirstOrDefault(c => c.Key == key);
            if (currentPayload != null)
            {
                return currentPayload;
            }
            if (noteSegmentPayload != null)
            {
                if (!this.IsTransient())
                {
                    (noteSegmentPayload as NoteSegmentTemplatePayload).NoteSegmentTemplateId = this.Id;
                }
                NoteSegmentTemplatePayloads.Add((noteSegmentPayload as NoteSegmentTemplatePayload));
            }
            return noteSegmentPayload;
        }
        return noteSegmentPayload;
    }

}


笔记片段模板负载实体

定义于
\MatoProductivity.Core\Models\Entities\NoteSegmentTemplatePayload.cs

public class NoteSegmentTemplatePayload : FullAuditedEntity<long>, INoteSegmentPayload
{
    public NoteSegmentTemplatePayload()
    {

    }


    public NoteSegmentTemplatePayload(string key, object value, string valuetype = null)
    {
        if (value is string)
        {
            this.SetStringValue((value as string).ToString());
        }
        else if (value is byte[])
        {
            this.Value = value as byte[];
        }
        else if (value is DateTime)
        {
            this.SetStringValue(((DateTime)value).ToString("yyyy-MM-dd HH:mm:ss"));
        }
        else
        {
            this.SetStringValue(value.ToString());
        }
        this.Key = key;
        this.ValueType = valuetype;

    }


    [Key, DatabaseGenerated(DatabaseGeneratedOption.Identity)]
    public override long Id { get; set; }

    [ForeignKey(nameof(NoteSegmentTemplateId))]
    public NoteSegmentTemplate NoteSegmentTemplate { get; set; }

    public long NoteSegmentTemplateId { get; set; }

    public string Key { get; set; }

    public byte[] Value { get; set; }

    public string ValueType { get; set; }

    [NotMapped]
    public string StringValue => GetStringValue();

    public T GetConcreteValue<T>() where T : struct
    {
        var value = Encoding.UTF8.GetString(Value);
        T result = value.To<T>();
        return result;
    }

    public string GetStringValue()
    {
        var value = Encoding.UTF8.GetString(Value);
        return value;
    }

    public void SetStringValue(string value)
    {
        this.Value = Encoding.UTF8.GetBytes(value);
    }
}


配置EF

数据库上下文对象
MatoProductivityDbContext
定义如下

    public class MatoProductivityDbContext : AbpDbContext
    {
        //Add DbSet properties for your entities...

        public DbSet<Note> Note { get; set; }
        public DbSet<NoteGroup> NoteGroup { get; set; }
        public DbSet<NoteSegment> NoteSegment { get; set; }
        public DbSet<NoteSegmentStore> NoteSegmentStore { get; set; }
        public DbSet<NoteSegmentPayload> NoteSegmentPayload { get; set; }
        public DbSet<NoteTemplate> NoteTemplate { get; set; }
        public DbSet<NoteSegmentTemplate> NoteSegmentTemplate { get; set; }
        public DbSet<NoteSegmentTemplatePayload> NoteSegmentTemplatePayload { get; set; }
        public DbSet<Theme> Theme { get; set; }
        public DbSet<Setting> Setting { get; set; }
        public MatoProductivityDbContext(DbContextOptions<MatoProductivityDbContext> options) 
            : base(options)
        {

        }
    }

MatoProductivity.EntityFrameworkCore是应用程序数据库的维护和管理项目,依赖于Abp.EntityFrameworkCore。
在MatoProductivity.EntityFrameworkCore项目中csproj文件中,引用下列包

<PackageReference Include="Abp.EntityFrameworkCore" Version="7.4.0" />
<PackageReference Include="Microsoft.EntityFrameworkCore" Version="7.0.0" />
<PackageReference Include="Microsoft.EntityFrameworkCore.Sqlite" Version="7.0.0" />
<PackageReference Include="Microsoft.EntityFrameworkCore.Sqlite.Design" Version="1.1.6" />
<PackageReference Include="Microsoft.EntityFrameworkCore.Tools" Version="7.0.0">

在该项目MatoProductivityEntityFrameworkCoreModule.cs 中,将注册上下文对象,并在程序初始化运行迁移,此时将在设备上生成
mato.db
文件

public override void PostInitialize()
{
    Helper.WithDbContextHelper.WithDbContext<MatoProductivityDbContext>(IocManager, RunMigrate);
    if (!SkipDbSeed)
    {
        SeedHelper.SeedHostDb(IocManager);
    }
}

public static void RunMigrate(MatoProductivityDbContext dbContext)
{
    dbContext.Database.Migrate();
}

创建映射

从场景到笔记,或者说从模板到实例,我们需要映射,例如从笔记片段菜单中选择一个片段添加,那么需要从笔记片段仓库实体(NoteSegmentStore)映射到笔记片段实体(NoteSegment)或者,在编辑场景中,映射到笔记片段模板实体(NoteSegmentTemplate)。

[AutoMapTo(typeof(NoteSegment), typeof(NoteSegmentTemplate))]

public class NoteSegmentStore : Entity<long>
{
    ...
}

使用时:

var note = ObjectMapper.Map<NoteSegment>(noteSegmentStore);

ABP框架默认使用
AutoMapper
进行映射,所以需要配置映射关系。

Configuration.Modules.AbpAutoMapper().Configurators.Add(config =>
{
    IgnoreAbpProperties(config.CreateMap<NoteTemplate, Note>()
    .ForMember(
        c => c.NoteSegments,
        options => options.MapFrom(input => input.NoteSegmentTemplates))
      .ForMember(
        c => c.Id,
        options => options.Ignore()));


    IgnoreAbpProperties(config.CreateMap<Note, NoteTemplate>()
       .ForMember(
           c => c.NoteSegmentTemplates,
           options => options.MapFrom(input => input.NoteSegments))
      .ForMember(
        c => c.Id,
        options => options.Ignore()));


    IgnoreAbpProperties(config.CreateMap<NoteSegmentTemplate, NoteSegment>()
    .ForMember(
        c => c.Note,
        options => options.MapFrom(input => input.NoteTemplate))
    .ForMember(
        c => c.NoteSegmentPayloads,
        options => options.MapFrom(input => input.NoteSegmentTemplatePayloads))
     .ForMember(
        c => c.NoteId,
        options => options.Ignore())
      .ForMember(
        c => c.Id,
        options => options.Ignore()));

    IgnoreAbpProperties(config.CreateMap<NoteSegmentStore, NoteSegment>()
     .ForMember(
       c => c.Id,
       options => options.Ignore()));

    IgnoreAbpProperties(config.CreateMap<NoteSegment, NoteSegmentTemplate>()
       .ForMember(
        c => c.NoteTemplate,
        options => options.MapFrom(input => input.Note))
       .ForMember(
        c => c.NoteTemplateId,
        options => options.Ignore())
       .ForMember(
           c => c.NoteSegmentTemplatePayloads,
           options => options.MapFrom(input => input.NoteSegmentPayloads))
      .ForMember(
        c => c.Id,
        options => options.Ignore()));

    IgnoreAbpProperties(config.CreateMap<NoteSegmentTemplatePayload, NoteSegmentPayload>()
       .ForMember(
           c => c.NoteSegment,
           options => options.MapFrom(input => input.NoteSegmentTemplate))
       .ForMember(
        c => c.NoteSegmentId,
        options => options.Ignore())

      .ForMember(
        c => c.Id,
        options => options.Ignore()));

    IgnoreAbpProperties(
    config.CreateMap<NoteSegmentPayload, NoteSegmentTemplatePayload>()
       .ForMember(
           c => c.NoteSegmentTemplate,
           options => options.MapFrom(input => input.NoteSegment))
       .ForMember(
        c => c.NoteSegmentTemplateId,
        options => options.Ignore()));


});

迁移和种子数据

MatoProductivity.EntityFrameworkCore.Seed.SeedHelper
可在程序启动时,访问数据库,并初始化种子数据。

public override void PostInitialize()
{
    Helper.WithDbContextHelper.WithDbContext<MatoProductivityDbContext>(IocManager, RunMigrate);
    if (!SkipDbSeed)
    {
        SeedHelper.SeedHostDb(IocManager);
    }
}

它通过
SkipDbSeed
来决定是否跳过执行种子数据初始化。我们需要在安装完成App后第一次运行才执行种子数据初始化。

MAUI中提供了
VersionTracking.Default.IsFirstLaunchEver
方式获取是否是第一次在此设备上启动应用,请查看
官方文档

public override async void Initialize()
{
    IocManager.RegisterAssemblyByConvention(typeof(MatoProductivityModule).GetAssembly());
    if (VersionTracking.Default.IsFirstLaunchEver)
    {
        MatoProductivityEntityFrameworkCoreModule.SkipDbSeed = false;
    }
    else
    {
        MatoProductivityEntityFrameworkCoreModule.SkipDbSeed = true;

    }
}

在InitialDbBuilder中我们定义了大多数的业务初始数据,具体的实现方式请查阅源码。

internal void Create()
{

    CreateSetting("Theme", "Light");
    CreateSetting("DetailPageMode", "PreviewPage");


    CreateNoteSegmentStore("时间戳", "时间/提醒", "DateTimeSegment", "记录一个瞬时时间", FaIcons.IconClockO, "#D8292B");
    CreateNoteSegmentStore("计时器", "时间/提醒", "TimerSegment", "创建一个计时器,当它结束时会通知您", FaIcons.IconBell, "#D8292B");
    CreateNoteSegmentStore("笔记", "文本", "TextSegment", "随时用文本记录您的想法", FaIcons.IconStickyNoteO, "#E1A08B");
    CreateNoteSegmentStore("Todo", "文本", "TodoSegment", "记录一个Todo项目", FaIcons.IconCheckSquareO, "#E1A08B");
    CreateNoteSegmentStore("数值", "文本", "KeyValueSegment", "记录数值,以便统计数据", FaIcons.IconLineChart, "#E1A08B");
    CreateNoteSegmentStore("手绘", "文件", "ScriptSegment", "创建一个手绘", FaIcons.IconPaintBrush, "#AD9CC2");
    CreateNoteSegmentStore("照片/视频", "文件", "MediaSegment", "拍照或摄像", FaIcons.IconCamera, "#AD9CC2");
    CreateNoteSegmentStore("文档", "文件", "DocumentSegment", "从您设备中选取一个文档", FaIcons.IconFile, "#AD9CC2");
    CreateNoteSegmentStore("录音", "文件", "VoiceSegment", "记录一段声音", FaIcons.IconMicrophone, "#AD9CC2");
    CreateNoteSegmentStore("地点", "其它", "LocationSegment", "获取当前地点,或者从地图上选取一个地点", FaIcons.IconMapMarker, "#6D987C");
    CreateNoteSegmentStore("天气", "其它", "WeatherSegment", "获取当前天气信息", FaIcons.IconCloud, "#6D987C");
    CreateNoteSegmentStore("联系人", "其它", "ContactSegment", "从您设备的通讯录中选择一个联系人", FaIcons.IconUser, "#6D987C");
}

项目地址

GitHub:MatoProductivity