2024年7月

本文介绍Nginx Proxy Manager配置Halo的反向代理和申请 SSL 证书,如需要了解Halo 2的安装,参考
如何在Linux云服务器上通过Docker Compose部署安装Halo,搭建个人博客网站?

安装Nginx Proxy Manager

Nginx Proxy Manager安装

Nginx Proxy Manager就是一个 Nginx 的代理管理器。没有Nginx基础的小伙伴,也能轻松地用它来完成反向代理的操作,而且因为自带面板,操作极其简单,非常适合配合 docker 搭建的应用使用。

安装了 NPM 之后,就不需要再安装 Nginx 了,否则会端口冲突(不建议修改 NPM 的 80、443 端口)。如果你的服务器安装了宝塔面板,也可以和 NPM 一起使用,只要你到软件后台把宝塔安装的 Nginx 关闭或者卸载即可。

新建docker-compose.yaml

我们创建一个文件夹来存放 NPM 的 docker-compose.yaml 文件:

mkdir -p ~/data/docker_data/nginxproxymanager   # 创建一个 npm 的文件夹

cd ~/data/docker_data/nginxproxymanager    # 进入该文件夹

vi docker-compose.yml

在英文状态的输入法下,按下 i,左下角出现 --INSERT-- 后,粘贴填入下面的内容:

version: '3'
services:
  app:
    image: 'jc21/nginx-proxy-manager:latest'
    restart: unless-stopped
    ports:
      - '80:80'              # 不建议修改端口
      - '81:81'              # 可以把冒号左边的 81 端口修改成你服务器上没有被占用的端口
      - '443:443'            # 不建议修改端口
    volumes:
      - ./data:/data         # 点号表示当前文件夹,冒号左边的意思是在当前文件夹下创建一个 data 目录,用于存放数据,如果不存在的话,会自动创建
      - ./letsencrypt:/etc/letsencrypt  # 点号表示当前文件夹,冒号左边的意思是在当前文件夹下创建一个 letsencrypt 目录,用于存放证书,如果不存在的话,会自动创建

启动NPM

docker-compose up -d

使用
http://127.0.0.1:81
就可以访问 NPM 的网页端了,默认登录的用户名:admin@example.com 密码:changeme。第一次登录会提示更改用户名和密码,建议修改一个复杂一点的密码。

配置 Halo 的反向代理

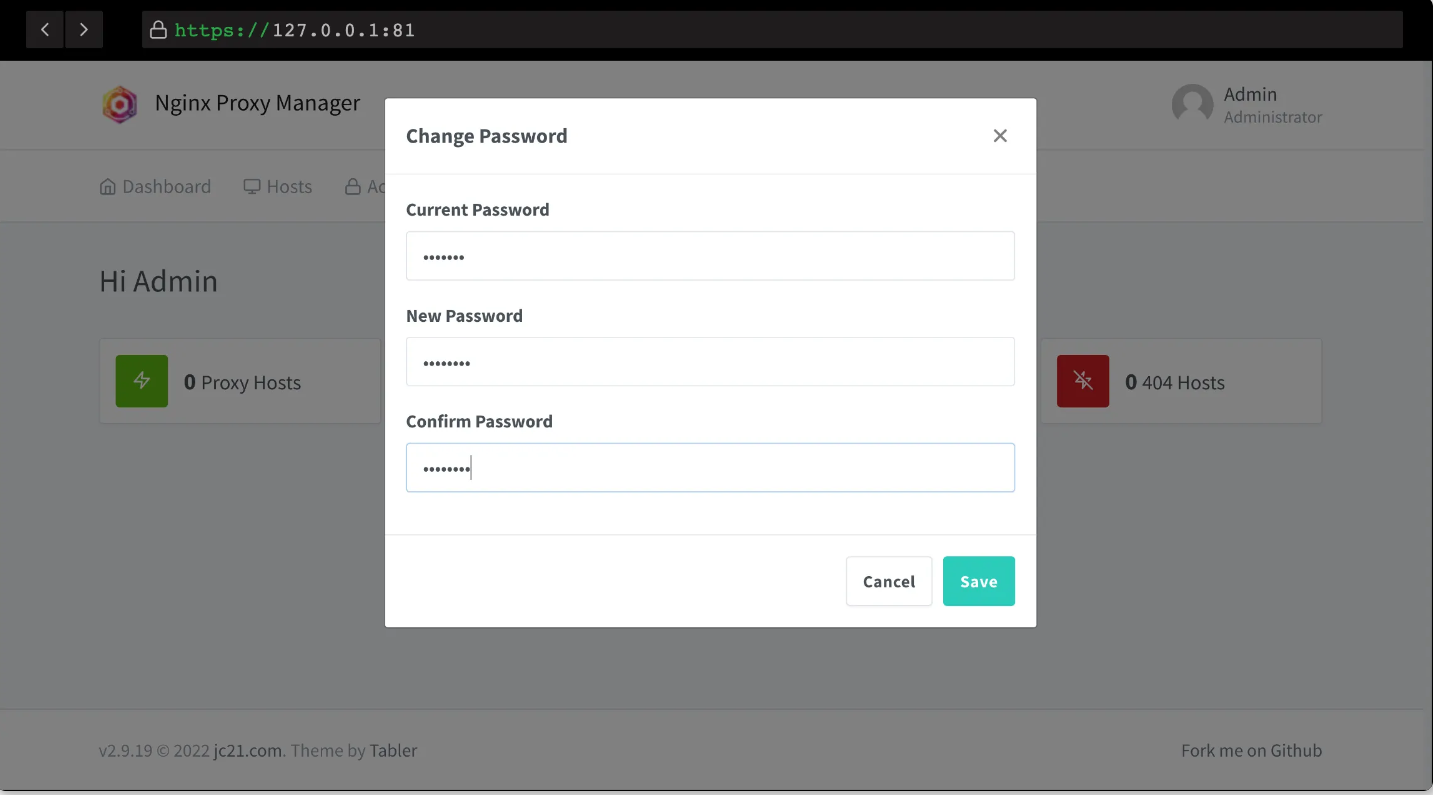
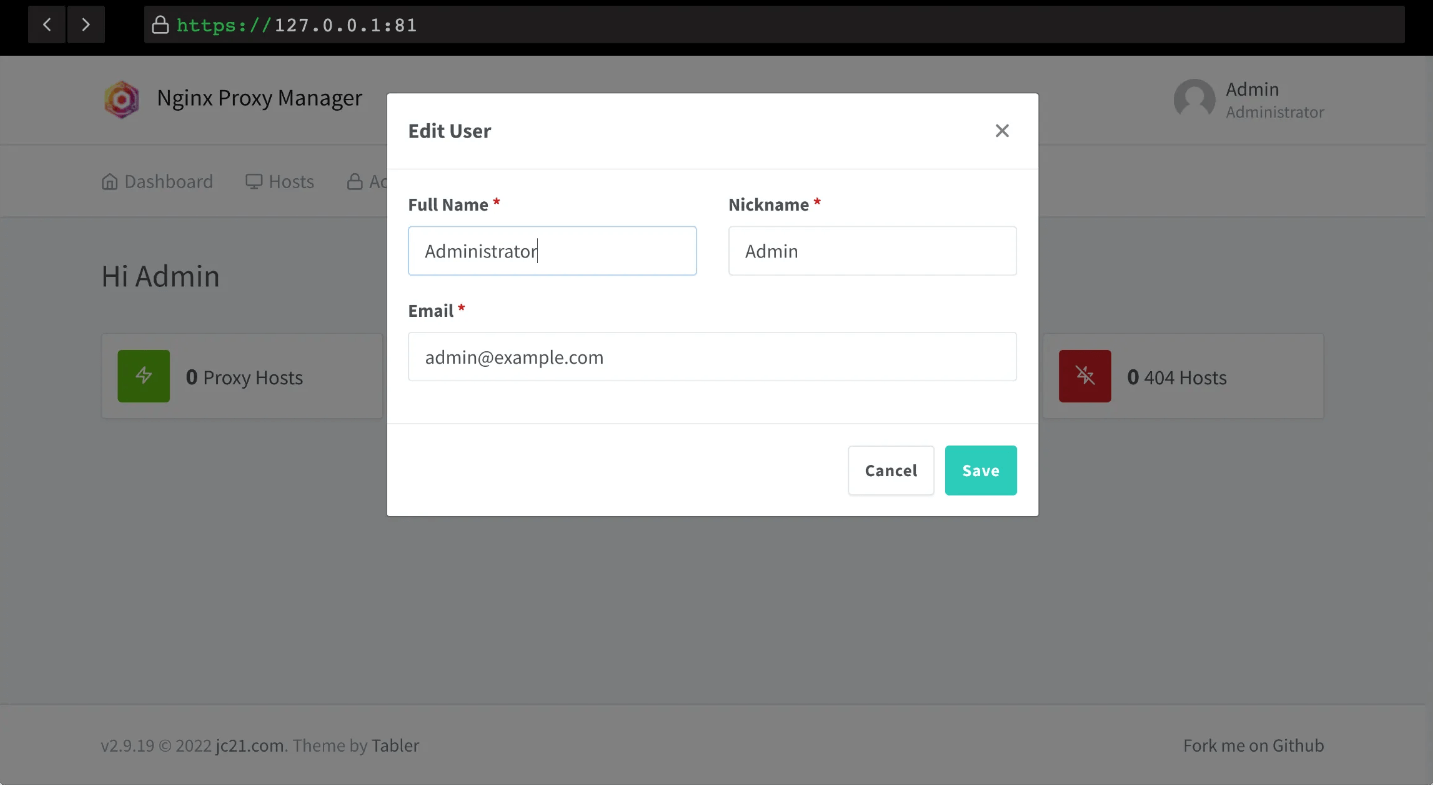
首先登录网页端之后,会弹出修改用户名和密码的对话框,根据自己的实际来修改自己的用户名和邮箱。

保存之后,会让我们修改密码(建议用一个复杂的密码)。

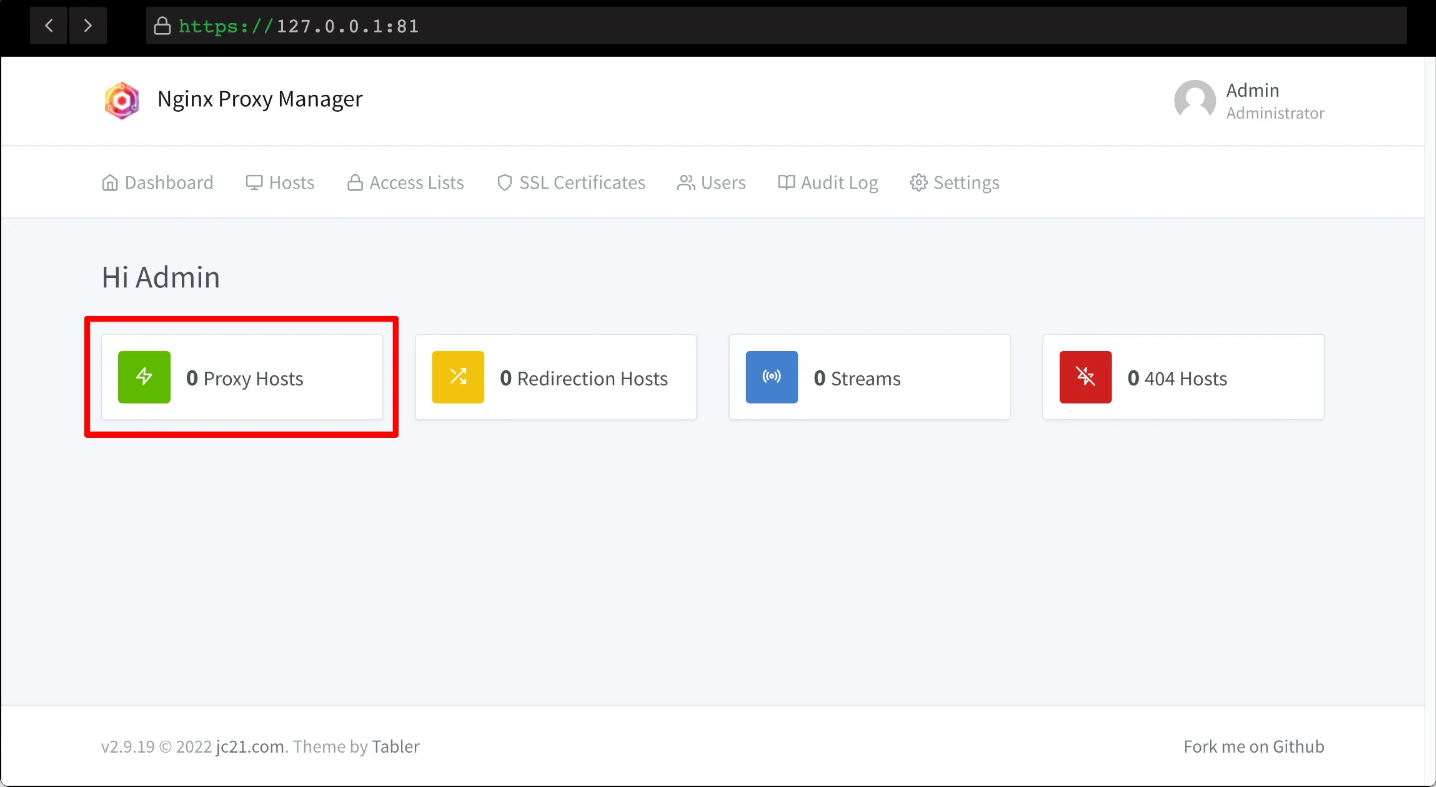
接着我们就可以来给 Halo 来添加一个反向代理了,点击Proxy Hosts.

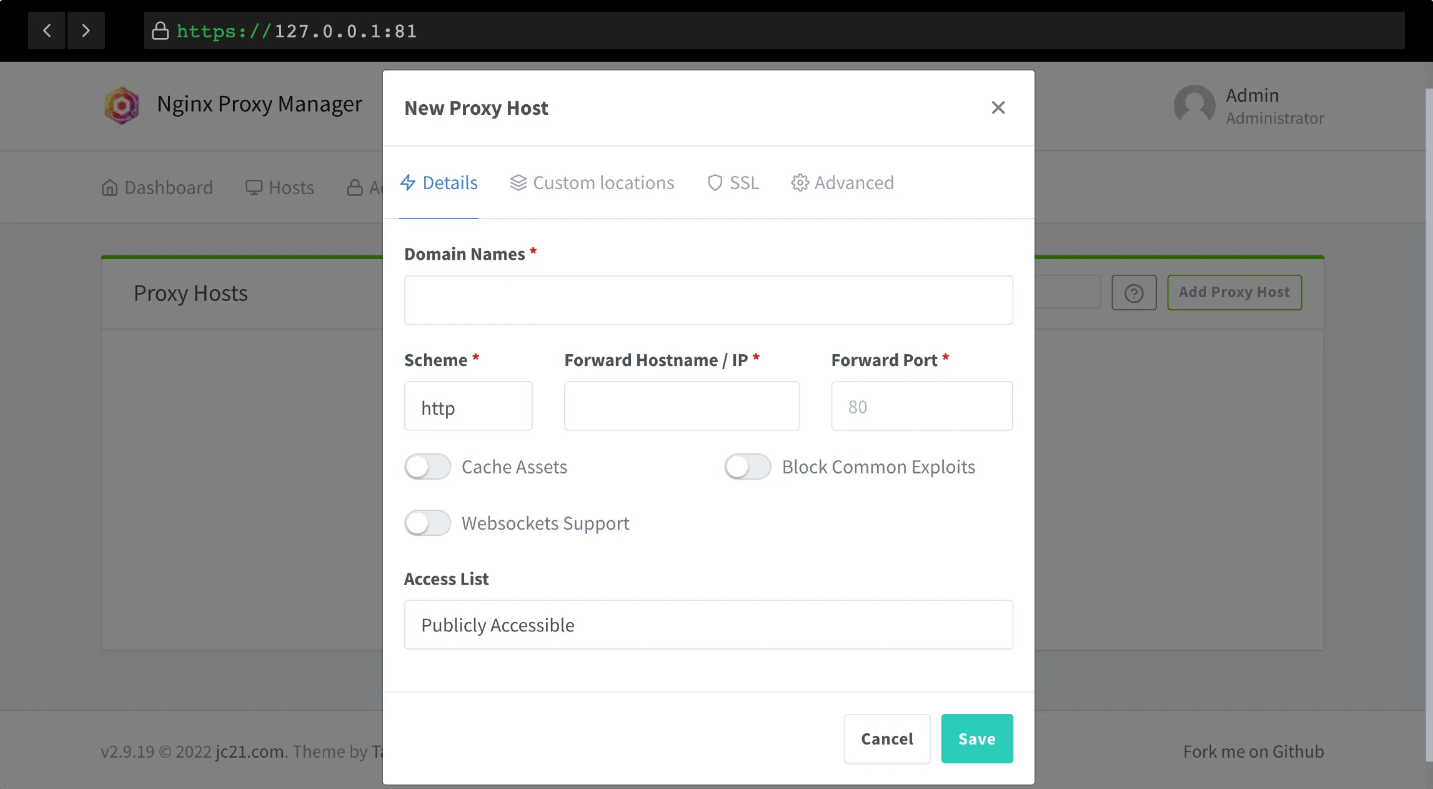
接着点击Add Proxy Host,弹出如下对话框:

参数解释:

参数名 描述
Domain Names 填我们 Halo 网站的域名,首先记得做好 DNS 解析,把域名绑定到我们的服务器的 IP 上
Scheme 默认 http 即可,除非你有自签名证书
Forward Hostname/IP 填入服务器的 IP,或者 Docker 容器内部的 IP(如果 NPM 和 Halo 搭建在同一台服务器上的话)
Forward Port 填入 Halo 映射出的端口,这边默认是 8090
Cache Assets 缓存,可以选择打开
Block Common Exploits 阻止常见的漏洞,可以选择打开
Websockets Support WS 支持,可以选择打开
Access List 这个是 NPM 自带的一个限制访问功能,后续可以自行研究

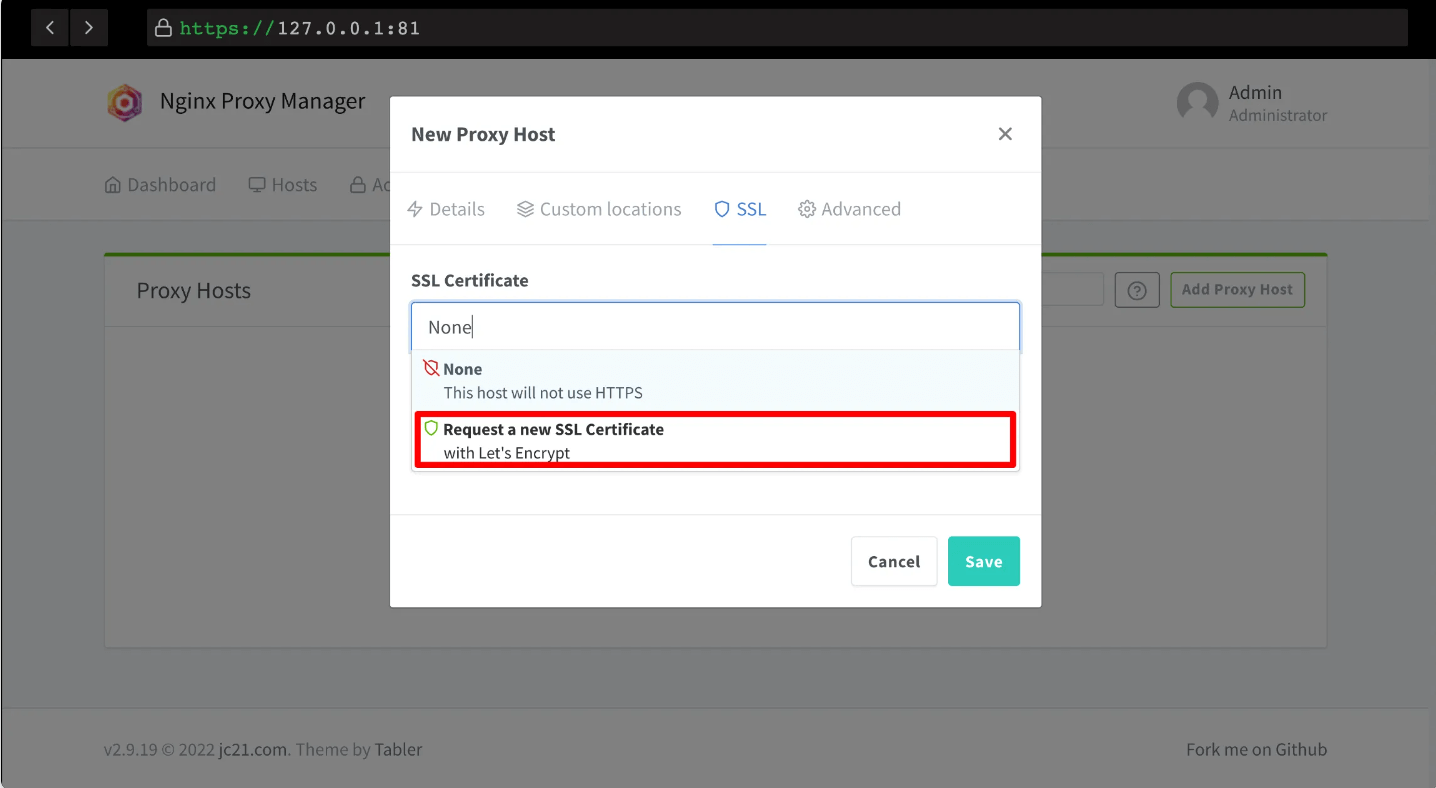
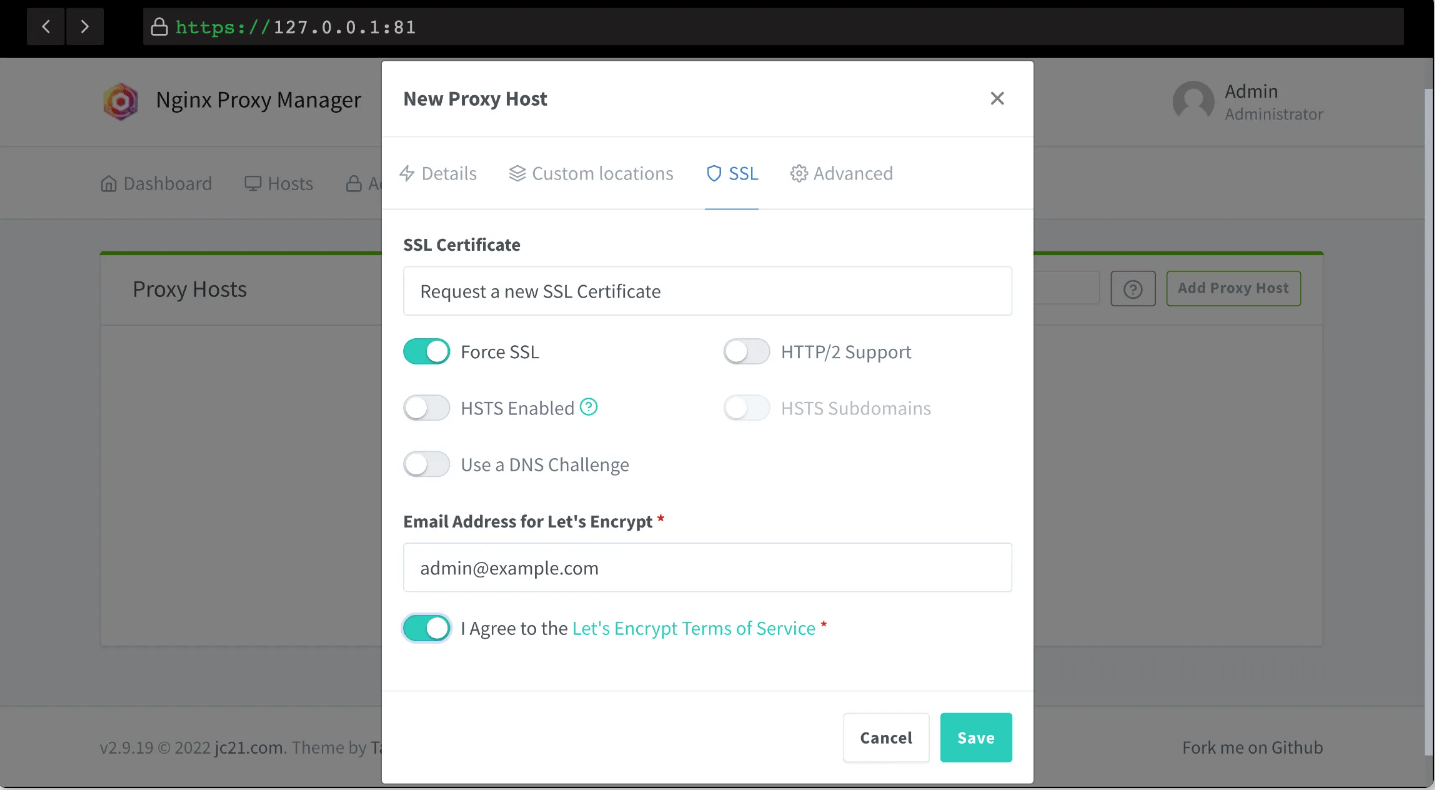
申请SSL证书

NPM支持申请SSL证书,证书会三个月自动续期,使得网站支持https访问。申请证书需要你提前将域名解析到NPM所在的服务器的IP上。


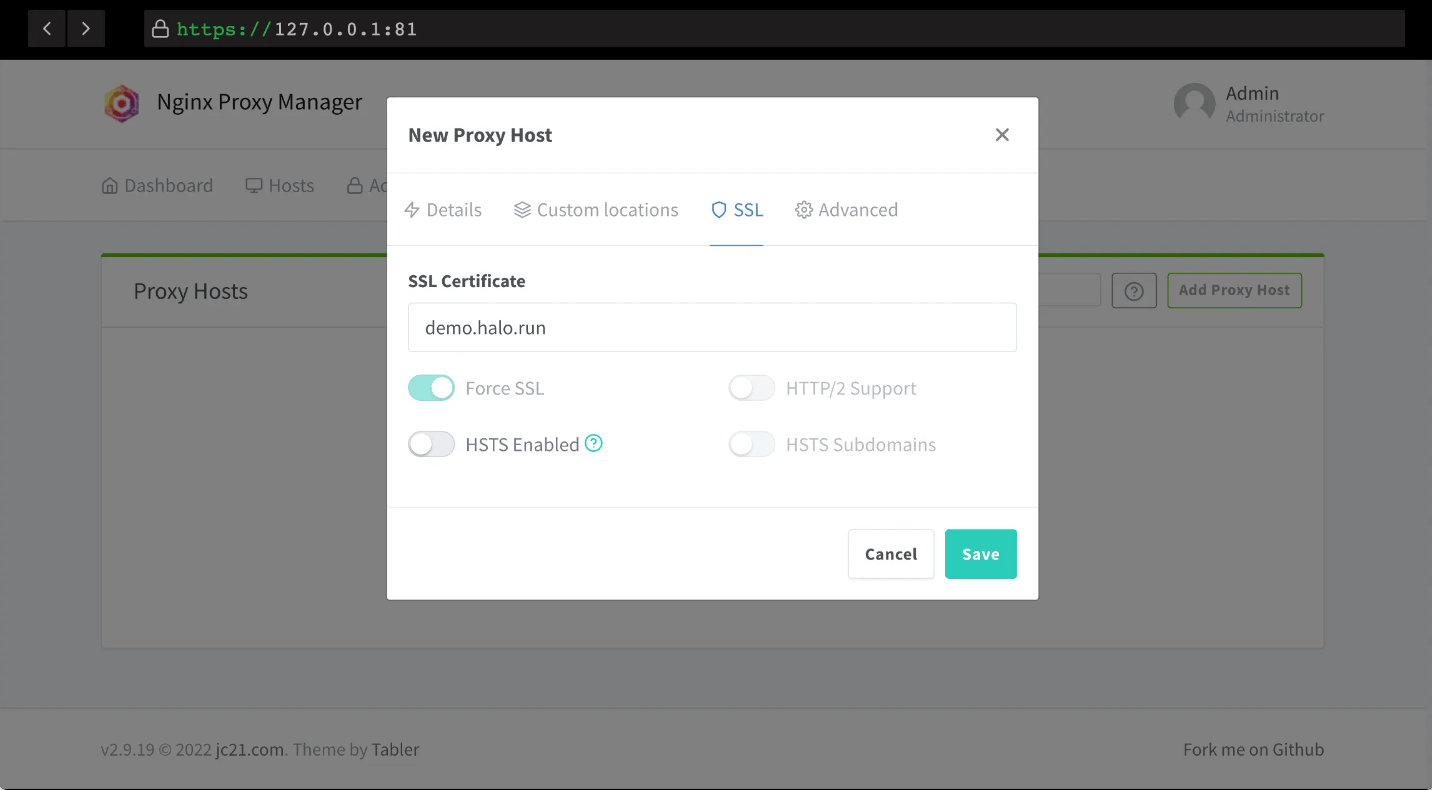
成功申请到SSL证书后。再次点开配置,查看一下,将强制SSL打开。

到这里,就大功告成了,完成了Halo的反向代理。

原文地址:
使用Nginx Proxy Manager配置Halo的反向代理和申请 SSL 证书

写在前面

本随笔是非常菜的菜鸡写的。如有问题请及时提出。

可以联系:1160712160@qq.com

GitHhub:
https://github.com/WindDevil
(目前啥也没有

批处理操作系统的启动和运行流程

要想把本章实现的那些模块全部都串联在一起以实现运行一个批处理操作系统,回顾本章内容,思考批处理操作系统的运行流程.

可以看到本章完成的内容大概如图所示:

可以看到在内核层,最重要的就是实现了
batch
来加载程序和切换程序,以及
trap
用来处理用户层的请求.

因此,我们只需要在
main.rs
中添加这两个模块的初始化即可.

编写main.rs

主要是三部分:

  1. 引入上述编写模块
    1. 嵌入
      link_app.S
    2. 引入
      batch
      ,
      trap
      ,
      syscall
  2. 初始化模块
  3. 开始运行用户态APP

需要添加的内容就这么多:

pub mod batch;
pub mod syscall;
pub mod trap;

global_asm!(include_str!("link_app.S"));
pub fn rust_main() -> ! {
	trap::init();
    batch::init();
    batch::run_next_app();
}

最终实现的
main.rs
:

//! The main module and entrypoint
//!
//! Various facilities of the kernels are implemented as submodules. The most
//! important ones are:
//!
//! - [`trap`]: Handles all cases of switching from userspace to the kernel
//! - [`syscall`]: System call handling and implementation
//!
//! The operating system also starts in this module. Kernel code starts
//! executing from `entry.asm`, after which [`rust_main()`] is called to
//! initialize various pieces of functionality. (See its source code for
//! details.)
//!
//! We then call [`batch::run_next_app()`] and for the first time go to
//! userspace.

#![deny(missing_docs)]
#![deny(warnings)]
#![no_std]
#![no_main]
#![feature(panic_info_message)]

use core::arch::global_asm;

use log::*;
#[macro_use]
mod console;
pub mod batch;
mod lang_items;
mod logging;
mod sbi;
mod sync;
pub mod syscall;
pub mod trap;

global_asm!(include_str!("entry.asm"));
global_asm!(include_str!("link_app.S"));

/// clear BSS segment
fn clear_bss() {
    extern "C" {
        fn sbss();
        fn ebss();
    }
    unsafe {
        core::slice::from_raw_parts_mut(sbss as usize as *mut u8, ebss as usize - sbss as usize)
            .fill(0);
    }
}

/// the rust entry-point of os
#[no_mangle]
pub fn rust_main() -> ! {
    extern "C" {
        fn stext(); // begin addr of text segment
        fn etext(); // end addr of text segment
        fn srodata(); // start addr of Read-Only data segment
        fn erodata(); // end addr of Read-Only data ssegment
        fn sdata(); // start addr of data segment
        fn edata(); // end addr of data segment
        fn sbss(); // start addr of BSS segment
        fn ebss(); // end addr of BSS segment
        fn boot_stack_lower_bound(); // stack lower bound
        fn boot_stack_top(); // stack top
    }
    clear_bss();
    logging::init();
    println!("[kernel] Hello, world!");
    trace!(
        "[kernel] .text [{:#x}, {:#x})",
        stext as usize,
        etext as usize
    );
    debug!(
        "[kernel] .rodata [{:#x}, {:#x})",
        srodata as usize, erodata as usize
    );
    info!(
        "[kernel] .data [{:#x}, {:#x})",
        sdata as usize, edata as usize
    );
    warn!(
        "[kernel] boot_stack top=bottom={:#x}, lower_bound={:#x}",
        boot_stack_top as usize, boot_stack_lower_bound as usize
    );
    error!("[kernel] .bss [{:#x}, {:#x})", sbss as usize, ebss as usize);
    trap::init();
    batch::init();
    batch::run_next_app();
}

编译运行

使用第一章就编写好的
Makefile
文件实现一键编译运行:

cd os
make run

第一次编译运行:

error: expected expression, found keyword `extern`
  --> src/batch.rs:94:13
   |
94 |             extern "C" 
   |             ^^^^^^ expected expression

error: cannot find macro `asm` in this scope
  --> src/batch.rs:84:9
   |
84 |         asm!("fence.i")
   |         ^^^
   |
help: consider importing this macro
   |
1  + use core::arch::asm;
   |

error: cannot find macro `global_asm` in this scope
 --> src/trap/mod.rs:3:1
  |
3 | global_asm!(include_str!("trap.S"));
  | ^^^^^^^^^^
  |
help: consider importing one of these items
  |
3 + use core::arch::global_asm;
  |
3 + use crate::global_asm;
  |

error[E0412]: cannot find type `TrapContext` in this scope
  --> src/batch.rs:34:36
   |
34 |     pub fn push_context(&self, cx: TrapContext) -> &'static mut TrapContext {
   |                                    ^^^^^^^^^^^ not found in this scope

error[E0412]: cannot find type `TrapContext` in this scope
  --> src/batch.rs:34:65
   |
34 |     pub fn push_context(&self, cx: TrapContext) -> &'static mut TrapContext {
   |                                                                 ^^^^^^^^^^^ not found in this scope

error[E0412]: cannot find type `TrapContext` in this scope
  --> src/batch.rs:35:60
   |
35 |         let cx_ptr = (self.get_sp() - core::mem::size_of::<TrapContext>()) as *mut TrapContext;
   |                                                            ^^^^^^^^^^^ not found in this scope
   |
help: you might be missing a type parameter
   |
30 | impl<TrapContext> KernelStack {
   |     +++++++++++++

error[E0412]: cannot find type `TrapContext` in this scope
  --> src/batch.rs:35:84
   |
35 |         let cx_ptr = (self.get_sp() - core::mem::size_of::<TrapContext>()) as *mut TrapContext;
   |                                                                                    ^^^^^^^^^^^ not found in this scope

error[E0412]: cannot find type `RefCell` in this scope
 --> src/sync/up.rs:5:12
  |
5 |     inner: RefCell<T>,
  |            ^^^^^^^ not found in this scope
  |
help: consider importing this struct
  |
3 + use core::cell::RefCell;
  |

error[E0433]: failed to resolve: use of undeclared type `RefCell`
  --> src/sync/up.rs:14:23
   |
14 |         Self { inner: RefCell::new(value) }
   |                       ^^^^^^^ use of undeclared type `RefCell`
   |
help: consider importing this struct
   |
3  + use core::cell::RefCell;
   |

error[E0412]: cannot find type `RefMut` in this scope
  --> src/sync/up.rs:17:39
   |
17 |     pub fn exclusive_access(&self) -> RefMut<'_, T> {
   |                                       ^^^^^^ not found in this scope
   |
help: consider importing this struct
   |
3  + use core::cell::RefMut;
   |

error[E0412]: cannot find type `TrapContext` in this scope
  --> src/trap/mod.rs:13:30
   |
13 | pub fn trap_handler(cx: &mut TrapContext) -> &mut TrapContext {
   |                              ^^^^^^^^^^^ not found in this scope

error[E0412]: cannot find type `TrapContext` in this scope
  --> src/trap/mod.rs:13:51
   |
13 | pub fn trap_handler(cx: &mut TrapContext) -> &mut TrapContext {
   |                                                   ^^^^^^^^^^^ not found in this scope

error[E0425]: cannot find function `syscall` in this scope
  --> src/trap/mod.rs:19:24
   |
19 |             cx.x[10] = syscall(cx.x[17], [cx.x[10], cx.x[11], cx.x[12]]) as usize;
   |                        ^^^^^^^ not found in this scope
   |
help: consider importing this function
   |
3  + use crate::syscall::syscall;
   |

error[E0425]: cannot find function `run_next_app` in this scope
  --> src/trap/mod.rs:24:13
   |
24 |             run_next_app();
   |             ^^^^^^^^^^^^ not found in this scope
   |
help: consider importing this function
   |
3  + use crate::batch::run_next_app;
   |

error[E0425]: cannot find function `run_next_app` in this scope
  --> src/trap/mod.rs:28:13
   |
28 |             run_next_app();
   |             ^^^^^^^^^^^^ not found in this scope
   |
help: consider importing this function
   |
3  + use crate::batch::run_next_app;
   |

error[E0425]: cannot find function `init` in module `batch`
  --> src/main.rs:88:12
   |
88 |     batch::init();
   |            ^^^^ not found in `batch`
   |
help: consider importing one of these items
   |
23 + use crate::logging::init;
   |
23 + use crate::trap::init;
   |
help: if you import `init`, refer to it directly
   |
88 -     batch::init();
88 +     init();
   |

error[E0308]: mismatched types
   --> src/batch.rs:80:41
    |
80  |         core::slice::from_raw_parts_mut(APP_BASE_ADDRESS as *const u8, APP_SIZE_LIMIT).fill(0);
    |         ------------------------------- ^^^^^^^^^^^^^^^^^^^^^^^^^^^^^ types differ in mutability
    |         |
    |         arguments to this function are incorrect
    |
    = note: expected raw pointer `*mut _`
               found raw pointer `*const u8`
note: function defined here
   --> /home/winddevil/.rustup/toolchains/nightly-2024-05-01-x86_64-unknown-linux-gnu/lib/rustlib/src/rust/library/core/src/slice/raw.rs:147:21
    |
147 | pub const unsafe fn from_raw_parts_mut<'a, T>(data: *mut T, len: usize) -> &'a mut [T] {
    |                     ^^^^^^^^^^^^^^^^^^

error[E0599]: the method `get` exists for struct `Lazy<UPSafeCell<AppManager>>`, but its trait bounds were not satisfied
   --> src/batch.rs:88:1
    |
88  | / lazy_static!
89  | | {
90  | |     static ref APP_MANAGER: UPSafeCell<AppManager> = unsafe 
91  | |     {
...   |
110 | |     };
111 | | }
    | |_^ method cannot be called on `Lazy<UPSafeCell<AppManager>>` due to unsatisfied trait bounds
    |
   ::: src/sync/up.rs:3:1
    |
3   |   pub struct UPSafeCell<T> {
    |   ------------------------ doesn't satisfy `UPSafeCell<AppManager>: Sized`
    |
    = note: the following trait bounds were not satisfied:
            `{type error}: Sized`
            which is required by `UPSafeCell<AppManager>: Sized`
    = note: this error originates in the macro `__lazy_static_internal` which comes from the expansion of the macro `lazy_static` (in Nightly builds, run with -Z macro-backtrace for more info)

error[E0433]: failed to resolve: use of undeclared type `TrapContext`
   --> src/batch.rs:126:13
    |
126 |             TrapContext::app_init_context(APP_BASE_ADDRESS, USER_STACK.get_sp())
    |             ^^^^^^^^^^^ use of undeclared type `TrapContext`

error[E0425]: cannot find function `sys_write` in this scope
 --> src/syscall/mod.rs:5:26
  |
5 |         SYSCALL_WRITE => sys_write(args[0], args[1] as *const u8, args[2]),
  |                          ^^^^^^^^^ not found in this scope

error[E0425]: cannot find function `sys_exit` in this scope
 --> src/syscall/mod.rs:6:25
  |
6 |         SYSCALL_EXIT => sys_exit(args[0] as i32),
  |                         ^^^^^^^^ not found in this scope

error[E0433]: failed to resolve: use of undeclared crate or module `stvec`
 --> src/trap/mod.rs:8:9
  |
8 |         stvec::write(__alltraps as usize, TrapMode::Direct);
  |         ^^^^^ use of undeclared crate or module `stvec`

error[E0433]: failed to resolve: use of undeclared type `TrapMode`
 --> src/trap/mod.rs:8:43
  |
8 |         stvec::write(__alltraps as usize, TrapMode::Direct);
  |                                           ^^^^^^^^ use of undeclared type `TrapMode`

error[E0433]: failed to resolve: use of undeclared crate or module `scause`
  --> src/trap/mod.rs:14:18
   |
14 |     let scause = scause::read();
   |                  ^^^^^^ use of undeclared crate or module `scause`

error[E0433]: failed to resolve: use of undeclared crate or module `stval`
  --> src/trap/mod.rs:15:17
   |
15 |     let stval = stval::read();
   |                 ^^^^^ use of undeclared crate or module `stval`

error: unused variable: `metadata`
  --> src/logging.rs:9:23
   |
9  |     fn enabled(&self, metadata: &Metadata) -> bool 
   |                       ^^^^^^^^ help: if this is intentional, prefix it with an underscore: `_metadata`
   |
note: the lint level is defined here
  --> src/main.rs:18:9
   |
18 | #![deny(warnings)]
   |         ^^^^^^^^
   = note: `#[deny(unused_variables)]` implied by `#[deny(warnings)]`

error[E0433]: failed to resolve: use of undeclared type `Exception`
  --> src/trap/mod.rs:26:25
   |
26 |         Trap::Exception(Exception::IllegalInstruction) => {
   |                         ^^^^^^^^^ use of undeclared type `Exception`

error[E0433]: failed to resolve: use of undeclared type `Trap`
  --> src/trap/mod.rs:26:9
   |
26 |         Trap::Exception(Exception::IllegalInstruction) => {
   |         ^^^^ use of undeclared type `Trap`

error[E0433]: failed to resolve: use of undeclared type `Exception`
  --> src/trap/mod.rs:22:25
   |
22 |         Trap::Exception(Exception::StorePageFault) => {
   |                         ^^^^^^^^^ use of undeclared type `Exception`

error[E0433]: failed to resolve: use of undeclared type `Trap`
  --> src/trap/mod.rs:22:9
   |
22 |         Trap::Exception(Exception::StorePageFault) => {
   |         ^^^^ use of undeclared type `Trap`

error[E0433]: failed to resolve: use of undeclared type `Exception`
  --> src/trap/mod.rs:21:25
   |
21 |         Trap::Exception(Exception::StoreFault) |
   |                         ^^^^^^^^^ use of undeclared type `Exception`

error[E0433]: failed to resolve: use of undeclared type `Trap`
  --> src/trap/mod.rs:17:9
   |
17 |         Trap::Exception(Exception::UserEnvCall) => {
   |         ^^^^ use of undeclared type `Trap`

error[E0433]: failed to resolve: use of undeclared type `Exception`
  --> src/trap/mod.rs:17:25
   |
17 |         Trap::Exception(Exception::UserEnvCall) => {
   |                         ^^^^^^^^^ use of undeclared type `Exception`

error[E0433]: failed to resolve: use of undeclared type `Trap`
  --> src/trap/mod.rs:21:9
   |
21 |         Trap::Exception(Exception::StoreFault) |
   |         ^^^^ use of undeclared type `Trap`

Some errors have detailed explanations: E0308, E0412, E0425, E0433, E0599.
For more information about an error, try `rustc --explain E0308`.
error: could not compile `os` (bin "os") due to 34 previous errors
make: *** [Makefile:42: kernel] Error 101

看到大段的报错不要着急,首先先看容易解决,能够解决的.

首先是在
batch.rs
里加入
use core::arch::asm;
:

error: cannot find macro `asm` in this scope
  --> src/batch.rs:84:9
   |
84 |         asm!("fence.i")
   |         ^^^
   |
help: consider importing this macro
   |
1  + use core::arch::asm;
   |

同样地,在
src/trap/mod.rs
里边加入
use core::arch::global_asm;
:

error: cannot find macro `global_asm` in this scope
 --> src/trap/mod.rs:3:1
  |
3 | global_asm!(include_str!("trap.S"));
  | ^^^^^^^^^^
  |
help: consider importing one of these items
  |
3 + use core::arch::global_asm;
  |
3 + use crate::global_asm;
  |


batch.rs
加入
use crate::trap::TrapContext;
,这时候我们发现实际上在
src/trap/mod.rs
里也没有声明
TrapContext
则在里边声明
mod context;
:

error[E0412]: cannot find type `TrapContext` in this scope
  --> src/batch.rs:34:36
   |
34 |     pub fn push_context(&self, cx: TrapContext) -> &'static mut TrapContext {
   |                                    ^^^^^^^^^^^ not found in this scope

后续有很多找不到
TrapContext
的问题,可能都会解决.


src/sync/up.rs
里加入
use core::cell::{RefCell, RefMut};
:

error[E0412]: cannot find type `RefCell` in this scope
 --> src/sync/up.rs:5:12
  |
5 |     inner: RefCell<T>,
  |            ^^^^^^^ not found in this scope
  |
help: consider importing this struct
  |
3 + use core::cell::RefCell;
  |
error[E0412]: cannot find type `RefMut` in this scope
  --> src/sync/up.rs:17:39
   |
17 |     pub fn exclusive_access(&self) -> RefMut<'_, T> {
   |                                       ^^^^^^ not found in this scope
   |
help: consider importing this struct
   |
3  + use core::cell::RefMut;
   |

这里还有一个比较难搞的依赖问题,如果这个
module
不是自己实现的,那么一般考虑外部依赖问题,

error[E0433]: failed to resolve: use of undeclared crate or module `riscv`
 --> src/trap/context.rs:2:5
  |
2 | use riscv::register::sstatus::{self, Sstatus, SPP};
  |     ^^^^^ use of undeclared crate or module `riscv`


Cargo.toml
加入
riscv = { git = "https://github.com/rcore-os/riscv", features = ["inline-asm"] }

同理,把所有的这种依赖性问题都解决,
不一定
是对应着这个报错列表来,而是可以选择根据
rust-analyzer
自动报错的内容,顺便改一下.

再次编译一下,发现有很多类似的报错:

error: missing documentation for an associated function

这意味着你在编译一个 Rust 项目时启用了某个 lint (编译时检查规则),该 lint 要求所有关联函数都必须有文档注释.

那么我们只需要给这些函数加上注释就行了.

还有一个新的问题:

error: unused variable: `metadata`
  --> src/logging.rs:9:23
   |
9  |     fn enabled(&self, metadata: &Metadata) -> bool 
   |                       ^^^^^^^^ help: if this is intentional, prefix it with an underscore: `_metadata`
   |

因为这个
metadata

enbaled
函数中没有被调用,因此需要在其前面加一个下划线
_
,从而声明这个参数是故意不被调用的.

另外.
trap.S
需要被链接到
.text
部分,并且需要声明
__alltraps

__restore
,因此需要加入这个.

    .section .text
    .globl __alltraps
    .globl __restore

最终得到的
trap.S
为:

.altmacro
.macro SAVE_GP n
    sd x\n, \n*8(sp)
.endm
.macro LOAD_GP n
    ld x\n, \n*8(sp)
.endm
    .section .text
    .globl __alltraps
    .globl __restore
    .align 2
__alltraps:
    csrrw sp, sscratch, sp
    # now sp->kernel stack, sscratch->user stack
    # allocate a TrapContext on kernel stack
    addi sp, sp, -34*8
    # save general-purpose registers
    sd x1, 1*8(sp)
    # skip sp(x2), we will save it later
    sd x3, 3*8(sp)
    # skip tp(x4), application does not use it
    # save x5~x31
    .set n, 5
    .rept 27
        SAVE_GP %n
        .set n, n+1
    .endr
    # we can use t0/t1/t2 freely, because they were saved on kernel stack
    csrr t0, sstatus
    csrr t1, sepc
    sd t0, 32*8(sp)
    sd t1, 33*8(sp)
    # read user stack from sscratch and save it on the kernel stack
    csrr t2, sscratch
    sd t2, 2*8(sp)
    # set input argument of trap_handler(cx: &mut TrapContext)
    mv a0, sp
    call trap_handler

__restore:
    # case1: start running app by __restore
    # case2: back to U after handling trap
    mv sp, a0
    # now sp->kernel stack(after allocated), sscratch->user stack
    # restore sstatus/sepc
    ld t0, 32*8(sp)
    ld t1, 33*8(sp)
    ld t2, 2*8(sp)
    csrw sstatus, t0
    csrw sepc, t1
    csrw sscratch, t2
    # restore general-purpuse registers except sp/tp
    ld x1, 1*8(sp)
    ld x3, 3*8(sp)
    .set n, 5
    .rept 27
        LOAD_GP %n
        .set n, n+1
    .endr
    # release TrapContext on kernel stack
    addi sp, sp, 34*8
    # now sp->kernel stack, sscratch->user stack
    csrrw sp, sscratch, sp
    sret

最后运行结果是:

[rustsbi] RustSBI version 0.3.1, adapting to RISC-V SBI v1.0.0
.______       __    __      _______.___________.  _______..______   __
|   _  \     |  |  |  |    /       |           | /       ||   _  \ |  |
|  |_)  |    |  |  |  |   |   (----`---|  |----`|   (----`|  |_)  ||  |
|      /     |  |  |  |    \   \       |  |      \   \    |   _  < |  |
|  |\  \----.|  `--'  |.----)   |      |  |  .----)   |   |  |_)  ||  |
| _| `._____| \______/ |_______/       |__|  |_______/    |______/ |__|
[rustsbi] Implementation     : RustSBI-QEMU Version 0.2.0-alpha.2
[rustsbi] Platform Name      : riscv-virtio,qemu
[rustsbi] Platform SMP       : 1
[rustsbi] Platform Memory    : 0x80000000..0x88000000
[rustsbi] Boot HART          : 0
[rustsbi] Device Tree Region : 0x87000000..0x87000f02
[rustsbi] Firmware Address   : 0x80000000
[rustsbi] Supervisor Address : 0x80200000
[rustsbi] pmp01: 0x00000000..0x80000000 (-wr)
[rustsbi] pmp02: 0x80000000..0x80200000 (---)
[rustsbi] pmp03: 0x80200000..0x88000000 (xwr)
[rustsbi] pmp04: 0x88000000..0x00000000 (-wr)
[kernel] Hello, world!
[kernel] num_app = 5
[kernel] app_0 [0x8020a038, 0x8020b360)
[kernel] app_1 [0x8020b360, 0x8020c730)
[kernel] app_2 [0x8020c730, 0x8020dcd8)
[kernel] app_3 [0x8020dcd8, 0x8020f090)
[kernel] app_4 [0x8020f090, 0x80210440)
[kernel] Loading app_0
Hello, world!
[kernel] Application exited with code 0
[kernel] Loading app_1
Into Test store_fault, we will insert an invalid store operation...
Kernel should kill this application!
[kernel] PageFault in application, kernel killed it.
[kernel] Loading app_2
3^10000=5079(MOD 10007)
3^20000=8202(MOD 10007)
3^30000=8824(MOD 10007)
3^40000=5750(MOD 10007)
3^50000=3824(MOD 10007)
3^60000=8516(MOD 10007)
3^70000=2510(MOD 10007)
3^80000=9379(MOD 10007)
3^90000=2621(MOD 10007)
3^100000=2749(MOD 10007)
Test power OK!
[kernel] Application exited with code 0
[kernel] Loading app_3
Try to execute privileged instruction in U Mode
Kernel should kill this application!
[kernel] IllegalInstruction in application, kernel killed it.
[kernel] Loading app_4
Try to access privileged CSR in U Mode
Kernel should kill this application!
[kernel] IllegalInstruction in application, kernel killed it.
All applications completed!

可以看到启动了批处理系统之后,一个个APP运行,然后会想起用户层
lib.rs
中为每个app写得启动部分:

#[no_mangle]
#[link_section = ".text.entry"]
pub extern "C" fn _start() -> ! {
    clear_bss();
    exit(main());
    panic!("unreachable after sys_exit!");
}

每次运行之后,

  1. 因为触发了异常而退出
  2. 直接由
    exit(main());
    退出

都会陷入
trap
,然后在
trap_handler
里处理,只要不出现没有预期到的
Expectation
都会调用
run_next_app
,因此所有的app按顺序运行.

最后完美结束了这一章,我真是一条懒狗,怎么什么坑都要踩一遍.
本文深入分析了Docker镜像构建的技术细节,从基础概念到高级技术,涵盖了多阶段构建、安全性优化、性能提升及实战案例。旨在为专业人士提供全面的技术洞察和实用指导,以提升Docker镜像构建的效率和安全性。

关注【TechLeadCloud】,分享互联网架构、云服务技术的全维度知识。作者拥有10+年互联网服务架构、AI产品研发经验、团队管理经验,同济本复旦硕,复旦机器人智能实验室成员,阿里云认证的资深架构师,项目管理专业人士,上亿营收AI产品研发负责人。

file

一、Docker镜像基础与优化

file

Docker镜像概念

Docker镜像是Docker技术中的核心概念之一,它是一个轻量级、可执行的独立软件包,包含了运行应用所需的所有内容——代码、运行时环境、库、环境变量和配置文件。这种封装方式保证了应用在不同环境中的一致性,解决了常见的“在我机器上可以运行”的问题,从而显著提高了软件的可移植性和环境一致性。

在云原生和微服务架构中,Docker镜像的重要性更是不言而喻。它们允许开发人员构建一次,随处运行,确保了应用在开发、测试和生产环境中的行为一致性。这不仅加速了开发和部署流程,也为持续集成和持续部署(CI/CD)奠定了基础。

Dockerfile详解

结构与指令

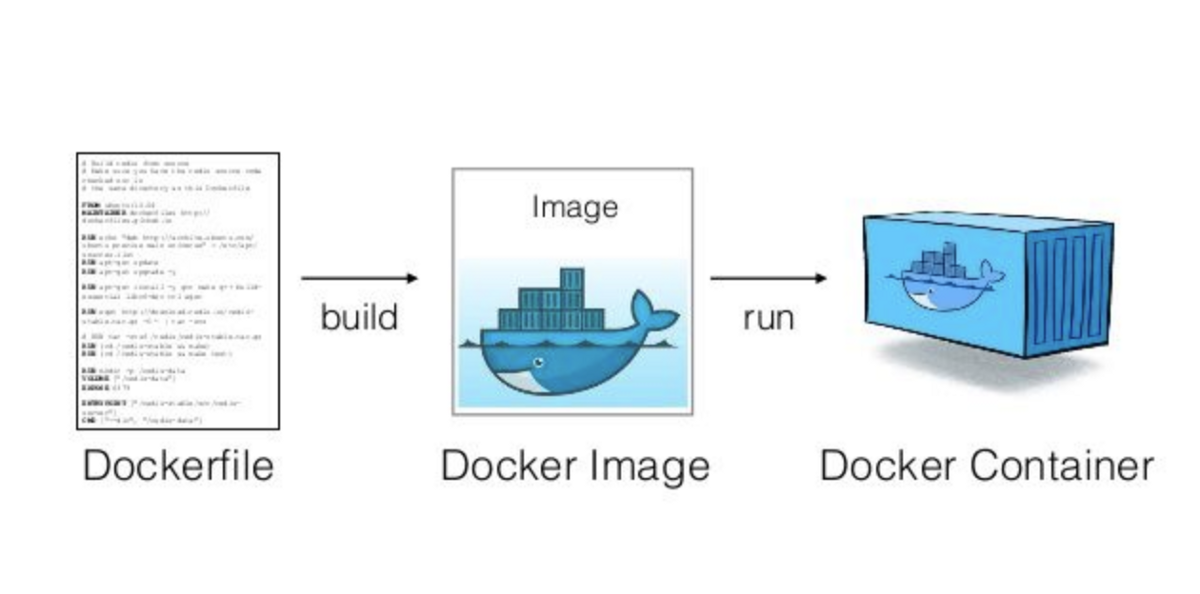
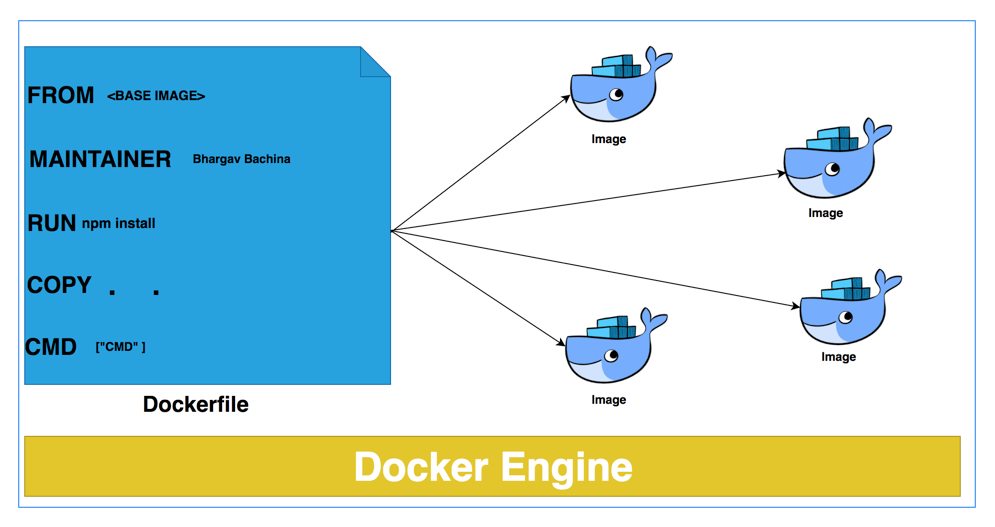
Docker镜像的构建过程是通过Dockerfile来定义的。Dockerfile是一个文本文件,包含了一系列的指令和参数,用于指定如何构建一个Docker镜像。理解Dockerfile的结构和指令对于创建有效和高效的镜像至关重要。

关键的Dockerfile指令包括:

  • FROM
    :指定基础镜像。选择合适的基础镜像是优化Docker镜像大小和安全性的第一步。
  • RUN
    :执行命令,用于安装软件包、创建文件夹等。
  • COPY

    ADD
    :用于将文件和目录复制到镜像中。
  • CMD

    ENTRYPOINT
    :定义容器启动时执行的命令。

优化策略

  • 减少镜像层数
    :尽量通过合并
    RUN
    命令减少镜像层数,使用链式命令和清理不必要的缓存。
  • 选择合适的基础镜像
    :例如,使用
    alpine
    这样的小型基础镜像可以显著减小最终镜像的大小。
  • 利用
    .dockerignore
    文件

    :排除不必要的文件和目录,减少构建上下文的大小,从而加快构建过程。

层级缓存机制

Docker的层级缓存机制是理解镜像构建过程中的一个关键概念。Docker镜像由一系列的层组成,每一层代表Dockerfile中的一个指令。当重建镜像时,Docker会检查每一层的指令是否有更改,如果没有,它会使用缓存的层,这大大加快了构建过程。

优化层级缓存的关键是合理地组织Dockerfile指令。例如,将不经常更改的指令放在Dockerfile的前面,这样在构建过程中就可以更多地利用缓存。

二、镜像构建的高级技术

在Docker镜像构建的基础之上,存在一系列高级技术,这些技术旨在提高镜像的效率、安全性和可维护性。本章节将深入探讨这些高级技术,为专业的Docker用户提供深度的技术洞见。

多阶段构建

多阶段构建是Docker镜像构建过程中的一项革命性技术。传统的Docker镜像构建往往需要在一个单一的Dockerfile中完成所有步骤,这导致最终的镜像包含了许多仅在构建过程中需要的依赖和文件。多阶段构建通过允许在单个Dockerfile中使用多个
FROM
指令,有效地解决了这个问题。

使用场景和优势

  • 减少镜像大小
    :通过分离构建阶段和最终运行阶段,可以显著减少最终镜像的大小。
  • 安全性提升
    :在构建阶段使用的工具和依赖不会出现在最终镜像中,减少了潜在的安全风险。
  • 提高构建效率
    :可以重用前一个阶段的缓存,提高后续构建的效率。

实践案例

例如,在构建一个Java应用的镜像时,第一阶段使用一个包含Maven或Gradle的基础镜像来构建应用,第二阶段则使用一个仅包含JRE的轻量级基础镜像来运行应用。

安全性考量

在Docker镜像构建中,安全性是一个不可忽视的重要方面。随着Docker的普及,镜像安全已成为云原生环境中的一个热门话题。

非root用户

在Docker容器中,默认情况下,所有操作都以root用户身份运行,这可能会带来安全风险。为了减少这种风险,推荐在Dockerfile中显式地指定一个非root用户来运行应用。

处理敏感数据

在构建过程中,经常需要处理敏感数据,例如密码和私钥。应避免将这些敏感信息直接嵌入到镜像中。一种常见的做法是使用环境变量或挂载的配置文件来传递这些敏感信息。

安全扫描

定期对Docker镜像进行安全扫描,以识别和修复安全漏洞。可以利用一些自动化工具,如Clair或Trivy,来进行这些扫描。

依赖管理

定期更新镜像中的依赖和基础镜像,以确保使用的是最新的、没有已知漏洞的版本。

三、构建性能优化与调试

在Docker镜像构建的过程中,性能优化和有效的调试是确保高效开发流程的关键因素。一个优化良好的构建过程可以显著减少时间和资源的消耗,而有效的调试技巧则可以帮助开发者快速定位和解决问题。本章节将探讨如何在Docker镜像构建中实现性能优化,以及如何进行有效的调试。

性能优化策略

分析构建时间

为了优化构建性能,首先需要理解构建过程中时间的分配。使用如Docker Buildx等工具可以帮助分析每个步骤的耗时,从而识别性能瓶颈。

优化构建上下文

构建上下文的大小直接影响构建时间。优化
.dockerignore
文件,排除不必要的文件和目录,可以有效减少上下文大小,加快构建速度。

利用缓存

合理利用Docker的层级缓存机制是提高构建效率的关键。通过优化Dockerfile中指令的顺序和结构,可以更有效地利用缓存。

并行构建

在可能的情况下,使用并行构建来缩短总体构建时间。例如,多阶段构建中的不同阶段可以并行进行,特别是当它们之间没有依赖关系时。

构建过程调试

使用调试工具

合理利用调试工具可以大大提高问题定位的效率。例如,使用Docker自带的日志和事件监控功能,可以帮助开发者监控和分析构建过程。

容器内调试

在某些情况下,可能需要在构建的容器内部进行调试。使用
docker exec
命令进入运行中的容器,或在Dockerfile中插入特定的调试命令,可以帮助开发者直接在容器环境中进行问题诊断。

构建历史分析

通过分析构建历史,可以帮助开发者理解构建失败的模式和原因。Docker提供了详细的构建历史记录,包括每一步的输出和状态。

安全性调试

在遇到与安全性相关的构建问题时,使用专门的安全扫描和分析工具进行调试非常重要。这包括扫描漏洞、检查配置问题等。

四、代码实战

在理论学习之后,将知识应用到实际场景中是至关重要的。本章节将通过具体的代码示例和实践操作,展示如何将前文提及的Docker镜像构建技术和优化策略应用到实际的Dockerfile编写和镜像构建过程中。

实例:构建优化的Docker镜像

1. 基础Dockerfile

假设我们需要构建一个简单的Node.js应用的Docker镜像。基础的Dockerfile可能如下所示:

FROM node:14
WORKDIR /app
COPY . /app
RUN npm install
CMD ["node", "app.js"]

2. 优化Dockerfile

使用多阶段构建

为了减小镜像大小,我们可以采用多阶段构建:

# 构建阶段
FROM node:14 AS builder
WORKDIR /app
COPY . /app
RUN npm install

# 运行阶段
FROM node:14-alpine
WORKDIR /app
COPY --from=builder /app /app
CMD ["node", "app.js"]

在这个例子中,我们首先在一个较大的基础镜像中完成应用的构建,然后将构建的结果复制到一个更小的基础镜像中运行。

利用.dockerignore优化构建上下文

创建一个
.dockerignore
文件,排除不必要的文件:

node_modules
npm-debug.log
Dockerfile
.git
.gitignore

这样可以减少构建上下文的大小,加快构建过程。

3. Docker构建命令

使用以下命令来构建优化后的Docker镜像:

docker build -t my-node-app .

调试技巧

使用Docker日志进行调试

如果构建过程中出现错误,可以使用Docker的日志功能来获取更多信息:

docker build -t my-node-app . --progress=plain

容器内调试

如果需要在容器内部进行调试,可以先启动一个容器实例,然后使用
docker exec
进入该容器:

# 启动容器
docker run -d --name my-app my-node-app

# 进入容器进行调试
docker exec -it my-app /bin/sh

构建历史分析

查看镜像的构建历史,可以帮助我们了解每一步的执行情况:

docker history my-node-app

实例:提高Docker镜像安全性

使用非root用户运行容器

在Dockerfile中指定非root用户来运行应用,增加安全性。

FROM node:14-alpine
WORKDIR /app
COPY --from=builder /app /app
# 添加非root用户
RUN adduser -D myuser
USER myuser
CMD ["node", "app.js"]

这个示例中,在构建完成后添加了一个新的用户
myuser
,并使用
USER
指令切换到该用户,确保容器不是以root用户运行。

敏感数据处理

处理敏感数据时,避免将其写入Dockerfile或镜像中。一种做法是通过环境变量传递。

FROM node:14-alpine
# 省略其他指令
ENV DATABASE_PASSWORD=your_password
CMD ["node", "app.js"]

实例:Dockerfile性能优化

减少层的数量

合并多个
RUN
指令,以减少镜像层的数量。

FROM ubuntu
RUN apt-get update && apt-get install -y \
    package1 \
    package2 \
    && rm -rf /var/lib/apt/lists/*

在这个示例中,多个安装命令被合并成一个
RUN
指令,减少了镜像的层数,这有助于减小镜像的大小,并提高构建效率。

使用并行构建

在可能的情况下,使用并行构建技术来提高构建速度。这通常需要依赖Docker构建工具的高级功能,例如使用Docker BuildKit。

# 启用Docker BuildKit
DOCKER_BUILDKIT=1 docker build -t my-app .

这个命令启用了Docker的BuildKit功能,它可以自动优化构建过程,包括缓存管理和并行构建任务。

通过这些实战案例,我们可以看到理论知识在实际操作中的应用,并理解如何针对特定的需求调整和优化Docker镜像的构建。这些案例展示了Docker镜像构建技术的灵活性和强大功能,是提高云计算和微服务部署效率的关键工具。

关注【TechLeadCloud】,分享互联网架构、云服务技术的全维度知识。作者拥有10+年互联网服务架构、AI产品研发经验、团队管理经验,同济本复旦硕,复旦机器人智能实验室成员,阿里云认证的资深架构师,项目管理专业人士,上亿营收AI产品研发负责人。

如有帮助,请多关注
TeahLead KrisChang,10+年的互联网和人工智能从业经验,10年+技术和业务团队管理经验,同济软件工程本科,复旦工程管理硕士,阿里云认证云服务资深架构师,上亿营收AI产品业务负责人。

本文介绍如何实现进销存管理系统的财务对账模块,财务对账模块包括供应商对账和客户对账2个菜单页面。供应商和客户对账字段相同,因此可共用一个页面组件类。

1. 配置模块

运行项目,在【系统管理-模块管理】中配置如下模块菜单,配置教程参考之前的教程。

一级模块 二级模块 代码 图标 Url 描述
财务管理 Finance property-safety
客户对账单 CustomerAccount unordered-list /fms/CustomerAccount 查询和维护客户对账单信息。
供应商对账单 SupplierAccount unordered-list /fms/SupplierAccount 查询和维护供应商对账单信息。

2. 实体类


JxcLite
项目
Entities
文件夹下面添加
JxAccountHead.cs

JxAccountList.cs
两个实体类文件,实体类代码可以直接复制模块管理中由模型设置生成的代码。文章中只简单描述一下实体类的定义,具体代码参见开源,代码定义如下:

namespace JxcLite.Entities;

/// <summary>
/// 对账单表头信息类。
/// </summary>
public class JxAccountHead : EntityBase { }

/// <summary>
/// 对账单表体信息类。
/// </summary>
public class JxAccountList : EntityBase { }

3. 建表脚本

打开
JxcLite.Web
项目
Resources
文件夹下的
Tables.sql
资源文件,复制粘贴由【模块管理-模型设置】中生成的建表脚本。文章中只简单描述一下建表脚本,具体脚本参见开源,内容如下:

CREATE TABLE [JxAccountHead] (
    [Id]         varchar(50)      NOT NULL PRIMARY KEY,
    ...
    [Files]      nvarchar(500)    NULL
);

CREATE TABLE [JxAccountList] (
    [Id]         varchar(50)      NOT NULL PRIMARY KEY,
    ...
    [BillId]     varchar(50)      NOT NULL
);

4. 服务接口


JxcLite
项目
Services
文件夹下面添加财务管理模块服务接口,文件名定义为
IFinanceService.cs
,该接口定义前后端交互的Api访问方法,包括分页查询、批量删除实体、保存实体。具体方法定义如下:

namespace JxcLite.Services;

public interface IFinanceService : IService
{
    //分页查询客户或供应商对账单,通过查询条件Type字段筛选
    Task<PagingResult<JxAccountHead>> QueryAccountsAsync(PagingCriteria criteria);
    //根据账单类型获取默认对账单信息
    Task<JxAccountHead> GetDefaultAccountAsync(string type);
    //批量删除对账单表头及表体信息
    Task<Result> DeleteAccountsAsync(List<JxAccountHead> models);
    //保存对账单表头信息
    Task<Result> SaveAccountAsync(UploadInfo<JxAccountHead> info);
}

5. 服务实现


JxcLite.Web
项目
Services
文件夹下面添加财务管理模块服务接口的实现类,文件名定义为
FinanceService.cs
,文章中只简单描述一下实现类的定义和继承,具体实现参见开源,定义如下:

namespace JxcLite.Web.Services;

class FinanceService(Context context) : ServiceBase(context), IFinanceService
{
    public Task<PagingResult<JxAccountHead>> QueryAccountsAsync(PagingCriteria criteria) { }
    public Task<JxAccountHead> GetDefaultAccountAsync(string type) { }
    public Task<Result> DeleteAccountsAsync(List<JxAccountHead> models) { }
    public Task<Result> SaveAccountAsync(UploadInfo<JxAccountHead> info) { }
}

双击打开
JxcLite.Web
项目中的
AppWeb.cs
文件,在
AddJxcLiteCore
方法中注册服务类,前端组件可以通过依赖注入工厂创建服务的实例。代码如下:

public static class AppWeb
{
    public static void AddJxcLiteCore(this IServiceCollection services)
    {
        services.AddScoped<IFinanceService, FinanceService>();
    }
}

6. 数据依赖


JxcLite.Web
项目
Repositories
文件夹下面添加财务管理模块数据依赖类,文件名定义为
FinanceRepository.cs
,文章中只简单描述一下依赖类的定义,具体实现参见开源,定义如下:

namespace JxcLite.Web.Repositories;

class FinanceRepository
{
    internal static Task<PagingResult<JxAccountHead>> QueryAccountsAsync(Database db, PagingCriteria criteria) { }
    internal static Task<List<JxBillList>> GetBillListsAsync(Database db, string headId) { }
    //根据前缀获取最大业务单号
    internal static Task<string> GetMaxAccountNoAsync(Database db, string prefix) { }
    internal static Task DeleteAccountListsAsync(Database db, string headId) { }
    internal static Task DeleteAccountListAsync(Database db, string headId, string billId) { }
}

7. 列表页面


JxcLite.Client
项目
Pages\Finance
文件夹下面添加
AccountList.cs
单据列表组件,该组件是客户和供应商对账单的列表组件共用类,具体实现参见开源,部分代码如下:

namespace JxcLite.Client.Pages.Finance;

public class AccountList : BaseTablePage<JxAccountHead>
{
    private IFinanceService Service;
    //取得对账类型(客户、供应商),由具体对账单页面重写该类型
    protected virtual string Type { get; }
    
    protected override async Task OnPageInitAsync()
    {
        await base.OnPageInitAsync();
        Service = await CreateServiceAsync<IFinanceService>();//创建服务
        Table.FormType = typeof(AccountForm);//自定义表单类型
        Table.OnQuery = QueryAccountsAsync;  //查询方法
        //下面是设置列表栏位显示的模板
        Table.Column(c => c.Status).Template((b, r) => b.Tag(r.Status));
        Table.Column(c => c.AccountDate).Type(FieldType.Date);
    }
    //新增
    public async void New()
    {
        var row = await Service.GetDefaultBillAsync(Type);
        Table.NewForm(Service.SaveBillAsync, row);
    }
    //编辑
    public void Edit(JxAccountHead row) => Table.EditForm(Service.SaveAccountAsync, row);
    //批量删除和删除
    public void DeleteM() => Table.DeleteM(Service.DeleteAccountsAsync);
    public void Delete(JxAccountHead row) => Table.Delete(Service.DeleteAccountsAsync, row);
    //导出
    public async void Export() => await ExportDataAsync();
    
    private Task<PagingResult<JxAccountHead>> QueryAccountsAsync(PagingCriteria criteria)
    {
        //设置对账单类型查询条件
        criteria.SetQuery(nameof(JxAccountHead.Type), QueryType.Equal, Type);
        return Service.QueryAccountsAsync(criteria);
    }
}

8. 表头组件

首先打开
JxcLite.Client
项目
Shared
文件夹下面
TypeForms.cs
文件,添加对账单表头类型表单组件,代码如下:

namespace JxcLite.Client.Shared;

public class AccountHeadTypeForm : AntForm<JxAccountHead> { }

再在
JxcLite.Client
项目
Pages\Finance
文件夹下面添加
AccountHead.razor
文件,具体实现参见开源,部分代码如下:

@inherits BaseForm<JxAccountHead>

<AccountHeadTypeForm Form="Model" ShowAction>
    <AntRow>
        <DataItem Span="8" Label="对账单号" Required>
            <AntInput Disabled @bind-Value="@context.AccountNo" />
        </DataItem>
        <DataItem Span="8" Label="单证状态">
            <KTag Text="@context.Status" />
        </DataItem>
        <DataItem Span="8" Label="对账日期" Required>
            <AntDatePicker @bind-Value="@context.AccountDate" />
        </DataItem>
    </AntRow>
    <AntRow>
        <DataItem Span="8" Label="商业伙伴" Required>
            <PartnerPicker Value="@context.Partner" AllowClear Type="@context.Type"
                           ValueChanged="e=>context.Partner=e[0].Name" />
        </DataItem>
        <DataItem Span="8" Label="业务日期" Required>
            <AntRangePicker @bind-RangeValue="@context.BizDates" />
        </DataItem>
        <DataItem Span="8" Label="总金额">
            <AntDecimal @bind-Value="@context.TotalAmount" /> 元
        </DataItem>
    </AntRow>
    <AntRow>
        <DataItem Span="8" Label="合同号">
            <AntInput @bind-Value="@context.ContractNo" />
        </DataItem>
        <DataItem Span="8" Label="发票号">
            <AntInput @bind-Value="@context.InvoiceNo" />
        </DataItem>
    </AntRow>
    <AntRow>
        <DataItem Span="24" Label="备注">
            <AntTextArea @bind-Value="@context.Note" />
        </DataItem>
    </AntRow>
    <AntRow>
        <DataItem Span="24" Label="附件">
            <KUpload @ref="upload" ReadOnly="Model.IsView" Value="@context.Files"
                     OpenFile IsButton="!Model.Data.IsNew" OnFilesChanged="OnFilesChanged" />
        </DataItem>
    </AntRow>
</AccountHeadTypeForm>

@code {
    private KUpload upload;

    private async void OnFilesChanged(List<FileDataInfo> files)
    {
        if (Model.Data.IsNew)
        {
            Model.Files[nameof(JxAccountHead.Files)] = files;
        }
        else
        {
            Model.Files[nameof(JxAccountHead.Files)] = files;
            await Model.SaveAsync(d => upload.SetValue(d.Files), false);
        }
    }
}

9. 业务单表格组件

再在
JxcLite.Client
项目
Shared
文件夹下面添加
BillHeadTable.cs
文件,该组件为对账单明细列表,具体实现参见开源,部分代码如下:

namespace JxcLite.Client.Shared;

public class BillHeadTable : BaseTable<JxBillHead>
{
    private IBillService Service;

    [Parameter] public JxAccountHead Account { get; set; }

    protected override async Task OnInitAsync()
    {
        await base.OnInitAsync();
        Service = await CreateServiceAsync<IBillService>();
        Table.ShowPager = true;
        Table.OnQuery = QueryBillsAsync;
        if (!ReadOnly)
        {
            Table.Toolbar.AddAction(nameof(New));
            Table.Toolbar.AddAction(nameof(DeleteM));
            Table.SelectType = TableSelectType.Checkbox;
        }
        Table.AddColumn(c => c.BillNo, true).Width(100);
        Table.AddColumn(c => c.Status).Width(100).Template((b, r) => b.Tag(r.Status));
        Table.AddColumn(c => c.BillDate).Width(100).Type(FieldType.Date);
        Table.AddColumn(c => c.Partner).Width(150);
        Table.AddColumn(c => c.ContractNo).Width(100);
        Table.AddColumn(c => c.InvoiceNo).Width(100);
        Table.AddColumn(c => c.TotalAmount).Width(100).Sum();
        Table.AddColumn(c => c.Note).Width(200);
        if (!ReadOnly)
        {
            Table.AddAction(nameof(Delete));
        }
    }

    public void New() { }
    public void DeleteM() { }
    public void Edit(JxBillHead row) { }
    public void Delete(JxBillHead row) { }

    private Task<PagingResult<JxBillHead>> QueryBillsAsync(PagingCriteria criteria)
    {
        criteria.Parameters[nameof(BillQueryType)] = BillQueryType.Account;
        criteria.SetQuery("BizId", QueryType.Equal, Account.Id);
        return Service.QueryBillsAsync(criteria);
    }
}

10. 表单组件

再在
JxcLite.Client
项目
Pages\Finance
文件夹下面添加
AccountForm.cs
文件,该组件为对账单弹窗表单组件,分表头信息和对账明细两个标签,代码如下:

namespace JxcLite.Client.Pages.Finance;

class AccountForm : BaseTabForm
{
    [Parameter] public FormModel<JxAccountHead> Model { get; set; }

    protected override async Task OnInitFormAsync()
    {
        await base.OnInitFormAsync();
        Tab.AddTab("表头信息", BuildHead);
        Tab.AddTab("对账明细", BuildList);
        Tab.Right = b => b.Tag(Model.Data.Status);
    }

    private void BuildHead(RenderTreeBuilder builder)
    {
        builder.Component<AccountHead>().Set(c => c.Model, Model).Build();
    }

    private void BuildList(RenderTreeBuilder builder)
    {
        builder.Component<BillHeadTable>()
               .Set(c => c.ReadOnly, Model.IsView)
               .Set(c => c.Account, Model.Data)
               .Build();
    }
}

前言

.NET权限管理及快速开发框架、最好用的权限工作流系统。

基于经典领域驱动设计的权限管理及快速开发框架,源于Martin Fowler企业级应用开发思想及最新技术组合(SqlSugar、EF、Quartz、AutoFac、WebAPI、Swagger、Mock、NUnit、Vue2/3、Element-ui/plus、IdentityServer等)。已成功在docker/jenkins中实施。

核心模块包括:组织机构、角色用户、权限授权、表单设计、工作流等。

它的架构精良易于扩展,是中小企业的首选。

版本说明

1、主分支main运行环境默认为.NET SDK 6.0,支持.NET未来版本,需要.NET SDK 4.0/4.5开发环境的同学请查看本项目4.0分支,已停止维护。

2、目前OpenAuth.Net以全部开源的方式向大众开放,对于有经验的开发者,官方文档足以满足日常开发。为了能让项目走的更远,特推出基于vue2 + element-ui /vue3 + element-plus的单页面应用程序,即企业版/高级版OpenAuth.Pro

开源地址:
http://demo.openauth.net.cn:1802

3、该版本是一套后端基于OpenAuth.WebAPI接口,前端基于vue-element-admin,采用VUE全家桶(VUE+VUEX+VUE-ROUTER)单页面SPA开发的管理后台。

预览地址:
http://demo.openauth.net.cn:1803

另外 企业版包含一套基于有赞Vant+Vue3的移动端界面。

预览地址:
http://demo.openauth.net.cn:1804

核心看点

  • 同时支持EntityFramework、SqlSugar两款最流行的ORM框架
  • 符合国情的RBAC权限体系。超强的自定义权限控制功能,可灵活配置用户、角色可访问的数据权限。
  • 完整的字段权限控制,可以控制字段可见及API是否返回字段值
  • 可拖拽的表单设计。详情:可拖拽表单
  • 可视化流程设计
  • 全网最好用的打印解决方案。详情:智能打印
  • 基于Quartz.Net的定时任务控制,可随时启/停,可视化配置Cron表达式功能
  • 基于CodeSmith的代码生成功能,可快速生成带有头/明细结构的页面
  • 支持sqlserver、mysql、Oracle、PostgreSql数据库,理论上支持所有数据库
  • 集成IdentityServer4,实现基于OAuth2的登录体系
  • 建立三方对接规范,已有系统可以无缝对接流程引擎
  • 前端采用 vue + layui + element-ui + ztree + gooflow + leipiformdesign
  • 后端采用 .NET Core +EF core+ autofac + quartz +IdentityServer4 + nunit + swagger
  • 设计工具 PowerDesigner + Enterprise Architect

项目截图

流程中心

表单设计

数据权限

仓储中心

项目经验

教科书级的分层思想,哪怕苛刻的你阅读的是大神级精典大作(如:《企业应用架构模式》《重构与模式》《ASP.NET设计模式》等),你也可以参考本项目。不信?有图为证,Resharper自动生成的项目引用关系,毫无PS痕迹!

官方地址

  • 网站:http://www.openauth.net.cn
  • 文档:http://doc.openauth.net.cn
  • 项目:https://gitee.com/dotnetchina/OpenAuth.Net

如果觉得这篇文章对你有用,欢迎加入微信公众号 [
DotNet技术匠
] 社区,与其他热爱技术的同行交流心得,共同成长。