【C++】使用ort推理yolov10
前言:由于笔者是编导专业,想玩玩yolo模型,搜来搜去全是python,所以在学会之后写一篇文章帮助和笔者同样情况的人
环境
Windows 10
C++17
onnxruntime18.1(DML版本)
opencv4.9
visual studio2022
1. 环境配置
1.1 OpenCV环境配置
1.1.1 OpenCV 配置
- 访问 OpenCV 的 GitHub 页面
https://github.com/opencv/opencv
- 在 Releases 页面找到最新的 .exe 文件并下载
- 运行安装程序,选择默认安装路径
1.1.2
在 Visual Studio 中配置 OpenCV
- 打开 Visual Studio,新建一个控制台项目
- 右键点击项目,选择“属性”
- 在属性页中,选择“VC++ 目录”
- 在“包含目录”中添加 OpenCV 安装目录下的
include
文件夹路径,如:
C:\opencv\build\include
- 在“库目录”中添加 OpenCV 安装目录下的
x64\vc16\lib
文件夹路径,如:
C:\opencv\build\x64\vc16\lib
运行下面的代码,如果环境配置没有问题,则会正确显示图片
如果显示无法打开文件lib.obj,则把代码中的#pragma comment(lib,"opencv_world490.lib")去掉
改成在 "项目” → "链接器” → “输入” 附加依赖项中写opencv_world490.lib
#include <opencv2/opencv.hpp>
#pragma comment(lib,"opencv_world490.lib")
//注意!!我这里是opencv_world490.lib,不同版本的OpenCV跟的数字是不一样,如果是按照默认位置安装,则可以在这个文件夹看你的lib叫什么
//  C:\opencv\build\x64\vc16\lib
int main()
{
    cv::Mat image = cv::imread("path/to/your/image.jpg"); // 替换为你的图像路径
    if (image.empty())
    {
        std::cout << "无法加载图像!" << std::endl;
        return -1;
    }

    cv::imshow("图像", image);
    cv::waitKey(0);

    return 0;
}
1.2 onnxruntime1.18.1(DML版本)配置
使用 NuGet 安装 ONNX Runtime
- 在 Visual Studio 中,右键点击项目,选择“管理 NuGet 程序包”。
- 在搜索框中输入 “onnxruntime”。
- 选择 “Microsoft.ML.OnnxRuntime.DirectML”,点击“安装”。
1.3 把环境改成C++17
- 打开项目属性页: 右键点击项目,选择“属性”。
- 选择 C/C++ 选项卡: 在左侧菜单中选择“C/C++”。
- 选择“高级”选项: 在右侧菜单中选择“高级”。
- 更改编译器语言标准: ****在“编译器语言标准”下拉菜单中选择“ISO C++17 标准 (/std:c++17)”。
2. 需要了解的知识
2.1 onnxruntime基本认识
首先我们对onnxruntime建立一些基本认识,onnxruntime就是一个推理框架,可以把模型摆进去,输入数据,模型输出数据,不止可以跑yolo,还可以跑其他模型,同样是推理框架的有Pytorch,OpenVINO,tensorRT,NCNN(据说神中神,还没开始玩),关于为什么选择ORT,不知道,群友说ORT也神中神,所以就决定是他了
2.2 yolo模型基本认识
推理一个yolo模型,我们一般把他分为三个步骤:
1. 前处理 2.推理 3. 后处理
前处理要做什么
: 把不同宽高的图片处理成模型能推理的宽高,一般yolo模型都是支持(640,640)的图片的推理,如果输入的是(1920,1080)的图片就进行缩放+填充,把他变成(640,640)的图片
推理在做什么
: 推理就是拿推理框架推理,一般就是一行代码,也许就是session.run(),就推理完了
后处理在做什么
:模型输出的数据是非常杂乱的,因此需要对数据进行处理,比如说置信度过滤,nms,这是非常耗时的,但是在yolov10中,可以省去这一步,这也是yolov10效率高的原因
2.3 onnxruntime 是怎么进行推理的
onnxruntime执行推理依靠一行代码:
auto output_tensors = session->Run(...)
他需要传入的参数有这些
Ort::RunOptions{ nullptr }
: 推理选项,这里使用默认选项。
input_node_names_cstr.data()
: 输入节点名称数组。
&input_tensor, 1
: 输入张量指针和数量。
output_node_names_cstr.data()
: 输出节点名称数组。
output_node_names.size()
: 输出节点数量。
按照这些参数我们再继续
首先
input_node_names_cstr.data()
这个参数的值怎么得到,笔者不知道,选择抄代码,代码如下
  session = std::make_unique<Ort::Session>(*env, model_path.c_str(), session_options);
  allocator = std::make_unique<Ort::AllocatorWithDefaultOptions>();

  auto num_input_nodes = session->GetInputCount();
  auto num_output_nodes = session->GetOutputCount();
  input_node_names.resize(num_input_nodes);
  output_node_names.resize(num_output_nodes);

  for (size_t i = 0; i < num_input_nodes; i++)
  {
      auto input_name = session->GetInputNameAllocated(i, *allocator);
      input_node_names[i] = input_name.get();
      input_node_names_cstr.push_back(input_node_names[i].c_str());
  }
紧接着
input_tensor
的值要怎么得到,这个笔者知道
- 我们要先处理图片,把图片处理成640*640
- 将图片转成RGB格式
- 把图片归一化到[0,1]
- 把图片用split函数分成三个通道,分别存进大小为(640,640,1)的Mat的数组中(mat就是OpenCV提供的,用来储存图片信息的结构)
- 用for循环把三个通道的值分别用memcpy存到
input_tensor_value
- 用
Ort::Value::CreateTensor<float>();
将
input_tensor_value
变成
input_tensor
接下来是
output_node_names_cstr.data()
怎么得到,经典抄代码环节
    for (size_t i = 0; i < num_output_nodes; i++)
    {
        auto output_name = session->GetOutputNameAllocated(i, *allocator);
        output_node_names[i] = output_name.get();
        output_node_names_cstr.push_back(output_node_names[i].c_str());
    }
接下来是
output_node_names
,也是抄代码,就上面一段一起的,哦这些代码都是在官方仓库抄的
这些参数都有了,就可以推理了
3. 敲代码环节
3.1 预处理图片(把图片改成模型接受的shape,然后用灰度填充)
#include <opencv2/opencv.hpp>
// 我这里出现莫名奇妙的报错,然后去掉#pragma comment(lib,"opencv_world490.lib"),
// 在visual studio中的链接器中添加opencv_world490.lib就好了
void LetterBox(const cv::Mat& image, cv::Mat& outImage, cv::Vec4d& params, const cv::Size& newShape,
	bool autoShape, bool scaleFill, bool scaleUp, int stride, const cv::Scalar& color)
{

	cv::Size shape = image.size();
	float r = std::min((float)newShape.height / (float)shape.height,
		(float)newShape.width / (float)shape.width);
	if (!scaleUp)
		r = std::min(r, 1.0f);

	float ratio[2]{ r, r };
	int new_un_pad[2] = { (int)std::round((float)shape.width * r),(int)std::round((float)shape.height * r) };

	auto dw = (float)(newShape.width - new_un_pad[0]);
	auto dh = (float)(newShape.height - new_un_pad[1]);

	if (autoShape)
	{
		dw = (float)((int)dw % stride);
		dh = (float)((int)dh % stride);
	}
	else if (scaleFill)
	{
		dw = 0.0f;
		dh = 0.0f;
		new_un_pad[0] = newShape.width;
		new_un_pad[1] = newShape.height;
		ratio[0] = (float)newShape.width / (float)shape.width;
		ratio[1] = (float)newShape.height / (float)shape.height;
	}

	dw /= 2.0f;
	dh /= 2.0f;

	if (shape.width != new_un_pad[0] && shape.height != new_un_pad[1])
	{
		cv::resize(image, outImage, cv::Size(new_un_pad[0], new_un_pad[1]));
	}
	else {
		outImage = image.clone();
	}

	int top = int(std::round(dh - 0.1f));
	int bottom = int(std::round(dh + 0.1f));
	int left = int(std::round(dw - 0.1f));
	int right = int(std::round(dw + 0.1f));
	params[0] = ratio[0];
	params[1] = ratio[1];
	params[2] = left;
	params[3] = top;
	cv::copyMakeBorder(outImage, outImage, top, bottom, left, right, cv::BORDER_CONSTANT, color);
}

int main()
{
    auto img = cv::imread("./zidane.jpg");
    // 目标尺寸
    cv::Size newShape = cv::Size(640, 640);
	cv::Vec4d temp_param = { 1,1,0,0 };
    cv::Scalar color = cv::Scalar(114, 114, 114);
    cv::Mat outImage;
	LetterBox(img, outImage, temp_param, newShape, false, false, true, 32, color);
    return 0;
}
运行起来应该是下面这个效果

3.2紧接着为了要session.run(),我们需要先创建session,同时要创建session的参数
比如,打算使用几线程,打算用什么加速器,可以是cpu推理,也可以是cuda加速,也可以是dml加速,我们这里自然是选择dml加速,在选择加速器前,要判断加速器可不可用,使用的代码是
auto dml_it = std::find(providers.begin(), providers.end(), "DmlExecutionProvider");
std::vector<float> input_tensor_values;
input_tensor_values.resize(3 * width * height);
env = std::make_unique<Ort::Env>(ORT_LOGGING_LEVEL_ERROR, "YOLOv10Inference");
session_options.SetIntraOpNumThreads(1);
session_options.SetGraphOptimizationLevel(ORT_ENABLE_ALL);

std::vector<std::string> providers = Ort::GetAvailableProviders();
auto cuda_it = std::find(providers.begin(), providers.end(), "CUDAExecutionProvider");
auto dml_it = std::find(providers.begin(), providers.end(), "DmlExecutionProvider");

if (cuda_it != providers.end())
{
    std::cout << "CUDA Execution Provider is available" << std::endl;
}
else if (dml_it != providers.end())
{
    std::cout << "DirectML Execution Provider is available" << std::endl;
    OrtSessionOptionsAppendExecutionProvider_DML(session_options, 0);
}
else
{
    std::cout << "No suitable provider found, using default CPU execution" << std::endl;
}

session = std::make_unique<Ort::Session>(*env, model_path.c_str(), session_options);
加了这几行之后代码应该张这个样子,并且编译应该是能通过的,如果编译不能通过,自己排查一下吧~,我是边做边写的,如果你真的和我做的一样,应该也是可以编译通过的
// yolov10示例2.cpp : 此文件包含 "main" 函数。程序执行将在此处开始并结束。
//
#define NOMINMAX
#include <iostream>
#include <opencv2/opencv.hpp>
#include <onnxruntime_cxx_api.h>
#include <dml_provider_factory.h>
void LetterBox(const cv::Mat& image, cv::Mat& outImage, cv::Vec4d& params, const cv::Size& newShape,
	bool autoShape, bool scaleFill, bool scaleUp, int stride, const cv::Scalar& color)
{

	cv::Size shape = image.size();
	float r = std::min((float)newShape.height / (float)shape.height,
		(float)newShape.width / (float)shape.width);
	if (!scaleUp)
		r = std::min(r, 1.0f);

	float ratio[2]{ r, r };
	int new_un_pad[2] = { (int)std::round((float)shape.width * r),(int)std::round((float)shape.height * r) };

	auto dw = (float)(newShape.width - new_un_pad[0]);
	auto dh = (float)(newShape.height - new_un_pad[1]);

	if (autoShape)
	{
		dw = (float)((int)dw % stride);
		dh = (float)((int)dh % stride);
	}
	else if (scaleFill)
	{
		dw = 0.0f;
		dh = 0.0f;
		new_un_pad[0] = newShape.width;
		new_un_pad[1] = newShape.height;
		ratio[0] = (float)newShape.width / (float)shape.width;
		ratio[1] = (float)newShape.height / (float)shape.height;
	}

	dw /= 2.0f;
	dh /= 2.0f;

	if (shape.width != new_un_pad[0] && shape.height != new_un_pad[1])
	{
		cv::resize(image, outImage, cv::Size(new_un_pad[0], new_un_pad[1]));
	}
	else {
		outImage = image.clone();
	}

	int top = int(std::round(dh - 0.1f));
	int bottom = int(std::round(dh + 0.1f));
	int left = int(std::round(dw - 0.1f));
	int right = int(std::round(dw + 0.1f));
	params[0] = ratio[0];
	params[1] = ratio[1];
	params[2] = left;
	params[3] = top;
	cv::copyMakeBorder(outImage, outImage, top, bottom, left, right, cv::BORDER_CONSTANT, color);
	cv::imshow("1", outImage);
	cv::waitKey(0);
}

int main()
{
    auto img = cv::imread("./zidane.jpg");
    // 目标尺寸
	int width = 640;
	int height = 640;
	const std::wstring& model_path = L"./yolov10n.onnx";
    cv::Size newShape = cv::Size(width, height);
	cv::Vec4d temp_param = { 1,1,0,0 };
    cv::Scalar color = cv::Scalar(114, 114, 114);
    cv::Mat outImage;
	LetterBox(img, outImage, temp_param, newShape, false, false, true, 32, color);
	Ort::SessionOptions session_options;
	std::unique_ptr<Ort::Env> env;
	std::unique_ptr<Ort::Session> session;
	std::vector<float> input_tensor_values;
	input_tensor_values.resize(3 * width * height);
	env = std::make_unique<Ort::Env>(ORT_LOGGING_LEVEL_ERROR, "YOLOv10Inference");
	session_options.SetIntraOpNumThreads(1);
	session_options.SetGraphOptimizationLevel(ORT_ENABLE_ALL);

	std::vector<std::string> providers = Ort::GetAvailableProviders();
	auto cuda_it = std::find(providers.begin(), providers.end(), "CUDAExecutionProvider");
	auto dml_it = std::find(providers.begin(), providers.end(), "DmlExecutionProvider");

	if (cuda_it != providers.end())
	{
		std::cout << "CUDA Execution Provider is available" << std::endl;
	}
	else if (dml_it != providers.end())
	{
		std::cout << "DirectML Execution Provider is available" << std::endl;
		OrtSessionOptionsAppendExecutionProvider_DML(session_options, 0);
	}
	else
	{
		std::cout << "No suitable provider found, using default CPU execution" << std::endl;
	}

	session = std::make_unique<Ort::Session>(*env, model_path.c_str(), session_options);
	return 0;
}
3.3 获取输入输出节点名称输入输出节点数量(写完了报错不要怕,因为我也报错)
allocator = std::make_unique<Ort::AllocatorWithDefaultOptions>();

auto num_input_nodes = session->GetInputCount();
auto num_output_nodes = session->GetOutputCount();
input_node_names.resize(num_input_nodes);
output_node_names.resize(num_output_nodes);

for (size_t i = 0; i < num_input_nodes; i++)
{
    auto input_name = session->GetInputNameAllocated(i, *allocator);
    input_node_names[i] = input_name.get();
    input_node_names_cstr.push_back(input_node_names[i].c_str());
}

for (size_t i = 0; i < num_output_nodes; i++)
{
    auto output_name = session->GetOutputNameAllocated(i, *allocator);
    output_node_names[i] = output_name.get();
    output_node_names_cstr.push_back(output_node_names[i].c_str());
}
3.4 把图片转成浮点型,并且归一化到[0,1],把三个通道的数据分别储存到channels中(channels是三个一维的Mat组成的数组),并把他放到input_tensor_values中,并且CreateTensor,创建input_tensor
cv::Mat float_img;
std::vector<cv::Mat> channels(3);
outImage.convertTo(float_img, CV_32FC3, 1.0 / 255.0);
cv::split(float_img, channels);
for (int i = 0; i < 3; ++i)
{
    std::memcpy(input_tensor_values.data() + i * width * height, channels[i].data, width * height * sizeof(float));
}
std::vector<int64_t> input_node_dims = { 1, 3, height, width };
Ort::MemoryInfo memory_info = Ort::MemoryInfo::CreateCpu(OrtArenaAllocator, OrtMemTypeDefault);

Ort::Value input_tensor = Ort::Value::CreateTensor<float>(
    memory_info, input_tensor_values.data(), input_tensor_values.size(),
    input_node_dims.data(), input_node_dims.size()
);
3.5 推理!!获取推理结果
  auto output_tensors = session->Run(Ort::RunOptions{ nullptr },
      input_node_names_cstr.data(), &input_tensor, 1,
      output_node_names_cstr.data(), output_node_names.size()
  );
3.6 把现在的内容整合一下(这应该是编译成功的),看到那个
output_tensors ,模型输出就在那里面
// yolov10示例2.cpp : 此文件包含 "main" 函数。程序执行将在此处开始并结束。
//
#define NOMINMAX
#include <iostream>
#include <opencv2/opencv.hpp>
#include <onnxruntime_cxx_api.h>
#include <dml_provider_factory.h>
void LetterBox(const cv::Mat& image, cv::Mat& outImage, cv::Vec4d& params, const cv::Size& newShape,
	bool autoShape, bool scaleFill, bool scaleUp, int stride, const cv::Scalar& color)
{

	cv::Size shape = image.size();
	float r = std::min((float)newShape.height / (float)shape.height,
		(float)newShape.width / (float)shape.width);
	if (!scaleUp)
		r = std::min(r, 1.0f);

	float ratio[2]{ r, r };
	int new_un_pad[2] = { (int)std::round((float)shape.width * r),(int)std::round((float)shape.height * r) };

	auto dw = (float)(newShape.width - new_un_pad[0]);
	auto dh = (float)(newShape.height - new_un_pad[1]);

	if (autoShape)
	{
		dw = (float)((int)dw % stride);
		dh = (float)((int)dh % stride);
	}
	else if (scaleFill)
	{
		dw = 0.0f;
		dh = 0.0f;
		new_un_pad[0] = newShape.width;
		new_un_pad[1] = newShape.height;
		ratio[0] = (float)newShape.width / (float)shape.width;
		ratio[1] = (float)newShape.height / (float)shape.height;
	}

	dw /= 2.0f;
	dh /= 2.0f;

	if (shape.width != new_un_pad[0] && shape.height != new_un_pad[1])
	{
		cv::resize(image, outImage, cv::Size(new_un_pad[0], new_un_pad[1]));
	}
	else {
		outImage = image.clone();
	}

	int top = int(std::round(dh - 0.1f));
	int bottom = int(std::round(dh + 0.1f));
	int left = int(std::round(dw - 0.1f));
	int right = int(std::round(dw + 0.1f));
	params[0] = ratio[0];
	params[1] = ratio[1];
	params[2] = left;
	params[3] = top;
	cv::copyMakeBorder(outImage, outImage, top, bottom, left, right, cv::BORDER_CONSTANT, color);
	cv::imshow("1", outImage);
	cv::waitKey(0);
}

int main()
{
    auto img = cv::imread("./zidane.jpg");
    // 目标尺寸
	int width = 640;
	int height = 640;
	const std::wstring& model_path = L"./yolov10n.onnx";
    cv::Size newShape = cv::Size(width, height);
	cv::Vec4d temp_param = { 1,1,0,0 };
    cv::Scalar color = cv::Scalar(114, 114, 114);
    cv::Mat outImage;
	LetterBox(img, outImage, temp_param, newShape, false, false, true, 32, color);
	Ort::SessionOptions session_options;
	std::unique_ptr<Ort::Env> env;, 1.0 / 255.0
	std::unique_ptr<Ort::Session> session;
	std::unique_ptr<Ort::AllocatorWithDefaultOptions> allocator;
	std::vector<float> input_tensor_values;
	std::vector<std::string> input_node_names;
	std::vector<std::string> output_node_names;
	std::vector<const char*> input_node_names_cstr;
	std::vector<const char*> output_node_names_cstr;
	input_tensor_values.resize(3 * width * height);
	env = std::make_unique<Ort::Env>(ORT_LOGGING_LEVEL_ERROR, "YOLOv10Inference");
	session_options.SetIntraOpNumThreads(1);
	session_options.SetGraphOptimizationLevel(ORT_ENABLE_ALL);

	std::vector<std::string> providers = Ort::GetAvailableProviders();
	auto cuda_it = std::find(providers.begin(), providers.end(), "CUDAExecutionProvider");
	auto dml_it = std::find(providers.begin(), providers.end(), "DmlExecutionProvider");

	if (cuda_it != providers.end())
	{
		std::cout << "CUDA Execution Provider is available" << std::endl;
	}
	else if (dml_it != providers.end())
	{
		std::cout << "DirectML Execution Provider is available" << std::endl;
		OrtSessionOptionsAppendExecutionProvider_DML(session_options, 0);
	}
	else
	{
		std::cout << "No suitable provider found, using default CPU execution" << std::endl;
	}

	session = std::make_unique<Ort::Session>(*env, model_path.c_str(), session_options);
	allocator = std::make_unique<Ort::AllocatorWithDefaultOptions>();

	auto num_input_nodes = session->GetInputCount();
	auto num_output_nodes = session->GetOutputCount();
	input_node_names.resize(num_input_nodes);
	output_node_names.resize(num_output_nodes);

	for (size_t i = 0; i < num_input_nodes; i++)
	{
		auto input_name = session->GetInputNameAllocated(i, *allocator);
		input_node_names[i] = input_name.get();
		input_node_names_cstr.push_back(input_node_names[i].c_str());
	}

	for (size_t i = 0; i < num_output_nodes; i++)
	{
		auto output_name = session->GetOutputNameAllocated(i, *allocator);
		output_node_names[i] = output_name.get();
		output_node_names_cstr.push_back(output_node_names[i].c_str());
	}
	cv::Mat float_img;
	std::vector<cv::Mat> channels(3);
	outImage.convertTo(float_img, CV_32FC3, 1.0 / 255.0);
	cv::split(float_img, channels);
	for (int i = 0; i < 3; ++i)
	{
		std::memcpy(input_tensor_values.data() + i * width * height, channels[i].data, width * height * sizeof(float));
	}

	std::vector<int64_t> input_node_dims = { 1, 3, height, width };
	Ort::MemoryInfo memory_info = Ort::MemoryInfo::CreateCpu(OrtArenaAllocator, OrtMemTypeDefault);

	Ort::Value input_tensor = Ort::Value::CreateTensor<float>(
		memory_info, input_tensor_values.data(), input_tensor_values.size(),
		input_node_dims.data(), input_node_dims.size()
	);

	auto output_tensors = session->Run(Ort::RunOptions{ nullptr },
		input_node_names_cstr.data(), &input_tensor, 1,
		output_node_names_cstr.data(), output_node_names.size()
	);
	return 0;
}
3.7 后处理咯,相当之简单,因为yolov10就是没后处理,他要做的就是根据缩放函数(letterbox),把坐标缩放回去
	auto output_tensors = session->Run(Ort::RunOptions{ nullptr },
	input_node_names_cstr.data(), &input_tensor, 1,
	output_node_names_cstr.data(), output_node_names.size()
	);
	const float* raw_output = output_tensors[0].GetTensorData<float>();
	auto shape = output_tensors[0].GetTensorTypeAndShapeInfo().GetShape();
	int64_t num_boxes = shape[1];
	int64_t box_data_length = shape[2];
	detections.clear();
	for (int64_t i = 0; i < num_boxes; i++)
	{
		const float* detection = raw_output + i * box_data_length;
		float x1 = detection[0];
		float y1 = detection[1];
		float x2 = detection[2];
		float y2 = detection[3];
		float confidence = detection[4];
		int class_id = static_cast<int>(detection[5]);

		if (confidence > 0.8)
		{

			// Adjust coordinates to remove padding
			float x = (x1 + 0.5 * (x2 - x1)-temp_param[2])/temp_param[0];
			float y = (y1 + 0.5 * (y2 - y1) - temp_param[3]) / temp_param[1];

			float w = (x2 - x1) / temp_param[0];
			float h = (y2 - y1) / temp_param[1];

			int left = MAX(int(x - 0.5 * w + 0.5), 0);
			int top = MAX(int(y - 0.5 * h + 0.5), 0);

			cv::Rect rect(left, top, int(w + 0.5), int(h + 0.5));
			detections.emplace_back(rect, confidence, class_id);
		}
	}
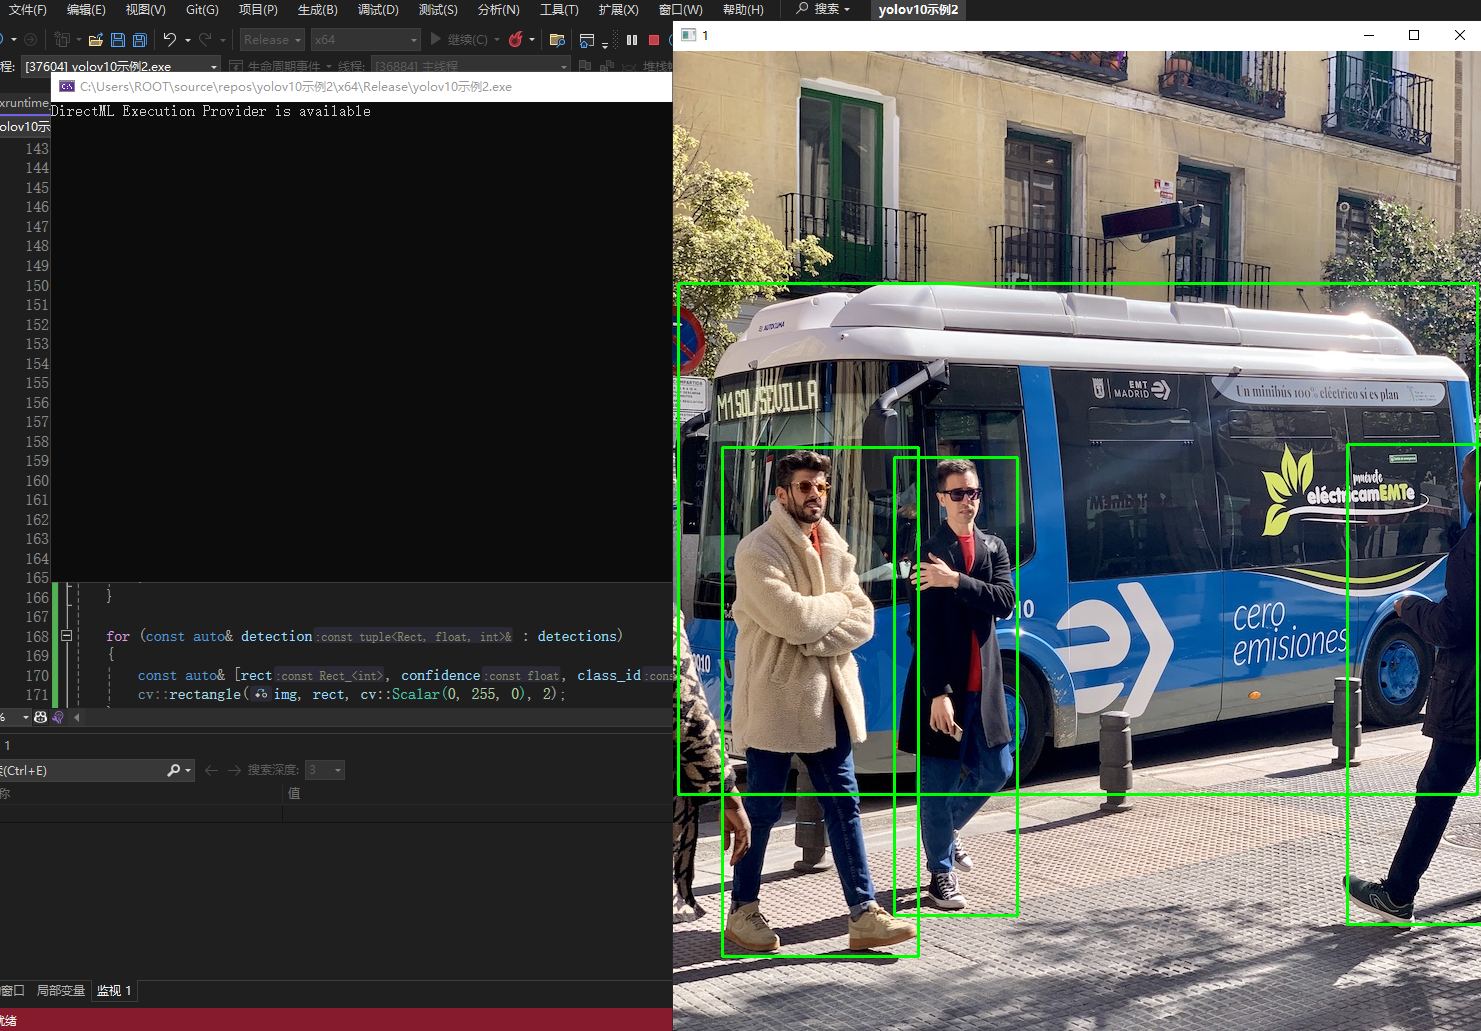
3.8 根据rect绘制方框
for (const auto& detection : detections)
{
	const auto& [rect, confidence, class_id] = detection;
	cv::rectangle(img, rect, cv::Scalar(0, 255, 0), 2);
}
cv::imshow("1", img);
cv::waitKey(0);
4. 最终代码和实现效果
实现效果,注意!!你使用的模型yolov10n.onnx,要和你的cpp文件在一个目录下
// yolov10示例2.cpp : 此文件包含 "main" 函数。程序执行将在此处开始并结束。
//
#define NOMINMAX
#include <iostream>
#include <opencv2/opencv.hpp>
#include <onnxruntime_cxx_api.h>
#include <dml_provider_factory.h>
void LetterBox(const cv::Mat& image, cv::Mat& outImage, cv::Vec4d& params, const cv::Size& newShape,const cv::Scalar& color)
{

	cv::Size shape = image.size();
	float r = std::min((float)newShape.height / (float)shape.height,
		(float)newShape.width / (float)shape.width);

	float ratio[2]{ r, r };
	int new_un_pad[2] = { (int)std::round((float)shape.width * r),(int)std::round((float)shape.height * r) };

	auto dw = (float)(newShape.width - new_un_pad[0]);
	auto dh = (float)(newShape.height - new_un_pad[1]);

	dw /= 2.0f;
	dh /= 2.0f;

	if (shape.width != new_un_pad[0] && shape.height != new_un_pad[1])
	{
		cv::resize(image, outImage, cv::Size(new_un_pad[0], new_un_pad[1]));
	}
	else {
		outImage = image.clone();
	}

	int top = int(std::round(dh - 0.1f));
	int bottom = int(std::round(dh + 0.1f));
	int left = int(std::round(dw - 0.1f));
	int right = int(std::round(dw + 0.1f));
	params[0] = ratio[0];
	params[1] = ratio[1];
	params[2] = left;
	params[3] = top;
	cv::copyMakeBorder(outImage, outImage, top, bottom, left, right, cv::BORDER_CONSTANT, color);
}

int main()
{
    auto img = cv::imread("./bus.jpg");
    // 目标尺寸
	int width = 640;
	int height = 640;
	const std::wstring& model_path = L"./yolov10n.onnx";
    cv::Size newShape = cv::Size(width, height);
	std::vector<std::tuple<cv::Rect, float, int>> detections;
	cv::Vec4d temp_param = { 1,1,0,0 };
    cv::Scalar color = cv::Scalar(114, 114, 114);
    cv::Mat outImage;
	LetterBox(img, outImage, temp_param, newShape, color);
	Ort::SessionOptions session_options;
	std::unique_ptr<Ort::Env> env;
	std::unique_ptr<Ort::Session> session;
	std::unique_ptr<Ort::AllocatorWithDefaultOptions> allocator;
	std::vector<float> input_tensor_values;
	std::vector<std::string> input_node_names;
	std::vector<std::string> output_node_names;
	std::vector<const char*> input_node_names_cstr;
	std::vector<const char*> output_node_names_cstr;
	input_tensor_values.resize(3 * width * height);
	env = std::make_unique<Ort::Env>(ORT_LOGGING_LEVEL_ERROR, "YOLOv10Inference");
	session_options.SetIntraOpNumThreads(1);
	session_options.SetGraphOptimizationLevel(ORT_ENABLE_ALL);

	std::vector<std::string> providers = Ort::GetAvailableProviders();
	auto cuda_it = std::find(providers.begin(), providers.end(), "CUDAExecutionProvider");
	auto dml_it = std::find(providers.begin(), providers.end(), "DmlExecutionProvider");

	if (cuda_it != providers.end())
	{
		std::cout << "CUDA Execution Provider is available" << std::endl;
	}
	else if (dml_it != providers.end())
	{
		std::cout << "DirectML Execution Provider is available" << std::endl;
		OrtSessionOptionsAppendExecutionProvider_DML(session_options, 0);
	}
	else
	{
		std::cout << "No suitable provider found, using default CPU execution" << std::endl;
	}

	session = std::make_unique<Ort::Session>(*env, model_path.c_str(), session_options);
	allocator = std::make_unique<Ort::AllocatorWithDefaultOptions>();

	auto num_input_nodes = session->GetInputCount();
	auto num_output_nodes = session->GetOutputCount();
	input_node_names.resize(num_input_nodes);
	output_node_names.resize(num_output_nodes);

	for (size_t i = 0; i < num_input_nodes; i++)
	{
		auto input_name = session->GetInputNameAllocated(i, *allocator);
		input_node_names[i] = input_name.get();
		input_node_names_cstr.push_back(input_node_names[i].c_str());
	}

	for (size_t i = 0; i < num_output_nodes; i++)
	{
		auto output_name = session->GetOutputNameAllocated(i, *allocator);
		output_node_names[i] = output_name.get();
		output_node_names_cstr.push_back(output_node_names[i].c_str());
	}
	cv::Mat float_img;
	std::vector<cv::Mat> channels(3);
	//cv::cvtColor(img, img, cv::COLOR_BGR2RGB);

	outImage.convertTo(float_img, CV_32FC3, 1.0 / 255.0);

	cv::split(float_img, channels);
	for (int i = 0; i < 3; ++i)
	{
		std::memcpy(input_tensor_values.data() + i * width * height, channels[i].data, width * height * sizeof(float));
	}

	std::vector<int64_t> input_node_dims = { 1, 3, height, width };
	Ort::MemoryInfo memory_info = Ort::MemoryInfo::CreateCpu(OrtArenaAllocator, OrtMemTypeDefault);

	Ort::Value input_tensor = Ort::Value::CreateTensor<float>(
		memory_info, input_tensor_values.data(), input_tensor_values.size(),
		input_node_dims.data(), input_node_dims.size()
	);

	auto output_tensors = session->Run(Ort::RunOptions{ nullptr },
		input_node_names_cstr.data(), &input_tensor, 1,
		output_node_names_cstr.data(), output_node_names.size()
	);
	const float* raw_output = output_tensors[0].GetTensorData<float>();
	auto shape = output_tensors[0].GetTensorTypeAndShapeInfo().GetShape();
	int64_t num_boxes = shape[1];
	int64_t box_data_length = shape[2];
	detections.clear();
	for (int64_t i = 0; i < num_boxes; i++)
	{
		const float* detection = raw_output + i * box_data_length;
		float x1 = detection[0];
		float y1 = detection[1];
		float x2 = detection[2];
		float y2 = detection[3];
		float confidence = detection[4];
		int class_id = static_cast<int>(detection[5]);

		if (confidence > 0.8)
		{

			// Adjust coordinates to remove padding
			float x = (x1 + 0.5 * (x2 - x1)-temp_param[2])/temp_param[0];
			float y = (y1 + 0.5 * (y2 - y1) - temp_param[3]) / temp_param[1];

			float w = (x2 - x1) / temp_param[0];
			float h = (y2 - y1) / temp_param[1];

			int left = MAX(int(x - 0.5 * w + 0.5), 0);
			int top = MAX(int(y - 0.5 * h + 0.5), 0);

			cv::Rect rect(left, top, int(w + 0.5), int(h + 0.5));
			detections.emplace_back(rect, confidence, class_id);
		}
	}

	for (const auto& detection : detections)
	{
		const auto& [rect, confidence, class_id] = detection;
		cv::rectangle(img, rect, cv::Scalar(0, 255, 0), 2);
	}
	cv::imshow("1", img);
	cv::waitKey(0);
	return 0;
}
可以优化的地方
- OpenCV的mat速度好像是有点慢,自己实现一个MAT用,速度和占用都能好不少
- 如果确定要推理某个尺寸的图片,直接训练那个尺寸的图片,然后可以去掉letterbox,速度又能快点
- 如果追求极致效率,请转去ncnn,都说是神中神,快去试试,回来告诉我
最后
闷了,写的时候搜个半天搜不到,AI写出来的都是老代码,onnxruntime1.18.1都不适用,希望这篇文章能帮到你,如果文章有问题也欢迎斧正
