SpringBoot2.7 霸王硬上弓 Logback1.3 → 不甜但解渴
开心一刻
一大早,她就发消息质问我
她:你给我老实交代,昨晚去哪鬼混了?
我:没有,就哥几个喝了点酒
她:那我给你打了那么多视频,为什么不接?
我:不太方便呀
她:我不信,和你哥们儿喝酒有啥不方便接视频的?
她:你肯定有别的女人了!
我:你老公就坐在我旁边,我敢接?

前情回顾
SpringBoot2.7还是任性的,就是不支持Logback1.3,你能奈他何
讲了很多,总结下来就两点
SpringBoot 2.7.x 默认依赖 Logback 1.2.x,不支持 Logback 1.3.x
如果强行将 Logback 升级到 1.3.x,启动会报异常
Exception in thread "main" java.lang.NoClassDefFoundError: org/slf4j/impl/StaticLoggerBinder
	at org.springframework.boot.logging.logback.LogbackLoggingSystem.getLoggerContext(LogbackLoggingSystem.java:304)
	at org.springframework.boot.logging.logback.LogbackLoggingSystem.beforeInitialize(LogbackLoggingSystem.java:118)
	at org.springframework.boot.context.logging.LoggingApplicationListener.onApplicationStartingEvent(LoggingApplicationListener.java:238)
	at org.springframework.boot.context.logging.LoggingApplicationListener.onApplicationEvent(LoggingApplicationListener.java:220)
	at org.springframework.context.event.SimpleApplicationEventMulticaster.doInvokeListener(SimpleApplicationEventMulticaster.java:178)
	at org.springframework.context.event.SimpleApplicationEventMulticaster.invokeListener(SimpleApplicationEventMulticaster.java:171)
	at org.springframework.context.event.SimpleApplicationEventMulticaster.multicastEvent(SimpleApplicationEventMulticaster.java:145)
	at org.springframework.context.event.SimpleApplicationEventMulticaster.multicastEvent(SimpleApplicationEventMulticaster.java:133)
	at org.springframework.boot.context.event.EventPublishingRunListener.starting(EventPublishingRunListener.java:79)
	at org.springframework.boot.SpringApplicationRunListeners.lambda$starting$0(SpringApplicationRunListeners.java:56)
	at java.util.ArrayList.forEach(ArrayList.java:1249)
	at org.springframework.boot.SpringApplicationRunListeners.doWithListeners(SpringApplicationRunListeners.java:120)
	at org.springframework.boot.SpringApplicationRunListeners.starting(SpringApplicationRunListeners.java:56)
	at org.springframework.boot.SpringApplication.run(SpringApplication.java:299)
	at org.springframework.boot.SpringApplication.run(SpringApplication.java:1300)
	at org.springframework.boot.SpringApplication.run(SpringApplication.java:1289)
	at com.qsl.Application.main(Application.java:15)
Caused by: java.lang.ClassNotFoundException: org.slf4j.impl.StaticLoggerBinder
	at java.net.URLClassLoader.findClass(URLClassLoader.java:381)
	at java.lang.ClassLoader.loadClass(ClassLoader.java:424)
	at sun.misc.Launcher$AppClassLoader.loadClass(Launcher.java:331)
	at java.lang.ClassLoader.loadClass(ClassLoader.java:357)
	... 17 more
原因也分析过了
spring-boot-2.7.18 依赖 org.slf4j.impl.StaticLoggerBinder,而 logback 1.3.x 没有该类
SpringBoot 2.7.x 支持 Logback 1.3.x 也不是没办法,但有一些限制,同时也存在一些未知的风险
关于未知的风险,相信大家都能理解,为什么了,这就好比从
JDK8
升级到
JDK 11
,你们为什么不敢升,一个道理,因为大版本的升级,变动点往往比较多,甚至会移除掉低版本的一些内容,编译期报错还算直观的(我们可以根据报错调整代码),如果是运行期报错那就头疼了,上了生产就算事故了,这锅你敢背吗?
所以大版本的升级,意味着我们不但要修复编译期的错,还要进行全方位的测试,尽可能的覆盖所有场景,以排除运行期可能存在的任何异常。业务简单还好,如果业务非常庞大,这个全量测试是要花大量时间的,不仅开发会口吐芬芳,测试也会
mmp
Upgrade to SLF4J 2.0 and Logback 1.4
进行了一些讨论,
wilkinsona
(Spring Boot 目前 Contributor 榜一)就提到了一些风险点
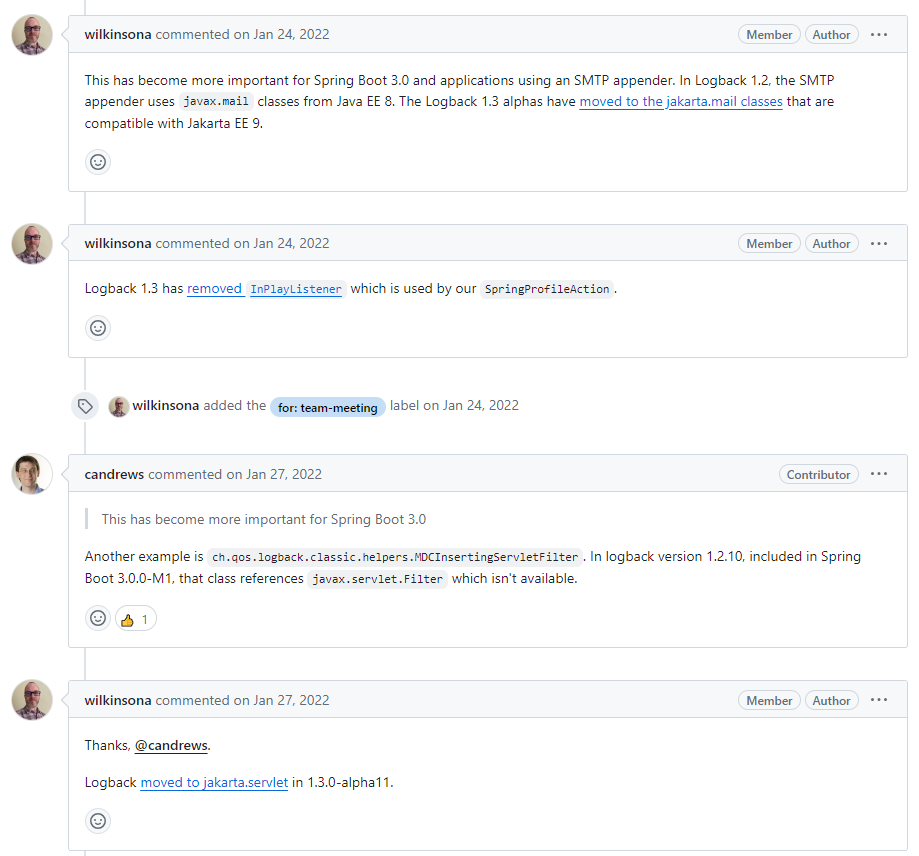
里面讨论了很多,
Logback
的 Contributor 榜一大哥
ceki
也在里面进行了很多说明与答疑,感兴趣的可以详细看看
总之就是:通过调整配置,SpringBoot 2.7.x 可以支持 Logback 1.3.x,但风险需要我们自己承担
换个角度想想,我们应该是能理解
Spring Boot
官方的
- 对
Logback
不是那么熟,只能通过
Logback
官方说明知道变动点(能保证事无巨细列全了?),若变动点太多,不可能每个点都去核实 Spring Boot
那么庞大,集成了那么多功能,怕是榜一大哥也不能熟记所有细节(我们敢保证对我们负责的项目的所有细节都了如指掌吗),所以也没法评估升级到
Logback 1.3.x
会有哪些点受影响
所以求稳,
Spring Boot 2.x.x
不打算集成
Logback 1.3.x
但是,如果我们也任性一回,非要强扭这个瓜,
Spring Boot
是不是也不能奈我们何?
霸王硬上弓
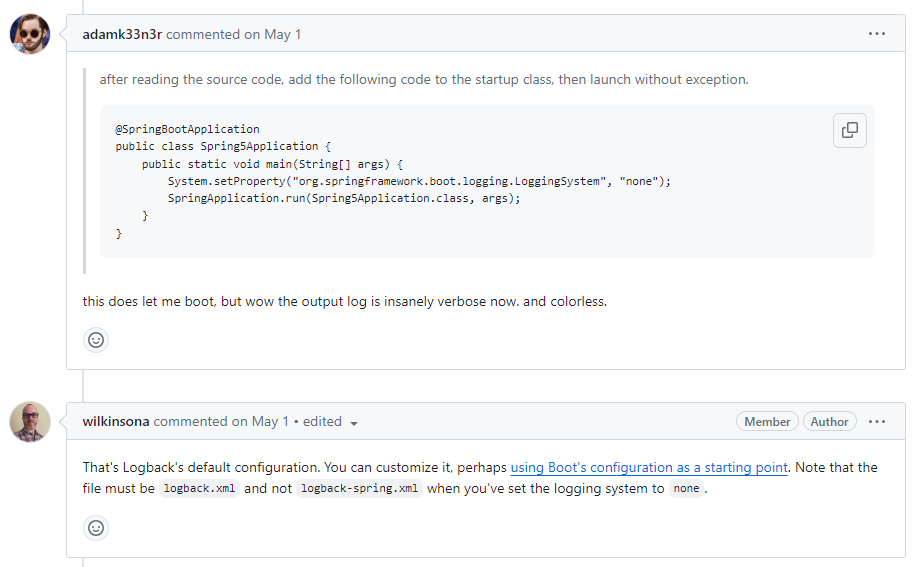
参考这个,我们来配置下
关闭
Spring Boot
的
LoggingSystem@SpringBootApplication public class Application { public static void main(String[] args) { System.setProperty("org.springframework.boot.logging.LoggingSystem", "none"); SpringApplication.run(Application.class, args); } }配置文件用
logback.xml<?xml version="1.0" encoding="UTF-8"?> <configuration> <property name="LOG_FILE" value="/logs/spring-boot-2_7_18.log"/> <property name="FILE_LOG_PATTERN" value="%d{yyyy-MM-dd HH:mm:ss.SSS}|%level|%t|%line|%-40.40logger{39}:%msg%n"/> <!-- 按照每天生成日志文件--> <appender name="FILE" class="ch.qos.logback.core.rolling.RollingFileAppender"> <encoder class="ch.qos.logback.classic.encoder.PatternLayoutEncoder"> <pattern>${FILE_LOG_PATTERN}</pattern> </encoder> <file>${LOG_FILE}</file> <rollingPolicy class="ch.qos.logback.core.rolling.TimeBasedRollingPolicy"> <fileNamePattern>${LOG_FILE}.%d{yyyy-MM-dd}.zip</fileNamePattern> <maxHistory>30</maxHistory> </rollingPolicy> </appender> <!-- 控制台输出 --> <appender name="STDOUT" class="ch.qos.logback.core.ConsoleAppender"> <encoder> <pattern>${FILE_LOG_PATTERN}}</pattern> </encoder> </appender> <root level="${loglevel:-INFO}"> <appender-ref ref="STDOUT" /> <appender-ref ref="FILE" /> </root> </configuration>
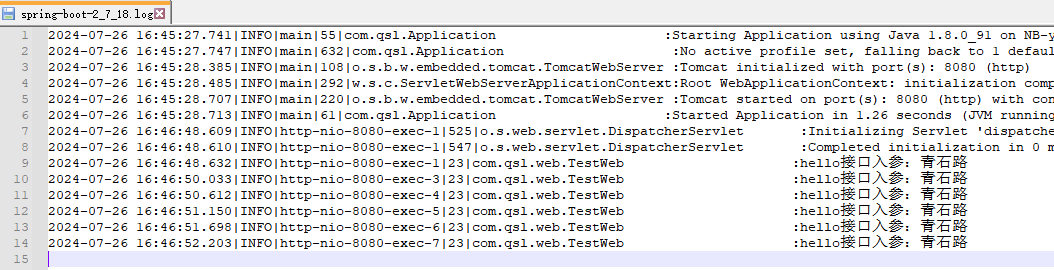
启动确实正常了,我们加点简单的业务日志,发现日志也输出正常
2024-07-26 16:46:48.609|INFO|http-nio-8080-exec-1|525|o.s.web.servlet.DispatcherServlet       :Initializing Servlet 'dispatcherServlet'
2024-07-26 16:46:48.610|INFO|http-nio-8080-exec-1|547|o.s.web.servlet.DispatcherServlet       :Completed initialization in 0 ms
2024-07-26 16:46:48.632|INFO|http-nio-8080-exec-1|23|com.qsl.web.TestWeb                     :hello接口入参:青石路
2024-07-26 16:46:50.033|INFO|http-nio-8080-exec-3|23|com.qsl.web.TestWeb                     :hello接口入参:青石路
2024-07-26 16:46:50.612|INFO|http-nio-8080-exec-4|23|com.qsl.web.TestWeb                     :hello接口入参:青石路
2024-07-26 16:46:51.150|INFO|http-nio-8080-exec-5|23|com.qsl.web.TestWeb                     :hello接口入参:青石路
2024-07-26 16:46:51.698|INFO|http-nio-8080-exec-6|23|com.qsl.web.TestWeb                     :hello接口入参:青石路
2024-07-26 16:46:52.203|INFO|http-nio-8080-exec-7|23|com.qsl.web.TestWeb                     :hello接口入参:青石路
日志文件写入也正常
这不仅解渴,还很甜呀

但不要甜的太早,这仅仅只是一个
demo
:
spring-boot-2_7_18
,没有业务代码,简单的不能再简单了,你们要是以此来判断甜与不甜,那就大错特错了;应用到项目中,不但要保证能够正常启动,还要保证已有的所有业务能够正常运行,至于计划中的业务,那就将来再说,谁知道明天和意外哪个先来,认真过好当下!
初步尝试,是可行的,所以你们大胆的去试吧,但要做好全方位的业务测试

wilkinsona
提到了,关闭
Spring Boot
的
LoggingSystem
后,用的是
Logback
的默认配置,配置文件必须是
logback.xml
而不能是
logback-spring.xml
;虽然榜一大哥的话很权威,但我们主打一个任性,就想来试试
logback-spring.xml
,会有什么样的结果,直接将
logback.xml
改名成
logback-spring.xml
,能启动起来,但有一堆
debug
日志,重点是
日志没有写入文件
wilkinsona
诚不欺我!
原理分析
关闭了
Spring Boot
的
LoggingSystem
后,日志相关的全权交给
Logback
,而关于
Logback
的配置文件加载,我是写过一篇详解的:
从源码来理解slf4j的绑定,以及logback对配置文件的加载
,直接跳到总结部分,有这么一段
编译期间,完成slf4j的绑定以及logback配置文件的加载。slf4j会在classpath中寻找org/slf4j/impl/StaticLoggerBinder.class(会在具体的日志框架如log4j、logback等中存在),找到并完成绑定;同时,logback也会在classpath中寻找配置文件,先找logback.configurationFile、没有则找logback.groovy,若logback.groovy也没有,则找logback-test.xml,若logback-test.xml还是没有,则找logback.xml,若连logback.xml也没有,那么说明没有配置logback的配置文件,那么logback则会启用默认的配置(日志信息只会打印在控制台)
虽说
Logback
是
1.1.17
,而不是
1.3.14
,但对配置文件的加载应该是没变的
大家注意看我的措辞:应该,这样即使变了,你们也不能说我,因为我说的是应该
保险起见,你们应该去看下 1.3.14 的源码!
这也是为什么配置文件是
logback.xml
的时候,日志能正常写入文件,而是
logback-spring.xml
时候,日志不能写入日志文件的原因,因为
Logback
不认
logback-spring.xml
,
Spring Boot
才认!
至于
Spring Boot LoggingSystem
嘛,等我掌握了再来和你们聊,一定要等我哟

总结
Spring Boot 2.x.x
默认依赖
Logback 1.2.x
,不支持
Logback 1.3.x
,但是通过设置
System.setProperty("org.springframework.boot.logging.LoggingSystem", "none");
启动时不报错的,再结合
logback.xml
,日志是能够正常写入日志文件的;但是保险起见,还是不推荐升级到
Logback 1.3.x
能不动就不要动,改好没绩效,改出问题要背锅,吃力不讨好,又不是不能跑
如果一定要升级,那就做好全量测试,把所有业务场景都覆盖到