2024年8月

最近发现一些快手的作者,作品还不错,出于学习研究的目的,决定看一下怎么爬取数据。现在网上有一些爬虫工具,不过大部分都失效了,或者不开源。于是自己就写了一个小工具。先看一下成果:
image
image
软件只需要填写作者uid以及网页版的请求Cookie,即可实现自动下载,下载目录在程序根目录下的Download文件夹。
由于快手的风控比较厉害,软件也做了应对措施。不过需要用户点击软件中的提示文字,复制粘贴到浏览器,把请求的json保存到本地文件。使用软件提供的解析本地json按钮解析下载即可。如果返回的json文件很短或者没有数据,需要在快手的任意一个页面刷新一下,也就是告诉快手风控,现在是正常浏览,没有机器人的行为。

下面说一下构建整个App的思路。

1. 快手网页端准备

  1. 打开
    https://live.kuaishou.com/
    ,在顶部搜索你要爬取的作者昵称,进入作者主页。也可以从App端分享作者的主页链接,粘贴进来。作者主页加载完成后,地址栏的地址一定要是类似:
    https://live.kuaishou.com/profile/xxxxxx。
    后面的xxxxxx就是作者的user id。这个记住,复制出来,后面会用到。

  2. 按F12打开浏览器的开发者工具(我之前就说过开发者工具是好东西,研究爬虫必备,一定要好好学习)。

  3. 选择开发者工具顶部的“网络”,“全部”,如图所示。在请求列表中找到user id,点击它,右面就会出来请求的标头。里面有个Cookie,需要记住,复制出来。如果没有的话,记得刷新页面。
    image

  4. 在列表里面可以看到很多请求,我们需要从中找到网页端展示作品列表的那条请求,即public开头的,或者直接在左上角搜索public,即可过滤绝大部分无关请求。这个请求的响应数据里面有作者作品的完整json响应。
    image

你可以右击它,在新标签页面打开,打开后地址栏会显示完成的浏览器请求地址。这个网址需要记住,后续会用到。那个count默认是12或者20,我们用到时候,直接拉满,9999即可。
image
image

2. Postman拦截请求,模拟请求,并生成C#请求代码

  1. 安装postman interceptor拦截器,安装地址
    https://chromewebstore.google.com/detail/postman-interceptor/aicmkgpgakddgnaphhhpliifpcfhicfo
    不得不说,这又是一个神器,搭配开发者工具,理论上可以搞定几乎所有的爬虫需求了。

  2. 打开Postman,点击右下角的Start Proxy,
    image
    开启拦截后,重新回到网页版作者主页,刷新一下页面,等页面加载完成后,点击停止拦截。否则列表会一直增多,因为他会拦截电脑的所有网络请求。这时Postman拦截器就会拦截到一大堆请求,同理,找到public请求,或者在左上角输入public,即可过滤出来我们需要的。
    image
    点击这个请求链接
    image
    这是Postman会打开一个新的窗口,包含了请求这个链接的所有参数以及标头信息。
    image
    点击Postman最右面的代码工具即可生成我们需要的代码。你可以选择C#、python、js、curl等等。
    image

3. 使用WPF写界面以及下载逻辑

  1. 新建WPF工程,为了界面好看,这次我用了开源的WPF UI,之前用过HandyControl、MicaWPF,这些都是不错的UI控件库。
    下载使用了开源的Downloader,请求使用了RestSharp,解析Json使用NewtonsoftJson,另外推荐一个免费的图标库FlatIcon。
    界面如下:
点击查看代码
<ui:FluentWindow
  x:Class="KuaishouDownloader.MainWindow"
  xmlns="http://schemas.microsoft.com/winfx/2006/xaml/presentation"
  xmlns:x="http://schemas.microsoft.com/winfx/2006/xaml"
  xmlns:d="http://schemas.microsoft.com/expression/blend/2008"
  xmlns:local="clr-namespace:KuaishouDownloader"
  xmlns:mc="http://schemas.openxmlformats.org/markup-compatibility/2006"
  xmlns:ui="http://schemas.lepo.co/wpfui/2022/xaml"
  Title="MainWindow"
  Width="900"
  Height="760"
  ExtendsContentIntoTitleBar="True"
  WindowBackdropType="Mica"
  WindowCornerPreference="Default"
  WindowStartupLocation="CenterScreen"
  mc:Ignorable="d">
  <Grid>
    <Grid.RowDefinitions>
      <RowDefinition Height="Auto" />
      <RowDefinition Height="*" />
    </Grid.RowDefinitions>
    <ui:TitleBar Title="快手作者主页作品爬取" Height="32" />
    <ui:Button
      x:Name="themeButton"
      Grid.Row="1"
      Width="32"
      Height="32"
      Margin="0,0,8,0"
      Padding="0"
      HorizontalAlignment="Right"
      VerticalAlignment="Top"
      Click="Theme_Click"
      CornerRadius="16"
      FontSize="24"
      Icon="{ui:SymbolIcon WeatherMoon48}"
      ToolTip="切换主题" />
    <ui:SnackbarPresenter
      x:Name="snackbarPresenter"
      Grid.Row="1"
      VerticalAlignment="Bottom" />
    <StackPanel
      Grid.Row="1"
      HorizontalAlignment="Center"
      VerticalAlignment="Center">
      <Border
        Width="200"
        Height="200"
        HorizontalAlignment="Center"
        CornerRadius="100">
        <ui:Image
          x:Name="imgHeader"
          Width="200"
          Height="200"
          CornerRadius="100" />
      </Border>
      <ui:TextBlock
        x:Name="tbNickName"
        Margin="0,12,0,0"
        HorizontalAlignment="Center" />
      <StackPanel Margin="0,12,0,0" Orientation="Horizontal">
        <ui:TextBlock
          Width="60"
          Margin="0,12,0,0"
          VerticalAlignment="Center"
          Text="uid" />
        <ui:TextBox
          x:Name="tbUid"
          Width="660"
          Height="36"
          VerticalContentAlignment="Center"
          ToolTip="App进入作者主页,分享主页-复制链接,用浏览器打开链接,地址栏一般变为https://www.kuaishou.com/profile/xxxxxx/开头的,复制xxxxxx过来" />
      </StackPanel>
      <StackPanel Margin="0,12,0,0" Orientation="Horizontal">
        <ui:TextBlock
          Width="60"
          VerticalAlignment="Center"
          Text="cookie" />
        <ui:TextBox
          x:Name="tbCookie"
          Width="660"
          Height="36"
          VerticalContentAlignment="Center"
          ToolTip="利用浏览器开发者工具,从网络-请求标头中获取" />
      </StackPanel>
      <StackPanel
        Margin="0,12,0,0"
        HorizontalAlignment="Center"
        Orientation="Horizontal">
        <ui:Button
          x:Name="btnDownload"
          Height="32"
          Appearance="Primary"
          Click="Download_Click"
          Content="开始下载"
          CornerRadius="4 0 0 4"
          ToolTip="默认下载到程序根目录下,文件日期为作品发布日期" />
        <ui:Button
          x:Name="btnParseJson"
          Height="32"
          Appearance="Primary"
          Click="ParseJson_Click"
          Content="..."
          CornerRadius="0 4 4 0"
          ToolTip="解析从web或者postman保存的json数据" />
      </StackPanel>
      <TextBlock
        Width="700"
        Margin="0,12,0,0"
        Foreground="Gray"
        MouseDown="CopyUrl"
        Text="被快手风控不要慌,浏览器打开快手网页版,扫码登陆,点击我复制网址,粘贴到浏览器打开。打开后如果有很长很长的json数据返回,就对了。复制json保存到本地json文件,然后用第二个按钮解析json数据即可下载。"
        TextWrapping="Wrap" />
      <Expander Margin="0,12,0,0" Header="更多选项">
        <StackPanel Orientation="Horizontal">
          <CheckBox
            x:Name="cbAddDate"
            Margin="12,0,0,0"
            VerticalAlignment="Center"
            Content="文件名前加上日期"
            IsChecked="True"
            ToolTip="文件名前面加上类似2024-01-02 13-00-00的标识,方便排序" />
          <CheckBox
            x:Name="cbLongInterval"
            Margin="12,0,0,0"
            VerticalAlignment="Center"
            Content="增加作品下载延时"
            IsChecked="True"
            ToolTip="默认勾选,作品间下载延时5~10秒。取消勾选1~5秒随机,可能被风控" />
        </StackPanel>
      </Expander>
    </StackPanel>
    <StackPanel
      Grid.Row="1"
      Margin="0,0,0,-2"
      VerticalAlignment="Bottom">
      <TextBlock x:Name="tbProgress" HorizontalAlignment="Center" />
      <ProgressBar x:Name="progress" Height="8" />
    </StackPanel>
    <ui:Button
      x:Name="infoButton"
      Grid.Row="1"
      Width="32"
      Height="32"
      Margin="0,0,8,8"
      Padding="0"
      HorizontalAlignment="Right"
      VerticalAlignment="Bottom"
      Click="Info_Click"
      CornerRadius="16"
      FontSize="24"
      Icon="{ui:SymbolIcon Info28}"
      ToolTip="鸣谢" />
    <ui:Flyout
      x:Name="flyout"
      Grid.Row="1"
      HorizontalAlignment="Right">
      <ui:TextBlock Text="鸣谢: &#xA;1. Microsoft Presentation Foundation&#xA;2. WPF-UI&#xA;3. RestSharp&#xA;4. Newtonsoft.Json&#xA;5. Downloader&#xA;6. Icon from FlatIcon" />
    </ui:Flyout>
  </Grid>
</ui:FluentWindow>

  1. 后台逻辑没有使用MVVM,就是图方便。
点击查看代码
using KuaishouDownloader.Models;
using Newtonsoft.Json;
using RestSharp;
using System.Diagnostics;
using System.IO;
using System.Text.RegularExpressions;
using System.Windows;
using Wpf.Ui;
using Wpf.Ui.Controls;

namespace KuaishouDownloader
{
    /// <summary>
    /// Interaction logic for MainWindow.xaml
    /// </summary>
    public partial class MainWindow
    {
        string downloadFolder = AppContext.BaseDirectory;
        SnackbarService? snackbarService = null;

        public MainWindow()
        {
            InitializeComponent();
            this.Loaded += MainWindow_Loaded;
        }

        private void MainWindow_Loaded(object sender, RoutedEventArgs e)
        {
            snackbarService = new SnackbarService();
            snackbarService.SetSnackbarPresenter(snackbarPresenter);

            if (File.Exists("AppConfig.json"))
            {
                var model = JsonConvert.DeserializeObject<AppConfig>(File.ReadAllText("AppConfig.json"));
                if (model != null)
                {
                    tbUid.Text = model.Uid;
                    tbCookie.Text = model.Cookie;
                }
            }
        }

        private void Theme_Click(object sender, RoutedEventArgs e)
        {
            if (Wpf.Ui.Appearance.ApplicationThemeManager.GetAppTheme() == Wpf.Ui.Appearance.ApplicationTheme.Light)
            {
                themeButton.Icon = new SymbolIcon(SymbolRegular.WeatherSunny48);
                Wpf.Ui.Appearance.ApplicationThemeManager.Apply(Wpf.Ui.Appearance.ApplicationTheme.Dark);
            }
            else
            {
                themeButton.Icon = new SymbolIcon(SymbolRegular.WeatherMoon48);
                Wpf.Ui.Appearance.ApplicationThemeManager.Apply(Wpf.Ui.Appearance.ApplicationTheme.Light);
            }
        }

        private async void Download_Click(object sender, RoutedEventArgs e)
        {
            try
            {
                btnDownload.IsEnabled = false;
                btnParseJson.IsEnabled = false;

                if (string.IsNullOrEmpty(tbUid.Text) || string.IsNullOrEmpty(tbCookie.Text))
                {
                    snackbarService?.Show("提示", $"请输入uid以及cookie", ControlAppearance.Caution, null, TimeSpan.FromSeconds(3));
                    return;
                }

                var json = JsonConvert.SerializeObject(new AppConfig() { Uid = tbUid.Text, Cookie = tbCookie.Text }, Formatting.Indented);
                File.WriteAllText("AppConfig.json", json);

                var options = new RestClientOptions("https://live.kuaishou.com")
                {
                    Timeout = TimeSpan.FromSeconds(15),
                    UserAgent = "Mozilla/5.0 (Windows NT 10.0; Win64; x64) AppleWebKit/537.36 (KHTML, like Gecko) Chrome/127.0.0.0 Safari/537.36",
                };
                var client = new RestClient(options);
                var request = new RestRequest($"/live_api/profile/public?count=9999&pcursor=&principalId={tbUid.Text}&hasMore=true", Method.Get);
                request.AddHeader("host", "live.kuaishou.com");
                request.AddHeader("connection", "keep-alive");
                request.AddHeader("cache-control", "max-age=0");
                request.AddHeader("sec-ch-ua", "\"Not)A;Brand\";v=\"99\", \"Google Chrome\";v=\"127\", \"Chromium\";v=\"127\"");
                request.AddHeader("sec-ch-ua-mobile", "?0");
                request.AddHeader("sec-ch-ua-platform", "\"Windows\"");
                request.AddHeader("upgrade-insecure-requests", "1");
                request.AddHeader("accept", "text/html,application/xhtml+xml,application/xml;q=0.9,image/avif,image/webp,image/apng,*/*;q=0.8,application/signed-exchange;v=b3;q=0.7");
                request.AddHeader("sec-fetch-site", "none");
                request.AddHeader("sec-fetch-mode", "navigate");
                request.AddHeader("sec-fetch-user", "?1");
                request.AddHeader("sec-fetch-dest", "document");
                request.AddHeader("accept-encoding", "gzip, deflate, br, zstd");
                request.AddHeader("accept-language", "zh,en;q=0.9,zh-CN;q=0.8");
                request.AddHeader("cookie", tbCookie.Text);
                request.AddHeader("x-postman-captr", "9467712");
                RestResponse response = await client.ExecuteAsync(request);
                Debug.WriteLine(response.Content);

                var model = JsonConvert.DeserializeObject<KuaishouModel>(response.Content!);
                if (model == null || model?.Data?.List == null || model?.Data?.List?.Count == 0)
                {
                    snackbarService?.Show("提示", $"获取失败,可能触发了快手的风控机制,请等一段时间再试。", ControlAppearance.Danger, null, TimeSpan.FromSeconds(3));
                    return;
                }

                await Download(model!);
            }
            finally
            {
                btnDownload.IsEnabled = true;
                btnParseJson.IsEnabled = true;
            }
        }

        private async void ParseJson_Click(object sender, RoutedEventArgs e)
        {
            try
            {
                btnDownload.IsEnabled = false;
                btnParseJson.IsEnabled = false;

                var dialog = new Microsoft.Win32.OpenFileDialog();
                dialog.Filter = "Json文件(.Json)|*.json";
                bool? result = dialog.ShowDialog();
                if (result == false)
                {
                    return;
                }
                var model = JsonConvert.DeserializeObject<KuaishouModel>(File.ReadAllText(dialog.FileName)!);
                if (model == null || model?.Data?.List == null || model?.Data?.List?.Count == 0)
                {
                    snackbarService?.Show("提示", $"不是正确的json", ControlAppearance.Caution, null, TimeSpan.FromSeconds(3));
                    return;
                }

                await Download(model!);
            }
            finally
            {
                btnDownload.IsEnabled = true;
                btnParseJson.IsEnabled = true;
            }
        }

        private async Task Download(KuaishouModel model)
        {
            progress.Value = 0;
            progress.Minimum = 0;
            progress.Maximum = (double)model?.Data?.List?.Count!;
            snackbarService?.Show("提示", $"解析到{model?.Data?.List?.Count!}个作品,开始下载", ControlAppearance.Success, null, TimeSpan.FromSeconds(5));

            imgHeader.Source = new System.Windows.Media.Imaging.BitmapImage(new Uri(model?.Data?.List?[0]?.Author?.Avatar!));
            tbNickName.Text = model?.Data?.List?[0]?.Author?.Name;

            string pattern = @"\d{4}/\d{2}/\d{2}/\d{2}";

            for (int i = 0; i < model?.Data?.List!.Count; i++)
            {
                DateTime dateTime = DateTime.Now;
                string fileNamePrefix = "";
                var item = model?.Data?.List[i]!;
                Match match = Regex.Match(item.Poster!, pattern);
                if (match.Success)
                {
                    dateTime = new DateTime(int.Parse(match.Value.Split("/")[0]), int.Parse(match.Value.Split("/")[1]),
                        int.Parse(match.Value.Split("/")[2]), int.Parse(match.Value.Split("/")[3]), 0, 0);
                    if (cbAddDate.IsChecked == true)
                        fileNamePrefix = match.Value.Split("/")[0] + "-" + match.Value.Split("/")[1] + "-" + match.Value.Split("/")[2]
                            + " " + match.Value.Split("/")[3] + "-00-00 ";
                }
                downloadFolder = Path.Combine(AppContext.BaseDirectory, "Download", item?.Author?.Name! + "(" + item?.Author?.Id! + ")");
                Directory.CreateDirectory(downloadFolder);

                switch (item?.WorkType)
                {
                    case "single":
                    case "vertical":
                    case "multiple":
                        {
                            await DownLoadHelper.Download(item?.ImgUrls!, dateTime, downloadFolder, fileNamePrefix);
                        }
                        break;
                    case "video":
                        {
                            await DownLoadHelper.Download(new List<string>() { item?.PlayUrl! }, dateTime, downloadFolder, fileNamePrefix);
                        }
                        break;
                }

                progress.Value = i + 1;
                tbProgress.Text = $"{i + 1} / {model?.Data?.List!.Count}";
                Random random = new Random();
                if (cbLongInterval.IsChecked == true)
                    await Task.Delay(random.Next(5000, 10000));
                else
                    await Task.Delay(random.Next(1000, 5000));
            }

            snackbarService?.Show("提示", $"下载完成,共下载{model?.Data?.List!.Count}个作品", ControlAppearance.Success, null, TimeSpan.FromDays(1));
        }

        private void CopyUrl(object sender, System.Windows.Input.MouseButtonEventArgs e)
        {
            if (string.IsNullOrEmpty(tbUid.Text))
            {
                snackbarService?.Show("提示", "请输入uid以及cookie", ControlAppearance.Caution, null, TimeSpan.FromSeconds(3));
                return;
            }
            Clipboard.SetText($"https://live.kuaishou.com/live_api/profile/public?count=9999&pcursor=&principalId={tbUid.Text}&hasMore=true");

            snackbarService?.Show("提示", "复制完成,请粘贴到浏览器打开", ControlAppearance.Success, null, TimeSpan.FromSeconds(3));
        }

        private void Info_Click(object sender, RoutedEventArgs e)
        {
            flyout.IsOpen = true;
        }
    }
}
  1. 下载类,下载完文件后,将文件的日志修改为发表日志,方便排序以及数据分析。
点击查看代码
public static async Task Download(List<string> urls, DateTime dateTime, string downloadFolder, string fileNamePrefix)
{
    string file = string.Empty;
    try
    {
        var downloader = new DownloadService();
        foreach (var url in urls)
        {
            Uri uri = new Uri(url);
            file = downloadFolder + "\\" + fileNamePrefix + Path.GetFileName(uri.LocalPath);
            if (!File.Exists(file))
                await downloader.DownloadFileTaskAsync(url, file);

            //修改文件日期时间为发博的时间
            File.SetCreationTime(file, dateTime);
            File.SetLastWriteTime(file, dateTime);
            File.SetLastAccessTime(file, dateTime);
        }
    }
    catch
    {
        Debug.WriteLine(file);
        Trace.Listeners.Add(new TextWriterTraceListener(downloadFolder + "\\_FailedFiles.txt", "myListener"));
        Trace.TraceInformation(file);
        Trace.Flush();
    }
}
  1. 源码分享
    完整版代码已上传到Github
    https://github.com/hupo376787/KuaishouDownloader
    ,喜欢的点一下Star谢谢。

4. 下载使用

打开
https://github.com/hupo376787/KuaishouDownloader/releases/tag/1.0
,点击下载zip文件,解压缩后,就可以像开头那样使用了。
image
image

开心一刻

现实中,我有一个异性游戏好友,昨天我心情不好,找她聊天

我:我们两个都好久没有坐下来好好聊天了

她:你不是有女朋友吗

我:人家不需要我这种穷人啊

她:难道我需要吗

难道我需要吗

前情回顾

从源码分析 SpringBoot 的 LoggingSystem → 它是如何绑定日志组件的
从源码的角度讲述了 Spring Boot 的 LoggingSystem 与日志组件的绑定,默认情况下绑定的是 Logback;但当我们具体去看 Spring Boot 的日志打印,却发现用的是
spring-jcl
,通过它适配了
slf4j
,真正的日志打印还得依赖具体的日志组件,默认情况下使用的是
logback
;那这么说来,Spring Boot 的日志打印与 Spring Boot 的 LoggingSystem 貌似没关系呀?

到底有没有关系,有何关系,我们慢慢往下看;先声明下

后面的分析都是基于 Spring Boot 默认的 Logback,其他日志组件可能有所不同,大家别带入错了

LoggerFactory

不管是我们用的
slf4j
方式

private static final Logger LOGGER = LoggerFactory.getLogger(TestWeb.class);

还是 Spring Boot 用的
spring-jcl
方式

private static final Log logger = LogFactory.getLog(SpringApplication.class);

都会通过 slf4j 的
org.slf4j.LoggerFactory#getLogger(java.lang.String)
方法来获取
Logger

public static Logger getLogger(String name) {
    ILoggerFactory iLoggerFactory = getILoggerFactory();
    return iLoggerFactory.getLogger(name);
}

LoggerFactory 被
final
修饰,且其构造方法是
private
,不能被继承,也不能在其他地方
new
,纯纯就是一个工具类;它
import

StaticLoggerBinder

import org.slf4j.impl.StaticLoggerBinder;

但大家去看下
slf4j-api
的包结构

slf4j包结构

根本就没有
StaticLoggerBinder
呀?这也可以?这里其实涉及到一个细节

编译后的 class,可以选择性的打包进 jar,运行的时候只要保证依赖的 class 被正常加载了就行,至于是否在同个 jar 包下并没有关系

slf4j 1.7 源码中其实是有 StaticLoggerBinder 的

slf4j_StaticLoggerBinder

只是打包的时候剔除了

slf4j_剔除StaticLogggerBinder

所以,如果使用 1.7.x 及以下的
slf4j
,必须还得结合有
org.slf4j.impl.StaticLoggerBinder
的日志组件,比如
logback

logback1.2.12_StaticLoggerBinder

这是不是又是个细节,你们是不是又学到了?

又是个细节

StaticLoggerBinder

我们对它进行提炼下

/**
 * The unique instance of this class.
 */
private static StaticLoggerBinder SINGLETON = new StaticLoggerBinder();

static {
    SINGLETON.init();
}

private StaticLoggerBinder() {
    defaultLoggerContext.setName(CoreConstants.DEFAULT_CONTEXT_NAME);
}

private LoggerContext defaultLoggerContext = new LoggerContext();

public static StaticLoggerBinder getSingleton() {
    return SINGLETON;
}

这是不是
饿汉式单例
的实现?那么 StaticLoggerBinder 的
LoggerContext defaultLoggerContext
是不是也可以当做单例来看待?

LoggerContext

同样,我们对它进行精炼,重点关注
root

size

loggerCache

LoggerContext()

getLogger(final String name)

public class LoggerContext extends ContextBase implements ILoggerFactory, LifeCycle {

    final Logger root;
    private int size;

    private Map<String, Logger> loggerCache;

    public LoggerContext() {
        super();
        this.loggerCache = new ConcurrentHashMap<String, Logger>();

        this.loggerContextRemoteView = new LoggerContextVO(this);
        this.root = new Logger(Logger.ROOT_LOGGER_NAME, null, this);
        this.root.setLevel(Level.DEBUG);
        loggerCache.put(Logger.ROOT_LOGGER_NAME, root);
        initEvaluatorMap();
        size = 1;
        this.frameworkPackages = new ArrayList<String>();
    }

    public final Logger getLogger(final Class<?> clazz) {
        return getLogger(clazz.getName());
    }

    @Override
    public final Logger getLogger(final String name) {

        if (name == null) {
            throw new IllegalArgumentException("name argument cannot be null");
        }

        // if we are asking for the root logger, then let us return it without
        // wasting time
        if (Logger.ROOT_LOGGER_NAME.equalsIgnoreCase(name)) {
            return root;
        }

        int i = 0;
        Logger logger = root;

        // check if the desired logger exists, if it does, return it
        // without further ado.
        Logger childLogger = (Logger) loggerCache.get(name);
        // if we have the child, then let us return it without wasting time
        if (childLogger != null) {
            return childLogger;
        }

        // if the desired logger does not exist, them create all the loggers
        // in between as well (if they don't already exist)
        String childName;
        while (true) {
            int h = LoggerNameUtil.getSeparatorIndexOf(name, i);
            if (h == -1) {
                childName = name;
            } else {
                childName = name.substring(0, h);
            }
            // move i left of the last point
            i = h + 1;
            synchronized (logger) {
                childLogger = logger.getChildByName(childName);
                if (childLogger == null) {
                    childLogger = logger.createChildByName(childName);
                    loggerCache.put(childName, childLogger);
                    incSize();
                }
            }
            logger = childLogger;
            if (h == -1) {
                return childLogger;
            }
        }
    }

    private void incSize() {
        size++;
    }

    int size() {
        return size;
    }
}
  1. root

    Logger root 定义了最顶层的日志记录规则,可以被视为所有其他
    Logger
    对象的父级,并且它的配置会应用于所有的日志记录,除非被特定的
    Logger
    配置所覆盖

  2. size

    Logger 数量,也就是 loggerCache 的 size

  3. loggerCache

    Map<String, Logger> loggerCache 缓存了应用中所有的 Logger 实例;Logger 实例之间存在父子关系,涉及到日志规则的继承与覆盖

  4. LoggerContext()

    初始化 loggerCache,实例化 Logger root,并将 root 放到 loggerCache 中

  5. getLogger(final String name)

    先判断是否是 root,是则直接返回,不是则从 loggerCache 获取,获取到则直接返回;若还是没获取到,则说明当前 Logger 还没被创建,则通过
    while(true)
    按产品包逐层创建 Logger,绑定好 Logger 之间的父子关系,都 put 进 loggerCache 中


    Logger父子关系

当应用启动完成后,所有的 Logger 实例都被创建并缓存到 LoggerContext 的 loggerCache 中

logCache内容

配置文件加载

private static final Logger LOGGER = LoggerFactory.getLogger(TestWeb.class);

@GetMapping("hello")
public String hello(@RequestParam("name") String name) {
    LOGGER.info("hello接口入参:{}", name);
    return "hello, " + name;
}

直接
debug
跟进
LOGGER.info
,几次跟进后会来到 ch.qos.logback.classic.Logger#buildLoggingEventAndAppend

private void buildLoggingEventAndAppend(final String localFQCN, final Marker marker, final Level level, final String msg, 
                final Object[] params, final Throwable t) {
    LoggingEvent le = new LoggingEvent(localFQCN, this, level, msg, t, params);
    le.setMarker(marker);
    callAppenders(le);
}

这里涉及到事件机制,不细讲,大家可以去看:
设计模式之观察者模式 → 事件机制的底层原理
,我们把重点放到
callAppenders
上,直译就是调用
appender
,appender 在哪?是不是在配置文件中

appender

配置文件什么时候加载的,在 StaticLoggerBinder 加载的时候就完成了

private static StaticLoggerBinder SINGLETON = new StaticLoggerBinder();

static {
    SINGLETON.init();
}

/**
 * Package access for testing purposes.
 */
void init() {
    try {
        try {
            new ContextInitializer(defaultLoggerContext).autoConfig();
        } catch (JoranException je) {
            Util.report("Failed to auto configure default logger context", je);
        }
        // logback-292
        if (!StatusUtil.contextHasStatusListener(defaultLoggerContext)) {
            StatusPrinter.printInCaseOfErrorsOrWarnings(defaultLoggerContext);
        }
        contextSelectorBinder.init(defaultLoggerContext, KEY);
        initialized = true;
    } catch (Exception t) { // see LOGBACK-1159
        Util.report("Failed to instantiate [" + LoggerContext.class.getName() + "]", t);
    }
}

autoConfig()
就不细跟了(感兴趣的可以去看:
从源码来理解slf4j的绑定,以及logback对配置文件的加载
),执行完之后,我们看下 LoggerContext 的
objectMap

LoggerContext

简单来说,就是将日志配置文件 (logback.xml)加载到了 LoggerContext 的 objectMap 中;我们再回到 Spring Boot 的 LoggingSystem,以
LoggingApplicationListener#onApplicationEnvironmentPreparedEvent
方法作为起点(细节就不跟了,大家直接去看:
从源码分析 SpringBoot 的 LoggingSystem → 它是如何绑定日志组件的
),我们直接来看
LogbackLoggingSystem#reinitialize

@Override
protected void reinitialize(LoggingInitializationContext initializationContext) {
    getLoggerContext().reset();
    getLoggerContext().getStatusManager().clear();
    loadConfiguration(initializationContext, getSelfInitializationConfig(), null);
}

getLoggerContext()
就不用多说了吧,就是获取全局唯一的 LoggerContext 实例,重点看它的
reset()

@Override
public void reset() {
    resetCount++;
    super.reset();
    initEvaluatorMap();
    initCollisionMaps();
    root.recursiveReset();
    resetTurboFilterList();
    cancelScheduledTasks();
    fireOnReset();
    resetListenersExceptResetResistant();
    resetStatusListeners();
}

super.reset()

public void reset() {

    removeShutdownHook();
    getLifeCycleManager().reset();
    propertyMap.clear();
    objectMap.clear();
}

reset 执行完之后,LoggerContext 的 objectMap 被置空了

reset

说白了就是 Spring Boot 把 Logback 加载的日志配置给清空了,接下来就是 Spring Boot 加载日志配置信息到 LoggerContext 中,也就是如下代码完成的事

loadConfiguration(initializationContext, getSelfInitializationConfig(), null);

不继续跟了,感兴趣的自行去跟;该方法执行完之后,LoggerContext 的 objectMap 又有内容了

reset之后LoggerContext_objectMap

总结下

  1. StaticLoggerBinder 类加载的时候,会加载日志配置文件内容到 LoggerContext 的 objectMap 中
  2. Spring Boot 启动过程中会重置 LoggerContext,其中包括 LoggerContext 的 objectMap,然后重新加载日志配置文件内容到 LoggerContext 的 objectMap中

所以甭管是使用
spring-jcl
,还是使用
slf4j
进行的日志打印,用到的 Appenders 都是 Spring Boot 启动过程中从日志配置文件中加载的,那么 spring-jcl 与 LoggingSystem 有什么关系,大家清楚了吗?

补充个问题

将 logback.xml 重命名成 logback-spring.xml,为什么 Spring Boot 的日志以及我们的业务日志都能正常打印,并且与使用 logback.xml 时一样?

这个问题要是答不上来,那你们肯定是没仔细看
从源码分析 SpringBoot 的 LoggingSystem → 它是如何绑定日志组件的
,里面详细介绍了 Spring Boot 对日志配置文件的加载

总结

  1. StaticLoggerBinder 类加载的时候,会加载日志配置文件内容到 LoggerContext

    Logback 1.2.12 默认日志配置文件的优先级


    logback.configurationFile > logback-test.xml > logback.xml

  2. Spring Boot 启动过程中会重置 LoggerContext,然后重新加载日志配置文件内容到 LoggerContext

    Spring Boot 2.7.18 先按优先级


    logback-test.groovy > logback-test.xml > logback.groovy > logback.xml


    如果如上四个都不存在,则继续按优先级


    logback-test-spring.groovy > logback-test-spring.xml > logback-spring.groovy > logback-spring.xml


    寻找日志配置文件

  3. 正因为 Spring Boot 启动过程中会重新加载日志配置文件内容到 LoggerContext,所以不管是
    spring-jcl
    还是
    slf4j
    打印,日志格式是一致的

    Spring Boot 拓展了日志配置文件的文件名

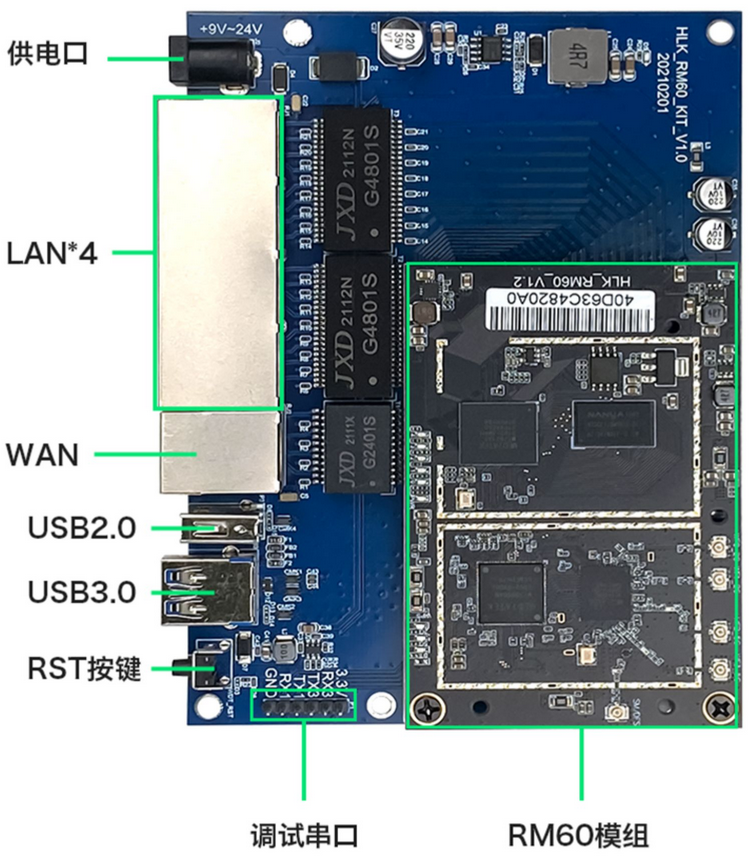
1. 简介

  • HLK-RM60官网


    https://www.hlktech.com/en/Goods-176.html

  • 采用联发科SOC,
    MT7621/MT7905/MT7975

  • 实际上采购的是
    MT7621
    ,
    NOR Flash
    版本(注意:固件烧录时要选择
    NOR Flash
    对应的镜像,而不是
    NAND Flash
    )

  • 128MB RAM + 16MB Flash(只有16MB Flash, openwrt二次开发时注意这个限制)

2. 功能需求

  • 将其下挂在我司的聚合路由器下,作为一个子网的交换机使用

  • 同时提供
    2.4G AP

    5G AP

  • 2.4G AP
    5G AP
    LAN
    下的子网设备要能够互相访问

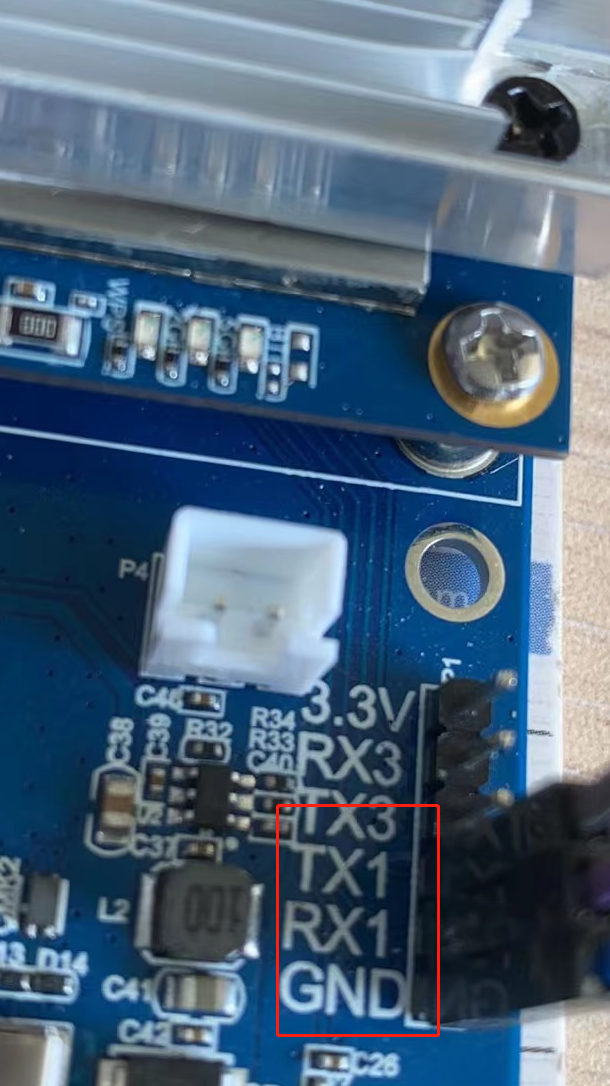
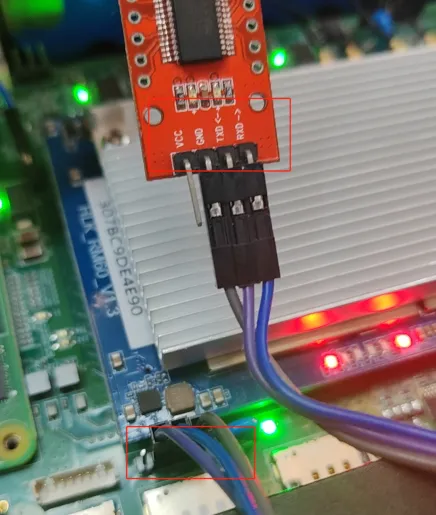
3. 调试串口

  • 调试串口使用
    TX1/RX1
    ,支持可变波特率,就使用常见的
    115200

4. 固件定制

4.1 获取SDK

4.2 编译准备

  • 编译环境
    Ubuntu 16.04
  • 安装依赖
    $ sudo apt-get install -y \
    make \
    cmake \
    gawk \
    ninja \
    g++ \
    gcc \
    libncurses5-dev \
    zlib1g-dev \
    bison \
    flex \
    unzip \
    autoconf \
    gettext \
    binutils \
    patch \
    bzip2 \
    libz-dev \
    asciidoc \
    subversion \
    quilt
    
  • 解压
    $ unzip wifi6-sdk-master.zip
    
  • 进入SDK源码目录
    $ cd wifi6-sdk-master/mtk-openwrt-lede-4.2.0.0/
    

4.3 配置成交换机模式

  • 在源码根目录下创建一个
    files/etc/config
    目录


  • files/etc/config
    下创建文件
    network
    ,用来将RM60上的所有网口都放到网桥
    br-lan
    中,即将其配置成交换机模式,默认管理IP为
    192.168.4.254
    ,文件内容如下:

    config interface 'loopback'
          option ifname 'lo'
          option proto 'static'
          option ipaddr '127.0.0.1'
          option netmask '255.0.0.0'
    
    config globals 'globals'
            option ula_prefix 'fda1:7234:8df5::/48'
    
    config interface 'lan'
            option type 'bridge'
            option proto 'static'
            option ipaddr '192.168.4.254'
            option netmask '255.255.255.0'
            option ip6assign '60'
            option _orig_ifname 'eth0 ra0 rax0'
            option _orig_bridge 'true'
            option ifname 'apcli0 apclix0 eth0 eth1 ra0 rax0'
    
    config switch
            option name 'switch0'
            option reset '1'
            option enable_vlan '1'
    
    config switch_vlan
            option device 'switch0'
            option vlan '1'
            option ports '0 1 2 3 6'
    
    config switch_vlan
            option device 'switch0'
            option vlan '2'
            option ports '4 5'
    

4.4 开启SSH


  • files/etc/config
    下创建文件
    dropbear
    ,用来开启SSH,内容如下
    config dropbear
            option Port '22'
            option GatewayPorts 'on'
            option PasswordAuth 'on'
    

4.5 关闭DHCP服务

  • 需要关闭RM60的DHCP服务,子网设备的IP由上一级路由器分配


  • files/etc/config
    下创建文件
    dhcp
    , 用来关闭DHCP服务,内容如下

    config dnsmasq
            option domainneeded '1'
            option boguspriv '1'
            option filterwin2k '0'
            option localise_queries '1'
            option rebind_protection '1'
            option rebind_localhost '1'
            option local '/lan/'
            option domain 'lan'
            option expandhosts '1'
            option nonegcache '0'
            option authoritative '1'
            option readethers '1'
            option leasefile '/tmp/dhcp.leases'
            option resolvfile '/tmp/resolv.conf.auto'
            option localservice '1'
    
    config dhcp 'lan'
            option interface 'lan'
            option dhcpv6 'server'
            option ra 'server'
            option ignore '1'
            option ra_management '1'
    
    config dhcp 'wan'
            option interface 'wan'
            option ignore '1'
    
    config odhcpd 'odhcpd'
            option maindhcp '0'
            option leasefile '/tmp/hosts/odhcpd'
            option leasetrigger '/usr/sbin/odhcpd-update'
    

4.6 配置AP

  • AP的默认配置,后续可以通过web或配置文件修改

4.6.1 5G AP

  • 5G AP
    对应的配置文件路径:
    package/mtk/drivers/wifi-profile/files/mt7915/mt7915.dbdc.b1.dat

  • 修改如下条目,注意是修改,不是添加
    (tips: #后边的注释不要添加到文件中)

    SSID1=AP_5G								# AP名称
    EncrypType=AES									# 加密方式AES
    AuthMode=WPAPSKWPA2PSK							# 认证方式
    WPAPSK1=12345678								# 密码
    RekeyMethod=TIME												
    

4.6.2 2.4G AP

  • 2.4G AP
    对应的配置文件为:
    package/mtk/drivers/wifi-profile/files/mt7915/mt7915.dbdc.b0.dat

  • 修改如下条目,注意是修改,不是添加
    (tips: #后边的注释不要添加到文件中)

    SSID1=AP_2.4G								# AP名称
    EncrypType=AES									# 加密方式AES
    AuthMode=WPAPSKWPA2PSK							# 认证方式
    WPAPSK1=12345678								# 密码
    RekeyMethod=TIME										
    

4.6.2 禁止SDK修改AP相关的配置文件

  • SDK中有一个脚本,在烧录固件后第一次开机时会修改用户自定义的配置文件,奇葩!既然你这个SDK已经提供了默认的配置文件,为啥子还要再修改一次呢?为了排查这个问题,浪费了大量时间!!!

  • 脚本路径:
    mtk-openwrt-lede-4.2.0.0/package/base-files/files/bin/config_generate

  • 注释该脚本中的如下内容

4.7 增加一个VERSION文件


  • files/etc/config
    下创建一个文件
    VERSION
    ,用来记录一些注意事项,比如固件编译/发布时间,注意事项等

  • 这里先简单将固件修改的日期写入
    VERSION
    文件中

    mtk-openwrt-lede-4.2.0.0$ date > files/etc/config/VERSION
    

4.8 web页面修改成中文

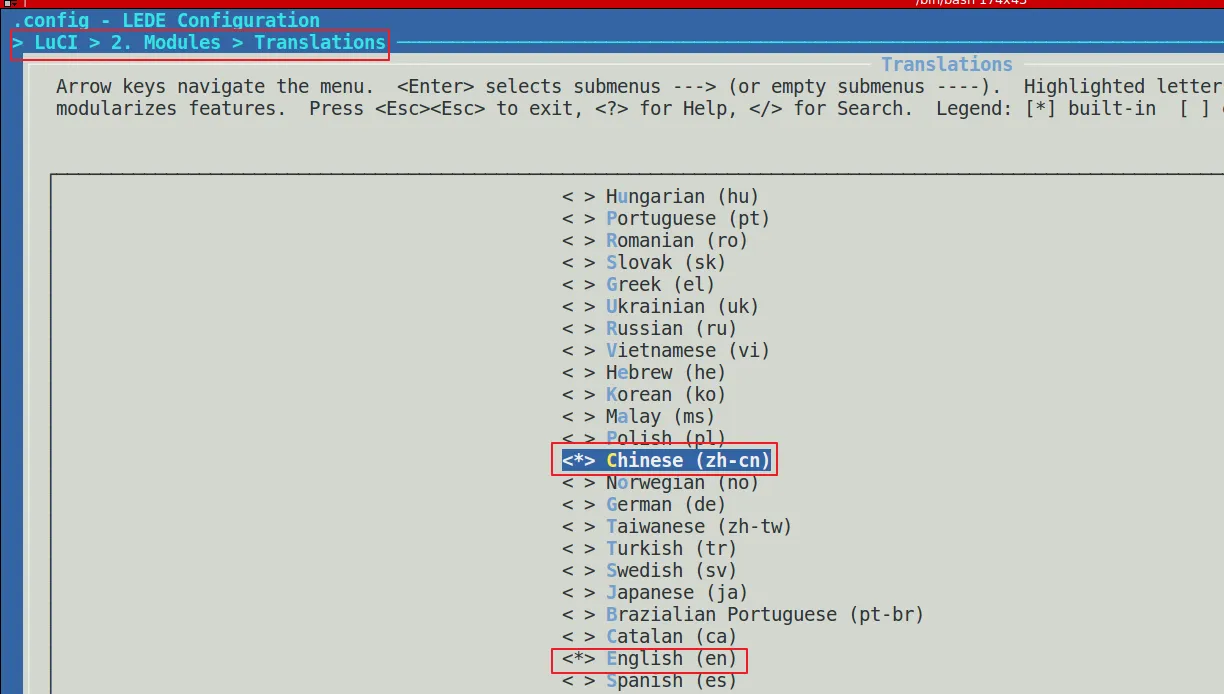
  • 进入
    hlk_build
    目录,进行
    menuconfig
    配置

    $ cd hlk_build
    $ hlk_build$ ./build.sh RM60 menuconfig
    
  • 选中
    Chinese

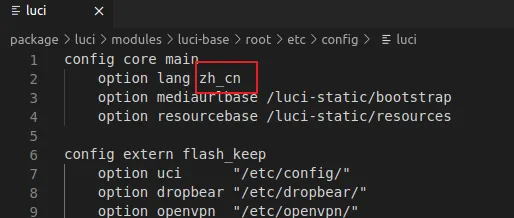
    Enlish


  • package/luci/modules/luci-base/root/etc/config/luci
    ,如下图

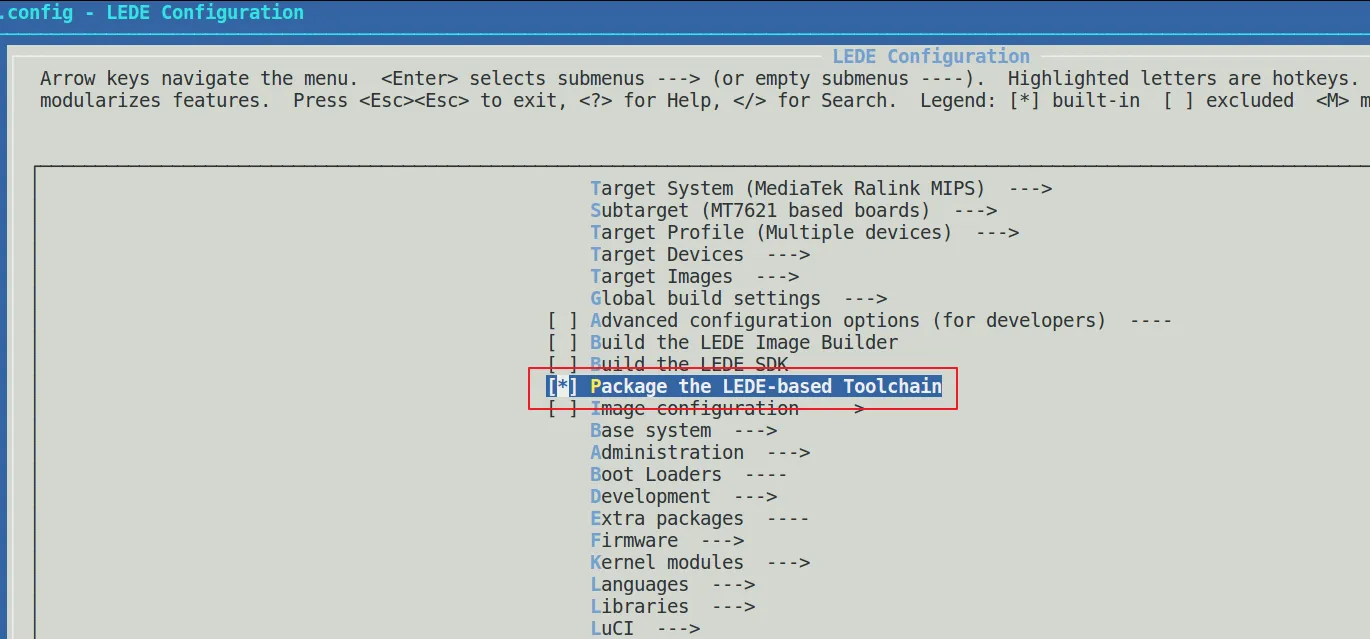
4.9 生成交叉编译工具链

  • menuconfig
    菜单中选中如下项

4.10 固件编译

  • 进入
    hlk_build
    目录

    wifi6-sdk-master$ cd mtk-openwrt-lede-4.2.0.0/hlk_build/
    
  • 执行
    build.sh
    ,开始编译

    hlk_build$ ./build.sh RM60 all
    
  • 编译输出路径
    bin/targets/ramips/mt7621/


    • lede-ramips-mt7621-mt7621-rfb-ax-nor-squashfs-sysupgrade.bin
      就是编译得到的固件

    • lede-toolchain-ramips-mt7621_gcc-5.4.0_musl-1.1.16.Linux-x86_64.tar.bz2
      生成的交叉编译工具链


5. 固件烧录

5.1 烧录原理

  • 烧录过程总的来说就是在RM60的
    U-Boot
    启动过程中,会到一个tftp服务器查找固件,找到后就会拉取固件进行升级,因此要保证RM60能够访问指定的tftp服务器

5.2 固件烧录

  • tftpd
    下载路径


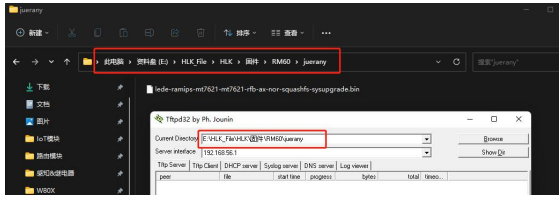
    https://bitbucket.org/phjounin/tftpd64/downloads/


  • 将固件和
    tftpd
    放到同一个目录下

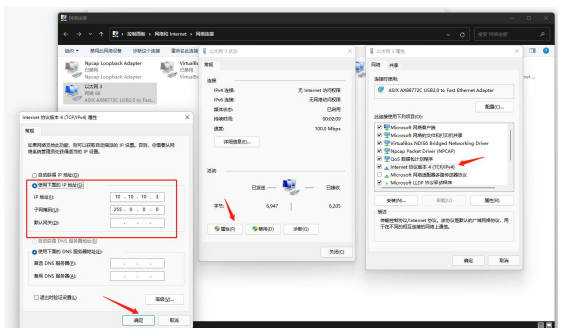
  • 电脑连接模块
    lan
    或者
    wan
    口,设置静态IP(下图中的IP不对,根据实际情况进行设置,要确保RM60和电脑网络互通)

  • 将调试串口接到电脑上,参考
    3. 调试串口

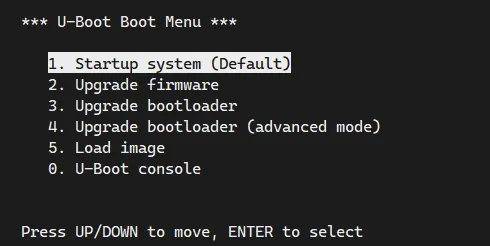
  • 上电开机,
    U-Boot
    打印如下,选择
    2
    进入固件升级

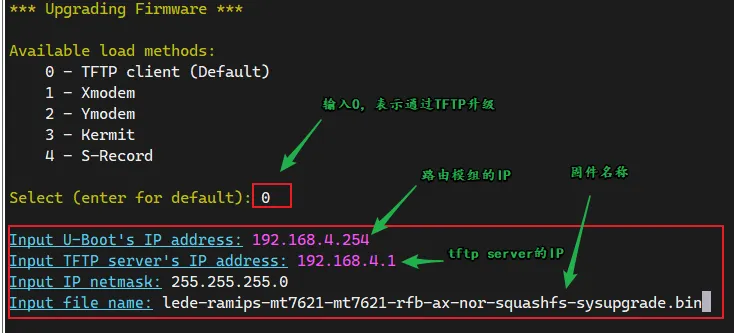
  • 选择
    0
    ,设置RM60 IP和tftpd服务器的IP,填写固件名称

  • 如果中途输入错误的话,直接
    Ctrl + C
    进入到命令行,输入
    boot
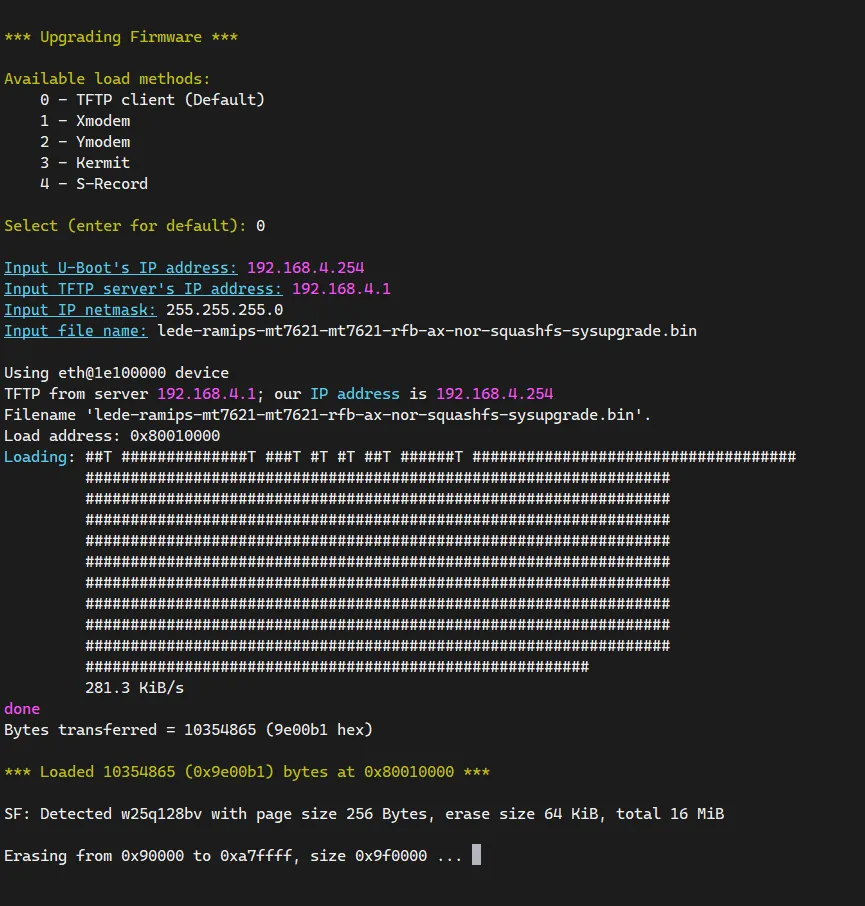
    指令回到上一级页面,重新输入

  • 回车,开始升级

6. 默认用户名密码

  • 用户名:
    root
  • 密 码:
    admin

7. 写在最后

禁止转载到CSDN !!! 其它随意,转载请注明出处

不建议去查看aceEditor官方,最好去
github
查看

安装命令:

npm install react-ace

引入包:

import AceEditor from 'react-ace';
import 'ace-builds/src-noconflict/mode-sql'; // sql模式的包
import 'ace-builds/src-noconflict/mode-mysql';// mysql模式的包
import 'ace-builds/src-noconflict/theme-eclipse';// eclipse的主题样式

界面渲染:

<AceEditor
  mode='mysql'
  theme="eclipse"
name="app_code_editor"
fontSize={14}
showPrintMargin
showGutter
onChange={value => {
  console.log(value); // 输出代码编辑器内值改变后的值
}}
value={props.data.sql}
wrapEnabled
highlightActiveLine  //突出活动线
enableSnippets  //启用代码段
style={{ width: '100%', height: 300 }}
setOptions={{
  enableBasicAutocompletion: true,   //启用基本自动完成功能
  enableLiveAutocompletion: true,   //启用实时自动完成功能 (比如:智能代码提示)
  enableSnippets: true,  //启用代码段
  showLineNumbers: true,
  tabSize: 2,
}}
/>

操作至此就算完成了,但还存在问题,编辑器引入成功,但是引入的依赖包却找不到导致主题以及代码块无法正常使用

查阅API后发现安装的
react-ace
依赖包不完整,发现少了一个
ace-builds
的依赖包,发现问题后就重新安装了一遍,正确的安装命令:
npm install react-ace ace-builds
安装完
ace-builds
后发现引入的主题以及代码块能正常使用了,我们看一下演示效果
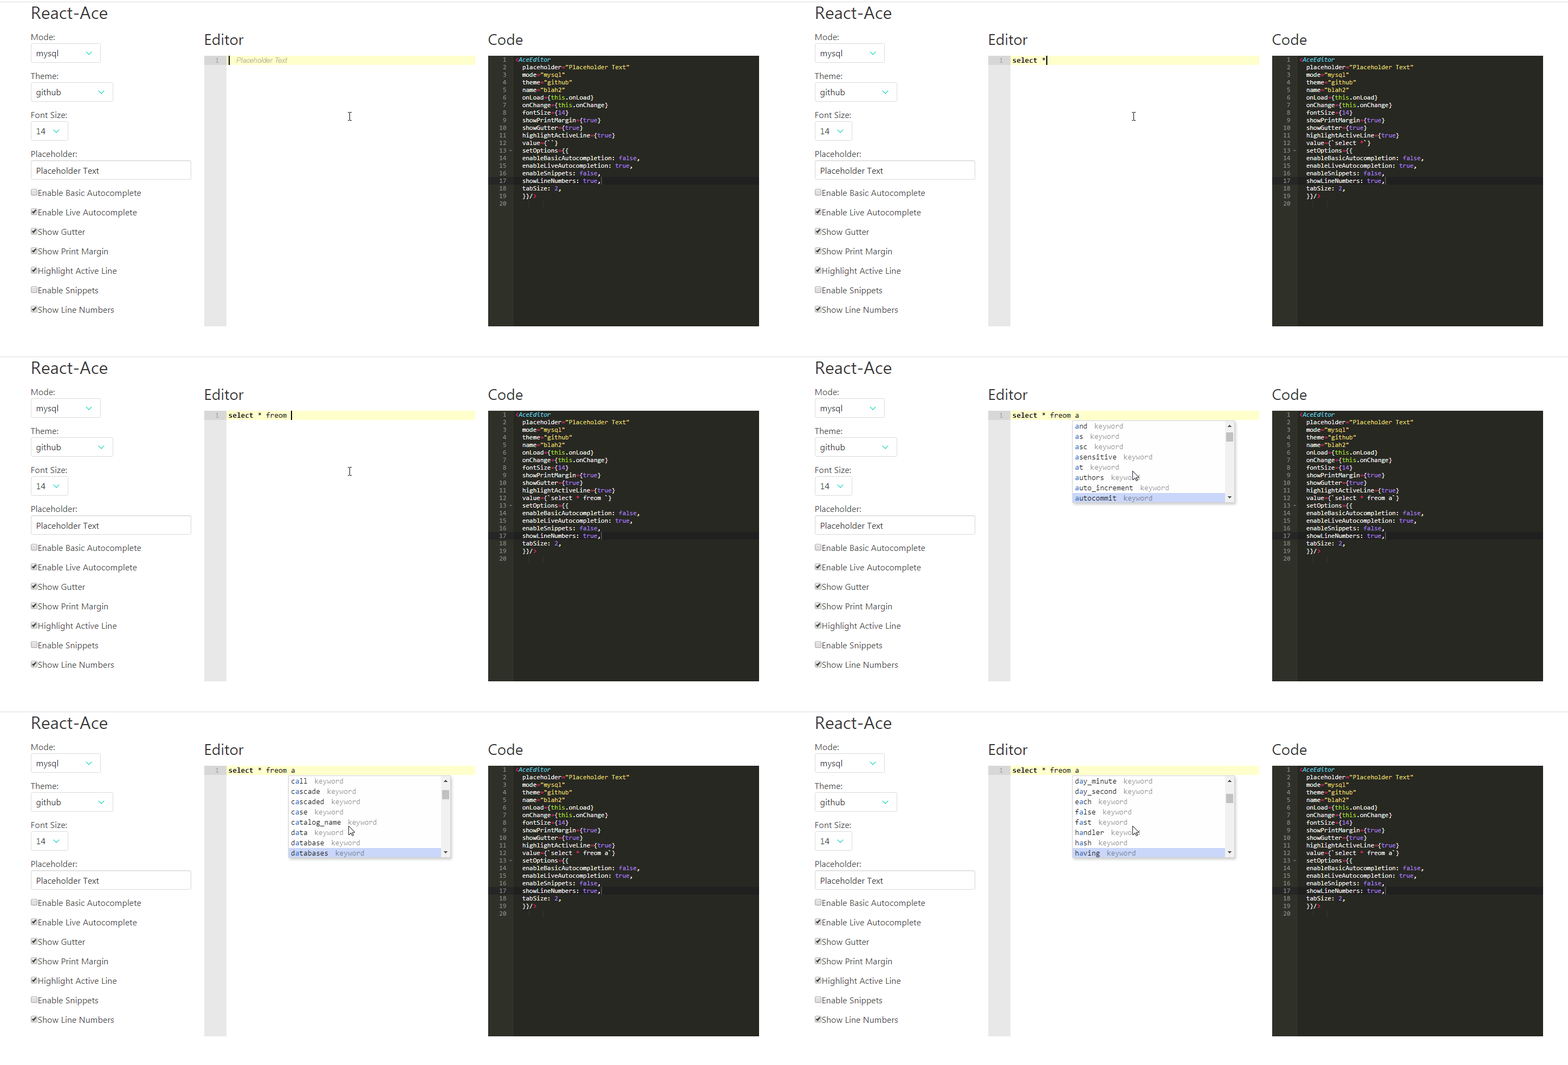
image
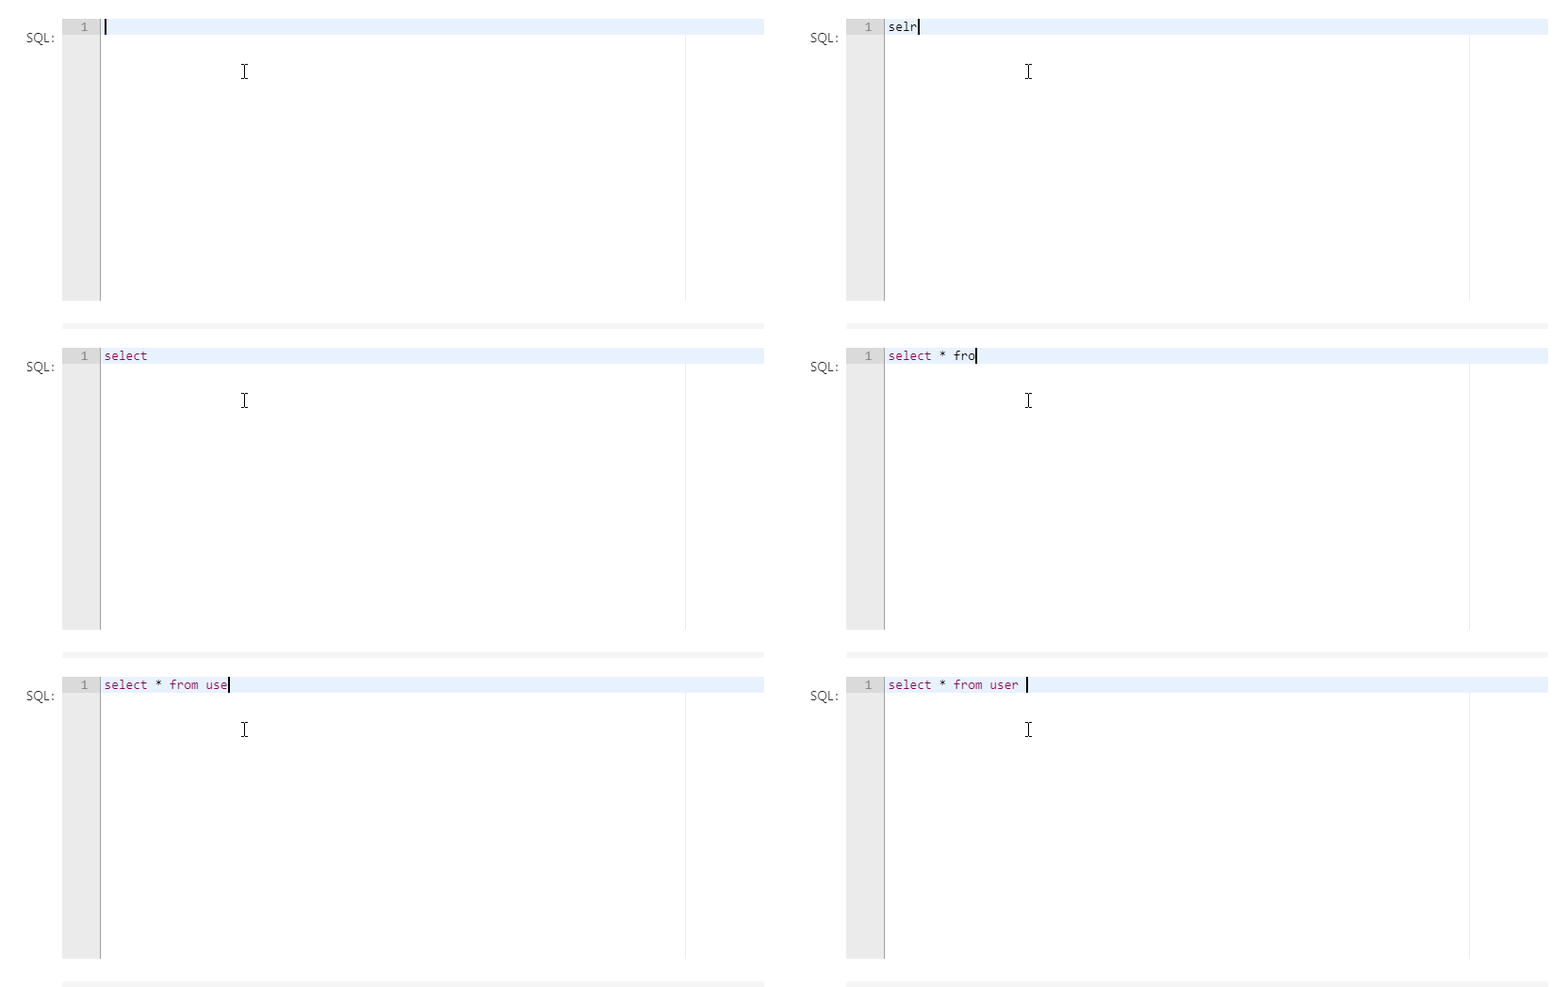
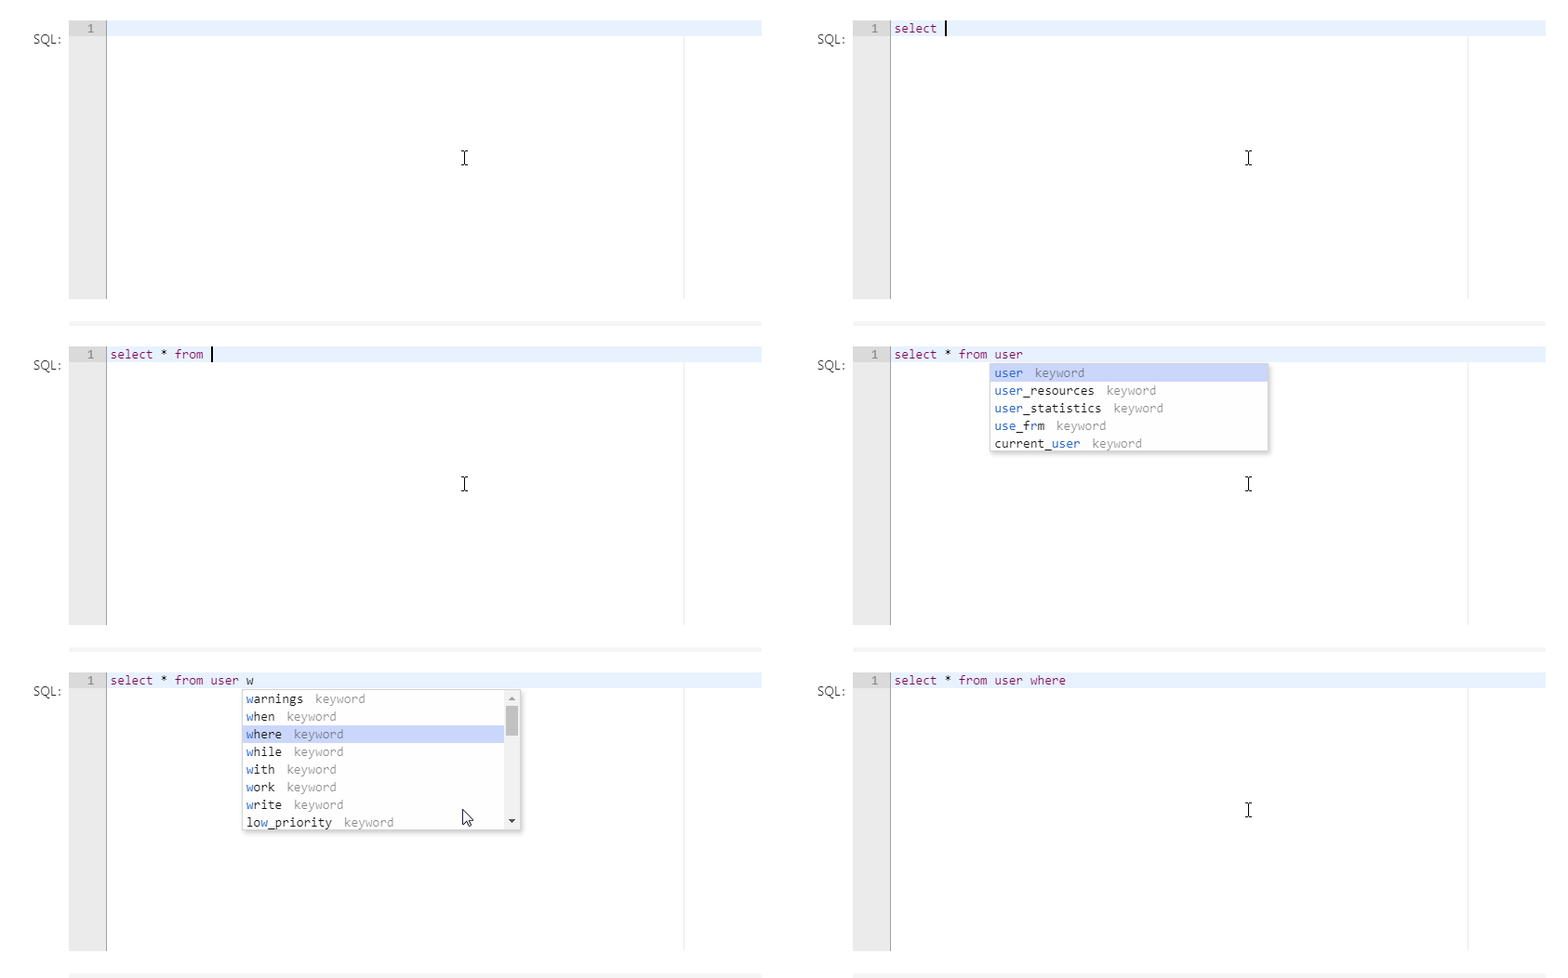
虽然已经能正常使用后,但还有一个问题,查看了官方的演示demo,启用实时自动完成功能后,输入会有代码提示块,但我们这个却没有代码提示。
我们先看一下个官方演示demo吧
image
检查我们的代码以及官方demo展示的代码,几乎一模一样,但就是不提示,经过多次尝试以及API的查看,发现我们引入的依赖包还不够,我们还需要引入另外一个
ace-builds
内的
ext-language_tools
依赖。

import 'ace-builds/src-noconflict/ext-language_tools';

引入后我们再来看一下效果图:
image

前言

最近遇到一个场景需要把大量的资源文件存储到 OSS 里,这里选的是腾讯的 COS 对象存储

(话说我接下来想搞的 SnapMix 项目也是需要大量存储的,我打算搭个 MinIO 把 24T 的服务器利用起来~)

为啥腾讯不搞个兼容
Amazon S3
协议的啊…… 官方的 SDK 和文档都奇奇怪怪的,感觉国内的厂商都不怎么重视文档、SDK这些,开发体验很差(特别点名微信小程序)

因为腾讯的 COS 不在 django-storages 的支持中,所以本文就没有使用这个库了,而是自己封装了一个 Storage,其实 Django 里要自定义一个 Storage 是很简单的。

OK,我在参考了一些互联网资源(以及官方文档、Github)之后,把腾讯的这个 COS 集成到 DjangoStarter 里了,不得不说 Django 这套东西还是好用,只要把
DEFAULT_FILE_STORAGE
存储后端切换到 COS ,就能实现
FileField, ImageField
这些全都自动通过 OSS 去存储和使用。

为了方便管理文件,我还用上了
django-filer
这个也算是方便,开箱即用,不过中文的 locale 有点问题,默认安装之后只能显示英文,如果需要中文得自己 fork 之后改一下(重命名 locale 目录)

PS:另外说一下,为了使用简单,我使用
django-filer
实现了在 admin 里管理静态资源,但这样流量会经过服务器,更好的做法是在前端直接上传文件到 OSS 里

本文的代码都是在 DjangoStarter 框架的基础上进行修改,在普通的 Django 项目中使用也没有问题,只是需要根据实际情况做一些修改(文件路径不同)

配置

编辑
src/config/settings/components/tencent_cos.py
文件

DEFAULT_FILE_STORAGE = "django_starter.contrib.storages.backends.TencentCOSStorage"

TENCENTCOS_STORAGE = {
    # 存储桶名称,必填
    "BUCKET": "",

    # 存储桶文件根路径,选填,默认 '/'
    "ROOT_PATH": "/",
    # 上传文件时最大缓冲区大小(单位 MB),选填,默认 100
    "UPLOAD_MAX_BUFFER_SIZE": 100,
    # 上传文件时分块大小(单位 MB),选填,默认 10
    "UPLOAD_PART_SIZE": 10,
    # 上传并发上传时最大线程数,选填,默认 5
    "UPLOAD_MAX_THREAD": 5,

    # 腾讯云存储 Python SDK 的配置参数,详细说明请参考腾讯云官方文档。
    # 注意:CONFIG中字段的大小写请与python-sdk中CosConfig的构造参数保持一致
    "CONFIG": {
        "Region": "ap-guangzhou",
        "SecretId": "",
        "SecretKey": "",
    }
}

这个配置里注释都很清楚了,根据实际情况填写 bucket、id、key 等配置即可。

Storage 实现

前面有说到我把 COS 集成到 DjangoStarter 里了,所以放到了
src/django_starter/contrib
下面

安装依赖

这里需要用到腾讯提供的 Python SDK,请先安装

pdm add cos-python-sdk-v5

编写代码

编辑
src/django_starter/contrib/storages/backends/cos.py
文件。

from io import BytesIO
from shutil import copyfileobj
from tempfile import SpooledTemporaryFile

from datetime import datetime, timezone
from django.conf import settings
from django.core.exceptions import ImproperlyConfigured
from django.core.files.storage import Storage
from django.utils.deconstruct import deconstructible
from qcloud_cos import CosConfig, CosS3Client
from qcloud_cos.cos_exception import CosServiceError
from importlib import metadata
import os.path

from django.core.files.base import File


class TencentCOSFile(File):
    def __init__(self, name, storage, file=None):
        super().__init__(file, name)
        self.name = name
        self._storage = storage
        self._file = None

    @property
    def file(self):
        if self._file is None:
            self._file = SpooledTemporaryFile()
            response = self._storage.client.get_object(
                Bucket=self._storage.bucket,
                Key=self.name,
            )
            raw_stream = response["Body"].get_raw_stream()
            with BytesIO(raw_stream.data) as file_content:
                copyfileobj(file_content, self._file)
            self._file.seek(0)
        return self._file

    @file.setter
    def file(self, value):
        self._file = value


@deconstructible
class TencentCOSStorage(Storage):
    """Tencent Cloud Object Storage class for Django pluggable storage system."""

    def path(self, name):
        return super(TencentCOSStorage, self).path(name)

    def __init__(self, bucket=None, root_path=None, config=None):
        setting = getattr(settings, "TENCENTCOS_STORAGE", {})
        self.bucket = bucket or setting.get("BUCKET", None)
        if self.bucket is None:
            raise ImproperlyConfigured("Must configure bucket.")

        self.root_path = root_path or setting.get("ROOT_PATH", "/")
        if not self.root_path.endswith("/"):
            self.root_path += "/"

        self.upload_max_buffer_size = setting.get("UPLOAD_MAX_BUFFER_SIZE", None)
        self.upload_part_size = setting.get("UPLOAD_PART_SIZE", None)
        self.upload_max_thread = setting.get("UPLOAD_MAX_THREAD", None)

        config_kwargs = config or setting.get("CONFIG", {})
        package_name = "cos-python-sdk-v5"  # 替换为您要查询的包的名称
        version = metadata.version(package_name)
        config_kwargs["UA"] = "tencentcloud-django-plugin-cos/0.0.1;cos-python-sdk-v5/" + version
        required = ["Region", "SecretId", "SecretKey"]
        for key in required:
            if key not in config_kwargs:
                raise ImproperlyConfigured("{key} is required.".format(key=key))

        config = CosConfig(**config_kwargs)
        self.client = CosS3Client(config)

    def _full_path(self, name):
        if name == "/":
            name = ""
        # p = safe_join(self.root_path, name).replace("\\", "/")
        # 乱起名的问题(自动在路径前加上 D:\ 之类的)终于解决了
        # 腾讯哪个人才想到用 Django 内部的 safe_join 方法代替 os.path.join 的?告诉我,我绝对不打死他!!!
        p = os.path.join(self.root_path, name).replace("\\", "/")
        return p

    def delete(self, name):
        self.client.delete_object(Bucket=self.bucket, Key=self._full_path(name))

    def exists(self, name):
        try:
            return bool(
                self.client.head_object(Bucket=self.bucket, Key=self._full_path(name))
            )
        except CosServiceError as e:
            if e.get_status_code() == 404 and e.get_error_code() == "NoSuchResource":
                return False
            raise

    def listdir(self, path):
        directories, files = [], []
        full_path = self._full_path(path)

        if full_path == "/":
            full_path = ""

        contents = []
        marker = ""
        while True:
            # return max 1000 objects every call
            response = self.client.list_objects(
                Bucket=self.bucket, Prefix=full_path.lstrip("/"), Marker=marker
            )
            contents.extend(response["Contents"])
            if response["IsTruncated"] == "false":
                break
            marker = response["NextMarker"]

        for entry in contents:
            if entry["Key"].endswith("/"):
                directories.append(entry["Key"])
            else:
                files.append(entry["Key"])
        # directories includes path itself
        return directories, files

    def size(self, name):
        head = self.client.head_object(Bucket=self.bucket, Key=self._full_path(name))
        return head["Content-Length"]

    def get_modified_time(self, name):
        head = self.client.head_object(Bucket=self.bucket, Key=self._full_path(name))
        last_modified = head["Last-Modified"]
        dt = datetime.strptime(last_modified, "%a, %d %b %Y %H:%M:%S %Z")
        dt = dt.replace(tzinfo=timezone.utc)
        if settings.USE_TZ:
            return dt
        # convert to local time
        return datetime.fromtimestamp(dt.timestamp())

    def get_accessed_time(self, name):
        # Not implemented
        return super().get_accessed_time(name)

    def get_created_time(self, name):
        # Not implemented
        return super().get_accessed_time(name)

    def url(self, name):
        return self.client.get_conf().uri(
            bucket=self.bucket, path=self._full_path(name)
        )

    def _open(self, name, mode="rb"):
        tencent_cos_file = TencentCOSFile(self._full_path(name), self)
        return tencent_cos_file.file

    def _save(self, name, content):
        upload_kwargs = {}
        if self.upload_max_buffer_size is not None:
            upload_kwargs["MaxBufferSize"] = self.upload_max_buffer_size
        if self.upload_part_size is not None:
            upload_kwargs["PartSize"] = self.upload_part_size
        if self.upload_max_thread is not None:
            upload_kwargs["MAXThread"] = self.upload_max_thread

        self.client.upload_file_from_buffer(
            self.bucket, self._full_path(name), content, **upload_kwargs
        )
        return os.path.relpath(name, self.root_path)

    def get_available_name(self, name, max_length=None):
        name = self._full_path(name)
        return super().get_available_name(name, max_length)

一些絮絮叨叨:

  • 这个代码是根据腾讯github上的代码修改来的,实话说写的乱七八糟,不堪入目,不过想到这也都是腾讯打工人应付工作写出来的东西,也就能理解了……
  • Class 前面的
    @deconstructible
    装饰器是 Django 内置的,用于确保在迁移时类可以被正确序列化
  • 原版的代码运行起来有很多奇奇怪怪的问题,后面仔细分析了一下代码才发现,腾讯的人才好端端的
    os.path.join
    不用,非要去用 Django 内部的 safe_join 方法,这个还是私有的,不然随便调用的… 真的逆天

参考资料