2024年8月

效果图

在头文件类中声明变量

TCHAR m_dayStr[4];    // 日期
TCHAR m_weekStr[
4];  // 星期
Gdiplus::Font
*m_pFont;  // 字体
Gdiplus::StringFormat m_strFormat;  // 格式化字符串
Gdiplus::Pen
*m_pPen;      // 画笔
Gdiplus::SolidBrush
*m_pBrush;  // 画刷
Gdiplus::RectF m_dayRect;      // 日期矩形
Gdiplus::RectF m_weekRect;      // 星期矩形
Gdiplus::PointF m_orgPointF;
//圆点坐标 float m_rColok; //圆半径

Gdiplus::PointF hourPts[4];  //时针多边形数组
Gdiplus::PointF mimPts[4];    //分针多边形数组
Gdiplus::PointF scrPts[2];    //秒针数组


在初始化函数中初始变量的值

//获得系统时间
SYSTEMTIME sysTime;
GetLocalTime(
&sysTime);//格式化日期和星期字符串 _stprintf_s(m_dayStr,TEXT("%02d"),sysTime.wDay);

TCHAR weekStrs[
7][4]={L"",L"",L"",L"",L"",L"",L""};
_stprintf_s(m_weekStr,TEXT(
"%s"),weekStrs[sysTime.wDayOfWeek]);//启动时间计时器 SetTimer(m_hWnd,11,1000,NULL);

在WM_SIZE中计算圆点,半径,多边形分针,时针,秒针的顶点坐标数组值

float cx=LOWORD(lParam);float cy=HIWORD(lParam);//计算圆点
    m_orgPointF.X=cx/2;
m_orgPointF.Y
=cy/2;//计算半径 m_rColok=min(cx,cy)/2;
m_rColok
-=10;float r=m_rColok;//秒针数组赋值 scrPts[0].X=0;
scrPts[
0].Y=-r*9/10;
scrPts[
1].X=0;
scrPts[
1].Y=r*2/10;//分针多边形坐标数组 mimPts[0].X=(float)(-r*0.7 / 10);
mimPts[
0].Y=0;
mimPts[
1].X=0;
mimPts[
1].Y=-r * 8/ 10;
mimPts[
2].X=(float)(r*0.7 / 10);
mimPts[
2].Y=0;
mimPts[
3].X=0;
mimPts[
3].Y=r * 2/ 10;//时针多边形数组 hourPts[0].X=-r / 10;
hourPts[
0].Y=0;
hourPts[
1].X=0;
hourPts[
1].Y=-r * 6/ 10;
hourPts[
2].X=r / 10;
hourPts[
2].Y=0;
hourPts[
3].X=0;
hourPts[
3].Y=r * 2/ 10;//日期矩形 m_dayRect.X=r-16;
m_dayRect.Y
=-10;
m_dayRect.Width
=20;
m_dayRect.Height
=20;//日期矩形 m_weekRect.X=r-36;
m_weekRect.Y
=-10;
m_weekRect.Width
=20;
m_weekRect.Height
=20;

用旋转图片来绘制多边形,

图片旋转是以圆点为中心来旋转的,

所以要重新设置坐标系圆点为表盘中心点

自定义函数RotatePolygon来计算多边形的旋转,和绘制

// 旋转多边形,并绘制
// (绘制对象,多边形顶点坐标数组,顶点个数,旋转角度)
void
RotatePolygon(Gdiplus::Graphics* graphics, Gdiplus::PointF* points, int numPoints, floatangle) {//创建旋转矩阵 Gdiplus::Matrix matrix;
matrix.Rotate(angle);
//旋转多边形的每个点 Gdiplus::PointF* rotatedPoints = newGdiplus::PointF[numPoints];for (int i = 0; i < numPoints; i++) {
Gdiplus::PointF point
=points[i];
matrix.TransformPoints(
&point, 1);
rotatedPoints[i]
=point;
}

Gdiplus::Pen pen(Color(
255,0,0,0),(numPoints==2) ? 2.0f:1.0f);//绘制旋转后的多边形 graphics->DrawPolygon(&pen, rotatedPoints, numPoints);
  
  
  // 用线性渐变画刷填充多边形
graphics
->FillPolygon(&Gdiplus::LinearGradientBrush(rotatedPoints[0],rotatedPoints[2],
Color(
255,0,0,255),Color(255,255,255,0)),rotatedPoints,numPoints);delete[] rotatedPoints;
}

最后在WM_PAINT消息中绘制

voidMyMainWnd::OnPaint(){

PAINTSTRUCT ps;
HDC hdc
=BeginPaint(m_hWnd,&ps);//创建内存dc,创建内存位图,并将内存位图选入内存dc中 HDC hmdc=CreateCompatibleDC(hdc);;
HBITMAP hBitmap
=CreateCompatibleBitmap(hdc,ps.rcPaint.right,ps.rcPaint.bottom);
HGDIOBJ hOldMap
=SelectObject(hmdc,hBitmap);//创建在内存dc中绘图对象 Gdiplus::Graphics g(hmdc);
g.SetSmoothingMode(SmoothingModeAntiAlias);
//设置抗锯齿模式//用指定颜色填充整个内存位图 m_pBrush->SetColor(Color(255,128,128,129));
g.FillRectangle(m_pBrush,
0,0,ps.rcPaint.right,ps.rcPaint.bottom);//设置新的坐标系原点为表盘中心点 Gdiplus::Matrix transform;
transform.Translate(m_orgPointF.X, m_orgPointF.Y);
g.SetTransform(
&transform);floatxBegin,yBegin;float rClock=m_rColok; //圆的半径//用指定颜色的画刷,绘制表盘上的刻度 m_pBrush->SetColor(Color(255,217,222,18));for(int i=0;i<60;i++)
{
xBegin
= (float)( rClock * sin(2 * PI*i / 60));
yBegin
= (float)(rClock * cos(2 * PI*i / 60));if (i % 5)
{
//填充小圆点表示小刻度 g.FillEllipse(m_pBrush,xBegin-2,yBegin-2,4.0f,4.0f);
}
else{//填充大圆点表示大刻度 g.FillEllipse(m_pBrush,xBegin-4,yBegin-4,8.0f,8.0f);
}
}
//获取系统时间 SYSTEMTIME x;
GetLocalTime(
&x);//绘制显示日期和星期的矩形区域 m_pPen->SetColor(Color::Black);
m_pBrush
->SetColor(Color::YellowGreen);
g.DrawRectangle(m_pPen,m_dayRect);
g.DrawRectangle(m_pPen,m_weekRect);
g.FillRectangle(m_pBrush,m_dayRect);
g.FillRectangle(m_pBrush,m_weekRect);
//绘制日期和星期的字符串文本 m_pBrush->SetColor(Color::Black);
g.DrawString(m_dayStr,
-1,m_pFont,m_dayRect,&m_strFormat,m_pBrush);
g.DrawString(m_weekStr,
-1,m_pFont,PointF(m_weekRect.X+1,m_weekRect.Y+4),m_pBrush);//绘制时针 float tem=(float)((float)x.wMinute/60);float fHour=x.wHour+tem;float sita=float(fHour*30);
RotatePolygon(
&g,hourPts,4,(float)sita); //计算时针旋转角度并绘制//绘制分针 sita=float(x.wMinute*6);
RotatePolygon(
&g,mimPts,4,(float)sita);//绘制秒针 sita = float(x.wSecond*6);
RotatePolygon(
&g,scrPts,2,sita);//绘制圆心 m_pBrush->SetColor(Color(255,0,0,255));
g.FillEllipse(m_pBrush,
-6,-6,12,12);//将内存dc中绘制的图片复制到当前dc中 BitBlt(hdc,0,0,(int)ps.rcPaint.right,(int)ps.rcPaint.bottom,hmdc,0,0,SRCCOPY);//释放内存位图,内存dc SelectObject(hmdc,hOldMap);
DeleteObject(hBitmap);
DeleteObject(hmdc);

EndPaint(m_hWnd,
&ps);
}

mknod

创建块设备或者字符设备文件。此命令的适用范围:RedHat、RHEL、Ubuntu、CentOS、SUSE、openSUSE、Fedora。

用法:

mknod [选项]... 名称 类型 [主设备号 次设备号]

选项参数列表:

选项 说明
--version 显示命令版本信息
--help 显示帮助信息
-m | --mode=MODE 设置权限,类似chmod,后跟660、777等数字权限
-Z | --context=CTX 为创建的设备设置SELinux的安全上下文,确保该设备在SELinux安全策略下正常工作
设备类型 b,块设备;c,字符设备;u,没有缓冲的字符设备;p,fifo设备
设备号 主设备号和次设备号以"0x"或"0X"开头,它们会被视作十六进制数来解析;如果以"0"开头,则被视作八进制数;其余情况下被视作十进制数。设备类型为"p"时可不指定主设备号和次设备号,否则它们是必须指定的。

详细说明:

  • b-块设备:可以用来表示磁盘、分区、闪存驱动器等存储介质。这些设备通常支持随机读写操作,并且数据是以固定大小的数据块进行组织的。
  • c,u-字符设备:是指只能一个字节一个字节进行读写操作的设备,不能随机读取设备中的某一数据、读取数据要按照先后数据。字符设备是面向流的设备,常见的字符设备有鼠标、键盘、串口、控制台和LED等以及/dev/null等特殊的字符设备。
  • p-fifo设备:一种特殊类型的文件,用于进程间的通信。它允许一个进程向 FIFO 写入数据,另一个进程从 FIFO 读取数据。类似的创建管道的命令还有mkfifo
  • 主设备号:用于标识设备类型。例如:主设备号 8 通常用于标识传统的 IDE 硬盘和部分 SCSI 硬盘;主设备号 65(或者 0x41)用于标识一些现代的 SCSI 和 SAS 硬盘;主设备号 252 或 253(或者 0xFC 或 0xFD)用于标识一些固态硬盘(SSD)和其他高速存储设备;主设备号 5 通常用于标识标准的串行端口;主设备号 11 通常用于标识声音卡;主设备号 81(或者 0x51)通常用于标识视频捕获设备。
  • 次设备号:次设备号用于区分同一类型的不同设备实例。自定义一个唯一的设备号即可。

示例:

# 创建100个loop块设备
#!/bin/bash
for i in $(seq 1 100)
do
  mknod "/dev/loop$i" b 7 $i
done


小红书官方介入链接:
小红书分享开放平台

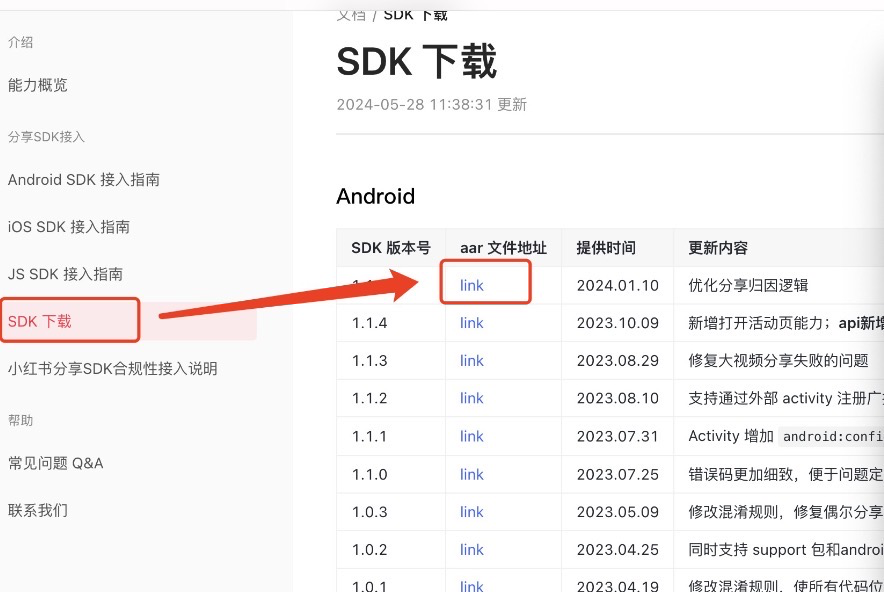
下载sdk文件,位置如下图所示

之后可以按照官方文档进行开发,接入也较简单,这里主要是说明一些隐藏的坑点

一、分享应用内的文件到小红书(这里主要是指应用包名下的文件内容),需要注意setFileProviderAuthority()这个方法。

例如我的代码如下:

AndroidManifest文件<providerandroid:name="androidx.core.content.FileProvider"android:authorities="${applicationId}.FileProvider"android:exported="false"android:grantUriPermissions="true"
            >
            <meta-dataandroid:name="android.support.FILE_PROVIDER_PATHS"android:resource="@xml/provider_paths"
                />
        </provider>
res目录下的xml配置文件<?xml version="1.0" encoding="utf-8"?>
<paths>
    <cache-pathname="cache"path="."
        /> <!--Context.getCacheDir()-->
    <files-pathname="files"path="."
        /> <!--Context.getFilesDir()-->

    <external-pathname="external"path="."
        />  <!--Environment.getExternalStorageDirectory()-->
    <external-cache-pathname="external-cache"path="."
        /> <!--Context.getExternalCacheDir()-->
    <external-files-pathname="external-files"path="."
        /> <!--Context.getExternalFilesDir()-->
    <external-files-pathname="opensdk_external"path="Images"
        />
    <root-pathname="opensdk_root"path=""
        />
</paths>

像我的项目配置的话,
需要设置的代码如下

XhsShareSdk.registerApp(context, XHS_APP_KEY,
XhsShareGlobalConfig().setEnableLog(
true).setClearCacheWhenShareComplete(true)//重点是下面的这句话,设置为自己应用的 Authority .setFileProviderAuthority("${context.packageName}.FileProvider")
,
object : XhsShareRegisterCallback {
override fun onSuccess() {
log {
"xhs---onSuccess: 注册成功!"}
}

override fun onError(
errorCode: Int,
errorMessage: String,
@Nullable exception: Exception
?) {
log {
"xhs---onError: 注册失败!errorCode: $errorCode errorMessage: $errorMessage exception: $exception"}
}
})

二、
小红书构造方法的坑:

XhsNote().apply {
title
= getTitleString() //正文,String content = getContentString() //标题,String imageInfo =XhsImageInfo(listOf(
XhsImageResourceBean.fromUrl(
"网络图片 url"),
XhsImageResourceBean.fromUrl(
"网络图片 url")))
}

小红书的示例代码和说明,都说的很简单,可以直接使用fromUrl这个方法进行构造,他会自动识别是网络图片还是本地图片。不需要手动处理了。

但是,之后,你就会发现,分享网络资源没有问题,但是如果分享的内容是自己应用内部的文件,就无论如何,都分享不成功,到了小红书APP,就提示未获取到图片或者视频。

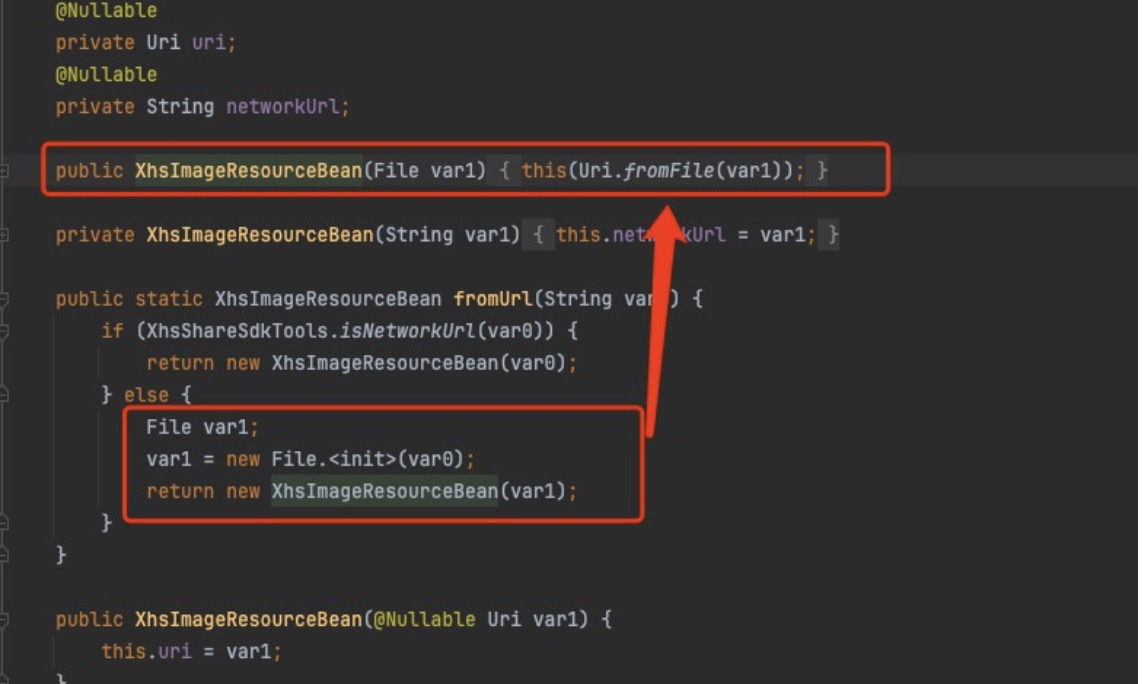
请看SDK代码

小红书SDK里面判断了是否是网络地址,然后通过File的构造方法,调用了顶部的Uri.fromFile(filePath),这个方法是存在问题的。

安卓7.0强制启用了striceMode策略,无法直接暴露file://类型的URI了。如果使用的公共目录分享文件,还是可以成功的,但是如果分享的是应用内部的文件,就会出现没有访问权限的问题。所以小红书APP,就会一直报为获取资源的问题。

解决办法:

使用
XhsImageResourceBean(Uri)方式去构造视频和图片的对象。示例代码如下:

fun shareXHS(
activity: Activity
=requireNotNull(SnsHelper.mainActivity),
filePath: String
//传递过来文件地址 ) {
val xhsPackageNames
= arrayOf("com.xingin.xhs")//获取赋予权限的URI val uri =getContentUriForFileProvider(
filePath
=filePath,
packages
=xhsPackageNames
)
log {
"xhs--- FilePath=$filePath \n,uri:$uri, "}
val title
="标题内容"val content="内容文字" try{//获取视频的首帧作为封面图 val bitmap=getThumbnailFromVideo(filePath)
val tempFile
= File("${activity.cacheDir.absolutePath}/cameraShooting", "tempFileForShare.png")
val stream
=FileOutputStream(tempFile)
bitmap
?.compress(Bitmap.CompressFormat.PNG, 100, stream)
stream.close()
//获取首帧的图片URI val picUri =getContentUriForFileProvider(
filePath
=tempFile.absolutePath,
packages
=xhsPackageNames
)
val xhsNote
=XhsNote().apply {this.title =titlethis.content =content
videoInfo
=XhsVideoInfo(//通过URI的方式,构建数据 XhsVideoResourceBean(uri),
XhsImageResourceBean(picUri)
)
//封面 }//分享数据 val sessionId =XhsShareSdk.shareNote(activity, xhsNote)
}
catch(e:Exception){ }
}
fun getContentUriForFileProvider(
filePath: String,
packages: Array
<String> =emptyArray(),
context: Context
=CoreApp.getContext(),
): Uri {
//根据文件路径,生成关联的 content://内容 URI val file =File(filePath)
val contentUri
=FileProvider.getUriForFile(
context,
"${context.packageName}.FileProvider",
file
)
//赋予权限 packages.forEach {
context.grantUriPermission(
it,
contentUri, Intent.FLAG_GRANT_READ_URI_PERMISSION
)
}
returncontentUri
}
fun getThumbnailFromVideo(path: String, percent: Int
= 0): Bitmap?{
val retriever
=MediaMetadataRetriever()
var bitmap: Bitmap
? = null try{
retriever.setDataSource(path)
val duration
=retriever.extractMetadata(MediaMetadataRetriever.METADATA_KEY_DURATION)?.toLongOrNull() ?: 0val timePositionUs= (duration / 100f * percent).toLong() * 1000bitmap=retriever.getFrameAtTime(
timePositionUs, MediaMetadataRetriever.OPTION_CLOSEST
)
}
catch(e: Exception) {
log(type
= LogType.E, errorThrowable =e)
e.printStackTrace()
}
finally{
retriever.release()
}
returnbitmap
}

这个东西是个非常古老的算法了,大概是2008年的东西,参考资料也有很多,不过基本上都是重复的。最近受一个朋友的需求,前后大概用了二十多天时间去研究,也有所成果,在这里简单的予以记录。

图像修复这个东西目前流行的基本都是用深度学习来弄了,而且深度学习的效果还是非常不错的(大部分情况下优于传统算法)。

PatchMatch本身并不是图像修复的算法,他只是描述了一套流程用于快速在两幅图之间找到近似的相似的块,主要包括随机初始化,然后传播,再随机搜索三个步骤,关于这部分描述可以直接看论文或者在百度上搜索PatchMatch,有一大堆相关的解释,我这里不想过多描述。

关于这个论文,大家可以搜索文章: PatchMatch: A Randomized Correspondence Algorithm for Structural Image Editing

而图像修复本身的过程除了PatchMatch外,还有很多其他的东西。一般情况下,这种应用场景都是客户手工指定一个区域,我们需要把这个区域的东西去掉并填充(不管原来这里是什么样子的,区域内部原有的信息完全不考虑),填充后的结果要和周边的环境自然的融为一体。关于这方面的步骤,论文里本身描述的不多,但是相关的代码可以在github上找到很多,我这里提供几个链接供大家参考:

https://github.com/vacancy/PyPatchMatch

https://github.com/liqing7/Inpaint/tree/master/Inpaint

github里一堆这样的代码,但是翻来翻去其实都是一个娘生的,里面的实现方式大同小异,而且基本上都是基于opencv实现的,里面的代码呢也是绕来绕去,重实现,不重流程和效率。我的工程也是参考了这些东西,并且使用C++脱离opencv独立予以实现,因此工作量大了很多。

我这里就我在提取并稍作优化这个算法的一些过程予以记录和描述,免得时间久了后自己都不太记得是怎么回事了。

一、Inpaint的基本流程。

1、用户标记的区域视为孔洞,里面没有任何的信息了,那要从现有的周边像素填充这个孔洞,采用的办法是,建立图像金字塔,在金字塔下采样的过程中,图像变小,孔洞也在变小,下采样就涉及到领域,当领域覆盖了孔洞边缘时,也必然有部分领域涉及到了孔洞周边的有效像素区域,此时以有效像素区域的信息加权填充缩小后的孔洞,这样不断的侵蚀,直到所有的孔洞在金字塔图像中都消失了,这个金字塔的层数就足够了(不管孔洞有多大,当金字塔在变为大小2像素、1像素的过程中孔洞肯定会消失)。

2、由最小的金字塔层开始,目标和源都设置为相同值,然后随机初始化PatchMatch里的NNF场,接着使用传播和随机扩散最小化NNF的误差,这个时候就可以利用这个NNF来初步构建目标图像(是个迭代过程,叫做EM迭代)。

3、在迭代的最后一步,做个上采样,并且做点精细化的工作(权重累加),然后到金字塔的上一层,在这一层时,初始的NNF就不要随机化了,而是可以有下一层的NNF通过最近邻插值获取,这样获取的数据比随机初始化的要更为接近理论的结果,就要就可以减少这一层的传播和随机扩散的迭代次数。

4、就这样一层一层的往上处理,得到最终的结果。

二、参考代码中一些细节


1、删除不必要的过程


我们贴一下论文里的一些描述先:

In this section, we discuss some of the novel interactive editing tools enabled by our algorithm. First, however, we must revisit the bidirectional similarity synthesis approach [Simakov et al. 2008]. This method is based on a bidirectional distance measure between pairs of images - the source (input) image S and a target (output) image T. The measure consists of two terms: (1) The completeness term ensures that the output image contains as much
visual information from the input as possible and therefore is a good summary. (2) The coherence term ensures that the output is coherent w.r.t. the input and that new visual structures (artifacts) are penalized. Formally, the distance measure is defined simply as the sum of the average distance of all patches in S to their most similar (nearest-neighbor) patches in T and vice versa:

where the distance D is the SSD (sum of squared differences) of patch pixel values in L*a*b* color space. For image retargeting, we wish to solve for the image T that minimizes dBDS under the constraints of the desired output dimensions. Given an initial guess for the output image, T0, this distance is iteratively minimized by an EM-like algorithm. In the E step of each iteration i, the NN- fields are computed from S and Ti and “patch-voting” is performed to accumulate the pixel colors of each overlapping neighbor patch. In the M step, all the color “votes” are averaged to generate a new image Ti+1. To avoid getting stuck in bad local minima, a multi-scale “gradual scaling” process is employed: T is initialized to a low-resolution copy of S and is gradually resized by a small factor, followed by a few EM iterations after each scaling, until the final dimensions are obtained. Then, both T and S are gradually upsampled to finer resolutions, followed by more EM iterations, until the final fine resolution is obtained.
In addition to image retargeting, Simakov et al. [2008] showed that this method can be used for other synthesis tasks such as image collages, reshuffling, automatic cropping and the analogies of these in video. Furthermore,
if we define a missing region (a “hole”) in an image as T and the rest of the image as S, and omit the completeness term, we end up with exactly the image and video completion algorithm of Wexler et al. [2007].
Importance weight maps can be used both in the input (e.g., for emphasizing an important region), and in the output (e.g., for guiding the completion process from the hole boundaries inwards).
这里面就讲到了关于使用PatchMatch进行一些图像编辑(inpaint, reshuffling\cropping )等等的过程,也包括对EM迭代的一个讲解,不过我们注意到上面标红加粗的部分的描述,他讲的意思时如果进行图像的修复,就只需要关注前面的公式5中的coherent部分就可以了。
不过我们仔细的观察所有的github上给出的代码,就可以看到都使用 m_source2target 和m_target2source 两个NNF,我们尝试了把m_source2target 这个NNF相关的所有内容都删除掉,完全不影响结果的,这样速度基本上可以提高一半的。
当然,github上这些代码都是一个模板出来的,最开始的作者应该时考虑了其他reshuffling等等其他的操作吧,因为这些操作确实需要双向的数据。
2、有问题的部分代码
a、在代码中有一个init_kDistance2Similarity函数,其内容如下:
voidinit_kDistance2Similarity() {double base[11] = {1.0, 0.99, 0.96, 0.83, 0.38, 0.11, 0.02, 0.005, 0.0006, 0.0001, 0};int length = (PatchDistanceMetric::kDistanceScale + 1);
kDistance2Similarity.resize(length);
for (int i = 0; i < length; ++i)
{
double t = (double) i /length;int j = (int) (100 *t);int k = j + 1;double vj = (j < 11) ? base[j] : 0;double vk = (k < 11) ? base[k] : 0;
kDistance2Similarity[i]
= 1;//vj + (100 * t - j) * (vk - vj);
}
}

这个函数的目的是根据两个块之间的距离来计算一个在[0,1]之间的相似权重。但是这个函数设计的不是很好,代码里块之间的距离是一个介于0和65535之间的数,这个权重也是个65536的表,但是问题是,这个表在后段大部分的值全为0,就表示他们毫无贡献了,这个可能造成的一个问题时图像出现莫名其妙的内容,而且如果遇到加权时的像素点权重都是0,这个点的计算就无效了。因此,需要适当的修改这个函数。

b、在NNF的minimize过程中,特别是随机扩散的代码里,上面我给出的链接里用了两种不同的方法,

其中一种是:

另外一个是:

两者的不同是,一个在随机搜索的时候的中心点是经过传播后得到更优的点,一个就是原始的中心点, 我这边测试呢使用原始的中心点得到的图形的清晰度更高,不知道这个是个什么道理。

3、一些其他的细节的理解

a、在参考代码里,对于距离的计算,除了常规的欧式距离外,有些版本还加入了对于边缘的权重的考量,比如下面的代码:

   mptry[j] = (ptry1[j] / 2 - ptry2[j] / 2) + 128;
mptrx[j]
= (ptrx1[j] / 2 - ptrx2[j] / 2) + 128;

这是简单的计算水平和垂直方向的梯度,而且这个公式的设计让他们的值自然的位于0和255之间,这样就能起到和像素的RGB在同一个有效的值范围和空间内,使得他们的权重自然就相同了。

b、对于块的大小,感觉大部分情况半径为2就比较合适,也就是计算5*5的领域,一般就能满足范围。

c、在下采样时,这个函数还是比较关键,不太能用向双线性插值这种只涉及到2*2领域的算法,参考代码给出的时一个6*6的领域,为什么用偶数领域,这个是基于什么考虑呢(其实常用的图像缩放算法都是偶数范围内领域,双向性是2*2, 三次立方是4*4),我采用的是5*5的领域,感觉这样比较集中。

d、参考代码里的下采样图的大小都是 SrcW / 2这种的,这种如果原图是51像素,则下一层就只有25个像素了,我个人感觉还是不合理,而是应该采用(SrcW + 1) / 2这种方式处理,而且我测试呢,如果采用SrcW / 2方式,对于图像宽度和高度是偶数的图,出来的结果就是模糊一些(这个东西和很多因素有关,但是我测试的环境确实有这个现象)。
e、虽然作者说patchmatch很快就会收敛,但是毕竟他只是近似算法,不是完全的准确,因此,每次执行后的结果都不他一样,所以实用的还是需要多点几次看那次结果更为合适)。

f、早期的photoshop里有一个智能填充,其实现方式和patchmatch也是类似的。

三、实测的效果

经过多个版本迭代,目前已经实现了一个简单的测试DEMO,这里选几个效果比较明显的看一下:

对于没有强烈边界的区域,可以看出整体还是不错的,不够目前的效果还是有些模糊,当然也有一些不太成功的案例。

目前我在美图秀秀和Photoshop中都有看到类似这样的功能,美图秀秀里有个智能抠图,应该是使用AI做的,大部分情况下都不错,不过对于刚才那个油菜花的图就有点失效了,如下图所示:

不晓得是他的模型问题,还是这个AI本身就做不太好。

我提供一个测试DMEO,有兴趣的朋友可以弄着玩:
https://files.cnblogs.com/files/Imageshop/PatchMatch.rar?t=1724314207&download=true

如果想时刻关注本人的最新文章,也可关注公众号:

哈喽大家好,我是咸鱼。

今天分享一个很实用的 bash 脚本,可以
通过手动提供单元格内容和列数或者将带有分隔符的文件(如 CSV、TSV 文件)转换为 Markdown 表格。

源代码在文末哦!原文链接:
https://josh.fail/2022/pure-bash-markdown-table-generator/

具体功能:

  • 手动生成表格:允许用户输入表格内容和列数,生成标准的 Markdown 格式表格。
  • 文件转换:可以将 CSV 或 TSV 文件转换为 Markdown 表格。
  • 选项支持:支持指定列数、设置分隔符、解析 CSV/TSV 文件等选项。

主要选项:

  • -COLUMNS
    :设置生成表格的列数。
  • -sSEPARATOR
    :自定义输入文件的列分隔符。
  • --csv

    --tsv
    :分别用于解析 CSV 和 TSV 文件。

几个月前,我想要一个便携式的 Markdown 表格生成器,于是写了这个
markdown-table
脚本。

一开始我只是想传入一堆参数和列数,并让它生成相应的 Markdown 表格。就像下面的例子:

markdown-table -4 \
 "Heading 1"  "Heading 2" "Heading 3" "Heading 4" \
 "Hi"         "There"     "From"      "Markdown\!" \
 "Everything" "Is"        "So"        "Nicely Aligned\!"

当我实现了这一功能后,我意识到还可以添加支持解析带有自定义分隔符的文件,比如 CSV 或 TSV。

markdown-table --tsv < test.tsv

上面两种方法都会生成一个 Markdown 表格:

| Heading 1  | Heading 2 | Heading 3 | Heading 4      |
| ---------- | --------- | --------- | -------------- |
| Hi         | There     | From      | Markdown       |
| Everything | Is        | So        | Nicely Aligned |
#!/usr/bin/env bash
# Usage: markdown-table -COLUMNS [CELLS]
#        markdown-table -sSEPARATOR < file
#
# NAME
#   markdown-table -- generate markdown tables
#
# SYNOPSIS
#   markdown-table -COLUMNS [CELLS]
#   markdown-table -sSEPARATOR < file
#
# DESCRIPTION
#   markdown-table helps generate markdown tables. Manually supply arguments
#   and a column count to generate a table, or pass in a delimited file to
#   convert to a table.
#
# OPTIONS
#   -COLUMNS
#       Number of columns to include in output.
#
#   -sSEPARATOR
#       String used to separate columns in input files.
#
#   --csv
#       Shortcut for `-s,` to parse CSV files. Note that this is a "dumb" CSV
#       parser -- it won't work if your cells contain commas!
#
#   --tsv
#       Shortcut for `-s$'\t'` to parse TSV files.
#
#   -h, --help
#       Prints help text and exits.
#
# EXAMPLES
#   Build a 4 column markdown table from arguments:
#     markdown-table -4 \
#       "Heading 1"  "Heading 2" "Heading 3" "Heading 4" \
#       "Hi"         "There"     "From"      "Markdown!" \
#       "Everything" "Is"        "So"        "Nicely Aligned!"
#
#   Convert a CSV file into a markdown table:
#     markdown-table -s, < some.csv
#     markdown-table --csv < some.csv
#
#   Convert a TSV file into a markdown table:
#     markdown-table -s$'\t' < test.tsv
#     markdown-table --tsv < test.tsv

# Call this script with DEBUG=1 to add some debugging output
if [[ "$DEBUG" ]]; then
  export PS4='+ [${BASH_SOURCE##*/}:${LINENO}] '
  set -x
fi

set -e

# Echoes given args to STDERR
#
# $@ - args to pass to echo
warn() {
  echo "$@" >&2
}

# Print the help text for this program
#
# $1 - flag used to ask for help ("-h" or "--help")
print_help() {
  sed -ne '/^#/!q;s/^#$/# /;/^# /s/^# //p' < "$0" |
    awk -v f="$1" '
      f == "-h" && ($1 == "Usage:" || u) {
        u=1
        if ($0 == "") {
          exit
        } else {
          print
        }
      }
      f != "-h"
      '
}

# Returns the highest number in the given arguments
#
# $@ - one or more numeric arguments
max() {
  local max=0 arg

  for arg; do
    (( ${arg:-0} > max )) && max="$arg"
  done

  printf "%s" "$max"
}

# Formats a table in markdown format
#
# $1 - field separator string
format_table() {
  local fs="$1" buffer col current_col=0 current_row=0 min=3
  local -a lengths=()

  buffer="$(cat)"

  # First pass to get column lengths
  while read -r line; do
    current_col=0

    while read -r col; do
      lengths["$current_col"]="$(max "${#col}" "${lengths[$current_col]}")"

      current_col=$((current_col + 1))
    done <<< "${line//$fs/$'\n'}"
  done <<< "$buffer"

  # Second pass writes each row
  while read -r line; do
    current_col=0
    current_row=$((current_row + 1))

    while read -r col; do
      printf "| %-$(max "${lengths[$current_col]}" "$min")s " "$col"

      current_col=$((current_col + 1))
    done <<< "${line//$fs/$'\n'}"

    printf "|\n"

    # If this is the first row, print the header dashes
    if [[ "$current_row" -eq 1 ]]; then
      for (( current_col=0; current_col < ${#lengths[@]}; current_col++ )); do
        printf "| "
        printf "%$(max "${lengths[$current_col]}" "$min")s" | tr " " -
        printf " "
      done

      printf "|\n"
    fi
  done <<< "$buffer"
}

# Main program
main() {
  local arg cols i fs="##$$FS##"

  while [[ $# -gt 0 ]]; do
    case "$1" in
      -h | --help) print_help "$1"; return 0 ;;
      -[0-9]*) cols="${1:1}"; shift ;;
      -s*) fs="${1:2}"; shift ;;
      --csv) fs=","; shift ;;
      --tsv) fs=$'\t'; shift ;;
      --) shift; break ;;
      -*) warn "Invalid option '$1'"; return 1 ;;
      *) break ;;
    esac
  done

  if [[ -z "$fs" ]]; then
    warn "Field separator can't be blank!"
    return 1
  elif [[ $# -gt 0 ]] && ! [[ "$cols" =~ ^[0-9]+$ ]]; then
    warn "Missing or Invalid column count!"
    return 1
  fi

  { if [[ $# -gt 0 ]]; then
      while [[ $# -gt 0 ]]; do
        for (( i=0; i < cols; i++ )); do
          if (( i + 1 == cols )); then
            printf "%s" "$1"
          else
            printf "%s%s" "$1" "$fs"
          fi
          shift
        done

        printf "\n"
      done
    else
      cat
    fi
  } | format_table "$fs"
}

main "$@"