2024年8月


title: 使用 refreshNuxtData 刷新 Nuxt应用 中的数据
date: 2024/8/21
updated: 2024/8/21
author:
cmdragon

excerpt:
refreshNuxtData 是 Nuxt 3 中一个非常有用的函数,能够帮助你在数据更新后及时刷新页面。通过了解如何刷新所有数据和刷新特定数据,你可以更灵活地控制数据更新的时机和方式。

categories:

  • 前端开发

tags:

  • Nuxt3
  • 数据刷新
  • 页面更新
  • 缓存失效
  • useAsyncData
  • useFetch
  • 手动刷新


image
image

扫描
二维码
关注或者微信搜一搜:
编程智域 前端至全栈交流与成长

在 Nuxt 3 应用中,有时候你可能需要手动刷新数据,尤其是在数据更新后希望界面能够实时反映这些变化时。
refreshNuxtData
函数可以帮助你做到这一点。

什么是
refreshNuxtData

refreshNuxtData
是一个 Nuxt 3 提供的函数,用于重新从服务器获取数据并更新页面。它会使
useAsyncData

useLazyAsyncData

useFetch

useLazyFetch
的缓存失效。使用这个函数,你可以选择刷新所有数据或仅刷新特定的数据。

函数签名

refreshNuxtData(keys?: string | string[]): Promise<void>
  • keys
    (可选):指定需要刷新的数据的键,可以是字符串或字符串数组。如果没有指定
    keys
    ,将重新获取所有数据。

使用示例

刷新所有数据

有时候,你可能需要刷新页面上所有的数据。这可以通过不传递
keys
参数来实现。

示例代码:


pages/some-page.vue
文件中,我们将添加一个按钮,点击后会刷新当前页面上的所有数据:

<template>
  <div>
    <button :disabled="refreshing" @click="refreshAll">
      重新获取所有数据
    </button>
  </div>
</template>

<script setup lang="ts">

const refreshing = ref(false)

const refreshAll = async () => {
  refreshing.value = true
  try {
    await refreshNuxtData()
  } finally {
    refreshing.value = false
  }
}
</script>

在上面的代码中:

  • refreshing
    是一个用于控制按钮禁用状态的响应式变量。
  • refreshAll
    函数会调用
    refreshNuxtData
    来刷新所有数据,并在完成后恢复按钮状态。

刷新特定数据

有时候,你只需要刷新某些特定的数据。例如,当某个数据项发生变化时,你可能希望只刷新这个特定数据项。

示例代码:


pages/some-page.vue
文件中,我们将演示如何刷新特定的数据:

<template>
  <div>
    {{ pending ? '加载中' : count }}
    <button @click="refresh">刷新</button>
  </div>
</template>

<script setup lang="ts">

const { pending, data: count } = await useLazyAsyncData('count', () => $fetch('/api/count'))

const refresh = () => {
  refreshNuxtData('count')
}
</script>

在上面的代码中:

  • useLazyAsyncData
    用于获取名为
    count
    的数据。
  • refresh
    函数会调用
    refreshNuxtData
    并传入
    'count'
    作为参数,以刷新特定的数据项。

总结

refreshNuxtData 是 Nuxt 3 中一个非常有用的函数,能够帮助你在数据更新后及时刷新页面。通过了解如何刷新所有数据和刷新特定数据,你可以更灵活地控制数据更新的时机和方式。

余下文章内容请点击跳转至 个人博客页面 或者 扫码关注或者微信搜一搜:
编程智域 前端至全栈交流与成长
,阅读完整的文章:
使用 refreshNuxtData 刷新 Nuxt应用 中的数据 | cmdragon's Blog

往期文章归档:

前言

本文主要讲神经网络的上半部分。
另外,我发现我前面文章写的有歧义的地方还是挺多,虽然,已经改了一部分,但,可能还有没发现的,大家看的时候尽量多理解着看吧。
本着目的是学会使用神经网络的开发,至于数学的部分,就能过就过吧。

神经网络

先学个例子

先结合以前的知识理解一个例子,理解了这个例子,后面理解神经网络就容易多了。

class NeuralNet1(nn.Module):
    def __init__(self, input_size, hidden_size):
        super(NeuralNet1,self).__init__()
        self,linear1 = nn.Linear(input_size, hidden_size) # x的列 转成 隐藏层的列
        self.relu = nn.ReLU() #使用了ReLU(Rectified Linear Unit) 作为激活函数
        self.linear2 = nn.Linear(hidden_size,1) #隐藏层的列转成1列
    def forward(self, x):
        out = self.linear1(x)
        out = self.relu(out)
        out = self.linear2(out)# sigmoid at the end
        y_pred = torch.sigmoid(out)
        return y_pred 
model=NeuralNet1(input_size=28*28,hidden_size=5)
criterion =nn.BCELoss()

结合我们之前的知识,上面代码就是定义了一个类,该类继承了Module。
然后初始化函数接受了两参数,俩参数分别是x列,和隐藏层列,然后定义三个对象linear1,linear2,relu。
然后forward就是执行,中间的转换逻辑是x列转成hidden列,hidden列转1列,这中间再加一个激活函数,我们先不管激活函数是什么,反正,代码结构,大概就是这样的逻辑。
criterion =nn.BCELosS()是定义损失函数,BCELoss 的全称是 Binary Cross Entropy Loss(二元交叉熵损失)。
ps:大家有没有注意到,自从我们开始使用model后,就再也没使用 requires_grad来开启张量计算了,这是因为model在计算的时候自己就开了【torch.tensor(0.0, requires_grad=True)】

激活函数

激活函数其实也是函数,就是把x进行一下数据转换。
我们上篇文章已经使用过了Sigmoid把数据转换成百分比了。
下面看一下最受欢迎的激活函数都有什么,如下:

# Most popular activationfunctions
# 1. Step function
# 2. Sigmoid
# 3. TanH
# 4. ReLU (不知道用什么,就用这个)
# 5. Leaky ReLU6. Softmax

各个激活函数x转换成y的模式
image
image
image
image
image
激活函数使用参考下面代码

import torch
import torch.nn as nn
import numpy as np
import torch.nn.functional as F #nn不好使时,在这里找激活函数
# 方法1 (create nn modules)
class NeuralNet(nn.Module):
    def __init__(self, input_size, hidden_size):
        super(NeuralNet, self)._init ()
        self.linear1 =nn.Linear(input_size,hidden_size)
        self.relu = nn.ReLU()
        self.linear2 =nn.inear(hidden_size,1)
        self.sigmoid = nn.Sigmoid()
    def forward(self, x):
        out = self.linear1(x)
        out = self.relu(out)
        out = self.linear2(out)
        out = self.sigmoid(out)
        return out
    
# 方法2 (use activation functions directly in forward pass)
class NeuralNet(nn.Module):
    def __init__(self, input_size, hidden_size):
        super(NeuralNet,self).__init__()
        self.linear1 =nn.Linear(input_size,hidden_size)
        self.linear2 =nn.Linear(hidden_size,1)
    def forward(self,x):
        # F.leaky_relu() #leaky_relu使用方法
     
        out = torch.relu(self.linear1(x))
        out = torch.sigmoid(self.linear2(out))
        return out

函数

我们先对下面函数进行一下逻辑理解。

sigmoid,MSELoss,BCELoss

前面我们使用了MSELoss做损失函数,他的逻辑是求y预测和y差的平方的均值,如下图:
image
后面我们的例子里,就把MSELoss换成了BCELoss,当时我们就是把他当做一个求损失值的函数,没研究他的逻辑。
BCELoss的全称是 Binary Cross Entropy Loss(二元交叉熵损失)他的公式是这样的。
image
经过这个转换y_pred的值范围已经是(0, 1)了。
后来在写例子的时候,在前向传播的时候,又增加了torch.sigmoid做数据转换。
sigmoid的公式是这样的。
image

softmax和cross_entropy

cross_entropy是 交叉熵损失函数,他的公式是这样的。
image
结合代码理解。

loss = nn.CrossEntropyLoss()
Y= torch.tensor([0]) #这y是一行一列矩阵,但值0表示类别,如0=猫,1=狗,2=兔子
#nsamples x nclasses=1x3  1行3列
Y_pred_good = torch.tensor([[2.0,1.0, 0.1]]) # 这个预测的y里,2最大,2的索引是0.所以,这个预测的y最可能是猫
Y_pred_bad = torch.tensor([[0.5,2.0,0.3]])  # 这个预测的y里,2最大,2的索引是1.所以,这个预测的y最可能是狗
11 = loss(Y_pred_good, Y)
12 = loss(Y_pred_bad, Y)
print(l1.item())
print(l2.item())

_,predictions1 = torch.max(Y_pred_good, 1)
_,predictions2 = torch.max(Y_pred_bad, 1)
print(predictions1)
print(predictions2)

多个类别的预测如下:

loss = nn.CrossEntropyLoss()
Y= torch.tensor([2,0,1]) #这y是一行三列矩阵,但值表示的含义是类别,如2,0,1=猫,0,1,2=狗,2,1,0=兔子
#nsamples x nclasses=3x3  3行3列
Y_pred_good = torch.tensor([[2.0,1.0, 2.1],[2.0,1.0, 0.1],[2.0,3.0, 0.1]]) # 这个预测的y里,三个张量的最大值的索引分别是 2,0,1 ,他跟上面的猫的类别一致,所以是猫这个类别,因为Y的值就代表猫,所以这个是一个好的预测
Y_pred_bad = torch.tensor([[0.5,2.0,0.3],[0.5,2.0,0.3],[0.5,2.0,0.3]])  # 这个预测跟Y不匹配,所以是个不好的预测
11 = loss(Y_pred_good, Y)
12 = loss(Y_pred_bad, Y)
print(l1.item())
print(l2.item())

_,predictions1 = torch.max(Y_pred_good, 1) #values, indices = torch.max(input, dim)
_,predictions2 = torch.max(Y_pred_bad, 1)
print(predictions1)
print(predictions2)

Softmax 激活函数
假设你有一个模型输出的向量 [2.0, 1.0, 0.1],应用 Softmax 函数可以将其转换为 [0.7, 0.2, 0.1],表示各个类别的概率分布。
公式如下:
image
结合代码理解:

# 之前把预测的y都转成了0~1之间的概率值,现在可以用softmax处理
# softmax
def softmax(x):
    return np.exp(x)/np.sum(np.exp(x), axis=0)


x = np.array([2.0, 1.0, 0.1])
outputs = softmax(x)
print('softmax numpy:', outputs)

torch的softmax使用。

x= torch.tensor([2.0,1.0,0.1])
outputs = torch.softmax(x, dim=0)
print(outputs)

CrossEntropyLoss内部会先申请Softmax函数的执行,在调用自己的计算逻辑(就是对数计算那一套)。

传送门:
零基础学习人工智能—Python—Pytorch学习(一)
零基础学习人工智能—Python—Pytorch学习(二)
零基础学习人工智能—Python—Pytorch学习(三)
零基础学习人工智能—Python—Pytorch学习(四)
零基础学习人工智能—Python—Pytorch学习(五)
零基础学习人工智能—Python—Pytorch学习(六)


注:此文章为原创,任何形式的转载都请联系作者获得授权并注明出处!


若您觉得这篇文章还不错,请点击下方的【推荐】,非常感谢!

https://www.cnblogs.com/kiba/p/18369584

一:背景

1. 讲故事

写这篇是起源于训练营里有位朋友提到了一个问题,在
!t -special
输出中有一个
SuspendEE
字样,这个字样在 coreclr 中怎么弄的?输出如下:


0:000> !t -special
ThreadCount:      3
UnstartedThread:  0
BackgroundThread: 2
PendingThread:    0
DeadThread:       0
Hosted Runtime:   no
                                                                                                            Lock  
 DBG   ID     OSID ThreadOBJ           State GC Mode     GC Alloc Context                  Domain           Count Apt Exception
   0    1     4ab0 000001CC44E5C490    2a020 Cooperative 0000000000000000:0000000000000000 000001cc44e520d0 -00001 MTA (GC) 
  11    2     19d8 000001CC44E84700    21220 Preemptive  0000000000000000:0000000000000000 000001cc44e520d0 -00001 Ukn (Finalizer) 
  12    3     6668 000001CC44ED4520    2b220 Preemptive  0000000000000000:0000000000000000 000001cc44e520d0 -00001 MTA 

          OSID Special thread type
        0 4ab0 SuspendEE 
       10 3b6c DbgHelper 
       11 19d8 Finalizer 

哈哈,其实我特别能理解,很多人学了高级调试之后好奇心会爆棚,看啥都想探究底层,有一种技术上的重生,这篇我们就好好聊一聊。

二:WinDbg 分析

1. SuspendEE 标记是什么

这个单词全称为 Suspend Engine Execution, 即
冻结执行引擎
,那冻结执行引擎的入口方法在哪里呢?这个考验着你对GC运作骨架图的认识,在 coreclr 源码中有一个骨架图,简化后如下:


     GarbageCollectGeneration()
     {
         SuspendEE();
         garbage_collect();
         RestartEE();
     }
     
     garbage_collect()
     {
         generation_to_condemn();
         gc1();
     }

上面的
SuspendEE()
即 SOS 中的 SuspendEE 标记的入口函数,接下来我们深入探究下这个方法。

2. SuspendEE 到底做了什么

如果你仔细阅读过 SuspendEE() 方法的源代码,你会发现核心枚举变量是
ThreadType_DynamicSuspendEE
,它起到了定乾坤的作用,参考代码如下:


thread_local size_t t_ThreadType;

void ThreadSuspend::SuspendEE(SUSPEND_REASON reason)
{
    // set tls flags for compat with SOS
    ClrFlsSetThreadType(ThreadType_DynamicSuspendEE);
}

void ClrFlsSetThreadType(TlsThreadTypeFlag flag)
{
    t_ThreadType |= flag;

    gCurrentThreadInfo.m_EETlsData = (void**)&t_ThreadType - TlsIdx_ThreadType;
}

enum PredefinedTlsSlots
{
    TlsIdx_ThreadType = 11 // bit flags to indicate special thread's type
};

enum TlsThreadTypeFlag // flag used for thread type in Tls data
{
    ThreadType_DynamicSuspendEE = 0x00000020,
}

从上面的代码中可以看到 t_ThreadType 是一个 C++ 级的线程本地存储,意味着每一个线程都有其备份,同时它也是 SuspendEE 标记的核心来源,如果 m_EETlsData 的第 11号 槽位为 0x20 的时候, SuspendEE 标记就会被成功打下,并且可以通过 gCurrentThreadInfo.m_EETlsData 变量去跟踪来源,有了这么多信息之后,接下来就可以代码验证了。

三:案例验证

1. 一段测试代码

代码非常简单,就是一个简单的手工 GC触发。


    internal class Program
    {
        static void Main(string[] args)
        {
            Debugger.Break();

            GC.Collect();

            Console.ReadLine();
        }
    }

接下来使用 windbg 在入口的 SuspendEE 方法上下断点
bp coreclr!ThreadSuspend::SuspendEE
观察,截图如下:

一旦将
ThreadType_DynamicSuspendEE=0x20
赋值之后,接下来用 windbg 去做个验证。


0:000> x coreclr!*gCurrentThreadInfo*
000001a1`668ee8c0 coreclr!gCurrentThreadInfo = struct ThreadLocalInfo

0:000> dx -id 0,0 -r1 (*((coreclr!ThreadLocalInfo *)0x1a1668ee8c0))
(*((coreclr!ThreadLocalInfo *)0x1a1668ee8c0))                 [Type: ThreadLocalInfo]
    [+0x000] m_pThread        : 0x1a166902e50 [Type: Thread *]
    [+0x008] m_pAppDomain     : 0x1a166948b40 [Type: AppDomain *]
    [+0x010] m_EETlsData      : 0x1a1668ee880 [Type: void * *]

0:000> dp 0x1a1668ee880
000001a1`668ee880  00000000`00000000 00000000`00000000
000001a1`668ee890  00000000`00000000 00000000`00000000
000001a1`668ee8a0  00000000`00000000 00000000`00000000
000001a1`668ee8b0  00000000`00000000 00000000`00000000
000001a1`668ee8c0  000001a1`66902e50 000001a1`66948b40
000001a1`668ee8d0  000001a1`668ee880 00000000`00000020

从上面输出可以看到
000001a1668ee8d0+0x8
地址的内容已经被成功种下,相信这时候
!t -special
也能拿到标记了。


0:000> !t -special
                                                                                                            Lock  
 DBG   ID     OSID ThreadOBJ           State GC Mode     GC Alloc Context                  Domain           Count Apt Exception
   0    1     640c 000001A166902E50    2a020 Preemptive  000001A16B0094A8:000001A16B00A5B8 000001a166948b40 -00001 MTA (GC) 
  11    2     3e50 000001A16692B2D0    21220 Preemptive  0000000000000000:0000000000000000 000001a166948b40 -00001 Ukn (Finalizer) 
  12    3     6a24 000001A16699F8F0    2b220 Preemptive  0000000000000000:0000000000000000 000001a166948b40 -00001 MTA 

    OSID Special thread type
        0 640c SuspendEE 
       10 76b0 DbgHelper 
       11 3e50 Finalizer 

那这个 0x20 什么时候被拿掉呢? 这个在源码中也能找到相应的答案,继续 go 运行,输出如下:


void ClrFlsClearThreadType(TlsThreadTypeFlag flag)
{
    t_ThreadType &= ~flag;
}

0:012> dp 0x1a1668ee880
000001a1`668ee880  00000000`00000000 00000000`00000000
000001a1`668ee890  00000000`00000000 00000000`00000000
000001a1`668ee8a0  00000000`00000000 00000000`00000000
000001a1`668ee8b0  00000000`00000000 00000000`00000000
000001a1`668ee8c0  000001a1`66902e50 000001a1`66948b40
000001a1`668ee8d0  000001a1`668ee880 00000000`00000000

当然如果你去寻找 sos 的源码实现,也会找到相应的答案。


HRESULT PrintSpecialThreads()
{
    ...
    if (ThreadType & ThreadType_DynamicSuspendEE)
    {
        type += "SuspendEE ";
    }
    ...
    return Status;
}

四:总结

挖掘这个标记的前世今生回头看其实还是挺有意思的,coreclr 居然新增了 m_EETlsData 字段来给 sos 做妥协,哈哈,这彰显了 sos 一等公民的地位。
图片名称

在设计一个系统的时候,肯定都有会有用户身份认证的问题,一般对用户校验的时候,都是对用户存在数据库总的密码哈希值进行判断,从而避免密码泄露和反向解密,那么在Python 开发中,我们可以引入bcrypt 或 Passlib 对系统用户密码进行哈希和验证处理,以及介绍使用其他类库实现常规加解密处理操作。本篇随笔主要介绍bcrypt 和 Passlib 它们之间的差异,以及在实际使用中的一些代码供参考。

1、
bcrypt

Passlib的介绍

bcrypt

Passlib
都是用于密码哈希和验证的 Python 库,但它们有一些显著的区别:

  • bcrypt
    :


    • bcrypt
      是一个专门用于实现
      bcrypt
      哈希算法的库。它相对简单,专注于单一功能,即对密码进行
      bcrypt
      哈希处理和验证。
    • 适合只需要
      bcrypt
      哈希算法的场景。
    • 提供的 API 简单直接,功能较少。
  • Passlib
    :


    • Passlib
      是一个更高级的密码哈希库,它支持多种哈希算法(如
      bcrypt

      PBKDF2

      Argon2
      等),并且提供了更丰富的功能。
    • 适合需要支持多种密码哈希算法和策略的场景。
    • 提供的
      CryptContext
      类可以方便地管理和迁移多个哈希算法。还提供了密码哈希的自动升级机制,以及对旧算法的弃用处理。

当你确定只需要使用
bcrypt
算法,并且不需要额外的复杂功能时,
bcrypt
是一个合适的选择。它适合简单的项目,或者在需要直接控制
salt
等参数的情况下使用。

Passlib 适合复杂的项目,尤其是需要支持多个哈希算法或需要迁移哈希算法的场景。适合需要长期维护的项目,因为它提供了更多的配置和安全功能。

bcrypt
:
灵活性较低,因为它只支持
bcrypt
算法。
没有多种哈希算法选择或密码策略管理功能。使用简单,代码更直观。如果你只需要
bcrypt
算法,
bcrypt
库可能更容易上手。

Passlib
:
提供了很高的灵活性和扩展性。可以根据需要切换和配置不同的哈希算法,管理复杂的密码策略。
通过
CryptContext
,可以轻松管理不同算法之间的过渡。功能强大但相对复杂,需要更深入的学习和理解。但它的高层 API 设计得很友好,一旦熟悉,可以简化很多常见任务。
CryptContext
是其中一个用于管理多个哈希算法和密码哈希策略的类。

示例代码对比:

bcrypt
使用示例:

importbcrypt

password
= b"supersecretpassword"hashed=bcrypt.hashpw(password, bcrypt.gensalt())#验证密码 ifbcrypt.checkpw(password, hashed):print("Password matches!")else:print("Password does not match.")

Passlib
使用示例:

from passlib.context importCryptContext#创建一个 CryptContext 对象
pwd_context = CryptContext(schemes=["bcrypt"], deprecated="auto")#哈希密码
password = "my_secret_password"hashed_password=pwd_context.hash(password)print("Hashed password:", hashed_password)#验证密码
is_correct =pwd_context.verify(password, hashed_password)ifis_correct:print("密码正确")else:print("密码错误")

定义了一个
CryptContext
对象,用于管理密码哈希算法。
schemes=["bcrypt"]
表示你要使用
bcrypt
算法,而
deprecated="auto"
表示自动管理过时的哈希方案。

使用
pwd_context.hash()
方法对密码进行哈希处理。每次生成的哈希值都是唯一的,即使是相同的密码也会生成不同的哈希值。

使用
pwd_context.verify()
方法可以验证给定的密码与存储的哈希值是否匹配。

你还可以在创建
CryptContext
对象时传递更多参数来定制密码哈希行为,这种方法可以增强密码存储的安全性。例如:

pwd_context =CryptContext(
schemes
=["bcrypt"],
bcrypt__rounds
=12 #bcrypt 的哈希轮数,默认为 12 )

2、使用指定的salt进行加密


Passlib
中,
bcrypt
算法默认会自动生成一个随机的
salt
,这也是
bcrypt
的一种安全特性。如果你想使用指定的
salt
进行加密,需要注意的是,
Passlib
并不直接支持通过指定
salt
来进行哈希处理,因为这可能会降低安全性。

不过,如果你确实需要使用指定的
salt
进行哈希处理,你可以使用以下的方式:

  1. 手动拼接
    salt
    和密码

    :可以手动拼接
    salt
    和密码,然后对结果进行哈希处理。但这种方法仅适用于了解风险并确保安全措施的场景。

  2. 使用
    bcrypt

    :直接使用
    bcrypt
    库进行处理,它允许你传递一个指定的
    salt
    。不过,注意这会有一定的安全风险。

1) 使用
bcrypt
库指定
salt

如果你确实需要指定
salt
,可以使用
bcrypt
库。

importbcrypt#指定的 salt(必须为 16 字节,前缀为 b"$2b$")
salt = bcrypt.gensalt(rounds=12)  #或者使用自定义的 16 字节 salt
print(f"Generated salt: {salt}")#要加密的密码
password = "my_secret_password"

#使用指定的 salt 进行加密
hashed_password = bcrypt.hashpw(password.encode('utf-8'), salt)print(f"Hashed password: {hashed_password}")

2) 手动拼接
salt
和密码

如果你使用
Passlib
,并想使用指定的
salt
,可以手动拼接
salt
和密码,然后对这个组合结果进行哈希处理。这个方式一般不建议使用,因为它破坏了
bcrypt
的安全设计原则。

from passlib.context importCryptContext#创建一个 CryptContext 对象
pwd_context = CryptContext(schemes=["bcrypt"], deprecated="auto")#自定义 salt
custom_salt = "my_custom_salt"

#拼接 salt 和密码
password = "my_secret_password"password_with_salt= custom_salt +password#对拼接后的字符串进行哈希处理
hashed_password =pwd_context.hash(password_with_salt)print("Hashed password with custom salt:", hashed_password)

注意事项

  • 使用固定的
    salt
    会降低密码哈希的安全性,因为相同的
    salt
    和相同的密码会生成相同的哈希值。
  • bcrypt
    的设计初衷是让每次生成的
    salt
    都不同,以此提高安全性。
  • 如果你需要在特定的场景下使用固定的
    salt
    ,一定要确保你的系统有足够的其他安全措施。

同一密码,每次获得的hash值都会不同,那么有些人会问,如果通过pwd_context.hash获得的hash值,下一次能够对比正确吗?

回答是的,使用
pwd_context.hash()
生成的哈希值可以在后续对比中正确匹配,即使每次生成的哈希值看起来不同。
Passlib

bcrypt
的设计确保了这一点。

  • 自动生成的
    salt

    :每次你使用
    pwd_context.hash()
    生成一个新的哈希值时,
    bcrypt
    都会自动生成一个随机的
    salt
    并将其嵌入到生成的哈希值中。因此,即使对同一个密码进行多次哈希,每次生成的哈希值也会不同。

  • 验证过程
    :在验证过程中,
    pwd_context.verify()
    会自动从存储的哈希值中提取
    salt
    并重新计算哈希,然后将其与提供的哈希值进行比较。这意味着,即使哈希值不同,验证仍然能够成功匹配。

即使你每次运行
pwd_context.hash(password)
得到的哈希值不同(因为
salt
不同),
pwd_context.verify(password, hashed_password)
仍然会返回
True
,表示密码验证成功。

3、加密和解密处理

Passlib
主要用于密码哈希处理,并不支持加密和解密操作。如果你需要对字符串进行加密和解密,或者使用非对称加密,你需要使用其他库,例如
cryptography

PyCryptodome

1)
对称加密和解密

对于对称加密,你可以使用
cryptography
库中的
Fernet
,它是基于 AES 算法的加密方案。

安装
cryptography

pip install cryptography

对称加密和解密示例

from cryptography.fernet importFernet#生成密钥(注意:密钥需要安全存储)
key =Fernet.generate_key()
cipher
=Fernet(key)#加密 message = "This is a secret message"encrypted_message=cipher.encrypt(message.encode())print("Encrypted:", encrypted_message)#解密 decrypted_message =cipher.decrypt(encrypted_message).decode()print("Decrypted:", decrypted_message)

2)
非对称加密和解密

对于非对称加密,你可以使用
cryptography
库中的
RSA
算法。通常,非对称加密用于加密较短的信息或加密对称密钥。

非对称加密和解密示例

from cryptography.hazmat.primitives.asymmetric importrsa, paddingfrom cryptography.hazmat.primitives importserialization, hashes#生成私钥和公钥
private_key =rsa.generate_private_key(
public_exponent
=65537,
key_size
=2048,
)

public_key
=private_key.public_key()#加密 message = b"This is a secret message"encrypted_message=public_key.encrypt(
message,
padding.OAEP(
mgf
=padding.MGF1(algorithm=hashes.SHA256()),
algorithm
=hashes.SHA256(),
label
=None
)
)
print("Encrypted:", encrypted_message)#解密 decrypted_message =private_key.decrypt(
encrypted_message,
padding.OAEP(
mgf
=padding.MGF1(algorithm=hashes.SHA256()),
algorithm
=hashes.SHA256(),
label
=None
)
)
print("Decrypted:", decrypted_message.decode())

3)保存和加载密钥

保存私钥
:

private_pem =private_key.private_bytes(
encoding
=serialization.Encoding.PEM,
format
=serialization.PrivateFormat.TraditionalOpenSSL,
encryption_algorithm
=serialization.NoEncryption()
)
with open(
'private_key.pem', 'wb') as f:
f.write(private_pem)

加载私钥
:

with open('private_key.pem', 'rb') as f:
private_key
=serialization.load_pem_private_key(
f.read(),
password
=None,
)

保存公钥
:

public_pem =public_key.public_bytes(
encoding
=serialization.Encoding.PEM,
format
=serialization.PublicFormat.SubjectPublicKeyInfo
)
with open(
'public_key.pem', 'wb') as f:
f.write(public_pem)

加载公钥
:

with open('public_key.pem', 'rb') as f:
public_key
= serialization.load_pem_public_key(f.read())

我们在开发过程总,可以根据需求选择合适的加密方式和库,并妥善管理密钥。

赛题名称:RSNA 2024 Lumbar Spine Degenerative Classification
中文:腰椎退行性病变分类

kaggle官网赛题链接:
https://www.kaggle.com/competitions/rsna-2024-lumbar-spine-degenerative-classification/overview

文章安排


①、如何用python读取dcm/dicom文件
②、基于matplotlib可视化
③、绘制频率分布直方图
④、代码汇总

文件依赖


# requirements.txt
# Python version 3.11.8
torch==2.3.1
torchvision==0.18.1
matplotlib==3.8.4
pydicom==2.4.4
numpy==1.26.4
pip install -r requirements.txt

读取dicom图像并做预处理

概述

本文中采取
pydicom
包读取dicom文件,其关键代码格式为:

dcm_tensor = pydicom.dcmread(dcm_file)

注意数据集的路径,其在train_images文件下存放了每一患者的数据,对于每一患者包含三张MRI图像,每张MRI图像存放为一个文件夹。
需要注意的是,MRI图像为三维图像(dicom格式),一般习惯性将其每个切片分别保存为一个dcm文件,因此一张dicom图像将被存为一个文件夹,如下图

我们可以采用如下路径访问该dicom文件:

"./train_images/4003253/702807833"

读取路径


为了读取dicom图像,我们需要写代码读取文件夹中的所有dcm文件

# dicom文件路径
dicom_dir = "./train_images/4003253/702807833"
# 保存所有dcm文件的路径
dicom_files = [os.path.join(dicom_dir, f) for f in os.listdir(dicom_dir) if f.endswith('.dcm')] 
  • os.listdir
    :返回dicom_dir路径下的所有文件
  • f.endswith('.dcm')
    :筛选所有dcm格式的文件
  • os.path.join
    : 将dcm文件名添加到dicom_dir之后
    示意:"./hello"+“1.dcm”->"./hello/1.dcm"

路径排序


这次的kaggle赛题所给的数据集中,文件名的迭代方式为:

1.dcm、2.dcm、...、9.dcm、10.dcm、11.dcm、...

这给我们带来了一定的麻烦,因为在os的文件名排序规则中,首先检索高位字母的ASCII码大小做排序,也就是说10.dcm将被认为是2.dcm前面的文件。
对此,本文采用正则表达式的方式,实现了依据文件名中数字大小排序。

def extract_number(filepath):
    # 获取文件名(包括扩展名)
    filename = os.path.basename(filepath)
    # 提取文件名中的数字部分,假设文件名以数字结尾,如 '1.dcm'
    match = re.search(r'(\d+)\.dcm$', filename)
    return int(match.group(1)) if match else float('inf')

# 基于数字句柄排序
dicom_files.sort(key=extract_number)

该代码效果如下:

读取图像


为读取dicom图像,我们需要依次读取每一个dcm文件,并将其最终打包为3D tensor,下述代码实现了该功能:

# 创建空列表保存所有dcm文件
dcm_list= []

# 迭代每一个文件
for dcm_file in dicom_files:
    # 读取文件
    dcm = pydicom.dcmread(dcm_file)
    # 将其转为numpy格式
    image_data = dcm.pixel_array.astype(np.float32)
    # 加入文件列表 
    dcm_list.append(image_data)

# 将图片堆叠为3D张量
tensor_dcm = torch.stack([torch.tensor(image_data) for image_data in dcm_list])

数据预处理


常见的预处理方式有两种,
归一化(Normalization)

量化(Quantization)

  • 归一化
    :将数据缩放到某个标准范围内的过程。常见的归一化方法包括最小-最大归一化(Min-Max Normalization)和Z-score标准化(Z-score Normalization),前者将数据归一化至[0,1]范围,后者将数据转化为标准正态分布。本例中采用Min-Max方案。

  • 量化
    :量化是将数据的值域退化到离散值的过程。常用于减少存储和计算成本,尤其在神经网络模型中。量化通常将浮点数值转换为整数值。量化前一般先进行归一化。

归一化的实现如下:

def norm_tensor(tensor_dicom):
    # 查找图像的最大值和最小值
    vmin, vmax = tensor_dicom.min(), tensor_dicom.max()
    # 归一化
    tensor_dicom= (tensor_dicom- vmax ) / (max_val - vmin)
    
    return tensor_dicom

实现基于
method
句柄选择预处理方式:

if method == "norm":
    # 归一化
    tensor_dcm = norm_tensor(tensor_dcm)
elif method == "uint8":
    # 归一化
    tensor_dcm = norm_tensor(tensor_dcm)
    # 量化
    tensor_dcm = (tensor_dcm * 255).clamp(0, 255).to(torch.uint8)

绘图


由于dicom图像为三维数据,可视化时我们一般将其在z轴上分为多个切片依次可视化,本文采用的方式是,采用5*5网格可视化至多25个切片。

def show_dciom(tensor_dicom):
    # 查找图像的最大最小值
    vmin, vmax = tensor_dicom.min(), tensor_dicom.max()
    
    # 创建一个图形窗口
    fig, axes = plt.subplots(5, 5, figsize=(15, 15))  # 5x5 网格布局

    count = 0
    length = tensor_dicom.size()[0]
    for i in range(25):
        if count < length:
            count += 1
        else:
            return
        # 获取当前图像的坐标
        ax = axes[i // 5, i % 5]
        # 显示图片
        ax.imshow(tensor_dicom[i], cmap='gray') # , vmin=vmin, vmax=vmax
        ax.axis('off')  # 关闭坐标轴
    
    plt.tight_layout() # 避免重叠
    plt.title(f"Layer {i}")
    plt.show()

这里有一点需要比较注意,在
ax.imshow()
函数中,我们指定了vmin和vmax参数;这是因为当该参数未被指定时,imshow函数将会自动调整点的亮度,使值最大的点对应255亮度,值最小的点对应0亮度。鉴于相邻切片最大、最小像素值可能存在较大差异,这将使得相邻切片的图像亮度较异常,如下图:

这两张图的左上角区域实际上亮度相近,但从可视化图像来看,存在较大差异,这将对观察带来误解。

可视化频率分布直方图


可视化MRI图像的频率分布直方图在医学影像处理中有重要意义,主要包括以下几个方面:

  • 图像对比度分析
    :频率分布直方图可以显示MRI图像中不同灰度级别(或像素强度)的分布情况。通过分析直方图的形状和范围,可以了解图像的对比度。例如,直方图的分布范围较广表示图像对比度较高,能够更好地区分不同组织或结构。

  • 图像均衡化
    :通过直方图均衡化,可以改善图像的对比度,使得低对比度的区域更加清晰。均衡化过程通过重新分配图像中的像素值,使得直方图的分布更加均匀,从而增强图像的视觉效果。

  • 组织分割
    :频率分布直方图可以帮助确定适当的
    阈值
    ,以进行图像分割。通过分析直方图,可以选择合适的阈值将不同组织或病变从背景中分离出来。

  • 图像质量评估
    :直方图分析可以揭示图像的质量问题,例如过暗或过亮的图像,或者图像噪声的影响。通过直方图的形态,可以评估图像是否需要进一步的处理或优化。

在绘制频率分布直方图前,需要先将三维向量展平,本文采用
plt.hist
函数绘制

def show_hist(tensor_dicom):
    # 将所有图片的像素值展平为一个一维数组
    pixel_values = tensor_dicom.numpy().flatten()

    # 绘制直方图
    plt.figure(figsize=(10, 6))
    plt.hist(pixel_values, bins=50, color='gray', edgecolor='black')
    plt.title('Histogram of All Pixel Values')
    plt.xlabel('Pixel Value')
    plt.ylabel('Frequency')
    plt.grid(True)
    plt.show()

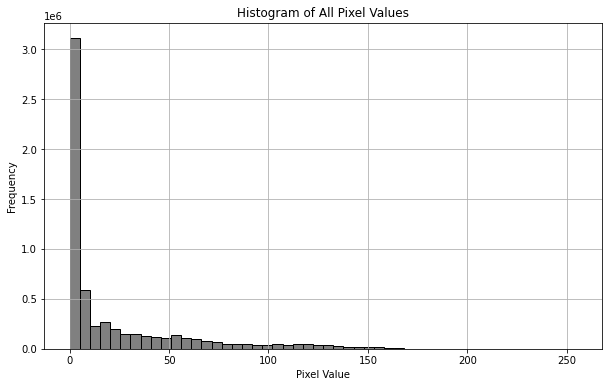
直方图呈现如下分步,在val=0附近有一高峰,这是因为MRI图像中大部分区域并不存在人体组织,为空值0。
倘若除零以外的点过分集中在较小值(<100),那么很可能是因为MRI图像中出现了一个亮度极大的噪点,使得以该噪点亮度为最值归一化质量较差,对于这种情形,可以用99%分位数代替最大值,并将99%分位数归一化至亮度为200. (比起归一化至255,这将允许亮度最大1%的像素点亮度值有区分)。
本例中图像质量均较高,故不需要做特殊处理。

代码汇总


代码架构

主函数

# main.py
# Import custom utility functions
from utils import read_one_dicom, show_dciom, show_hist

# Define the directory containing the DICOM images
dicom_dir = "./train_images/4003253/1054713880"

# Read the DICOM image into a tensor with uint8 data type
tensor_dicom = read_one_dicom(dicom_dir, method="uint8")

# Display the DICOM image slices in a 5x5 grid layout
show_dciom(tensor_dicom)

# Plot the histogram of pixel values from the DICOM image slices
show_hist(tensor_dicom)

# Convert the tensor to a NumPy array for further processing or inspection
np_img = tensor_dicom.numpy()

包文件

from .preprocess import read_one_dicom

from .show import show_dciom
from .show import show_hist

读取&预处理

# preprocess.py
import numpy as np
import torch
import os
import re
import pydicom
from tqdm import tqdm

def norm_tensor(tensor_dicom):
    """
    Normalize the image tensor to the range [0, 1].

    Args:
        tensor_dicom (torch.Tensor): Tensor containing image data.

    Returns:
        torch.Tensor: Normalized image tensor.
    """
    # Calculate the maximum and minimum values of the image tensor
    vmin, vmax = tensor_dicom.min(), tensor_dicom.max()

    # Normalize the image tensor to the range [0, 1]
    tensor_dicom = (tensor_dicom - vmin) / (vmax - vmin)
    
    return tensor_dicom

def extract_number(filepath):
    """
    Extract the numeric part from the DICOM filename.

    Args:
        filepath (str): Path to the DICOM file.

    Returns:
        int: Extracted number from the filename. Returns float('inf') if not found.
    """
    # Get the filename (including extension)
    filename = os.path.basename(filepath)
    # Extract numeric part from filename, assuming filenames end with digits, e.g., '1.dcm'
    match = re.search(r'(\d+)\.dcm$', filename)
    return int(match.group(1)) if match else float('inf')

def read_one_dicom(dicom_dir, method = "", bar_title = ""):
    """
    Reads DICOM files from a directory and converts them into a PyTorch tensor.

    Args:
        dicom_dir (str): Directory containing DICOM files.
        method (str): Optional method to process the tensor ('norm' for normalization, 'uint8' for normalization and conversion to uint8).
        bar_title (str): Optional title for the progress bar.

    Returns:
        torch.Tensor: PyTorch tensor containing image data from DICOM files.
    """
    # Get all DICOM files and sort them based on numeric part of the filename
    dicom_files = [os.path.join(dicom_dir, f) for f in os.listdir(dicom_dir) if f.endswith('.dcm')]    
    dicom_files.sort(key=extract_number)

    # Create an empty list to store image data
    dcm_list = []

    # Initialize tqdm progress bar
    with tqdm(total=len(dicom_files), desc='Processing DICOM files', unit='dcm', unit_scale=True, unit_divisor=1000000) as pbar:
        # Iterate over each DICOM file and read image data
        for count, dcm_file in enumerate(dicom_files, start=1):
            # Read the DICOM file
            dcm = pydicom.dcmread(dcm_file)

            # Extract and convert image data to a NumPy array
            image_data = dcm.pixel_array.astype(np.float32)

            # Add the image data to the list
            dcm_list.append(image_data)

            # Update progress bar description
            pbar.set_description(bar_title + 'Reading')

            # Update progress bar
            pbar.update(1)

    # Convert the list of image data to a PyTorch tensor and stack into a 3D tensor
    tensor_dicom = torch.stack([torch.tensor(image_data) for image_data in dcm_list])

    if method == "norm":
        # Normalize the image tensor
        tensor_dicom = norm_tensor(tensor_dicom)
    elif method == "uint8":
        # Normalize the image tensor
        tensor_dicom = norm_tensor(tensor_dicom)
        # Scale the tensor values to the range [0, 255] and convert to uint8 type
        tensor_dicom = (tensor_dicom * 255).clamp(0, 255).to(torch.uint8)

    return tensor_dicom

可视化、绘制直方图

# show.py
import numpy as np
import torch
import matplotlib.pyplot as plt

def show_dciom(tensor_dicom):
    """
    Display MRI image slices in a 5x5 grid layout.

    Parameters:
    tensor_dicom (torch.Tensor): Tensor containing MRI image slices, expected shape is (N, H, W),
                                 where N is the number of slices, and H and W are the height and width of the images.
    """
    # Calculate the minimum and maximum pixel values in the tensor
    vmin, vmax = tensor_dicom.min(), tensor_dicom.max()
    
    # Create a figure with a 5x5 grid layout
    fig, axes = plt.subplots(5, 5, figsize=(15, 15))  # 5x5 grid layout

    count = 0
    length = tensor_dicom.size(0)
    for i in range(25):
        if count < length:
            count += 1
        else:
            return
        # Get the current subplot's axis
        ax = axes[i // 5, i % 5]
        # Display the image
        ax.imshow(tensor_dicom[count - 1], cmap='gray', vmin=vmin, vmax=vmax)
        ax.axis('off')  # Hide the axis
    
    plt.tight_layout()  # Adjust layout to prevent overlap
    plt.title(f"Layer {i + 1}")  # Title indicating the last displayed slice
    plt.show()

def show_hist(tensor_dicom):
    """
    Plot the histogram of pixel values for all MRI image slices.

    Parameters:
    tensor_dicom (torch.Tensor): Tensor containing MRI image slices, expected shape is (N, H, W).
    """
    # Flatten all image pixel values into a single 1D array
    pixel_values = tensor_dicom.numpy().flatten()

    # Plot the histogram
    plt.figure(figsize=(10, 6))
    plt.hist(pixel_values, bins=50, color='gray', edgecolor='black')
    plt.title('Histogram of All Pixel Values')
    plt.xlabel('Pixel Value')
    plt.ylabel('Frequency')
    plt.grid(True)
    plt.show()

下篇预告


讨论本题的解题方法

制作不易,请帮我点一个免费的赞,谢谢!