计算机网络之TCP/IP协议简介
TCP/IP协议
简介
首先TCP/IP协议不只是表示TCP协议和IP协议两种协议,而是一个协议簇。协议簇是什么并不难理解,就是字面意思,一个由多个协议组合而成的集合体,其中最有代表性的就是TCP和IP这两个协议,除了这两个还有我们熟知的FTP、UDP等协议。当然我们下面主要介绍的还是这两位主角TCP和IP协议。
网络分层
网络分层是我们网络传输的一个框架,每个层级之间相互合作达到了我们相对迅速、安全的网络传输,我们这里介绍一下ISO组织推出的OSI分层模型。
物理层:该层定义了物理传输的接口介质等,用于物理节点之间的传输
数据链路层:这一层是交换机的工作层级,用来将从物理层接收到的数据进行MAC地址的封装与解封
MAC地址就是我们网络的物理地址,是网卡层级的地址,每个网卡都有自己的MAC地址
网络层:这一层是路由器的工作层级,该层用来通过IP协议进行封装或解封数据包
传输层:该层定义了我们传输数据用的协议以及端口号,将我们的数据包进行分段和传输,到目的地地址之后再进行重组,TCP和UDP协议就是在这层发挥作用的
会话层:用来通过传输层建立的传输通路进行发起或者接收会话请求
表示层:用来将接受的数据转化成我们用户能够识别的东西,反之就是将我们能识别的东西转化为计算机数据
应用层:该层主要为用户提供终端网络服务,比如我们进行的网页浏览或者邮件传输等,该层是HTTP、FTP等协议发挥作用的地方
IP协议
IP指网际互连协议,Internet Protocol的缩写,从我们的网络层级上来看,属于网络层,作用是将我们的数据通过IP协议封装成数据包的形式或者将数据包拆解提供给数据链路层帮助数据传输。
现如今我们的网络环境是非常复杂的,网络结构也是百花齐放,每个厂家产的网络设备、系统等可能就会有协议上的差别,因此IP协议强调了适应性、简洁性和可操作性,并且在可靠性上做出了一定的让步,IP不保证可靠性,所传送分组有可能出现丢失、重复、延迟或乱序等问题。
IP分片
IP包在进行传输的过程中,可能会经历不同的物理网络,受限于网络数据帧的最大传输单元,当IP数据包过大时就会将其分组拆分为多个满足传输单元条件的片段,传输完毕到达目标主机的时候再进行重组。
IP传输主要就是解决两个问题,一个是分解重组,一个是传输,具体细节大家可以再深层次研究研究,此处不过多赘述。
TCP协议
TCP是“Transmission Control Protocol”的简称,翻译过来的意思是“传输控制协议”。我们通过上面的介绍可以看出,如果我们直接拿着IP数据包去进行传输显然是非常不可靠的,稍微地一个网络动荡就会导致我接收不到数据包,并且发送方还不知道。那咋办呢?
TCP提供的端到端的字节流传输,他为我们的数据创建了一个通道,将数据包以流的形式在他创建的通道中进行传输,使得端与端之间的数据传输变得可靠起来。那么他是如何建立与终止这个通道的呢?
三次握手
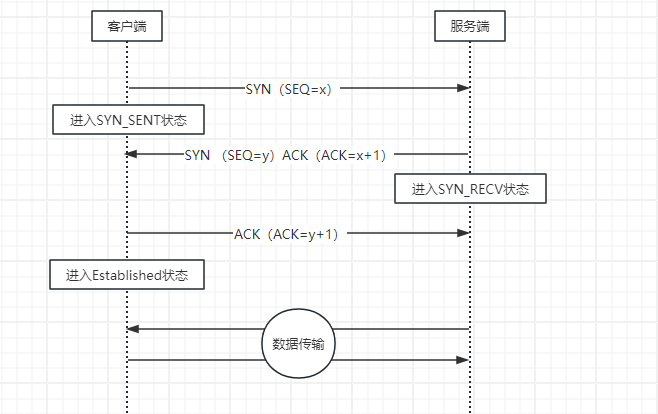
如图所示为三次握手的大致流程,三次报文传输,三次状态更新,少一步都会导致连接失败。三次握手完毕之后就可以进行数据传输了。
我们不剖析SYN与ACK的原理,我们看一下括号里的内容,不难看出,每次数据传输其实是基于收到的数据进行一个约定好的处理然后再发送,就相当于我们对诗,你一句(白日依山尽)我一句(黄河入海流),只有按照约定好的规则去返回我们传输的内容才会正常建立连接,所以这种连接方式确实是可靠的。
四次挥手
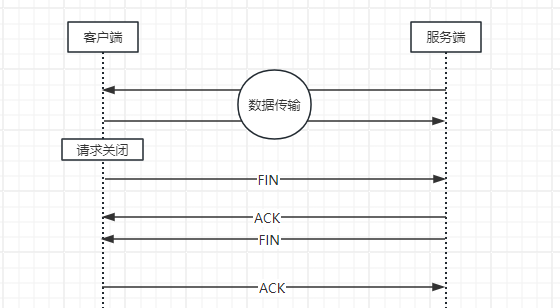
如图为四次挥手的大致流程,四次报文传输,两端分别都发送和接收了一次ACK与FIN报文。FIN报文的意思就是终止传输的请求报文,当客户端申请终止传输时,现向服务端发送一个终止确认,意思就是数据传输完毕,请求终止连接,然后服务端收到之后会发送一个ACK意思是剩余数据传输中,待传输结束之后发送FIN意思是服务端数据发送完毕申请终止连接,最终客户端回应一个ACK响应给服务端,说明该连接已关闭。
滑动窗口
TCP滑动窗口是用来控制网络传输时的流量的一种协议,该协议支持发送方在停止并等待确认前发送多个数据分组,来提高网络吞吐量、数据传输效率。
大概意思就是,发送方要发送数据,接收方给发送方一个窗口大小,然后发送方通过接收方给的窗口大小,对自己的数据流进行分组,按照接收方指定的大小一段一段的发送,这样做的好处就是接收方可以通过控制窗口大小的方式来管理发送方发送数据的大小,从而避免了发送方直接将大量数据发送进来造成的网络拥堵。
发送方发送数据时可以不必发送一批将窗口填满的数据包,发送方在慢启动模式下可以从一个数据包开始,一个一个递增直到接收方窗口大小的数据包量。
超时重传
超时重传机制是TCP可靠性的重要一环,此机制可以将接收方超过一定时间没收到但是发送方已发送的数据进行重发,保证了接收方能更有机会接收到数据。
TCP协议要求发送方每发送一个报文段的时候就启动一个定时器并且等待回应消息,如果超时就会对该段报文重组并重传。此机制最难的实现点就是重传超时时间(RTO)的确认,过大过小都会导致问题出现,太大会导致等待确认时间过长影响吞吐量,而太小会导致频繁重传浪费网络资源。所以说RTO的动态确认是很困难的,此处不过多赘述(其实是实力不够硬T_T)。
总结
TCP/IP协议簇是一个非常巧妙的协议集合,他们分布在不同的网络层级帮助我们约定、对接、传输各种报文、数据包等形式组成的数据。也有不同场景的不同应对协议,比如TCP与UDP的取舍,各有各的好处与使用场景。本篇文章仅仅通过我主观的理解去介绍了IP与TCP协议的大致情况。更深层次的东西如果有精力的话我们可以一起继续往深了挖。
感谢各位大佬的光临,本文重在介绍,若有不对的地方还请麻烦各位大佬指教,感谢。