浅谈TiKV集群运维问题排查与修复——磁盘空间占用问题
作者:来自 vivo 互联网存储团队- Yuan Jianwei
本文介绍了 TiKV 磁盘空间问题的排查思路与解决方案。
一、背景介绍
在业务快速扩张的年代,vivo 内部的很多业务为了可以快速上线,给现网功能提供支撑,在 KV 类型的选型下许多场景都选用了轻量快速的 Redis 集群。但是随着业务的不断发展与稳定,当数据量级达到一定程度的时候,数据性质开始发生变化:有的历史 Redis 集群热度下沉,但是依然基于 Redis 集群作为载体进行 KV 存储。这种类型的数据不仅量大,而且访问频次不高。
业务的发展阶段变化也会对数据载体的诉求也会相应发生变化。对于大规模而热度不算高的 KV 存储场景而言,业务对降低成本的诉求日益增多。为了满足这种类型的业务诉求,vivo 基于 TiKV 自研一套 KV 系统供业务使用。为了让业务可以更加便捷的接入,我们基于计算存储分离架构进行设计,把 TiKV 作为存储层开发 Redis 协议兼容的 KV 存储组件。架构如下:
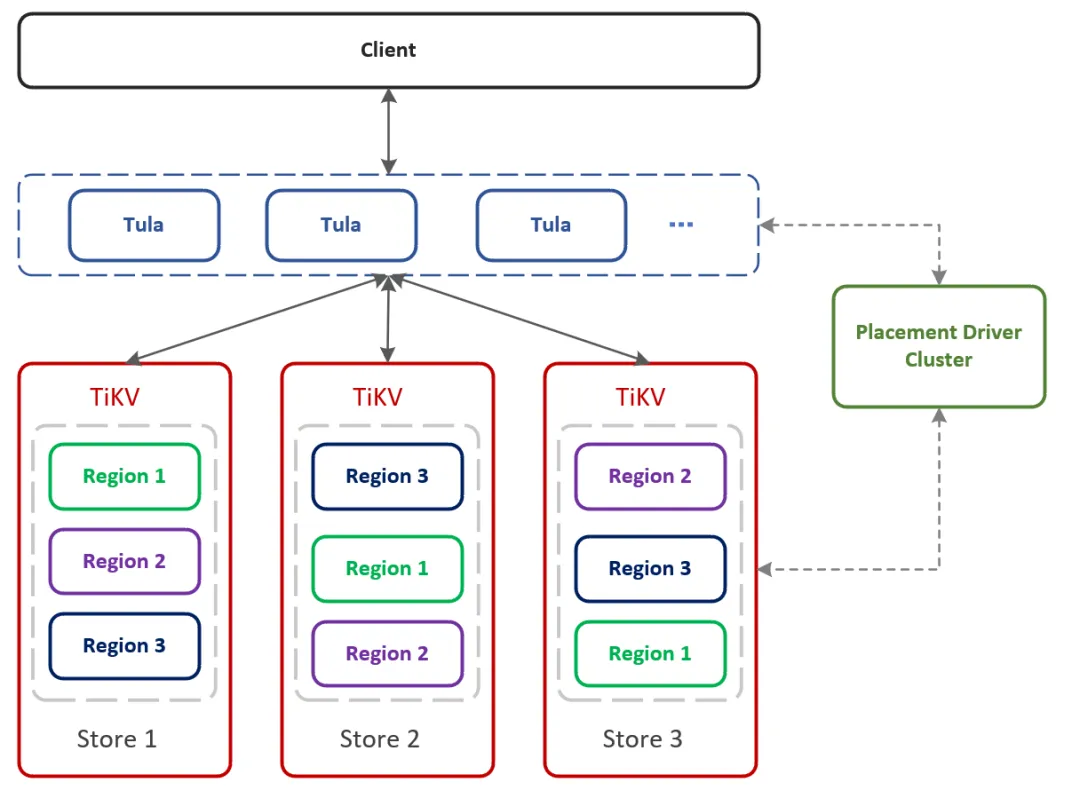
为了让机器资源可以得到更加高效的利用,我们使用不同业务混合部署的模式在相同的服务器上部署 TiKV 实例。随着集群使用的场景日益增多,使用过程中面临的问题也会各种各样,TiKV 集群会出现诸如磁盘空间占用与预期不符,读写时延抖动,负载(存储占用,region 个数,或者热读热写)不均衡等等的问题。
这次先从磁盘空间占用问题着手,从几个比较常见的排查点进行着手和排查。其他的问题排查和修复会通过其他的文章后续进行分享。
二、问题与排查
磁盘空间的占用空间如果较高,例如磁盘剩余空间占比低于 pd 的 low-space-ratio,会导致 pd 的 scheduler 判断节点所在机器磁盘资源不足,无法执行调度作业,导致集群的各种负载会越发不均衡;更加严重的情况可能会直接影响当前物理机器上的所有 TiKV 实例的可用性。
当前我们使用 TiKV 的 4.X,5.X 以及 6.X 版本,其中有的特性在更新的版本中会得到修复。
从我们运维的经验来看,磁盘空间占用构成主要分以下几块:
日志
buffer (占位文件)
数据
后续将根据这几种维度在 TiKV 的日常运维工作中进行排查和分析。总的来说,组成如下:
(1)日志
① Tikv 日志
② RocksDB 日志
(2)buffer
① 占位符文件
(3)数据
① RocksDB 数据
raft 数据(老版本)
KV 数据
② titan 数据
raft 数据(老版本)
KV 数据
下面基于我们在日常运维事项中出现频次较多的一些维度进行排查和分析,供大家线上运维工作一些参考。
2.1 日志文件占用较多
磁盘如果空间占用较大,可以优先对日志文件进行删除减缓磁盘空间资源使用。
在一些老版本 TiKV 配置是没有 RocksDB 和 raftdb 日志的滚动保留配置,这种情况下会导致一些较老的日志长期保存,长期运行会导致日志文件占据磁盘空间较大。
通常这种日志文件会在 Data 路径下:
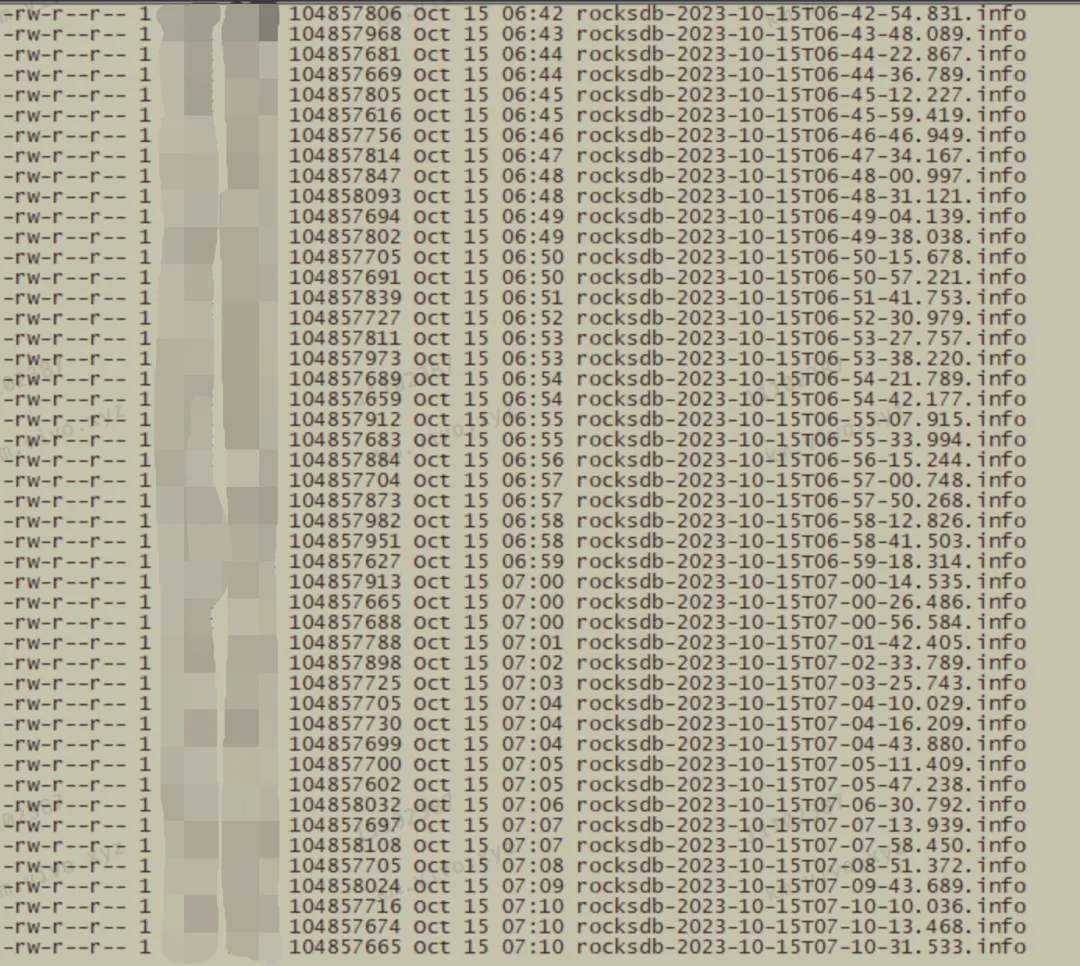
2.1.1 排查
可以使用以下指令快速统计当前日志的占用总量:
#排查raftdb.info日志
du -sh -c raftdb.info.*

#排查rocksdb.info日志
du -sh -c rocksdb.info.*

#其他按照匹配规则进行匹配
输出如下:
...
37M     raftdb.info.2022-08-12-18:17:22.338660642
36M     raftdb.info.2022-08-13-18:17:35.358329064
36M     raftdb.info.2022-08-14-18:17:47.024173873
36M     raftdb.info.2022-08-15-18:17:56.130172134
6.5G    total
如果在上述排查过程中,发现日志占用的比较多(例如 100G 粒度的日志),可以认为对磁盘空间资源的使用是比较影响的。应该对该集群进行操作。
2.1.2. 修复
原则上,日志文件其实是需要长期保存,因为后续进行问题定位等场景是需要的。这里的修复方式我们提供几种思路:
如果大家有一些类似 graylog 等日志搜集的组件,可以在确保日志上传完成之后,及时进行日志文件释放;
允许情况下,日志文件与数据日志文件存放在不同的磁盘或者载体中,区分日志文件对数据文件在容量上以及磁盘 io 的影响;
对日志文件进行转移(例如传到其他更低成本的服务器之后进行压缩等),再进行删除;
对较新的版本开启日志 rotation,根据需求自动删除。
情况允许的话
尽量保留较多的日志
,对日志进行转移,方便后续问题排查。
2.1.3. 成因
日志文件较多基本是以下几个方面造成:
原生的日志文件没有配置 rotation;
在目前的运维过程中我们发现,如果在 TiKV 的 API 层面有存在调用 unsafeDestroyRange 接口会导致 info 级别日志在 rocksdb.info.xx 日志产生(可以针对性排查)。
2.2. 占位文件占用空间较大
通常占位文件名字是 space_placeholder_file ,可以基本在部署路径 bin 或者 Data 下。通常用于 TiKV 节点重启的时候可以有更多的预留空间提供回放使用。
但是如果基于混部的方式进行部署,各个节点会重复使用这些占位文件,这种场景下随着节点数的增多,占位文件占用的总空间是比较可观的。
可以先使用 ll 指令查看占位文件大小,看是否对磁盘空间资源占用较大。
2.2.1. 排查
可以在 Tikv 的部署路径下通过以下指令进行排查。
ll|grep space_place输出如下:
-rw-r--r-- 1 root root 199941579980 Aug 5 2021 space_placeholder_file如果发现 space_placeholder_file 的占用空间比较大(对比磁盘 KV 原有的空间资源),可以认为占用的磁盘空间资源对当前 TiKV 节点的影响较大,需要处理。
2.2.2. 修复
如果发现当前磁盘空间确实比较低(尤其在一些可能影响到 pd 调度的场景下),可以进行临时删除。
注意:space_palceholder_file 会在 TiKV 启动的时候建立,在重启的时候会作为一个缓冲区使用。如果对磁盘空间利用率要求不至于极致,或者作业现场并没有对磁盘的空间资源要求很高,可以优先考虑其他维度的排查和操作。
另外,如果希望 TiKV 启动的时候不另外占用 space_palceholder_file,需要更改 TiKV 配置:
[storage]
reserve-space= "0MB"
否则后续启动持续生效。
建议在磁盘空间中,尤其混部场景下,可以使用统一的占位文件,在需要重启的场景下进行释放,节点恢复之后再把占位文件进行占据,保留缓冲区域。
2.2.3. 成因
在前期的一些部署中,默认保留了占位文件,防止磁盘 KV 在没有充足的空间,可以用于防御性的磁盘释放。
但是对于一些
同磁盘混布
的集群,这种过多的资源占用可能对机器磁盘资源带来额外负担。这种情况下可以通过删除占位文件进行资源释放。
2.3. TiKV 的 GC 过慢导致失效版本数据堆积较多
存在一种情况是因为 TiKV 的 compaction filter 开启的话, GC 速度太慢,导致大部分数据都还没 GC。
2.3.1. 排查
排查项有两个:
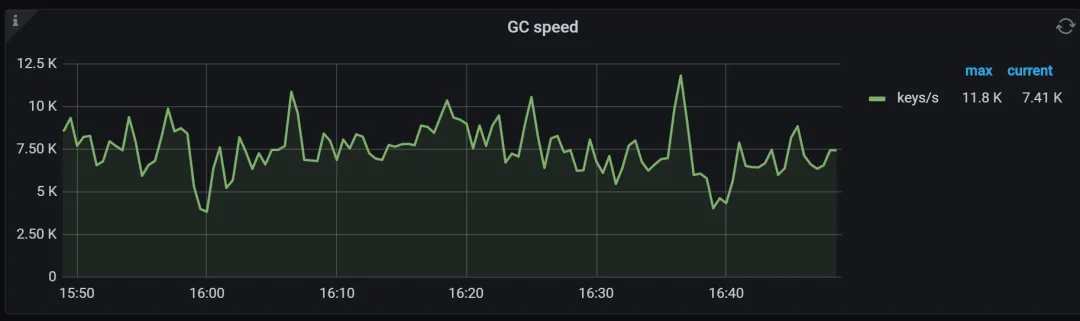
1. 排查监控:Tikv details.GC
如果发现 GC speed 监控中基本没有多少速度,但是业务侧是存在频繁的对同一个 key刷数据,或者删除数据,并没有对应的速冻的话,TiKV 层面的 GC 速度不够快。
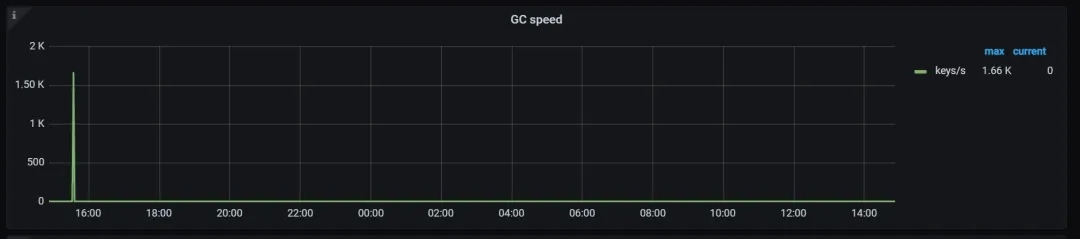
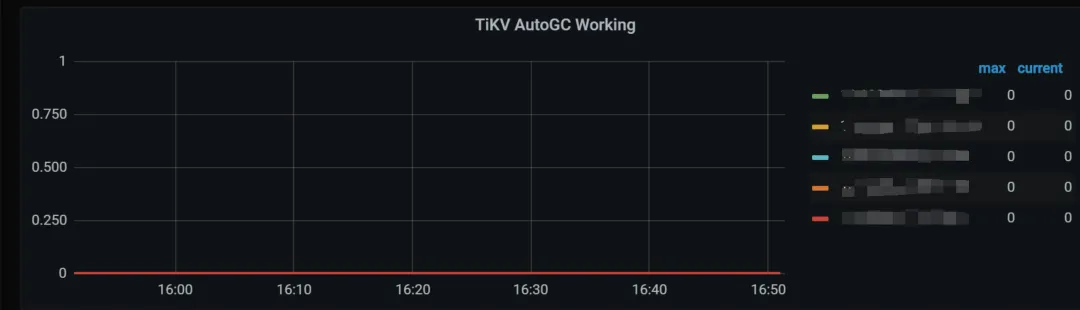
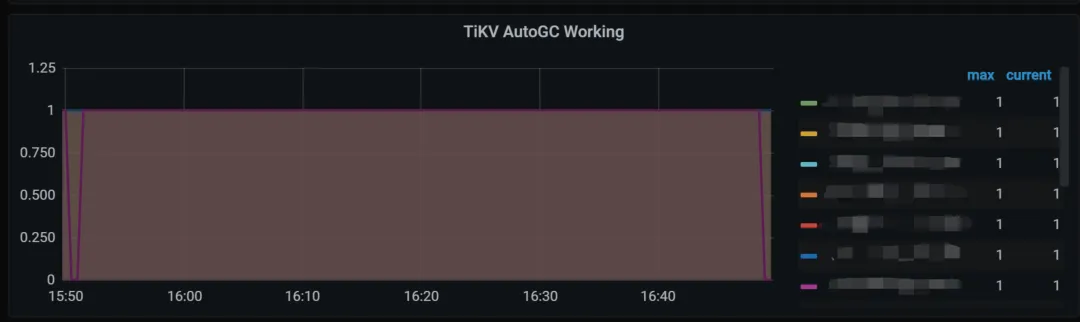
同时,如果因为 compaction filter 开启的话,TiKV AutoGC Working 曲线为0。
2. 排查配置: tikv.toml
可以查看 TiKV 的配置,查看 TiKV 部署路径下的 tikv.toml,查找项目 gc.enable-compaction-filter。
如果上述两项都得以验证,可以认为 compaction-filter 选项影响到了当前的 GC 进度。
2.3.2. 修复
操作步骤如下:
1. 对 TiKV 的配置 tikv.toml 进行更改:gc.enable-compaction-filter 修改成 true 。
[gc]
# Enable GC by compaction filter or not.
enable-compaction-filter = true
2. 对 TiKV 的配置 tikv.toml 进行更改:rocksdb.rate-bytes-per-sec 修改成建议配置。
[rocksdb]
rate-bytes-per-sec = "500MB"
注意配置的大小:
这里的“500MB”根据实际的磁盘测试写入上限来配置;
因为开启了 gc.enable-compaction-filter 之后,TiKV 的 GC 必然会增加,最终会带来磁盘 IO 资源消耗,为了可以减少 GC 对磁盘的 IO 资源,使用 rocksdb.rate-bytes-per-sec 对节点的磁盘 IO 资源进行控制;
对于磁盘独占的 TiKV 节点,可以配置成“500MB”(具体参考磁盘写入上限),如果后续发现节点性能下降,需要适当调低;
对于磁盘混布的 TiKV 节点,可以配置成“500MB”(具体参考磁盘写入上限)/<节点数>,如果后续发现节点性能下降,需要适当调低。
3. 重启&观察
操作成功后,应该会看到 Tikv details.GC.GC speed 监控项目以及 Tikv details.GC.TiKV AutoGC Working 监控项目发生变化。
之后,可以观察磁盘的使用情况,应该会存在长期的缓慢下降。
TiKV 开启 gc.enable-compaction-filter 使用注意:
因为开启了 gc.enable-compaction-filter 之后, TiKV 的 GC 必然会增加,最终会带来磁盘的负载,此处需要考虑好扫描的时候可能对 TiKV 带来的负载;
由于对集群存在长期影响,建议
提前与业务进行沟通
,并且关闭阶段前期
观察对业务的影响
;如果发现开启效果对现网业务存在一定影响,可以
先尝试调低
rocksdb.rate-bytes-per-sec ,先进行观察。
2.3.3. 成因
最初的部署为了保障性能优先,部署都默认关闭了 gc.enable-compaction-filter。但是具体的业务场景和资源消耗需要根据业务运行的状态而定。
此处需要在比较充分了解好业务的使用场景后最好在部署最初就决定好是否机器 gc.enable-compaction-filter。
注意
:
和这里情况比较相近的是,如果一些使用情况是
直接调用 TiKV 的事务接口
,需要额外配置线程按照数据的安全范围推进 gc-safepoint,否则这里的 gc 配置就算开启了,也会因为不在 gc-safepoint 的安全范围内,不进行数据删除。
2.4. TiKV 的 titan 数据占用磁盘空间大
后续的 TiKV 版本为了减缓写放大的问题,开发了 Titan 组件,可以供一些大于设定值的数据写入到 blob 文件中, sst 文件通过索引的方式指向 blob 文件,通过减少 sst 中的体积来降低写放大的问题。
但是我们在使用 Titan 的场景中也会遇到一些场景,如果业务对一些 key 删除较多,或者多版本覆盖写的场景下, Titan 的数据会明显较多。这种场景下需要对具体问题进行排查。
2.4.1 排查
主要从下面三个角度去排查和验证验证:
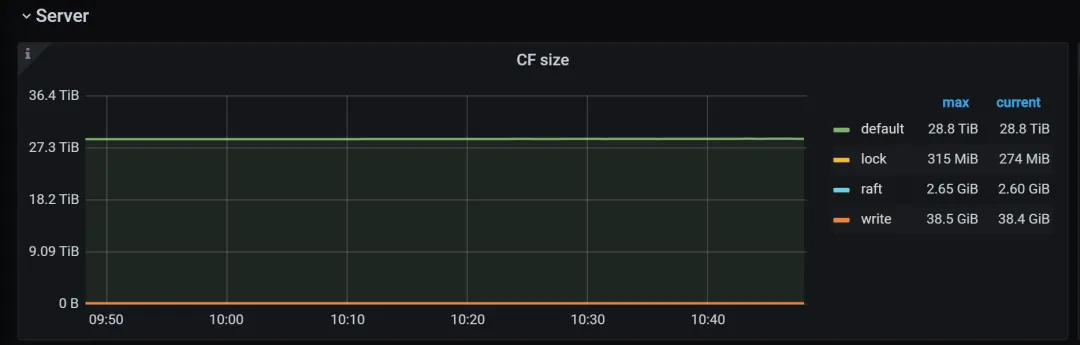
1. 查看监控面板
排查 Tikv detail 这个 dashboard,如果发现面板 Server.CF size 中的 default 较高,可以开始怀疑 titan 占用的空间比较高。
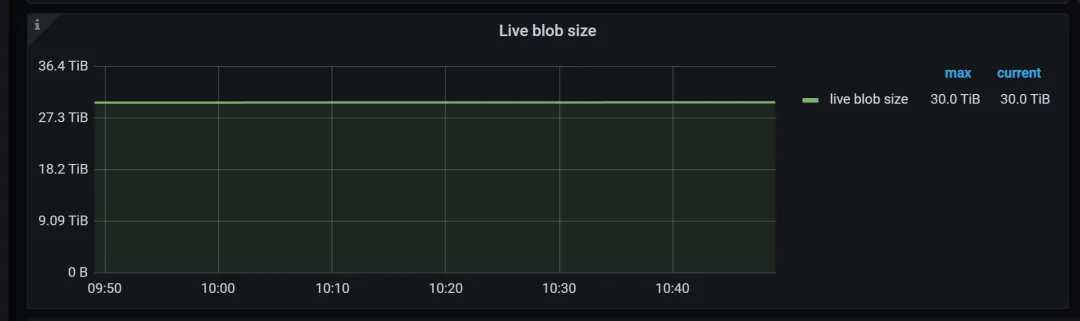
如果发现上述面板中的情况,可以进一步通过在面板 TitanDB-kv.Live blob size,以及 TitanDB-raft.Live blob size 中查看。
2. 是否大量数据写入了 titan 中。
如果上述监控面板发现异常,可以基于排查部署路径中的具体路径,确认是否 titan 占据太多资源。
进入 Data 路径后,存放数据的路径主要是 DB 和 raft。可以使用 du 工具进行查看。
以下是一个示例:
[xxx@xxx:/deploy_pathv/data]
$ du -h -d 1 db/titandb
937G    db/titandb

[xxx@xxx:/deploy_path/data]
$ du -h -d 1 raft/titandb/
1.1T    raft/titandb/
如果使用 du 工具发现占用的空间明显比较大,则可以认为这个 TiKV 节点的 titan 存放较多的数据。
3. 是否 discardable-ratio 的占比有问题。
在 Titan-kv 中的 Blob file discardable ratio distribution 中,可以观察 blob 文件的 discardable ratio 分布。
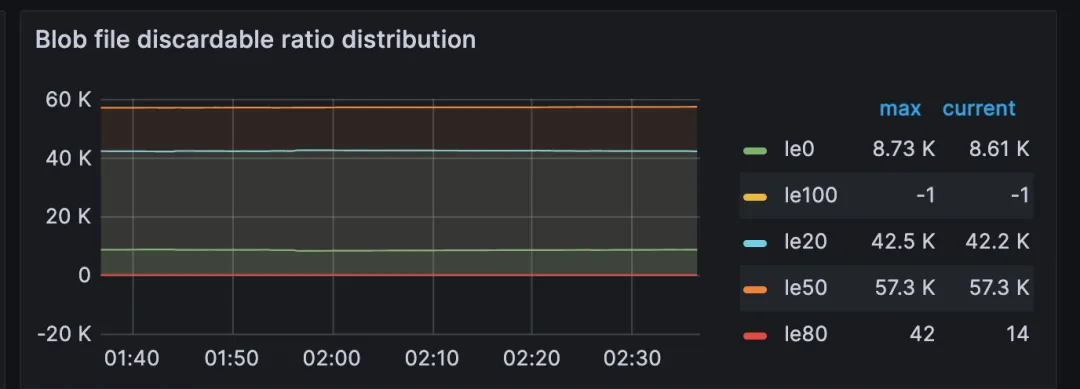
如果发现 le50 的比较高,并且查看 tikv.toml 发现没有配置 rocksdb.defaultcf.titan.discardable-ratio,大概可以推测:titan 中有大约一半的数据是可以进行清空。
2.4.2. 修复
操作过程主要是配置 rocksdb.defaultcf.titan.discardable-ratio,步骤如下:
添加rocksdb.defaultcf.titan.discardable-ratio,实例如下
:
[rocksdb.defaultcf.titan]
discardable-ratio = 0.2
rocksdb.defaultcf.titan.discardable-ratio 调整注意:
默认参数项目是0.5,表示 titan 中需要超过一半的失效数据才可以触发 titan 数据的 gc 机制。这样的设定是牺牲空间换取性能。但是这样的设定对一些预算敏感的业务可能不适用。但是调低参数之后必然导致 titan 数据的读写会存在一定的性能下降。
参数调整的依据可以参考以下:
① 如果业务对性能不太敏感,可以调整到0.1;
② 如果业务对性能比较敏感但是有磁盘空间资源释放需求,可以调整到0.2。
2. 滚动重启调整后的节点,需要把 leader region 先迁移后再进行重启,恢复。
rocksdb.defaultcf.titan.discardable-ratio 调整以及重启注意:
因为调整之后必然对 TiKV 的读写性能存在一定影响。建议重启之前提前与业务沟通,并且调整之后可以对单个 TiKV 节点进行观察,观察 Tikv detail 这个 dashboard 的以下 pannel:
① gRPC.gRPC QPS
② gRPC.99% gRPC message duration
③ gRPC.Average gRPC message duration
如果发现调整后影响业务严重,建议回退操作,并且重新评估以及调整参数rocksdb.defaultcf.titan.discardable-ratio,尝试找到适合业务的比率。
2.4.3. 成因
为了降低写放大 Titan 默认开启,如果业务写入的数据是超过 Titan 的默认大小(可以额外配置,目前默认配置是1KB大小作为写入 Titan 的判断依据),此处的逻辑会导致数据写入 Titan 中。
因为写入到 Titan,而目前现网中所有的磁盘 KV 的配置都是使用默认的配置,导致 Titan 中的数据会默认翻倍存储(保留一倍的失效数据)。Titan 这样的配置本意在于空间换取时间,可以更加高效地把磁盘 IO 资源进利用,减少因为 GC 带来的负担。但是对于一些业务写入较低但是对磁盘空间资源比较敏感的场景下,应该
根据实际的情况调整 ratio
确保满足业务的诉求。
三、总结
通过日志,占位文件,数据几个维度,我们对常见的 TiKV 占用磁盘较大的问题进行介绍和给出修复方案,以及其中的注意事项。
如果大家有其他的一些磁盘占用空间较大的问题,欢迎和我们进行交流和探讨。
后续我们会从性能,调度等方面入手,继续对TiKV的一些线上问题进行解析和讲解。请大家多多期待。