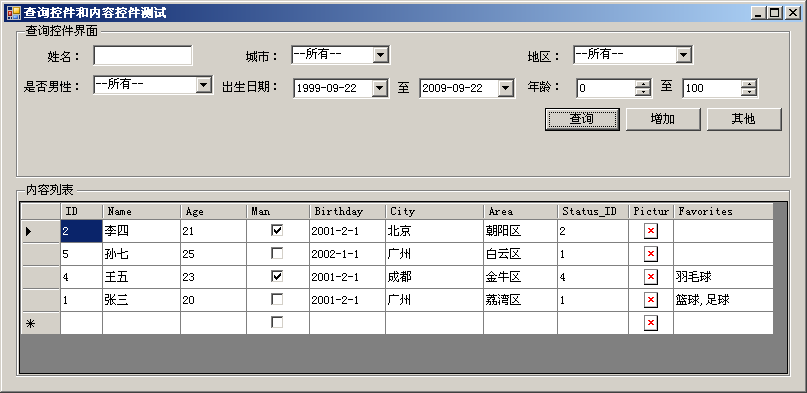
发布两个Winform新控件:Winfrom下的查询控件和内容展示控件
如果大家看过我的随笔文章《
查询控件、分页控件、页面展示控件,我的Web开发三大得力助手
》相信大家都对Web中的查询控件、页面展示控件有很多感触,现在我这两个发布两个Winform版本的相似控件:
Winfrom下的查询控件和内容展示控件。
WEB查询控件
1. 根据设定的字段属性在界面呈现相应的说明及控件
2. 支持下拉列表之间的联动,支持输入数据的验证操作。
3. 支持查询历史记录记忆功能
4. 支持日期控件的集成
5. 支持移动省公司界面样式集成

WEB页面展示控件
1. 支持查看、增加、编辑三种类型的页面展现
2. 根据设定的字段属性在界面呈现相应的说明及控件
3. 支持布局和样式修改
4. 支持日期控件的集成
5. 支持移动省公司界面样式集成

下面我来介绍下Winform下的两个控件。
Winfrom下的查询控件和内容展示控件和Web的属性和基本框架是一样的,都是根据字段信息,自动构筑UI,并提供对数据的验证,下拉列表联动等,以便减少界面代码和界面布局导致的工作量增加。
做这两个控件的主要目的是减少代码,并利于代码生成工具Database2Sharp自动生成UI内容(WEB和Winform界面),相当于把界面呈现的逻辑进行了封装。


虽然和Web界面的控件使用方法差不多,我们还是来展示下相关的代码把,这样有助于了解控件的使用方面。
查询控件窗体的部分代码:
private
void
InitSearch()
{
SearchControl1.Dock
=
DockStyle.Fill;
//
SearchControl1.PanelBorderStyle = TableLayoutPanelCellBorderStyle.Single;
this
.groupBox1.Controls.Add(SearchControl1);
this
.SearchControl1.OutSQLValueChanged
+=
new
OutSQLChangedHandle(SearchControl1_OutSQLValueChanged);
this
.SearchControl1.OnAddNew
+=
new
AddNewHandler(SearchControl1_OnAddNew);
this
.SearchControl1.OnDelete
+=
new
DeleteHandler(SearchControl1_OnDelete);
Button appendButton
=
CreateButton(
"
btnAppended
"
,
"
其他
"
);
this
.SearchControl1.AppendedButtons
=
new
Button[] { appendButton };
FieldInfo nameInfo
=
new
FieldInfo(
"
Name
"
,
"
姓名
"
, FieldType.String);
FieldInfo cityInfo
=
new
FieldInfo(
"
City
"
,
"
城市
"
, FieldType.String);
cityInfo.Width
=
100
;
cityInfo.Items
=
new
CListItem[] {
new
CListItem(
"
北京市
"
,
"
北京
"
),
new
CListItem(
"
广州
"
),
new
CListItem(
"
成都
"
) };
cityInfo.TargetFieldName
=
"
Area
"
;
cityInfo.OnFillItem
+=
new
AddItemHandler(
this
.OnFillItem);
FieldInfo areaInfo
=
new
FieldInfo(
"
Area
"
,
"
地区
"
, FieldType.String);
areaInfo.Items
=
new
CListItem[
0
];
FieldInfo manInfo
=
new
FieldInfo(
"
Man
"
,
"
是否男性
"
, FieldType.Boolean);
FieldInfo birthInfo
=
new
FieldInfo(
"
Birthday
"
,
"
出生日期
"
, FieldType.DateTime);
FieldInfo ageInfo
=
new
FieldInfo(
"
Age
"
,
"
年龄
"
, FieldType.Numeric);
this
.SearchControl1.SearchFields
=
new
FieldInfo[] { nameInfo, cityInfo, areaInfo, manInfo, birthInfo, ageInfo };
this
.SearchControl1.RowControls
=
3
;
this
.SearchControl1.ShowAddNew
=
true
;
this
.SearchControl1.LabelHorizontalAlign
=
System.Windows.Forms.VisualStyles.HorizontalAlign.Right;
this
.SearchControl1.InSQL
=
"
Select * from Test
"
;
BindData();
}
private
void
BindData()
{
using
(SqlConnection conn
=
new
SqlConnection(CONNECTION_STRING))
{
conn.Open();
string
sql
=
this
.SearchControl1.OutSQL;
SqlCommand command
=
new
SqlCommand(sql, conn);
foreach
(
string
key
in
this
.SearchControl1.PagerParameters.Keys)
{
command.Parameters.Add(
new
SqlParameter(key,
this
.SearchControl1.PagerParameters[key]));
}
SqlDataAdapter adapter
=
new
SqlDataAdapter(command);
DataSet ds
=
new
DataSet();
adapter.Fill(ds,
"
test
"
);
this
.dataGridView1.DataSource
=
ds.Tables[
0
];
}
页面展示控件的窗体部分代码:
private
void
InitEditControl()
{
editControl.Dock
=
DockStyle.Fill;
//
editControl.ControlType = ControlType.Edit;
//
TestInfo info = new TestInfo();
//
info.Name = "wuhuacong";
//
editControl.EntityObject = info;
FieldInfo nameInfo
=
new
FieldInfo(
"
Name
"
,
"
姓名
"
, FieldType.String);
nameInfo.IsRequired
=
true
;
nameInfo.ToolTip
=
"
请输入用户名称
"
;
nameInfo.ColumnSpan
=
2
;
nameInfo.Width
=
400
;
//
nameInfo.MaxLength = 255;
//
nameInfo.TextColumns = 100;
//
nameInfo.TextRows = 2;
//
nameInfo.Enabled = false;
nameInfo.IsMultiLine
=
true
;
//
if (editControl.ControlType != ControlType.Add)
//
{
//
nameInfo.Enabled = false;
//
设置“名称”不可编辑
//
}
FieldInfo cityInfo
=
new
FieldInfo(
"
City
"
,
"
城市
"
, FieldType.String);
cityInfo.Items
=
new
CListItem[] {
new
CListItem(
"
北京市
"
,
"
北京
"
),
new
CListItem(
"
广州
"
),
new
CListItem(
"
成都
"
),
new
CListItem(
"
武汉
"
) };
cityInfo.TargetFieldName
=
"
Area
"
;
cityInfo.OnFillItem
=
new
AddItemHandler(
this
.AddItem);
cityInfo.ColumnSpan
=
2
;
FieldInfo areaInfo
=
new
FieldInfo(
"
Area
"
,
"
地区
"
, FieldType.String);
areaInfo.Items
=
new
CListItem[
0
];
FieldInfo manInfo
=
new
FieldInfo(
"
Man
"
,
"
是否男性
"
, FieldType.Boolean);
manInfo.Items
=
new
CListItem[] {
new
CListItem(
"
男性
"
,
"
True
"
),
new
CListItem(
"
女性
"
,
"
False
"
) };
manInfo.DefaultValue
=
"
False
"
;
FieldInfo birthInfo
=
new
FieldInfo(
"
Birthday
"
,
"
出生日期
"
, FieldType.DateTime);
birthInfo.IsRequired
=
true
;
birthInfo.DefaultValue
=
"
2009-1-1
"
;
birthInfo.CustomFormat
=
"
yyyy-MM-dd
"
;
FieldInfo ageInfo
=
new
FieldInfo(
"
Age
"
,
"
年龄
"
, FieldType.Numeric);
//
ageInfo.CustomFormat = "#.##";
FieldInfo favoriteInfo
=
new
FieldInfo(
"
Favorites
"
,
"
兴趣爱好
"
, FieldType.String);
favoriteInfo.Items
=
new
CListItem[] {
new
CListItem(
"
篮球
"
),
new
CListItem(
"
足球
"
),
new
CListItem(
"
网球
"
),
new
CListItem(
"
乒乓球
"
),
new
CListItem(
"
台球
"
,
"
t
"
),
new
CListItem(
"
羽毛球
"
,
"
y
"
) };
favoriteInfo.ItemsType
=
ListControlType.CheckBoxList;
favoriteInfo.ColumnSpan
=
2
;
favoriteInfo.Width
=
300
;
//
favoriteInfo.DefaultValue = "篮球,乒乓球,t,y";
editControl.EidtFields
=
new
FieldInfo[] { nameInfo, cityInfo, areaInfo, manInfo, birthInfo, ageInfo, favoriteInfo };
editControl.RowControls
=
2
;
//
默认一行放置2个控件组
//
editControl.ContentControlWidth = 200;
//
所有控件统一宽度
editControl.LabelHorizontalAlign
=
HorizontalAlign.Right;
//
标签文本对其方式
editControl.PanelBorderStyle
=
TableLayoutPanelCellBorderStyle.None;
//
表格样式
editControl.OnCancel
=
new
CancelHandler(
this
.OnCancel);
editControl.OnSaveData
=
new
SaveDataHandler(
this
.OnSaveData);
this
.groupBox1.Controls.Add(editControl);
}
private
void
Form1_Load(
object
sender, EventArgs e)
{
InitEditControl();
}
下面附上使用的例子,可以下载下来慢慢研究,其中Database.sql是测试例子的数据库脚本,允许例子前,请初始化数据库。
https://files.cnblogs.com/wuhuacong/TestWinControl.rar
希望大家使用愉快,下一步我将集成UI的自动生成到Database2Sharp中,和Web一样,利用查询控件和分页控件、页面展示控件完成UI的生成。