在 K8S 中创建 Pod 是如何使用到 GPU 的: nvidia device plugin 源码分析

本文主要分析了在 K8s 中创建一个 Pod 并申请 GPU 资源,最终该 Pod 时怎么能够使用 GPU 的,具体的实现原理,以及 device plugin、nvidia-container-toolkit 相关源码分析。
1.概述
在 两篇文章中分别分享了在不同环境如何使用 GPU,以及在 k8s 中使用 GPU Operator 来加速部署。
在 中则是分析了 Device Plugin 的实现原理。
这篇文章则是将整个流程连起来做一个简单分析,即:
宿主机上的 GPU 是怎么能够被 K8s 中的 Pod 使用的
。
可以分为以下两部分:
- 1)k8s 是如何感知到 GPU 的
- 2)GPU 是如何分配给 Pod 的
2. 大致工作流程
这部分主要分享一下 NVIDIA 的 device-plugin 以及 nvidia-container-toolkit 的工作流程,以及二者是怎么配合的。
k8s 是如何感知到 GPU 的
这部分主要使用到了 k8s 提供的 device plugin 机制。
感兴趣的同学可以阅读一下这篇文章 -->
NVIDIA 实现了
NVIDIA/k8s-device-plugin
来使得节点上的 GPU 能够被 k8s 感知到。
这个 device plugin 主要做两件事:
- 1)检测节点上的 GPU 设备并上报给 Kubelet,再由 Kubelet 更新节点信息时提交到 kube-apiserver。
- 这样 k8s 就知道每个节点上有多少 GPU 了,后续 Pod 申请 GPU 时就会往有 GPU 资源的节点上调度。
- 2)Pod 申请 GPU 时,为对应容器添加一个
NVIDIA_VISIBLE_DEVICES
环境变量,后续底层 Runtime 在真正创建容器时就能根据这些信息把 GPU 挂载到容器中
- 例如添加环境变量:
NVIDIA_VISIBLE_DEVICES=GPU-03f69c50-207a-2038-9b45-23cac89cb67d
- 例如添加环境变量:
NVIDIA 这个 device plugin 比较复杂,支持多种策略,device plugin 提供的 env、mounts、device 以及 annotations 等方式它都做了支持,在部署时可以通过
DEVICE_LIST_STRATEGY
环境变量进行指定,不过默认还是用的 env。
另外
DEVICE_ID_STRATEGY
默认也是 uuid,因此在 Pod 中看到的
NVIDIA_VISIBLE_DEVICES
就不是 Docker 环境中常见的 0,1,2 这种编号了,而是 GPU 设备对应的 UUID。
GPU 是如何分配给 Pod 的
NVIDIA 提供了 nvidia-container-toolkit 来处理如何将 GPU 分配给容器的问题。
核心组件有以下三个:
nvidia-container-runtime
nvidia-container-runtime-hook
nvidia-container-cli
首先需要将 docker/containerd 的 runtime 设置为
nvidia-container-runtime
,此后整个调用链就变成这样了:
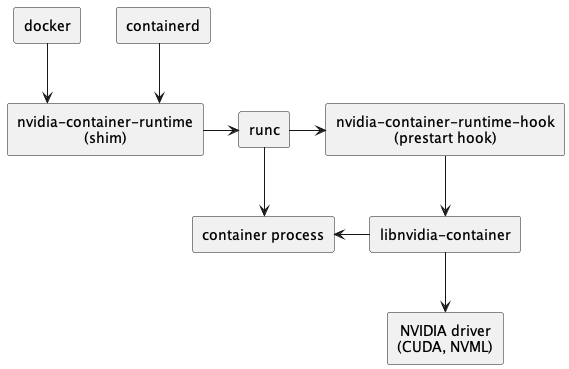
接下来就具体分析每个组件的作用。
nvidia-container-runtime
nvidia-container-runtime 的作用就是负责在容器启动之前,将 nvidia-container-runtime-hook 注入到 prestart hook。
小知识:docker/containerd 都是高级 Runtime,runC 则是低级 Runtime。不同层级 Runtime 通过 OCI Spec 进行交互。
也就是说 docker 调用 runC 创建容器时,会把 docker 收到的信息解析,组装成 OCI Spec,然后在往下传递。
而 nvidia-container-runtime 的作用就是修改容器 Spec,往里面添加一个 prestart hook,这个 hook 就是 nvidia-container-runtime-hook
。
这样 runC 根据 Spec 启动容器时就会执行该 hook,即执行 nvidia-container-runtime-hook。
也就是说 nvidia-container-runtime 其实没有任何逻辑,真正的逻辑都在 nvidia-container-runtime-hook 中。
nvidia-container-runtime-hook
nvidia-container-runtime-hook 包含了给容器分配 GPU 的核心逻辑,主要分为两部分:
- 1)从容器 Spec 的 mounts 和 env 中解析 GPU 信息
- mounts 对应前面 device plugin 中设置的 Mount 和 Device,env 则对应 Env
- 2)调用
nvidia-container-cli configure
命令,保证容器内可以使用被指定的 GPU 以及对应能力
也就是说
nvidia-container-runtime-hook
最终还是调用
nvidia-container-cli
来实现的给容器分配 GPU 能力的。
nvidia-container-cli
nvidia-container-cli 是一个命令行工具,用于配置 Linux 容器对 GPU 硬件的使用。
提供了三个命令
- list: 打印 nvidia 驱动库及路径
- info: 打印所有Nvidia GPU设备
- configure: 进入给定进程的命名空间,执行必要操作保证容器内可以使用被指定的 GPU 以及对应能力(指定 NVIDIA 驱动库)
一般主要使用 configure 命令,它将 NVIDIA GPU Driver、CUDA Driver 等 驱动库的 so 文件 和 GPU 设备信息, 通过文件挂载的方式映射到容器中。
小结
整个流程如下:
- 1)device plugin 上报节点上的 GPU 信息
- 2)用户创建 Pod,在 resources.rquest 中申请 GPU,Scheduler 根据各节点 GPU 资源情况,将 Pod 调度到一个有足够 GPU 的节点
- 3)DevicePlugin 根据 Pod 中申请的 GPU 资源,为容器添加 Env 和 Devices 配置
- 例如添加环境变量:
NVIDIA_VISIBLE_DEVICES=GPU-03f69c50-207a-2038-9b45-23cac89cb67d
- 例如添加环境变量:
- 4)docker / containerd 启动容器
- 由于配置了 nvidia-container-runtime,因此会使用 nvidia-container-runtime 来创建容器
- nvidia-container-runtime 额外做了一件事:将
nvidia-container-runtime-hook
作为 prestart hook 添加到容器 spec 中,然后就将容器 spec 信息往后传给 runC 了。 - runC 创建容器前会调用 prestart hook,其中就包括了上一步添加的 nvidia-container-runtime-hook,该 hook 主要做两件事:
- 从容器 Spec 的 mounts 或者 env 中解析 GPU 信息
- 调用
nvidia-container-cli configure
命令,将 NVIDIA 的 GPU Driver、CUDA Driver 等库文件挂载进容器,保证容器内可以使用被指定的 GPU以及对应能力
以上就是在 k8s 中使用 NVIDIA GPU 的流程,简单来说就是:
- 1)device plugin 中根据 pod 申请的 GPU 资源分配 GPU,并以 ENV 环境变量方式添加到容器上。
- 2)nvidia-container-toolkit 则根据该 Env 拿到要分配给该容器的 GPU 最终把相关文件挂载到容器里
当然并不是只有这一种实现方法,比如天数的
ix-device-plugin
实现中就没有提供自己的 container-toolkit,只在 device plugin 中通过 Device 指定要挂载哪些设备,这样容器启动时也会把这些设备挂载到容器中:
func (p *iluvatarDevicePlugin) allocateDevicesByDeviceID(hostminor uint, num int) *pluginapi.DeviceSpec {
	var device pluginapi.DeviceSpec

	hostPathPrefix := "/dev/"
	containerPathPrefix := "/dev/"

	// Expose the device node for iluvatar pod.
	device.HostPath = hostPathPrefix + deviceName + strconv.Itoa(int(hostminor))
	device.ContainerPath = containerPathPrefix + deviceName + strconv.Itoa(num)
	device.Permissions = "rw"

	return &device
}
不过由于没有挂载驱动进去,因此需要容器内自带驱动才行。
至此,已经分析了 k8s 创建 Pod 使用 GPU 的整个流程及大致原理,接下来简单分析下相关组件源码。
3. device plugin 源码分析
NVIDIA GPU 对应的 device plugin 叫做:
NVIDIA/k8s-device-plugin
Allocate 方法
主要看为容器分配资源的 Allocate 方法
// https://github.com/NVIDIA/k8s-device-plugin/blob/main/internal/plugin/server.go#L319-L332

// Allocate which return list of devices.
func (plugin *NvidiaDevicePlugin) Allocate(ctx context.Context, reqs *pluginapi.AllocateRequest) (*pluginapi.AllocateResponse, error) {
        responses := pluginapi.AllocateResponse{}
        for _, req := range reqs.ContainerRequests {
                if err := plugin.rm.ValidateRequest(req.DevicesIDs); err != nil {
                        return nil, fmt.Errorf("invalid allocation request for %q: %w", plugin.rm.Resource(), err)
                }
                response, err := plugin.getAllocateResponse(req.DevicesIDs)
                if err != nil {
                        return nil, fmt.Errorf("failed to get allocate response: %v", err)
                }
                responses.ContainerResponses = append(responses.ContainerResponses, response)
        }

        return &responses, nil
}
核心逻辑在
getAllocateResponse
中:
func (plugin *NvidiaDevicePlugin) getAllocateResponse(requestIds []string) (*pluginapi.ContainerAllocateResponse, error) {
	deviceIDs := plugin.deviceIDsFromAnnotatedDeviceIDs(requestIds)

	// Create an empty response that will be updated as required below.
	response := &pluginapi.ContainerAllocateResponse{
		Envs: make(map[string]string),
	}
	if plugin.deviceListStrategies.AnyCDIEnabled() {
		responseID := uuid.New().String()
		if err := plugin.updateResponseForCDI(response, responseID, deviceIDs...); err != nil {
			return nil, fmt.Errorf("failed to get allocate response for CDI: %v", err)
		}
	}
	if plugin.config.Sharing.SharingStrategy() == spec.SharingStrategyMPS {
		plugin.updateResponseForMPS(response)
	}

	// The following modifications are only made if at least one non-CDI device
	// list strategy is selected.
	if plugin.deviceListStrategies.AllCDIEnabled() {
		return response, nil
	}

	if plugin.deviceListStrategies.Includes(spec.DeviceListStrategyEnvvar) {
		plugin.updateResponseForDeviceListEnvvar(response, deviceIDs...)
	}
	if plugin.deviceListStrategies.Includes(spec.DeviceListStrategyVolumeMounts) {
		plugin.updateResponseForDeviceMounts(response, deviceIDs...)
	}
	if *plugin.config.Flags.Plugin.PassDeviceSpecs {
		response.Devices = append(response.Devices, plugin.apiDeviceSpecs(*plugin.config.Flags.NvidiaDevRoot, requestIds)...)
	}
	if *plugin.config.Flags.GDSEnabled {
		response.Envs["NVIDIA_GDS"] = "enabled"
	}
	if *plugin.config.Flags.MOFEDEnabled {
		response.Envs["NVIDIA_MOFED"] = "enabled"
	}
	return response, nil
}
可以看到,根据不同 flag 以及策略分为不同的设置方式
// Constants to represent the various device list strategies
const (
	DeviceListStrategyEnvvar         = "envvar"
	DeviceListStrategyVolumeMounts   = "volume-mounts"
	DeviceListStrategyCDIAnnotations = "cdi-annotations"
	DeviceListStrategyCDICRI         = "cdi-cri"
)
东西比较多,我们主要看设置 Env 的策略
if plugin.deviceListStrategies.Includes(spec.DeviceListStrategyEnvvar) {
    plugin.updateResponseForDeviceListEnvvar(response, deviceIDs...)
}
核心如下:
// updateResponseForDeviceListEnvvar sets the environment variable for the requested devices.
func (plugin *NvidiaDevicePlugin) updateResponseForDeviceListEnvvar(response *pluginapi.ContainerAllocateResponse, deviceIDs ...string) {
        response.Envs[plugin.deviceListEnvvar] = strings.Join(deviceIDs, ",")
}
可以看到,逻辑很简单,就是给容器添加了一个环境变量,value 为设备 id,具体 deviceID 提供了两种策略,可以是编号或者 uuid
const (
        DeviceIDStrategyUUID  = "uuid"
        DeviceIDStrategyIndex = "index"
)
key 是一个变量 plugin.deviceListEnvvar,初始化如下:
        plugin := NvidiaDevicePlugin{
                deviceListEnvvar:     "NVIDIA_VISIBLE_DEVICES",
                socket:               pluginPath + ".sock",
          // ...
        }
也就是说 NVIDIA 这个 device plugin 实现 Allocate 主要就是给容器增加了环境变量,例如:
NVIDIA_VISIBLE_DEVICES=GPU-03f69c50-207a-2038-9b45-23cac89cb67d
或者
NVIDIA_VISIBLE_DEVICES=1,2
小结
NVIDIA device plugin 核心逻辑就是给容器添加
NVIDIA_VISIBLE_DEVICES
环境变量,告知后续组件,需要给该组件分配 GPU。
比如当我们仅使用 Docker 时就可以在启动容器时指定 GPU,
--gpus
flag 和
NVIDIA_VISIBLE_DEVICES
环境变量效果一致。
# --gpus
docker run --gpus device=0 -it tensorflow/tensorflow:latest-gpu bash
# 或者环境变量 NVIDIA_VISIBLE_DEVICES
docker run -e NVIDIA_VISIBLE_DEVICES=0 -it tensorflow/tensorflow:latest-gpu bash
至于为什么添加了
NVIDIA_VISIBLE_DEVICES
环境变量就会给该容器分配 GPU,就是接下来的
nvidi-container-toolkit
组件实现的。
nvidia 在 device plugin 中也使用
NVIDIA_VISIBLE_DEVICES
环境变量正好能够兼容 nvidia-container-toolkit。
4. nvidia-container-toolkit 源码分析
这部分我们主要分析,为什么添加了
NVIDIA_VISIBLE_DEVICES
环境变量就会给该容器分配 GPU,nvidia-container-toolkit 中做了哪些处理。
nvidia-container-toolkit 包含以下 3 个部分:
nvidia-container-runtime
nvidia-container-runtime 可以看做是一个 docker/containerd 的底层 runtime(类似 runC),在模块在创建容器的整个调用链中处在如下位置:
它只做一件事,就是在容器启动之前,将 nvidia-container-runtime-hook 注入到 prestart hook。
以修改容器 Spec 的方式添加一个 prestart hook 进去
这样,后续 runC 使用容器 Spec 创建容器时就会执行该 prestart hook。
简单分析下源码,首先是启动命令:
nvidia-container-runtime/main.go
就是 New 了一个 nvidia runtime 对象,并执行其 Run 方法。
// https://github.com/NVIDIA/nvidia-container-toolkit/blob/main/cmd/nvidia-container-runtime/main.go#L9-L15

import (
    "os"

    "github.com/NVIDIA/nvidia-container-toolkit/internal/runtime"
)

func main() {
    r := runtime.New()
    err := r.Run(os.Args)
    if err != nil {
       os.Exit(1)
    }
}
具体的 New 方法也很简单,返回的是一个名为 Interface 的 Interface,包含一个 Run 方法
// https://github.com/NVIDIA/nvidia-containertoolkit/blob/main/internal/runtime/api.go#L17-L26

type rt struct {
    logger       *Logger
    modeOverride string
}

// Interface is the interface for the runtime library.
type Interface interface {
    Run([]string) error
}
func New(opts ...Option) Interface {
    r := rt{}
    for _, opt := range opts {
       opt(&r)
    }
    if r.logger == nil {
       r.logger = NewLogger()
    }
    return &r
}
Run 方法具体实现如下:
// https://github.com/NVIDIA/nvidia-container-toolkit/blob/main/internal/runtime/runtime.go#L34-L91

// Run is an entry point that allows for idiomatic handling of errors
// when calling from the main function.
func (r rt) Run(argv []string) (rerr error) {
    defer func() {
       if rerr != nil {
          r.logger.Errorf("%v", rerr)
       }
    }()

    printVersion := hasVersionFlag(argv)
    if printVersion {
       fmt.Printf("%v version %v\n", "NVIDIA Container Runtime", info.GetVersionString(fmt.Sprintf("spec: %v", specs.Version)))
    }

    cfg, err := config.GetConfig()
    if err != nil {
       return fmt.Errorf("error loading config: %v", err)
    }
    r.logger.Update(
       cfg.NVIDIAContainerRuntimeConfig.DebugFilePath,
       cfg.NVIDIAContainerRuntimeConfig.LogLevel,
       argv,
    )
    defer func() {
       if rerr != nil {
          r.logger.Errorf("%v", rerr)
       }
       if err := r.logger.Reset(); err != nil {
          rerr = errors.Join(rerr, fmt.Errorf("failed to reset logger: %v", err))
       }
    }()

    // We apply some config updates here to ensure that the config is valid in
    // all cases.
    if r.modeOverride != "" {
       cfg.NVIDIAContainerRuntimeConfig.Mode = r.modeOverride
    }
    //nolint:staticcheck  // TODO(elezar): We should swith the nvidia-container-runtime from using nvidia-ctk to using nvidia-cdi-hook.
    cfg.NVIDIACTKConfig.Path = config.ResolveNVIDIACTKPath(&logger.NullLogger{}, cfg.NVIDIACTKConfig.Path)
    cfg.NVIDIAContainerRuntimeHookConfig.Path = config.ResolveNVIDIAContainerRuntimeHookPath(&logger.NullLogger{}, cfg.NVIDIAContainerRuntimeHookConfig.Path)

    // Log the config at Trace to allow for debugging if required.
    r.logger.Tracef("Running with config: %+v", cfg)

    driver := root.New(
       root.WithLogger(r.logger),
       root.WithDriverRoot(cfg.NVIDIAContainerCLIConfig.Root),
    )

    r.logger.Tracef("Command line arguments: %v", argv)
    runtime, err := newNVIDIAContainerRuntime(r.logger, cfg, argv, driver)
    if err != nil {
       return fmt.Errorf("failed to create NVIDIA Container Runtime: %v", err)
    }

    if printVersion {
       fmt.Print("\n")
    }
    return runtime.Exec(argv)
}
核心部分:
runtime, err := newNVIDIAContainerRuntime(r.logger, cfg, argv, driver)
if err != nil {
   return fmt.Errorf("failed to create NVIDIA Container Runtime: %v", err)
}

if printVersion {
   fmt.Print("\n")
}
return runtime.Exec(argv)
继续查看 newNVIDIAContainerRuntime 实现
// https://github.com/NVIDIA/nvidia-container-toolkit/blob/main/internal/runtime/runtime_factory.go#L32-L62

// newNVIDIAContainerRuntime is a factory method that constructs a runtime based on the selected configuration and specified logger
func newNVIDIAContainerRuntime(logger logger.Interface, cfg *config.Config, argv []string, driver *root.Driver) (oci.Runtime, error) {
    lowLevelRuntime, err := oci.NewLowLevelRuntime(logger, cfg.NVIDIAContainerRuntimeConfig.Runtimes)
    if err != nil {
       return nil, fmt.Errorf("error constructing low-level runtime: %v", err)
    }

    logger.Tracef("Using low-level runtime %v", lowLevelRuntime.String())
    if !oci.HasCreateSubcommand(argv) {
       logger.Tracef("Skipping modifier for non-create subcommand")
       return lowLevelRuntime, nil
    }

    ociSpec, err := oci.NewSpec(logger, argv)
    if err != nil {
       return nil, fmt.Errorf("error constructing OCI specification: %v", err)
    }

    specModifier, err := newSpecModifier(logger, cfg, ociSpec, driver)
    if err != nil {
       return nil, fmt.Errorf("failed to construct OCI spec modifier: %v", err)
    }

    // Create the wrapping runtime with the specified modifier.
    r := oci.NewModifyingRuntimeWrapper(
       logger,
       lowLevelRuntime,
       ociSpec,
       specModifier,
    )

    return r, nil
}
暂时只需要关注 specModifier 这个对象,就是它在修改容器的 spec 以添加 hook
// newSpecModifier is a factory method that creates constructs an OCI spec modifer based on the provided config.
func newSpecModifier(logger logger.Interface, cfg *config.Config, ociSpec oci.Spec, driver *root.Driver) (oci.SpecModifier, error) {
    rawSpec, err := ociSpec.Load()
    if err != nil {
       return nil, fmt.Errorf("failed to load OCI spec: %v", err)
    }

    image, err := image.NewCUDAImageFromSpec(rawSpec)
    if err != nil {
       return nil, err
    }

    mode := info.ResolveAutoMode(logger, cfg.NVIDIAContainerRuntimeConfig.Mode, image)
    modeModifier, err := newModeModifier(logger, mode, cfg, ociSpec, image)
    if err != nil {
       return nil, err
    }
    // For CDI mode we make no additional modifications.
    if mode == "cdi" {
       return modeModifier, nil
    }

    graphicsModifier, err := modifier.NewGraphicsModifier(logger, cfg, image, driver)
    if err != nil {
       return nil, err
    }

    featureModifier, err := modifier.NewFeatureGatedModifier(logger, cfg, image)
    if err != nil {
       return nil, err
    }

    modifiers := modifier.Merge(
       modeModifier,
       graphicsModifier,
       featureModifier,
    )
    return modifiers, nil
}
修改 hook 的 modifier 在 newModeModifier 里面
func newModeModifier(logger logger.Interface, mode string, cfg *config.Config, ociSpec oci.Spec, image image.CUDA) (oci.SpecModifier, error) {
    switch mode {
    case "legacy":
       return modifier.NewStableRuntimeModifier(logger, cfg.NVIDIAContainerRuntimeHookConfig.Path), nil
    case "csv":
       return modifier.NewCSVModifier(logger, cfg, image)
    case "cdi":
       return modifier.NewCDIModifier(logger, cfg, ociSpec)
    }

    return nil, fmt.Errorf("invalid runtime mode: %v", cfg.NVIDIAContainerRuntimeConfig.Mode)
}
具体为 stableRuntimeModifier:
func (m stableRuntimeModifier) Modify(spec *specs.Spec) error {
    // If an NVIDIA Container Runtime Hook already exists, we don't make any modifications to the spec.
    if spec.Hooks != nil {
       for _, hook := range spec.Hooks.Prestart {
          hook := hook
          if isNVIDIAContainerRuntimeHook(&hook) {
             m.logger.Infof("Existing nvidia prestart hook (%v) found in OCI spec", hook.Path)
             return nil
          }
       }
    }

    path := m.nvidiaContainerRuntimeHookPath
    m.logger.Infof("Using prestart hook path: %v", path)
    args := []string{filepath.Base(path)}
    if spec.Hooks == nil {
       spec.Hooks = &specs.Hooks{}
    }
    spec.Hooks.Prestart = append(spec.Hooks.Prestart, specs.Hook{
       Path: path,
       Args: append(args, "prestart"),
    })

    return nil
}
核心部分:
path := m.nvidiaContainerRuntimeHookPath
spec.Hooks.Prestart = append(spec.Hooks.Prestart, specs.Hook{
   Path: path,
   Args: append(args, "prestart"),
})
可以看到,最终就是添加了一个 prestart hook,hook 的 path 就是 nvidia-container-runtime-hook 这个二进制文件的位置。
至此,nvidia-container-runtime 的工作就完成了,容器真正启动时,底层 runtime(比如 runC)检测到容器的 Spec 中有这个 hook 就会去执行了,最终 nvidia-container-runtime-hook 就会被运行了。
nvidia-container-runtime-hook
该组件则是 nvidia-container-toolkit 中的核心,所有的逻辑都在这里面实现。
主要做两件事:
- 1)从容器的 env 中解析 GPU 信息
- 2)调用
nvidia-container-cli configure
命令,挂载相关文件,保证容器内可以使用被指定的GPU以及对应能力
也是先从启动命令看起:
nvidia-container-runtime-hook/main.go
switch args[0] {
case "prestart":
    doPrestart()
    os.Exit(0)
case "poststart":
    fallthrough
case "poststop":
    os.Exit(0)
default:
    flag.Usage()
    os.Exit(2)
}
我们是添加的 prestart hook,因此会走 prestart 分支 执行doPrestart()方法。
func doPrestart() {
    var err error

    defer exit()
    log.SetFlags(0)

    hook, err := getHookConfig()
    if err != nil || hook == nil {
       log.Panicln("error getting hook config:", err)
    }
    cli := hook.NVIDIAContainerCLIConfig

    container := getContainerConfig(*hook)
    nvidia := container.Nvidia
    if nvidia == nil {
       // Not a GPU container, nothing to do.
       return
    }

    if !hook.NVIDIAContainerRuntimeHookConfig.SkipModeDetection && info.ResolveAutoMode(&logInterceptor{}, hook.NVIDIAContainerRuntimeConfig.Mode, container.Image) != "legacy" {
       log.Panicln("invoking the NVIDIA Container Runtime Hook directly (e.g. specifying the docker --gpus flag) is not supported. Please use the NVIDIA Container Runtime (e.g. specify the --runtime=nvidia flag) instead.")
    }

    rootfs := getRootfsPath(container)

    args := []string{getCLIPath(cli)}
    if cli.Root != "" {
       args = append(args, fmt.Sprintf("--root=%s", cli.Root))
    }
    if cli.LoadKmods {
       args = append(args, "--load-kmods")
    }
    if cli.NoPivot {
       args = append(args, "--no-pivot")
    }
    if *debugflag {
       args = append(args, "--debug=/dev/stderr")
    } else if cli.Debug != "" {
       args = append(args, fmt.Sprintf("--debug=%s", cli.Debug))
    }
    if cli.Ldcache != "" {
       args = append(args, fmt.Sprintf("--ldcache=%s", cli.Ldcache))
    }
    if cli.User != "" {
       args = append(args, fmt.Sprintf("--user=%s", cli.User))
    }
    args = append(args, "configure")

    if ldconfigPath := cli.NormalizeLDConfigPath(); ldconfigPath != "" {
       args = append(args, fmt.Sprintf("--ldconfig=%s", ldconfigPath))
    }
    if cli.NoCgroups {
       args = append(args, "--no-cgroups")
    }
    if len(nvidia.Devices) > 0 {
       args = append(args, fmt.Sprintf("--device=%s", nvidia.Devices))
    }
    if len(nvidia.MigConfigDevices) > 0 {
       args = append(args, fmt.Sprintf("--mig-config=%s", nvidia.MigConfigDevices))
    }
    if len(nvidia.MigMonitorDevices) > 0 {
       args = append(args, fmt.Sprintf("--mig-monitor=%s", nvidia.MigMonitorDevices))
    }
    if len(nvidia.ImexChannels) > 0 {
       args = append(args, fmt.Sprintf("--imex-channel=%s", nvidia.ImexChannels))
    }

    for _, cap := range strings.Split(nvidia.DriverCapabilities, ",") {
       if len(cap) == 0 {
          break
       }
       args = append(args, capabilityToCLI(cap))
    }

    for _, req := range nvidia.Requirements {
       args = append(args, fmt.Sprintf("--require=%s", req))
    }

    args = append(args, fmt.Sprintf("--pid=%s", strconv.FormatUint(uint64(container.Pid), 10)))
    args = append(args, rootfs)

    env := append(os.Environ(), cli.Environment...)
    //nolint:gosec // TODO: Can we harden this so that there is less risk of command injection?
    err = syscall.Exec(args[0], args, env)
    log.Panicln("exec failed:", err)
}
我们只需要关注下面这个就行
args := []string{getCLIPath(cli)}
container := getContainerConfig(*hook)
err = syscall.Exec(args[0], args, env)
一个是 getContainerConfig 解析容器配置 ,另一个就是 exec 真正开始执行命令。
这里执行的命令其实就是 nvidia-container-cli
getContainerConfig
这部分就是解析 Env 拿到要分配给该容器的 GPU,如果没有
NVIDIA_VISIBLE_DEVICES
环境变量就不会做任何事情。
func getContainerConfig(hook HookConfig) (config containerConfig) {
    var h HookState
    d := json.NewDecoder(os.Stdin)
    if err := d.Decode(&h); err != nil {
       log.Panicln("could not decode container state:", err)
    }

    b := h.Bundle
    if len(b) == 0 {
       b = h.BundlePath
    }

    s := loadSpec(path.Join(b, "config.json"))

    image, err := image.New(
       image.WithEnv(s.Process.Env),
       image.WithDisableRequire(hook.DisableRequire),
    )
    if err != nil {
       log.Panicln(err)
    }

    privileged := isPrivileged(s)
    return containerConfig{
       Pid:    h.Pid,
       Rootfs: s.Root.Path,
       Image:  image,
       Nvidia: getNvidiaConfig(&hook, image, s.Mounts, privileged),
    }
}
构建了一个 image 对象,注意这里把 ENV 也传进去了
之前说了需要给容器分配什么 GPU 是通过 NVIDIA_VISIBLE_DEVICES 环境变量指定的
image, err := image.New(
    image.WithEnv(s.Process.Env),
    image.WithDisableRequire(hook.DisableRequire),
)
然后解析配置
func getNvidiaConfig(hookConfig *HookConfig, image image.CUDA, mounts []Mount, privileged bool) *nvidiaConfig {
    legacyImage := image.IsLegacy()

    var devices string
    if d := getDevices(hookConfig, image, mounts, privileged); d != nil {
       devices = *d
    } else {
       // 'nil' devices means this is not a GPU container.
       return nil
    }

    var migConfigDevices string
    if d := getMigConfigDevices(image); d != nil {
       migConfigDevices = *d
    }
    if !privileged && migConfigDevices != "" {
       log.Panicln("cannot set MIG_CONFIG_DEVICES in non privileged container")
    }

    var migMonitorDevices string
    if d := getMigMonitorDevices(image); d != nil {
       migMonitorDevices = *d
    }
    if !privileged && migMonitorDevices != "" {
       log.Panicln("cannot set MIG_MONITOR_DEVICES in non privileged container")
    }

    var imexChannels string
    if c := getImexChannels(image); c != nil {
       imexChannels = *c
    }

    driverCapabilities := hookConfig.getDriverCapabilities(image, legacyImage).String()

    requirements, err := image.GetRequirements()
    if err != nil {
       log.Panicln("failed to get requirements", err)
    }

    return &nvidiaConfig{
       Devices:            devices,
       MigConfigDevices:   migConfigDevices,
       MigMonitorDevices:  migMonitorDevices,
       ImexChannels:       imexChannels,
       DriverCapabilities: driverCapabilities,
       Requirements:       requirements,
    }
}
核心是 getDevice,就是根据 Mounts 信息或者 Env 解析要分配给该容器的 GPU
func getDevices(hookConfig *HookConfig, image image.CUDA, mounts []Mount, privileged bool) *string {
    // If enabled, try and get the device list from volume mounts first
    if hookConfig.AcceptDeviceListAsVolumeMounts {
       devices := getDevicesFromMounts(mounts)
       if devices != nil {
          return devices
       }
    }

    // Fallback to reading from the environment variable if privileges are correct
    devices := getDevicesFromEnvvar(image, hookConfig.getSwarmResourceEnvvars())
    if devices == nil {
       return nil
    }
    if privileged || hookConfig.AcceptEnvvarUnprivileged {
       return devices
    }

    configName := hookConfig.getConfigOption("AcceptEnvvarUnprivileged")
    log.Printf("Ignoring devices specified in NVIDIA_VISIBLE_DEVICES (privileged=%v, %v=%v) ", privileged, configName, hookConfig.AcceptEnvvarUnprivileged)

    return nil
}
可以看到这里根据配置不同,提供了两种解析 devices 的方法:
- getDevicesFromMounts
- getDevicesFromEnvvar
这也就是为什么 nvidia device plugin 除了实现 Env 之外还实现了另外的方式,二者配置应该要对应才行。
这里我们只关注
getDevicesFromEnvvar
,从环境变量里解析 Device:
envNVVisibleDevices     = "NVIDIA_VISIBLE_DEVICES"

func getDevicesFromEnvvar(image image.CUDA, swarmResourceEnvvars []string) *string {
	// We check if the image has at least one of the Swarm resource envvars defined and use this
	// if specified.
	var hasSwarmEnvvar bool
	for _, envvar := range swarmResourceEnvvars {
		if image.HasEnvvar(envvar) {
			hasSwarmEnvvar = true
			break
		}
	}

	var devices []string
	if hasSwarmEnvvar {
		devices = image.DevicesFromEnvvars(swarmResourceEnvvars...).List()
	} else {
		devices = image.DevicesFromEnvvars(envNVVisibleDevices).List()
	}

	if len(devices) == 0 {
		return nil
	}

	devicesString := strings.Join(devices, ",")

	return &devicesString
}
核心如下:
devices = image.DevicesFromEnvvars(envNVVisibleDevices).List()
从 image 里面提取
NVIDIA_VISIBLE_DEVICES
环境变量,至于这个 Env 是哪里来的,也是容器 Spec 中定义的,之前 image 是这样初始化的:
	s := loadSpec(path.Join(b, "config.json"))

	image, err := image.New(
		image.WithEnv(s.Process.Env), // 这里把容器 env 传给了 image 对象
		image.WithDisableRequire(hook.DisableRequire),
	)
实际这里还有一个特殊逻辑:
如果没有设置
NVIDIA_VISIBLE_DEVICES
环境变量,也没通过其他方式解析到 device 并且还是是一个
legacy image
,那么默认使用全部 GPU
。
// Environment variable unset with legacy image: default to "all".
if !isSet && len(devices) == 0 && i.IsLegacy() {
  return NewVisibleDevices("all")
}
那么什么算是
legacy image
呢:
// IsLegacy returns whether the associated CUDA image is a "legacy" image. An
// image is considered legacy if it has a CUDA_VERSION environment variable defined
// and no NVIDIA_REQUIRE_CUDA environment variable defined.
func (i CUDA) IsLegacy() bool {
	legacyCudaVersion := i.env[envCUDAVersion]
	cudaRequire := i.env[envNVRequireCUDA]
	return len(legacyCudaVersion) > 0 && len(cudaRequire) == 0
}
这也就是为什么,有时候启动 Pod 并没有申请 GPU,但是 Pod 里面依旧可以看到所有 GPU,就是走了这个
legacy image
的分支逻辑。
至此,我们知道了这边 runtime 是怎么指定要把哪些 GPU 分配给容器了,接下来进入 Exec 逻辑。
Exec
Exec 部分比较短,就是这两行代码:
args := []string{getCLIPath(cli)}
err = syscall.Exec(args[0], args, env)
首先是 getCLIPath,用于寻找
nvidia-container-cli
工具的位置并作为第一个参数。
func getCLIPath(config config.ContainerCLIConfig) string {
    if config.Path != "" {
       return config.Path
    }

    if err := os.Setenv("PATH", lookup.GetPath(config.Root)); err != nil {
       log.Panicln("couldn't set PATH variable:", err)
    }

    path, err := exec.LookPath("nvidia-container-cli")
    if err != nil {
       log.Panicln("couldn't find binary nvidia-container-cli in", os.Getenv("PATH"), ":", err)
    }
    return path
}
可以看到,如果单独配置了 cli 的位置参数就使用配置的位置,否则使用 LookPath 根据名字寻找。
然后是相关的参数
    args := []string{getCLIPath(cli)}
    if cli.Root != "" {
       args = append(args, fmt.Sprintf("--root=%s", cli.Root))
    }
    if cli.LoadKmods {
       args = append(args, "--load-kmods")
    }
    if cli.NoPivot {
       args = append(args, "--no-pivot")
    }
    if *debugflag {
       args = append(args, "--debug=/dev/stderr")
    } else if cli.Debug != "" {
       args = append(args, fmt.Sprintf("--debug=%s", cli.Debug))
    }
    if cli.Ldcache != "" {
       args = append(args, fmt.Sprintf("--ldcache=%s", cli.Ldcache))
    }
    if cli.User != "" {
       args = append(args, fmt.Sprintf("--user=%s", cli.User))
    }
    args = append(args, "configure")

    if ldconfigPath := cli.NormalizeLDConfigPath(); ldconfigPath != "" {
       args = append(args, fmt.Sprintf("--ldconfig=%s", ldconfigPath))
    }
    if cli.NoCgroups {
       args = append(args, "--no-cgroups")
    }
    if len(nvidia.Devices) > 0 {
       args = append(args, fmt.Sprintf("--device=%s", nvidia.Devices))
    }
    if len(nvidia.MigConfigDevices) > 0 {
       args = append(args, fmt.Sprintf("--mig-config=%s", nvidia.MigConfigDevices))
    }
    if len(nvidia.MigMonitorDevices) > 0 {
       args = append(args, fmt.Sprintf("--mig-monitor=%s", nvidia.MigMonitorDevices))
    }
    if len(nvidia.ImexChannels) > 0 {
       args = append(args, fmt.Sprintf("--imex-channel=%s", nvidia.ImexChannels))
    }

    for _, cap := range strings.Split(nvidia.DriverCapabilities, ",") {
       if len(cap) == 0 {
          break
       }
       args = append(args, capabilityToCLI(cap))
    }

    for _, req := range nvidia.Requirements {
       args = append(args, fmt.Sprintf("--require=%s", req))
    }

    args = append(args, fmt.Sprintf("--pid=%s", strconv.FormatUint(uint64(container.Pid), 10)))
    args = append(args, rootfs)

    env := append(os.Environ(), cli.Environment...)
其中
args = append(args, "configure")
表示执行的是
nvidia-container-cli configure
命令。
最后则是调用 syscall.Exec 真正开始执行命令
err = syscall.Exec(args[0], args, env)
该命令具体在做什么呢,接着分析
nvidia-container-cli
实现。
nvidia-container-cli
nvidia-container-cli
是一个 C 写的小工具,主要作用就是根据上执行命令时传递的参数,把GPU 设备及其相关依赖库挂载到容器中,使得容器能够正常使用 GPU 能力。
简单看下部分代码。
首先是驱动信息:
// https://github.com/NVIDIA/libnvidia-container/blob/master/src/cli/configure.c#L279-L288

/* Query the driver and device information. */
if (perm_set_capabilities(&err, CAP_EFFECTIVE, ecaps[NVC_INFO], ecaps_size(NVC_INFO)) < 0) {
        warnx("permission error: %s", err.msg);
        goto fail;
}
if ((drv = libnvc.driver_info_new(nvc, NULL)) == NULL ||
    (dev = libnvc.device_info_new(nvc, NULL)) == NULL) {
        warnx("detection error: %s", libnvc.error(nvc));
        goto fail;
}
nvc_driver_info_new()
:获取 CUDA Driver 信息nvc_device_info_new()
:获取 GPU Drvier 信息
然后获取容器中可见的 GPU 列表
// https://github.com/NVIDIA/libnvidia-container/blob/master/src/cli/configure.c#L308-L314

        /* Select the visible GPU devices. */
        if (dev->ngpus > 0) {
                if (select_devices(&err, ctx->devices, dev, &devices) < 0) {
                        warnx("device error: %s", err.msg);
                        goto fail;
                }
        }
最后则是将相关驱动挂载到容器里去:
// https://github.com/NVIDIA/libnvidia-container/blob/master/src/cli/configure.c#L362-L408

/* Mount the driver, visible devices, mig-configs and mig-monitors. */
if (perm_set_capabilities(&err, CAP_EFFECTIVE, ecaps[NVC_MOUNT], ecaps_size(NVC_MOUNT)) < 0) {
        warnx("permission error: %s", err.msg);
        goto fail;
}
if (libnvc.driver_mount(nvc, cnt, drv) < 0) {
        warnx("mount error: %s", libnvc.error(nvc));
        goto fail;
}
for (size_t i = 0; i < devices.ngpus; ++i) {
        if (libnvc.device_mount(nvc, cnt, devices.gpus[i]) < 0) {
                warnx("mount error: %s", libnvc.error(nvc));
                goto fail;
        }
}
libnvidia-container
是采用 linux c
mount --bind
功能将 CUDA Driver Libraries/Binaries一个个挂载到容器里,而不是将整个目录挂载到容器中。
可通过
NVIDIA_DRIVER_CAPABILITIES
环境变量指定要挂载的 driver libraries/binaries。
例如:
docker run -e NVIDIA_VISIBLE_DEVICES=0,1 -e NVIDIA_DRIVER_CAPABILITIES=compute,utility -it tensorflow/tensorflow:latest-gpu bash
指定
NVIDIA_DRIVER_CAPABILITIES=compute,utility
就会把 compute 和 utility 相关的库挂载进去。
这样容器里就可以使用 GPU 了。
至此,相关源码就分析完成了。
5. 小结
整个流程如下:
- 1)device plugin 上报节点上的 GPU 信息
- 2)用户创建 Pod,在 resources.rquest 中申请 GPU,Scheduler 根据各节点 GPU 资源情况,将 Pod 调度到一个有足够 GPU 的节点
- 3)DevicePlugin 根据 Pod 中申请的 GPU 资源,为容器添加
NVIDIA_VISIBLE_DEVICES
环境变量
- 例如:
NVIDIA_VISIBLE_DEVICES=GPU-03f69c50-207a-2038-9b45-23cac89cb67d
- 例如:
- 4)docker / containerd 启动容器
- 由于配置了 nvidia-container-runtime,因此会使用 nvidia-container-runtime 来创建容器
- nvidia-container-runtime 额外做了一件事:将
nvidia-container-runtime-hook
作为 prestart hook 添加到容器 spec 中,然后就将容器 spec 信息往后传给 runC 了。 - runC 创建容器前会调用 prestart hook,其中就包括了上一步添加的 nvidia-container-runtime-hook,该 hook 主要做两件事:
- 从容器 Spec 的 mounts 或者 env 中解析 GPU 信息
- 调用
nvidia-container-cli
命令,将 NVIDIA 的 GPU Driver、CUDA Driver 等库文件挂载进容器,保证容器内可以使用被指定的 GPU以及对应能力
核心就是两个部分:
- device plugin 根据 GPU 资源申请为容器添加
NVIDIA_VISIBLE_DEVICES
环境变量 - nvidia-container-toolkit 则是根据
NVIDIA_VISIBLE_DEVICES
环境变量将 GPU、驱动等相关文件挂载到容器里。
看源码同时顺带解决了一个,之前遇到过的问题:
为什么 Pod 明明没有申请 GPU,启动后也能看到所有 GPU?
这是因为 nvidia-container-toolkit 中存在特殊逻辑,没有设置
NVIDIA_VISIBLE_DEVICES
环境变量,也没通过其他方式解析到 device 并且还是一个
legacy image
,那么默认会返回
all
,即:
NVIDIA_VISIBLE_DEVICES=all
,因此该 Pod 能看到全部 GPU。
6. 参考
NVIDIA/nvidia-container-toolkit
https://github.com/NVIDIA/libnvidia-container