wenmo8 发布的文章

Slate文档编辑器-TS类型扩展与节点类型检查

在之前我们基于
slate
实现的文档编辑器探讨了
WrapNode
数据结构与操作变换,主要是对于嵌套类型的数据结构类型需要关注的
Normalize

Transformers
,那么接下来我们更专注于文档编辑器的数据结构设计,聊聊基于
slate
实现的文档编辑器类型系统。

关于
slate
文档编辑器项目的相关文章:

TS类型扩展

当我们使用
TS
引入
slate
时,可能会发现调用
createEditor
实例化编辑器时,并没有提供范型的定义类型传入,那么这是不是意味着
slate
无法在
TS
中定义类型,而是只能在处理属性时采用
as
的形式强制类型断言。那么作为成熟的编辑器引擎显然是不能这样的,对于富文本编辑器来说,能够在
TS
中定义类型是非常重要的,我们可以将富文本理解为带着属性的文本,如果属性的定义不明确,那么维护起来可能会变得越来越困难,而本身维护富文本就充斥着各种问题,所以维护类型的定义是很有必要的。

在研究
slate
的类型扩展之前,我们需要先看看
TypeScript
提供的
declare module
以及
interface
声明,我们可能经常会遇到对
type

interface
定义的接口类型的区别,实际上除了
type
可以定义联合类型以外,
interface

type
还有一个比较重要的区别就是
interface
可以被合并,也就是可以将定义的接口进行扩展。而
type
在同一个模块内是无法重新定义类型声明的。

interface A { a: string }
interface A { b: number }
const a: A =  { a: "", b: 1 }

type B = { a: string }
// type B = { b: number }
const b = { a: "" }

当我们初步了解时可能会觉得
interface

type
的区别不大几乎可以平替,但是在实际应用中
interface
的合并特性是非常重要的,特别是在
declare module
的场景下,我们可以用于为模块扩展声明类型,也就是为已经有类型定义的库增加额外类型定义。

declare module "some-library" {
    export interface A {
        a: number;
    }
    export function fn(): void;
}

那么在这里我们就可以通过
declare module + interface
的合并特性来扩展模块的类型定义了,这也就是
slate
实际上定义的类扩展方式,我们可以通过为
slate
模块扩展类型的方式,来注入我们需要的基本类型,而我们的基本类型都是使用
interface
关键字定义的,这样就表示我们的类型是可以不断通过
declare module
的方式进行扩展的。还有一点需要特别关注,当我们实现了
declare module
的类型扩展时,我们就可以按需加载类型的扩展,也就是说只有当实际引用到我们定义好的类型时,才会加载对应的类型声明,做到按需扩展类型。

// packages/delta/src/interface.ts
import type { BaseEditor } from "slate";

declare module "slate" {
  interface CustomTypes {
    Editor: BaseEditor;
    Element: BlockElement;
    Text: TextElement;
  }
}

export interface BlockElement {
  text?: never;
  children: BaseNode[];
  [key: string]: unknown;
}

export interface TextElement {
  text: string;
  children?: never;
  [key: string]: unknown;
}

实际上我是非常推荐将类型定义独立抽离出单独的文件来定义的,否则当我们在
IDE
中使用跳转到类型定义的功能查看完整
slate
的类型文件时,发现其跳转的位置是我们上述定义的文件位置,同理当我们将
slate
及其相关模块独立抽离为单独的包时,会发现类型的跳转变得并不那么方便,即使我们的目标不是扩展类型的定义也会被跳转到我们
declare module
的文件位置。因此当我们将其抽离出来之后,声明文件单独作为独立的模块处理,这样就不会存在定位问题了,例如下面就是我们声明代码块格式的类型定义。

// packages/plugin/src/codeblock/types/index.ts
declare module "doc-editor-delta/dist/interface" {
  interface BlockElement {
    [CODE_BLOCK_KEY]?: boolean;
    [CODE_BLOCK_CONFIG]?: { language: string };
  }
  interface TextElement {
    [CODE_BLOCK_TYPE]?: string;
  }
}

export const CODE_BLOCK_KEY = "code-block";
export const CODE_BLOCK_TYPE = "code-block-type";
export const CODE_BLOCK_CONFIG = "code-block-config";

节点类型检查

那么在
TS
方面我们将类型扩展好之后,我们还需要关注实际的节点类型判断,毕竟
TS
只是帮我们实现了静态类型检查,在实际编译为
Js
运行在浏览器中时,通常是不会有实际额外代码注入的,而在我们平常使用的过程中是明显需要这些类型的判断的,例如通常我们需要检查当前的选区节点是否正确位于
Text
节点上,以便对用户的操作做出对应的响应。

那么我们就可以梳理一下在
slate
当中的节点类型,实际上根据
slate
导出的
CustomTypes
我们可以确定最基本的类型就只有
Element

Text
,而我更习惯将其重命名为
BlockElement

TextElement
。而实际上由于我们的业务复杂性,我们通常还需要扩展出
InlineElement

TextBlockElement
两个类型。

那么我们首先来看
BlockElement
,这是
slate
中定义的基本块元素,例如我们的代码块最外层的嵌套结构需要是
BlockElement
,而实际上由于可能存在的复杂嵌套结构,例如表格中嵌套分栏结构,分栏结构中继续嵌套代码块结构等,所以我们可以将其理解为
BlockElement
是嵌套所需的结构即可,而判断节点类型是否是
BlockElement
的方式则可以直接调度
Editor.isBlock
方法即可。

export interface BlockElement {
  text?: never;
  children: BaseNode[];
  [key: string]: unknown;
}

export const isBlock = (editor: Editor, node: Node | null): node is BlockElement => {
  if (!node) return false;
  return Editor.isBlock(editor, node);
};

// https://github.com/ianstormtaylor/slate/blob/25be3b/packages/slate/src/interfaces/editor.ts#L590
export const Editor = {
  isBlock(editor: Editor, value: any): value is Element {
    return Element.isElement(value) && !editor.isInline(value)
  }
}

TextElement
被定义为文本节点,需要注意的是这里同样也是可以加入属性的,在
slate
中被称为
marker
,无论什么节点类型的嵌套,数据结构即树形结构的叶子节点一定需要是文本节点,而针对于
TextElement
的判断则同样可以调度
Text
上的
isText
方法。

export interface TextElement {
  text: string;
  children?: never;
  [key: string]: unknown;
}

export const isText = (node: Node): node is TextElement => Text.isText(node);


// https://github.com/ianstormtaylor/slate/blob/25be3b/packages/slate/src/interfaces/text.ts#L53
export const Text = {
  isText(value: any): value is Text {
    return isPlainObject(value) && typeof value.text === 'string'
  },
}

如果仔细看
slate
判断
BlockElement
的条件,我们可以发现除了调用
Element.isElement
方法外,还判断了
editor.isInline
方法,由于
slate

InlineElement
是一种特殊的
BlockElement
,我们同样需要为其独立实现类型判断,而判断
InlineElement
的方式则需要由
editor.isInline
方法来实现,这部分实际上是由我们在
with
的时候需要定义好的。

export interface InlineElement {
  text?: never;
  children: TextElement[];
  [key: string]: unknown;
}

export const isInline = (editor: Editor, node:Node): node is InlineElement => {
  return editor.isInline(node);
}

在业务中通常我们还需要判断文本段落实际渲染的节点
TextBlockElement
,这个判断同样非常重要,因为这里决定了当前的节点是我们实际要渲染的段落了,这在数据转换等场景中非常有用,当我们需要二次解析数据的时候,当遇到文本段落时,我们就可以确定当前的块级结构解析可以结束了,接下来可以构建段落的内容组合了。而由于段落中可能存在
TextElement

InlineElement
两种节点,我们的判断就需要将两种情况都考虑到,在规范的条件下我们通常只需要判断首个节点是否符合条件即可,而在开发模式下我们可以尝试对比所有节点的结构来判断并且校验脏数据。

export interface TextBlockElement {
  text?: never;
  children: (TextElement | InlineElement)[];
  [key: string]: unknown;
}

export const isTextBlock = (editor: Editor, node: Node): node is TextBlockElement => {
  if (!isBlock(editor, node)) return false;
  const firstNode = node.children[0];
  const result = firstNode && (isText(firstNode) || isInline(editor, firstNode));
  if (process.env.NODE_ENV === "development") {
    const strictInspection = node.children.every(child => isText(firstNode) || isInline(editor, firstNode));
    if (result !== strictInspection) {
      console.error("Fatal Error: Text Block Check Fail", node);
    }
  }
  return result;
};

最后

在这里我们更专注于文档编辑器的数据结构设计,聊聊基于
slate
实现的文档编辑器类型系统。在
slate
中还有很多额外的概念和操作需要关注,例如
Range

Operation

Editor

Element

Path
等,那么在后边的文章中我们就主要聊一聊在
slate

Path
的表达,以及在
React
中是如何控制其内容表达与正确维护
Path
路径与
Element
内容渲染的,并且我们还可以聊一聊表格模块的设计与实现。

Blog

https://github.com/WindRunnerMax/EveryDay
鸿蒙(HarmonyOS)原生AI能力之文本识别

原生智能介绍

  • 在之前开发中,很多场景我们是通过调用云端的智能能力进行开发。例如文本识别、人脸识别等。

  • 原生即指将一些能力直接集成在本地鸿蒙系统中,通过不同层次的AI能力开放,满足开发者的不同场景下的诉求,降低应用开发门槛,帮助开发者快速实现应用智能化

有哪些原生智能能力

  • 基础视觉服务
  • 基础语音服务
  • 端侧模型部署
  • 端侧推理
  • 意图框架
  • .........

基础视觉服务 - Core Vision Kit

  • Core Vision Kit(基础视觉服务)是机器视觉相关的基础能力,接下来要导入的类,都在
    @kit.VisionKit
    中例如本篇要讲的文字识别即是如此。

文本识别介绍与使用

  • 概念:将图片中的文字给识别出来

  • 使用
    textRecognition
    实现文本识别

  • 限制:


    • 仅能识别5种语言类型
      • 简体中文、繁体中文、英文、日文、韩文
  • 使用步骤


    1. 导入textRecognition

      import { textRecognition } from '@kit.CoreVisionKit'
      
    2. 实例化
      visionInfo
      对象,用来准备待识别的图片(需PixelMap类型)

      let visionInfo: textRecognition.VisionInfo = {
          pixelMap: '待识别图片'
      };
      
    3. 实例化
      TextRecognitionConfiguration
      对象,设置识别配置(目前仅有是否开启朝向检测一项配置)

      let textConfiguration: textRecognition.TextRecognitionConfiguration = {
        	// 是否开启朝向检测
          isDirectionDetectionSupported: false
      };
      
    4. 调用textRecognition的
      recognizeText
      接口传入以上两个对象,开启识别并对识别结果进行处理,得到的是
      TextRecognitionResult
      类型结果,这个对象的
      value
      属性即为识别结果

      textRecognition.recognizeText(visionInfo, textConfiguration)
      
  • 这里解释一下这几步


    • 你需要用textRecognition,所以需要先找到它,也即导入,这没什么好说的

    • 你需要用它来帮你识别图片,那你是不是应该把需要识别的图片给它?所以
      第一个参数就是给他传递一个图片
      ,只不过这个图片只能传PixelMap类型的(这就是为什么上篇我要写PixMap的原因),但是这个图片不能直接传,要包装成VisionInfo类型的对象(虽然目前为止,这个对象只有这一个属性,但保不齐未来会加)

      然后就是设置一下它识别的相关参数,它目前也只有一个参数,叫
      isDirectionDetectionSupported
      ,设置是否开启朝向检测,因为有的图片可能是正的,有的图片可能是反的斜的。所以对于反的斜的图片如果这项开启为true,则会检测的更为准确。但是经过猫林老师肉测,其实开不开启扫描反的斜的图片,得到的结果都差不多了。所以可以看自己选择。顺便一提,这个参数可以不传,不传默认是true。然后猫林老师觉得:未来随着API发展,可能会多一些参数也说不准

    • 最后即为调用其进行识别的方法,也即recognizeText开始识别

    • 根据上面所说的,其实上面说的四步,也可以极简改为两步,代码如下

      import { textRecognition } from '@kit.CoreVisionKit'
      
      textRecognition.recognizeText({ pixelMap: '待识别图片' })
      

      • 解释:这里就相当于没传第二个参数,它默认值即为true,也即开启朝向检测。
    • 至于如何读取相册图片,以及把图片解码变成PixelMap,不是今天分享的主题,且之前猫林老师有两篇文章分别讲过不会的可以看之前文章,所以这里直接给代码(可看注释)

      // 1. 使用PhotoViewPicker选择相册图片
      let photoPicker = new photoAccessHelper.PhotoViewPicker();
      // 2. 使用select方法开始选择图片
       photoPicker.select({
         			// 设置只选择图片
              MIMEType: photoAccessHelper.PhotoViewMIMETypes.IMAGE_TYPE,
         			// 设置最大只能选择1张
              maxSelectNumber: 1
      })
      .then((res: photoAccessHelper.PhotoSelectResult) => {
         // res参数里的photoUris属性即为选择的图片结果数组(因为可以选择多张),每个元素得到的是临时路径
         // 用fs打开这个路径
         let fileSource = fileIo.openSync(res.photoUris[0], fileIo.OpenMode.READ_ONLY);
         // 使用createImageSource方法将图片文件流常见成图片源码
         let imageSource = image.createImageSource(fileSource.fd);
         // 再使用createPixelMap方法,将图片源码制作成PixelMap类型
         const pixelMap = imageSource.createPixelMapSync()
         // 后续使用textRecognition的recognizeText那一套代码进行识别即可
      })
      

文本识别展示案例

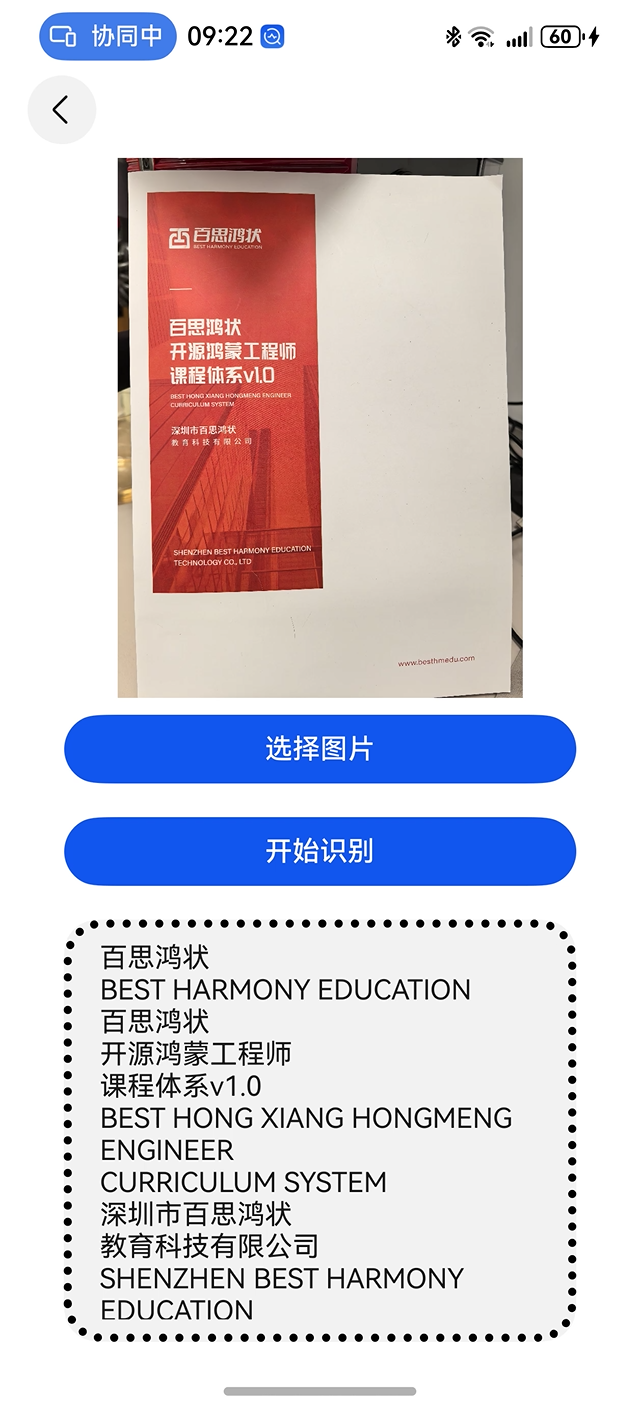
  • 我们来实现如下图的效果

    image-20241223092305711


    • 界面上从上往下放:
      • Image:显示选择的待识别图片
      • Button:选择相册里的图片
      • Button:开始识别按钮
      • TextArea:显示识别后的结果,使用TextArea的原因是它对比Text会多一个滚动效果(防止内容过多显示不全)
  • 结合上面说的使用方法,最终文本识别代码如下

    import { photoAccessHelper } from '@kit.MediaLibraryKit'
    import { fileIo } from '@kit.CoreFileKit'
    import { image } from '@kit.ImageKit'
    import { textRecognition } from '@kit.CoreVisionKit'
    
    @Entry
    @Component
    struct Index {
      @State text: string = '识别结果'
      @State imgPixelMap: PixelMap | null = null
    
      build() {
        Column({ space: 20 }) {
          Button('打开图片')
            .width('85%')
            .onClick(async () => {
              const uri = await this.selectPhoto()
              if (uri) {
                const pixelMap = await this.getPixMap(uri)
                this.imgPixelMap = pixelMap
              }
            })
    
          Button('开始识别')
            .width('85%')
            .onClick(() => {
              this.recognize()
            })
    
          Image(this.imgPixelMap)
            .objectFit(ImageFit.Contain)
            .height('45%')
    
          Text(this.text)
            .width('85%')
            .layoutWeight(1)
            .border({ style: BorderStyle.Dotted, width: 5, color: Color.Red })
        }
        .width('100%')
        .height('100%')
      }
    
      async selectPhoto() {
        try {
          // 实例化照片选择器
          const picker = new photoAccessHelper.PhotoViewPicker()
          // 选择图片
          const uris = await picker.select({
            MIMEType: photoAccessHelper.PhotoViewMIMETypes.IMAGE_TYPE,
            maxSelectNumber: 1
          })
          return uris.photoUris[0]
    
        } catch {
          console.log('err')
          return null
        }
      }
    
      // 根据图片路径转PixelMap
      async getPixMap(uri: string) {
        try {
          const imgSrc = await fileIo.open(uri, fileIo.OpenMode.READ_ONLY)
          let source = image.createImageSource(imgSrc.fd)
          return source.createPixelMapSync()
        } catch {
          console.log('error' + uri)
          return null
        }
      }
    
      // 文字识别
      async recognize() {
        const info: textRecognition.VisionInfo = {
          pixelMap: this.imgPixelMap!
        }
        const res = await textRecognition.recognizeText(info, {
          isDirectionDetectionSupported: false
        })
        this.text = res.value
      }
    }
    

总结

  • 今天猫林老师给大家分享了鸿蒙提供的原生AI能力。其实听起来名字很高大上,用起来非常简单。这是因为鸿蒙帮我们做了高度封装,我们无须再关注OCR的相关知识,只需要使用鸿蒙提供的接口即可。所以,华为为了推广鸿蒙,发展鸿蒙生态,真的为开发者想了好多。这样的华为,你爱了吗?
  • 友情提醒:本篇内容只适合用真机测试,模拟器无法出效果。
  • P.S:根据猫林老师肉测,在API12版本中的Mac模拟器成功出效果。其他版本都不行。所以建议有条件还是上真机。

前言

做过单片机的都知道,写驱动是直接代码设置和读取寄存器来控制外设实现基本的驱动功能,而linux操作系统上是由MMU(内存管理单元)来控制,MMU实现了虚拟地址与芯片物理地址的对应,设置和获取MMU地址就是设置和获取映射的物理地址,从而跟单片机一样实现与物理硬件的驱动连接。
本篇就是描述了MMU的基本实现原理和Demo。


Demo

在这里插入图片描述


内存管理单元(简称MMU)

MMU是Memory Management Unit的缩写,中文名是内存管理单元,有时称作分页内存管理单元(英语:paged memory management unit,缩写为PMMU)。它是一种负责处理中央处理器(CPU)的内存访问请求的计算机硬件。
它的功能包括虚拟地址到物理地址的转换(即虚拟内存管理)、内存保护、中央处理器高速缓存的控制,在较为简单的计算机体系结构中,负责总线的仲裁以及存储体切换(bank switching,尤其是在8位的系统上)。
具体如何管理内存是比较专业的,还有很多方法,这些是内存管理相关的技术,但是我们写驱动,不需要接触这些,虚拟地址到物理地址的转换大致如下:
在这里插入图片描述

只需要知道如何映射/取消映射物理地址到虚拟地址即可,这样我们可以通过设置虚拟地址来实现设置芯片物理地址,通过获取虚拟机地址的数据来获取芯片物理地址的寄存器数据,这样就跟操作单片机一样,就是包了一层(这里写过单片机裸机直接操作寄存器跑的很容易理解)。
这里,试用虚拟机ubuntu,我们写2个驱动来,来用程序A写入一个数据到驱动A,A写入一个特定的物理地址d,B来读取特定的物理地址d从而获取到。(PS:此处,虚拟机,这么使用是有风险的,如果物理地址被其他程序映射使用了,就会导致它的数据在其他程序中的修改,在这里,我们主要是为了在虚拟机ubuntu上能够实现这个原理过程)。


单片机(驱动)开发与linux驱动开发转化过程

在这里插入图片描述

单片机开发跨入linux驱动开发:

  • 熟悉linux系统(脚本,基本程序开发)
  • 熟悉linux烧写
  • 熟悉linux交叉编译
  • 熟悉linux文件系统制作和编译
  • 熟悉linux驱动编译
  • 熟悉linux物理地址映射
  • 熟悉linux一般开源库程序的编译移植(configre、make、make install)
  • 高级的makefile、系统编程等相关的就需要随着时间累积学习了
    概括起来,原来单片机就是直接操作寄存器,而linux需要通过内核的设备框架来注册设备驱动,驱动中用虚拟地址映射物理地址,通过写程序操作驱动虚拟机地址来实现操作物理地址。


概述

linux驱动中用虚拟地址映射物理地址,通过写程序操作驱动虚拟机地址来实现操作物理地址。
不出意外,内核提供了物理地址到虚拟地址的映射。


内核函数

头文件是:linux/uaccess.h(我们这是ubuntu,不是arm)
可以在内核根目录下搜索下:

find . -type f -exec grep -l "ioremap(phys" {} \;

在这里插入图片描述


ioremap函数:把物理地址转换成虚拟地址

成功返回虚拟地址的首地址,失败返回NULL。(注意:同一物理地址只能被映射一次,多次映射会失败返回)。
在这里插入图片描述

void __iomem *ioremap(phys_addr_t phys_addr, size_t size)

简化下:

void *ioremap(phys_addr_t phys_addr, size_t size);


iounmap:释放掉ioremap映射的地址

在这里插入图片描述

static inline void iounmap(void __iomem *addr)

简化下:

static void iounmap(void *addr)


查看已经映射的物理地址

内核以物理地址的形式来管理设备资源,比如寄存器。这些地址保存在 /proc/iomem 。该设备列出了当前系统内存到物理设备的地址映射。

  • 第一列:显示每种不同类型内存使用的内存寄存器;
  • 第二列,列出这些寄存器中的内存类型,并显示系统RAM中内核使用的内存寄存器,若网络接口卡有多个以太网端口,则显示为每个端口分配的内存寄存器。
cat /proc/iomem

(注意:由于笔者是虚拟机,所以都是0吧)
在这里插入图片描述


驱动模板准备

首先复制之前的004_testReadWirte的驱动,改个名字为:005_testReadWritePhyAddr

cd ~/work/drive/
ls
cp -arf 004_testReadWrite 005_testReadWritePhyAddr
cd 005_testReadWritePhyAddr
make clean
ls
mv testReadWrite.c testReadWritePhyAddr.c
ls

在这里插入图片描述

修改makefile里面的模块名称(obj-m模块名称),模板准备好了

gedit Makefile 

在这里插入图片描述

obj-m += testReadWritePhyAddr.o

#KDIR:=/usr/src/linux-source-4.18.0/linux-source-4.18.0
KDIR:=/usr/src/linux-headers-4.18.0-15-generic

PWD?=$(shell pwd)

all:
make -C $(KDIR) M=$(PWD) modules

clean:
rm *.ko *.o *.order *.symvers *.mod.c

修改.c文件的杂项设备名称:

gedit testReadWritePhyAddr.c

在这里插入图片描述

#include <linux/init.h>
#include <linux/module.h>

#include <linux/miscdevice.h>
#include <linux/fs.h>

#include <linux/uaccess.h> // Demo_004 add

static char kBuf[256] = {0x00}; // Demo_004 add

// int (*open) (struct inode *, struct file *);
int misc_open(struct inode * pInode, struct file * pFile)
{
printk("int misc_open(struct inode * pInode, struct file * pFile)\n");
memcpy(kBuf, "init kBuf", sizeof("init kBuf"));
printk("kBuf = %s\n", kBuf);
return 0;
}

// int (*release) (struct inode *, struct file *);
int misc_release(struct inode * pInde, struct file * pFile)
{
printk("int misc_release(struct inode * pInde, struct file * pFile)\n");
return 0;
}

// ssize_t (*read) (struct file *, char __user *, size_t, loff_t *);
ssize_t misc_read(struct file * pFile, char __user * pUser, size_t size, loff_t *pLofft)
{
printk("ssize_t misc_read(struct file * pFile, char __user * pUser, size_t size, loff_t *pLofft)\n");
if(copy_to_user(pUser, kBuf, strlen(kBuf)) != 0)
{
printk("Failed to copy_to_user(pUser, kBuf, strlen(kBuf)\n");
return -1;
}
return 0;
}

// ssize_t (*write) (struct file *, const char __user *, size_t, loff_t *);
ssize_t misc_write(struct file * pFile, const char __user * pUser, size_t size, loff_t *pLofft)
{
printk("ssize_t misc_write(struct file * pFile, const char __user * pUser, size_t size, loff_t *pLofft)\n");
if(copy_from_user(kBuf, pUser, size) != 0)
{
printk("Failed to copy_from_user(kBuf, pUser, size)\n");
return -1;
}
return 0;
}

struct file_operations misc_fops = {
.owner = THIS_MODULE,
.open = misc_open,
.release = misc_release,
.read = misc_read,
.write = misc_write,
};

struct miscdevice misc_dev = {
.minor = MISC_DYNAMIC_MINOR, // 这个宏是动态分配次设备号,避免冲突
.name = "register_hongPangZi_testReadWritePhyAddr", // 设备节点名称
.fops = &misc_fops, // 这个变量记住,自己起的,步骤二使用
};

static int registerMiscDev_init(void)
{
int ret;
// 在内核里面无法使用基础c库printf,需要使用内核库printk
printk("Hello, I’m hongPangZi, registerMiscDev_init\n");
ret = misc_register(&misc_dev);
if(ret < 0)
{
printk("Failed to misc_register(&misc_dev)\n");
return -1;
}
return 0;
}

static void registerMiscDev_exit(void)
{
misc_deregister(&misc_dev);
printk("bye-bye!!!\n");
}

MODULE_LICENSE("GPL");
module_init(registerMiscDev_init);
module_exit(registerMiscDev_exit);


杂项设备驱动添加物理内存映射虚拟机内存操作Demo


步骤一:修改驱动write操作

在这里插入图片描述

// ssize_t (*read) (struct file *, char __user *, size_t, loff_t *);
ssize_t misc_read(struct file * pFile, char __user * pUser, size_t size, loff_t *pLofft)
{
printk("ssize_t misc_read(struct file * pFile, char __user * pUser, size_t size, loff_t *pLofft)\n");
if(copy_to_user(pUser, kBuf, strlen(kBuf)) != 0)
{
printk("Failed to copy_to_user(pUser, kBuf, strlen(kBuf)\n");
return -1;
}
return 0;
}

在这里插入图片描述


步骤二:修改驱动read操作

在这里插入图片描述

// ssize_t (*write) (struct file *, const char __user *, size_t, loff_t *);
ssize_t misc_write(struct file * pFile, const char __user * pUser, size_t size, loff_t *pLofft)
{
printk("ssize_t misc_write(struct file * pFile, const char __user * pUser, size_t size, loff_t *pLofft)\n");
if(copy_from_user(kBuf, pUser, size) != 0)
{
printk("Failed to copy_from_user(kBuf, pUser, size)\n");
return -1;
}
printk("%s\n", kBuf);
return 0;
}

在这里插入图片描述


步骤三:在程序中添加参数写入和读取

在这里插入图片描述

// 读取
ret = read(fd, buf, sizeof(buf) < 0);
if(ret < 0)
{
printf("Failed to read %s\n", devPath);
close(fd);
return 0;
}else{
printf("Succeed to read [%s]\n", buf);
}
// 修改内容
memset(buf, 0x00, sizeof(buf));
memcpy(buf, "Get you content", strlen("Get you content"));
// 写入
ret = write(fd, buf, sizeof(buf));
if(ret < 0)
{
printf("Failed to write %s\n", devPath);
close(fd);
return 0;
}else{
printf("Succeed to write [%s]\n", buf);
}
// 读取
ret = read(fd, buf, sizeof(buf) < 0);
if(ret < 0)
{
printf("Failed to read %s\n", devPath);
close(fd);
return 0;
}else{
printf("Succeed to read [%s]\n", buf);
}

使用gcc编译.c,输出默认是a.out。


步骤四:编译驱动

make

在这里插入图片描述


步骤五:加载、卸载驱动查看输出

符合预期
在这里插入图片描述


Demo源码


驱动源码

#include <linux/init.h>
#include <linux/module.h>
#include <linux/miscdevice.h>
#include <linux/fs.h>

#include <linux/uaccess.h> // Demo_004 add

static char kBuf[256] = {0x00}; // Demo_004 add

// int (*open) (struct inode *, struct file *);
int misc_open(struct inode * pInode, struct file * pFile)
{
printk("int misc_open(struct inode * pInode, struct file * pFile)\n");
memcpy(kBuf, "init kBuf", sizeof("init kBuf"));
printk("kBuf = %s\n", kBuf);
return 0;
}

// int (*release) (struct inode *, struct file *);
int misc_release(struct inode * pInde, struct file * pFile)
{
printk("int misc_release(struct inode * pInde, struct file * pFile)\n");
return 0;
}

// ssize_t (*read) (struct file *, char __user *, size_t, loff_t *);
ssize_t misc_read(struct file * pFile, char __user * pUser, size_t size, loff_t *pLofft)
{
printk("ssize_t misc_read(struct file * pFile, char __user * pUser, size_t size, loff_t *pLofft)\n");
if(copy_to_user(pUser, kBuf, strlen(kBuf)) != 0)
{
printk("Failed to copy_to_user(pUser, kBuf, strlen(kBuf)\n");
return -1;
}
return 0;
}

// ssize_t (*write) (struct file *, const char __user *, size_t, loff_t *);
ssize_t misc_write(struct file * pFile, const char __user * pUser, size_t size, loff_t *pLofft)
{

printk("ssize_t misc_write(struct file * pFile, const char __user * pUser, size_t size, loff_t *pLofft)\n");
if(copy_from_user(kBuf, pUser, size) != 0)
{
printk("Failed to copy_from_user(kBuf, pUser, size)\n");
return -1;
}
printk("%s\n", kBuf);
return 0;
}

struct file_operations misc_fops = {
.owner = THIS_MODULE,
.open = misc_open,
.release = misc_release,
.read = misc_read,
.write = misc_write,
};

struct miscdevice misc_dev = {
.minor = MISC_DYNAMIC_MINOR, // 这个宏是动态分配次设备号,避免冲突
.name = "register_hongPangZi_testReadWritePhyAddr", // 设备节点名称
.fops = &misc_fops, // 这个变量记住,自己起的,步骤二使用
};

static int registerMiscDev_init(void)
{
int ret;
// 在内核里面无法使用基础c库printf,需要使用内核库printk
printk("Hello, I’m hongPangZi, registerMiscDev_init\n");
ret = misc_register(&misc_dev);
if(ret < 0)
{
printk("Failed to misc_register(&misc_dev)\n");
return -1;
}
return 0;
}

static void registerMiscDev_exit(void)
{
misc_deregister(&misc_dev);
printk("bye-bye!!!\n");
}

MODULE_LICENSE("GPL");

module_init(registerMiscDev_init);
module_exit(registerMiscDev_exit);


测试程序源码

#include <stdio.h>
#include <unistd.h>
#include <fcntl.h>

int main(int argc, char **argv)
{
int fd = -1;
char buf[32] = {0};
int ret = -1;

const char devPath[] = "/dev/register_hongPangZi_testReadWrite";
fd = open(devPath, O_RDWR);
if(fd < 0)
{
printf("Failed to open %s\n", devPath);
return -1;
}else{
printf("Succeed to open %s\n", devPath);
}
// 读取
ret = read(fd, buf, sizeof(buf) < 0);
if(ret < 0)
{
printf("Failed to read %s\n", devPath);
close(fd);
return 0;
}else{
printf("Succeed to read [%s]\n", buf);
}
// 修改内容
memset(buf, 0x00, sizeof(buf));
memcpy(buf, "Get you content", strlen("Get you content"));
// 写入
ret = write(fd, buf, sizeof(buf));
if(ret < 0)
{
printf("Failed to write %s\n", devPath);
close(fd);
return 0;
}else{
printf("Succeed to write [%s]\n", buf);
}
// 读取
ret = read(fd, buf, sizeof(buf) < 0);
if(ret < 0)
{
printf("Failed to read %s\n", devPath);
close(fd);
return 0;
}else{
printf("Succeed to read [%s]\n", buf);
}
close(fd);
printf("exit\n");
fd = -1;
return 0;
}

前言

在C#编程中字符串拼接是一种常见且基础的操作,广泛应用于各种场景,如动态生成SQL查询、构建日志信息、格式化用户显示内容等。然而,不同的字符串拼接方式在性能和内存使用上可能存在显著差异。今天咱们一起来看看在C#中字符串拼接的常见6种方式及其使用
BenchmarkDotNet
进行性能分析对比。

BenchmarkDotNet

BenchmarkDotNet是一个基于.NET开源、功能全面、易于使用的性能基准测试框架,它为.NET开发者提供了强大的性能评估和优化能力。通过自动化测试、多平台支持、高级统计分析和自定义配置等特性,BenchmarkDotNet帮助开发者更好地理解和优化软件系统的性能表现。

拼接基础数据

private const int IterationCount = 1000;
private const string StringPart1 = "追逐时光者";
private const string StringPart2 = "DotNetGuide";
private const string StringPart3 = "DotNetGuide技术社区";
private readonly string[] _stringPartsArray = { "追逐时光者", "DotNetGuide", "DotNetGuide技术社区" };

+
操作符

        /// <summary>
        /// 使用 + 操作符拼接字符串
        /// </summary>
        /// <returns></returns>
        [Benchmark]
        public string PlusOperator()
        {
            string result = string.Empty;
            for (int i = 0; i < IterationCount; i++)
            {
                result += StringPart1 + " " + StringPart2 + " " + StringPart3;
            }
            return result;
        }

$
内插字符串

        /// <summary>
        /// 使用 $ 内插字符串拼接字符串
        /// </summary>
        /// <returns></returns>
        [Benchmark]
        public string InterpolatedString()
        {
            string result = string.Empty;
            for (int i = 0; i < IterationCount; i++)
            {
                result += $"{StringPart1} {StringPart2} {StringPart3}";
            }
            return result;
        }

String.Format

        /// <summary>
        /// 使用string.Format()拼接字符串
        /// </summary>
        /// <returns></returns>
        [Benchmark]
        public string StringFormat()
        {
            string result = string.Empty;
            for (int i = 0; i < IterationCount; i++)
            {
                result += string.Format("{0} {1} {2}", StringPart1, StringPart2, StringPart3);
            }
            return result;
        }

String.Concat

        /// <summary>
        /// 使用string.Concat()拼接字符串
        /// </summary>
        /// <returns></returns>
        [Benchmark]
        public string StringConcat()
        {
            string result = string.Empty;
            for (int i = 0; i < IterationCount; i++)
            {
                result += string.Concat(StringPart1, " ", StringPart2, " ", StringPart3);
            }
            return result;
        }

String.Join

        /// <summary>
        /// 使用string.Join()拼接字符串
        /// </summary>
        /// <returns></returns>
        [Benchmark]
        public string StringJoin()
        {
            string result = string.Empty;
            for (int i = 0; i < IterationCount; i++)
            {
                result += string.Join(" ", _stringPartsArray);
            }
            return result;
        }

StringBuilder

        /// <summary>
        /// 使用StringBuilder拼接字符串
        /// </summary>
        /// <returns></returns>
        [Benchmark]
        public string StringBuilder()
        {
            StringBuilder stringBuilder = new StringBuilder();
            for (int i = 0; i < IterationCount; i++)
            {
                stringBuilder.Append(StringPart1);
                stringBuilder.Append(" ");
                stringBuilder.Append(StringPart2);
                stringBuilder.Append(" ");
                stringBuilder.Append(StringPart3);
            }
            return stringBuilder.ToString();
        }

性能基准对比测试完整代码

    [MemoryDiagnoser]//记录内存分配情况
    public class StringConcatenationBenchmark
    {
        private const int IterationCount = 1000;
        private const string StringPart1 = "追逐时光者";
        private const string StringPart2 = "DotNetGuide";
        private const string StringPart3 = "DotNetGuide技术社区";
        private readonly string[] _stringPartsArray = { "追逐时光者", "DotNetGuide", "DotNetGuide技术社区" };

        /// <summary>
        /// 使用 + 操作符拼接字符串
        /// </summary>
        /// <returns></returns>
        [Benchmark]
        public string PlusOperator()
        {
            string result = string.Empty;
            for (int i = 0; i < IterationCount; i++)
            {
                result += StringPart1 + " " + StringPart2 + " " + StringPart3;
            }
            return result;
        }

        /// <summary>
        /// 使用 $ 内插字符串拼接字符串
        /// </summary>
        /// <returns></returns>
        [Benchmark]
        public string InterpolatedString()
        {
            string result = string.Empty;
            for (int i = 0; i < IterationCount; i++)
            {
                result += $"{StringPart1} {StringPart2} {StringPart3}";
            }
            return result;
        }

        /// <summary>
        /// 使用string.Format()拼接字符串
        /// </summary>
        /// <returns></returns>
        [Benchmark]
        public string StringFormat()
        {
            string result = string.Empty;
            for (int i = 0; i < IterationCount; i++)
            {
                result += string.Format("{0} {1} {2}", StringPart1, StringPart2, StringPart3);
            }
            return result;
        }

        /// <summary>
        /// 使用string.Concat()拼接字符串
        /// </summary>
        /// <returns></returns>
        [Benchmark]
        public string StringConcat()
        {
            string result = string.Empty;
            for (int i = 0; i < IterationCount; i++)
            {
                result += string.Concat(StringPart1, " ", StringPart2, " ", StringPart3);
            }
            return result;
        }

        /// <summary>
        /// 使用string.Join()拼接字符串
        /// </summary>
        /// <returns></returns>
        [Benchmark]
        public string StringJoin()
        {
            string result = string.Empty;
            for (int i = 0; i < IterationCount; i++)
            {
                result += string.Join(" ", _stringPartsArray);
            }
            return result;
        }

        /// <summary>
        /// 使用StringBuilder拼接字符串
        /// </summary>
        /// <returns></returns>
        [Benchmark]
        public string StringBuilder()
        {
            StringBuilder stringBuilder = new StringBuilder();
            for (int i = 0; i < IterationCount; i++)
            {
                stringBuilder.Append(StringPart1);
                stringBuilder.Append(" ");
                stringBuilder.Append(StringPart2);
                stringBuilder.Append(" ");
                stringBuilder.Append(StringPart3);
            }
            return stringBuilder.ToString();
        }
    }

性能基准对比测试分析报告

Method Mean Error StdDev Gen0 Gen1 Allocated
PlusOperator 2,066.28 us 35.761 us 63.566 us 5238.2813 789.0625 32283.12 KB
InterpolatedString 1,984.56 us 29.949 us 28.014 us 5238.2813 789.0625 32283.12 KB
StringFormat 2,112.02 us 25.020 us 23.404 us 5257.8125 777.3438 32369.06 KB
StringConcat 2,027.09 us 28.300 us 26.472 us 5257.8125 777.3438 32369.06 KB
StringJoin 2,017.36 us 27.111 us 22.639 us 5257.8125 777.3438 32369.06 KB
StringBuilder 13.63 us 0.065 us 0.058 us 23.2544 4.6387 143.96 KB

说明:

  • Mean
    : 所有测量值的算术平均值。
  • Error
    : 99.9% 置信区间的一半。
  • StdDev
    : 所有测量值的标准差。
  • Gen0
    : 第 0 代 GC 每 1000 次操作收集一次。
  • Gen1
    : 第 1 代 GC 每 1000 次操作收集一次。
  • Gen2
    : 第 2 代 GC 每 1000 次操作收集一次。
  • Allocated
    : 每次操作分配的内存(仅托管内存,包含所有内容,1KB = 1024B)。
  • 1 ms
    : 1 毫秒(0.001 秒)。

性能基准对比测试结论

从上面的性能基准对比测试分析报告来看
StringBuilder
是性能最好的字符串拼接方式,特别是在需要频繁进行拼接的场景中。其他方式(
如+操作符

$内插字符串

String.Format

String.Concat

String.Join
)在性能上相对较差,因为它们会导致多次内存分配和复制。

因此我们在选择字符串拼接方式时,应该根据具体场景和需求进行选择。如果性能是关键因素,并且需要频繁进行拼接,则应使用
StringBuilder
。如果代码简洁性和易读性更重要,并且拼接次数较少,则可以考虑使用其他方式。

动态代理概述

什么是代理

代理模式
(Proxy pattern): 为另一个对象提供一个替身或占位符以控制对这个对象的访问

什么是动态代理?

动态代理就是,在程序运行期,创建目标对象的代理对象,并对目标对象中的方法进行功能性增强的一种技术。

在生成代理对象的过程中,目标对象不变,代理对象中的方法是目标对象方法的增强方法。可以理解为运行期间,对象中方法的动态拦截,在拦截方法的前后执行功能操作。

代理的创建

创建代理的方法是postProcessAfterInitialization:如果bean被子类标识为代理,则使用配置的拦截器创建一个代理

/**
  * Create a proxy with the configured interceptors if the bean is
  * identified as one to proxy by the subclass.
  * @see #getAdvicesAndAdvisorsForBean
  */
@Override
public Object postProcessAfterInitialization(@Nullable Object bean, String beanName) {
  if (bean != null) {
    Object cacheKey = getCacheKey(bean.getClass(), beanName);
    // 如果不是提前暴露的代理
    if (this.earlyProxyReferences.remove(cacheKey) != bean) {
      return wrapIfNecessary(bean, beanName, cacheKey);
    }
  }
  return bean;
}

wrapIfNecessary方法主要用于判断是否需要创建代理,如果Bean能够获取到advisor才需要创建代理

/**
  * Wrap the given bean if necessary, i.e. if it is eligible for being proxied.
  * @param bean the raw bean instance
  * @param beanName the name of the bean
  * @param cacheKey the cache key for metadata access
  * @return a proxy wrapping the bean, or the raw bean instance as-is
  */
protected Object wrapIfNecessary(Object bean, String beanName, Object cacheKey) {
   // 如果bean是通过TargetSource接口获取
   if (beanName != null && this.targetSourcedBeans.contains(beanName)) {
      return bean;
   }
   // 如果bean是切面类
   if (Boolean.FALSE.equals(this.advisedBeans.get(cacheKey))) {
      return bean;
   }
   // 如果是aop基础类?是否跳过?
   if (isInfrastructureClass(bean.getClass()) || shouldSkip(bean.getClass(), beanName)) {
      this.advisedBeans.put(cacheKey, Boolean.FALSE);
      return bean;
   }

  // 重点:获取所有advisor,如果没有获取到,那说明不要进行增强,也就不需要代理了。
  Object[] specificInterceptors = getAdvicesAndAdvisorsForBean(bean.getClass(), beanName, null);
  if (specificInterceptors != DO_NOT_PROXY) {
    this.advisedBeans.put(cacheKey, Boolean.TRUE);
    // 重点:创建代理
    Object proxy = createProxy(
        bean.getClass(), beanName, specificInterceptors, new SingletonTargetSource(bean));
    this.proxyTypes.put(cacheKey, proxy.getClass());
    return proxy;
  }

  this.advisedBeans.put(cacheKey, Boolean.FALSE);
  return bean;
}

获取所有的Advisor

我们看下获取所有advisor的方法getAdvicesAndAdvisorsForBean

@Override
@Nullable
protected Object[] getAdvicesAndAdvisorsForBean(
    Class<?> beanClass, String beanName, @Nullable TargetSource targetSource) {

  List<Advisor> advisors = findEligibleAdvisors(beanClass, beanName);
  if (advisors.isEmpty()) {
    return DO_NOT_PROXY;
  }
  return advisors.toArray();
}

通过findEligibleAdvisors方法获取advisor, 如果获取不到返回DO_NOT_PROXY(不需要创建代理),findEligibleAdvisors方法如下

/**
  * Find all eligible Advisors for auto-proxying this class.
  * @param beanClass the clazz to find advisors for
  * @param beanName the name of the currently proxied bean
  * @return the empty List, not {@code null},
  * if there are no pointcuts or interceptors
  * @see #findCandidateAdvisors
  * @see #sortAdvisors
  * @see #extendAdvisors
  */
protected List<Advisor> findEligibleAdvisors(Class<?> beanClass, String beanName) {
  // 和上文一样,获取所有切面类的切面方法生成Advisor
  List<Advisor> candidateAdvisors = findCandidateAdvisors();
  // 找到这些Advisor中能够应用于beanClass的Advisor
  List<Advisor> eligibleAdvisors = findAdvisorsThatCanApply(candidateAdvisors, beanClass, beanName);
  // 如果需要,交给子类拓展
  extendAdvisors(eligibleAdvisors);
  // 对Advisor排序
  if (!eligibleAdvisors.isEmpty()) {
    eligibleAdvisors = sortAdvisors(eligibleAdvisors);
  }
  return eligibleAdvisors;
}

获取所有切面类的切面方法生成Advisor

/**
  * Find all candidate Advisors to use in auto-proxying.
  * @return the List of candidate Advisors
  */
protected List<Advisor> findCandidateAdvisors() {
  Assert.state(this.advisorRetrievalHelper != null, "No BeanFactoryAdvisorRetrievalHelper available");
  return this.advisorRetrievalHelper.findAdvisorBeans();
}

找到这些Advisor中能够应用于beanClass的Advisor

/**
  * Determine the sublist of the {@code candidateAdvisors} list
  * that is applicable to the given class.
  * @param candidateAdvisors the Advisors to evaluate
  * @param clazz the target class
  * @return sublist of Advisors that can apply to an object of the given class
  * (may be the incoming List as-is)
  */
public static List<Advisor> findAdvisorsThatCanApply(List<Advisor> candidateAdvisors, Class<?> clazz) {
  if (candidateAdvisors.isEmpty()) {
    return candidateAdvisors;
  }
  List<Advisor> eligibleAdvisors = new ArrayList<>();
  for (Advisor candidate : candidateAdvisors) {
    // 通过Introduction实现的advice
    if (candidate instanceof IntroductionAdvisor && canApply(candidate, clazz)) {
      eligibleAdvisors.add(candidate);
    }
  }
  boolean hasIntroductions = !eligibleAdvisors.isEmpty();
  for (Advisor candidate : candidateAdvisors) {
    if (candidate instanceof IntroductionAdvisor) {
      // already processed
      continue;
    }
    // 是否能够应用于clazz的Advice
    if (canApply(candidate, clazz, hasIntroductions)) {
      eligibleAdvisors.add(candidate);
    }
  }
  return eligibleAdvisors;
}

创建代理的入口方法

获取所有advisor后,如果有advisor,则说明需要增强,即需要创建代理,创建代理的方法如下:

/**
  * Create an AOP proxy for the given bean.
  * @param beanClass the class of the bean
  * @param beanName the name of the bean
  * @param specificInterceptors the set of interceptors that is
  * specific to this bean (may be empty, but not null)
  * @param targetSource the TargetSource for the proxy,
  * already pre-configured to access the bean
  * @return the AOP proxy for the bean
  * @see #buildAdvisors
  */
protected Object createProxy(Class<?> beanClass, @Nullable String beanName,
    @Nullable Object[] specificInterceptors, TargetSource targetSource) {

  if (this.beanFactory instanceof ConfigurableListableBeanFactory) {
    AutoProxyUtils.exposeTargetClass((ConfigurableListableBeanFactory) this.beanFactory, beanName, beanClass);
  }

  ProxyFactory proxyFactory = new ProxyFactory();
  proxyFactory.copyFrom(this);

  if (proxyFactory.isProxyTargetClass()) {
    // Explicit handling of JDK proxy targets (for introduction advice scenarios)
    if (Proxy.isProxyClass(beanClass)) {
      // Must allow for introductions; can't just set interfaces to the proxy's interfaces only.
      for (Class<?> ifc : beanClass.getInterfaces()) {
        proxyFactory.addInterface(ifc);
      }
    }
  }
  else {
    // No proxyTargetClass flag enforced, let's apply our default checks...
    if (shouldProxyTargetClass(beanClass, beanName)) {
      proxyFactory.setProxyTargetClass(true);
    }
    else {
      evaluateProxyInterfaces(beanClass, proxyFactory);
    }
  }

  Advisor[] advisors = buildAdvisors(beanName, specificInterceptors);
  proxyFactory.addAdvisors(advisors);
  proxyFactory.setTargetSource(targetSource);
  customizeProxyFactory(proxyFactory);

  proxyFactory.setFrozen(this.freezeProxy);
  if (advisorsPreFiltered()) {
    proxyFactory.setPreFiltered(true);
  }

  // Use original ClassLoader if bean class not locally loaded in overriding class loader
  ClassLoader classLoader = getProxyClassLoader();
  if (classLoader instanceof SmartClassLoader && classLoader != beanClass.getClassLoader()) {
    classLoader = ((SmartClassLoader) classLoader).getOriginalClassLoader();
  }
  return proxyFactory.getProxy(classLoader);
}

proxyFactory.getProxy(classLoader)

/**
  * Create a new proxy according to the settings in this factory.
  * <p>Can be called repeatedly. Effect will vary if we've added
  * or removed interfaces. Can add and remove interceptors.
  * <p>Uses the given class loader (if necessary for proxy creation).
  * @param classLoader the class loader to create the proxy with
  * (or {@code null} for the low-level proxy facility's default)
  * @return the proxy object
  */
public Object getProxy(@Nullable ClassLoader classLoader) {
  return createAopProxy().getProxy(classLoader);
}

依据条件创建代理(jdk或cglib)

DefaultAopProxyFactory.createAopProxy

@Override
public AopProxy createAopProxy(AdvisedSupport config) throws AopConfigException {
  if (!NativeDetector.inNativeImage() &&
      (config.isOptimize() || config.isProxyTargetClass() || hasNoUserSuppliedProxyInterfaces(config))) {
    Class<?> targetClass = config.getTargetClass();
    if (targetClass == null) {
      throw new AopConfigException("TargetSource cannot determine target class: " +
          "Either an interface or a target is required for proxy creation.");
    }
    if (targetClass.isInterface() || Proxy.isProxyClass(targetClass)) {
      return new JdkDynamicAopProxy(config);
    }
    return new ObjenesisCglibAopProxy(config);
  }
  else {
    return new JdkDynamicAopProxy(config);
  }
}

小结

  • config.isOptimize() 是通过optimize设置,表示配置是自定义的,默认是false;
  • config.isProxyTargetClass()是通过
    <aop:config proxy-target-class="true" />
    来配置的,表示优先使用cglib代理,默认是false;
  • hasNoUserSuppliedProxyInterfaces(config) 表示是否目标类实现了接口

由此可以知道:

Spring默认在目标类实现接口时是通过JDK代理实现的,只有非接口的是通过Cglib代理实现的。当设置proxy-target-class为true时在目标类不是接口或者代理类时优先使用cglib代理实现。

JDK代理

JDK动态代理是有JDK提供的工具类Proxy实现的,动态代理类是在运行时生成指定接口的代理类,每个代理实例(实现需要代理的接口)都有一个关联的调用处理程序对象,此对象实现了InvocationHandler,最终的业务逻辑是在InvocationHandler实现类的invoke方法上。

JDK代理的流程如下:

JDK代理自动生成的class是由sun.misc.ProxyGenerator来生成的。

ProxyGenerator生成代码

我们看下sun.misc.ProxyGenerator生成代码的逻辑:

/**
    * Generate a proxy class given a name and a list of proxy interfaces.
    *
    * @param name        the class name of the proxy class
    * @param interfaces  proxy interfaces
    * @param accessFlags access flags of the proxy class
*/
public static byte[] generateProxyClass(final String name,
                                        Class<?>[] interfaces,
                                        int accessFlags)
{
    ProxyGenerator gen = new ProxyGenerator(name, interfaces, accessFlags);
    final byte[] classFile = gen.generateClassFile();
    ...
}

generateClassFile方法如下:

/**
    * Generate a class file for the proxy class.  This method drives the
    * class file generation process.
    */
private byte[] generateClassFile() {

    /* 第一步:将所有方法包装成ProxyMethod对象 */
    
    // 将Object类中hashCode、equals、toString方法包装成ProxyMethod对象
    addProxyMethod(hashCodeMethod, Object.class);
    addProxyMethod(equalsMethod, Object.class);
    addProxyMethod(toStringMethod, Object.class);

    // 将代理类接口方法包装成ProxyMethod对象
    for (Class<?> intf : interfaces) {
        for (Method m : intf.getMethods()) {
            addProxyMethod(m, intf);
        }
    }

    // 校验返回类型
    for (List<ProxyMethod> sigmethods : proxyMethods.values()) {
        checkReturnTypes(sigmethods);
    }

    /* 第二步:为代理类组装字段,构造函数,方法,static初始化块等 */
    try {
        // 添加构造函数,参数是InvocationHandler
        methods.add(generateConstructor());

        // 代理方法
        for (List<ProxyMethod> sigmethods : proxyMethods.values()) {
            for (ProxyMethod pm : sigmethods) {

                // 字段
                fields.add(new FieldInfo(pm.methodFieldName,
                    "Ljava/lang/reflect/Method;",
                        ACC_PRIVATE | ACC_STATIC));

                // 上述ProxyMethod中的方法
                methods.add(pm.generateMethod());
            }
        }

        // static初始化块
        methods.add(generateStaticInitializer());

    } catch (IOException e) {
        throw new InternalError("unexpected I/O Exception", e);
    }

    if (methods.size() > 65535) {
        throw new IllegalArgumentException("method limit exceeded");
    }
    if (fields.size() > 65535) {
        throw new IllegalArgumentException("field limit exceeded");
    }

    /* 第三步:写入class文件 */

    /*
        * Make sure that constant pool indexes are reserved for the
        * following items before starting to write the final class file.
        */
    cp.getClass(dotToSlash(className));
    cp.getClass(superclassName);
    for (Class<?> intf: interfaces) {
        cp.getClass(dotToSlash(intf.getName()));
    }

    /*
        * Disallow new constant pool additions beyond this point, since
        * we are about to write the final constant pool table.
        */
    cp.setReadOnly();

    ByteArrayOutputStream bout = new ByteArrayOutputStream();
    DataOutputStream dout = new DataOutputStream(bout);

    try {
        /*
            * Write all the items of the "ClassFile" structure.
            * See JVMS section 4.1.
            */
                                    // u4 magic;
        dout.writeInt(0xCAFEBABE);
                                    // u2 minor_version;
        dout.writeShort(CLASSFILE_MINOR_VERSION);
                                    // u2 major_version;
        dout.writeShort(CLASSFILE_MAJOR_VERSION);

        cp.write(dout);             // (write constant pool)

                                    // u2 access_flags;
        dout.writeShort(accessFlags);
                                    // u2 this_class;
        dout.writeShort(cp.getClass(dotToSlash(className)));
                                    // u2 super_class;
        dout.writeShort(cp.getClass(superclassName));

                                    // u2 interfaces_count;
        dout.writeShort(interfaces.length);
                                    // u2 interfaces[interfaces_count];
        for (Class<?> intf : interfaces) {
            dout.writeShort(cp.getClass(
                dotToSlash(intf.getName())));
        }

                                    // u2 fields_count;
        dout.writeShort(fields.size());
                                    // field_info fields[fields_count];
        for (FieldInfo f : fields) {
            f.write(dout);
        }

                                    // u2 methods_count;
        dout.writeShort(methods.size());
                                    // method_info methods[methods_count];
        for (MethodInfo m : methods) {
            m.write(dout);
        }

                                        // u2 attributes_count;
        dout.writeShort(0); // (no ClassFile attributes for proxy classes)

    } catch (IOException e) {
        throw new InternalError("unexpected I/O Exception", e);
    }

    return bout.toByteArray();
}

一共三个步骤(
把大象装进冰箱分几步
?):

  • 第一步:(把冰箱门打开)准备工作,将所有方法包装成ProxyMethod对象,包括Object类中hashCode、equals、toString方法,以及被代理的接口中的方法
  • 第二步:(把大象装进去)为代理类组装字段,构造函数,方法,static初始化块等
  • 第三步:(把冰箱门带上)写入class文件

从生成的Proxy代码看执行流程

从上述sun.misc.ProxyGenerator类中可以看到,这个类里面有一个配置参数
sun.misc.ProxyGenerator.saveGeneratedFiles
,可以通过这个参数将生成的Proxy类保存在本地,比如设置为true 执行后,生成的文件如下:

我们看下生成后的代码:

//
// Source code recreated from a .class file by IntelliJ IDEA
// (powered by FernFlower decompiler)
//

package com.sun.proxy;

import java.lang.reflect.InvocationHandler;
import java.lang.reflect.Method;
import java.lang.reflect.Proxy;
import java.lang.reflect.UndeclaredThrowableException;
import java.util.List;
import tech.pdai.springframework.service.IUserService;

// 所有类和方法都是final类型的
public final class $Proxy0 extends Proxy implements IUserService {
    private static Method m1;
    private static Method m3;
    private static Method m2;
    private static Method m0;
    private static Method m4;

    // 构造函数注入 InvocationHandler
    public $Proxy0(InvocationHandler var1) throws  {
        super(var1);
    }

    public final boolean equals(Object var1) throws  {
        try {
            return (Boolean)super.h.invoke(this, m1, new Object[]{var1});
        } catch (RuntimeException | Error var3) {
            throw var3;
        } catch (Throwable var4) {
            throw new UndeclaredThrowableException(var4);
        }
    }

    public final List findUserList() throws  {
        try {
            return (List)super.h.invoke(this, m3, (Object[])null);
        } catch (RuntimeException | Error var2) {
            throw var2;
        } catch (Throwable var3) {
            throw new UndeclaredThrowableException(var3);
        }
    }

    public final String toString() throws  {
        try {
            return (String)super.h.invoke(this, m2, (Object[])null);
        } catch (RuntimeException | Error var2) {
            throw var2;
        } catch (Throwable var3) {
            throw new UndeclaredThrowableException(var3);
        }
    }

    public final int hashCode() throws  {
        try {
            return (Integer)super.h.invoke(this, m0, (Object[])null);
        } catch (RuntimeException | Error var2) {
            throw var2;
        } catch (Throwable var3) {
            throw new UndeclaredThrowableException(var3);
        }
    }

    public final void addUser() throws  {
        try {
            super.h.invoke(this, m4, (Object[])null);
        } catch (RuntimeException | Error var2) {
            throw var2;
        } catch (Throwable var3) {
            throw new UndeclaredThrowableException(var3);
        }
    }

    static {
        try {
            // 初始化 methods, 2个IUserService接口中的方法,3个Object中的接口
            m1 = Class.forName("java.lang.Object").getMethod("equals", Class.forName("java.lang.Object"));
            m3 = Class.forName("tech.pdai.springframework.service.IUserService").getMethod("findUserList");
            m2 = Class.forName("java.lang.Object").getMethod("toString");
            m0 = Class.forName("java.lang.Object").getMethod("hashCode");
            m4 = Class.forName("tech.pdai.springframework.service.IUserService").getMethod("addUser");
        } catch (NoSuchMethodException var2) {
            throw new NoSuchMethodError(var2.getMessage());
        } catch (ClassNotFoundException var3) {
            throw new NoClassDefFoundError(var3.getMessage());
        }
    }
}

上述代码是比较容易理解的,我就不画图了。

主要流程是:

  • ProxyGenerator创建Proxy的具体类$Proxy0
  • 由static初始化块初始化接口方法:2个IUserService接口中的方法,3个Object中的接口方法
  • 由构造函数注入InvocationHandler
  • 执行的时候,通过ProxyGenerator创建的Proxy,调用InvocationHandler的invoke方法,执行我们自定义的invoke方法

SpringAOP中JDK代理的实现

SpringAOP扮演的是JDK代理的创建和调用两个角色,我们通过这两个方向来看下SpringAOP的代码(JdkDynamicAopProxy类)

SpringAOP Jdk代理的创建

代理的创建比较简单,调用getProxy方法,然后直接调用JDK中Proxy.newProxyInstance()方法将classloader和被代理的接口方法传入即可。

@Override
public Object getProxy() {
    return getProxy(ClassUtils.getDefaultClassLoader());
}

@Override
public Object getProxy(@Nullable ClassLoader classLoader) {
    if (logger.isTraceEnabled()) {
        logger.trace("Creating JDK dynamic proxy: " + this.advised.getTargetSource());
    }
    return Proxy.newProxyInstance(classLoader, this.proxiedInterfaces, this);
}

SpringAOP Jdk代理的执行

执行的方法如下:

/**
    * Implementation of {@code InvocationHandler.invoke}.
    * <p>Callers will see exactly the exception thrown by the target,
    * unless a hook method throws an exception.
    */
@Override
@Nullable
public Object invoke(Object proxy, Method method, Object[] args) throws Throwable {
    Object oldProxy = null;
    boolean setProxyContext = false;

    TargetSource targetSource = this.advised.targetSource;
    Object target = null;

    try {
        // 执行的是equal方法
        if (!this.equalsDefined && AopUtils.isEqualsMethod(method)) {
            // The target does not implement the equals(Object) method itself.
            return equals(args[0]);
        }
        // 执行的是hashcode方法
        else if (!this.hashCodeDefined && AopUtils.isHashCodeMethod(method)) {
            // The target does not implement the hashCode() method itself.
            return hashCode();
        }
        // 如果是包装类,则dispatch to proxy config
        else if (method.getDeclaringClass() == DecoratingProxy.class) {
            // There is only getDecoratedClass() declared -> dispatch to proxy config.
            return AopProxyUtils.ultimateTargetClass(this.advised);
        }
        // 用反射方式来执行切点
        else if (!this.advised.opaque && method.getDeclaringClass().isInterface() &&
                method.getDeclaringClass().isAssignableFrom(Advised.class)) {
            // Service invocations on ProxyConfig with the proxy config...
            return AopUtils.invokeJoinpointUsingReflection(this.advised, method, args);
        }

        Object retVal;

        if (this.advised.exposeProxy) {
            // Make invocation available if necessary.
            oldProxy = AopContext.setCurrentProxy(proxy);
            setProxyContext = true;
        }

        // Get as late as possible to minimize the time we "own" the target,
        // in case it comes from a pool.
        target = targetSource.getTarget();
        Class<?> targetClass = (target != null ? target.getClass() : null);

        // 获取拦截链
        List<Object> chain = this.advised.getInterceptorsAndDynamicInterceptionAdvice(method, targetClass);

        // Check whether we have any advice. If we don't, we can fallback on direct
        // reflective invocation of the target, and avoid creating a MethodInvocation.
        if (chain.isEmpty()) {
            // We can skip creating a MethodInvocation: just invoke the target directly
            // Note that the final invoker must be an InvokerInterceptor so we know it does
            // nothing but a reflective operation on the target, and no hot swapping or fancy proxying.
            Object[] argsToUse = AopProxyUtils.adaptArgumentsIfNecessary(method, args);
            retVal = AopUtils.invokeJoinpointUsingReflection(target, method, argsToUse);
        }
        else {
            // We need to create a method invocation...
            MethodInvocation invocation =
                    new ReflectiveMethodInvocation(proxy, target, method, args, targetClass, chain);
            // Proceed to the joinpoint through the interceptor chain.
            retVal = invocation.proceed();
        }

        // Massage return value if necessary.
        Class<?> returnType = method.getReturnType();
        if (retVal != null && retVal == target &&
                returnType != Object.class && returnType.isInstance(proxy) &&
                !RawTargetAccess.class.isAssignableFrom(method.getDeclaringClass())) {
            // Special case: it returned "this" and the return type of the method
            // is type-compatible. Note that we can't help if the target sets
            // a reference to itself in another returned object.
            retVal = proxy;
        }
        else if (retVal == null && returnType != Void.TYPE && returnType.isPrimitive()) {
            throw new AopInvocationException(
                    "Null return value from advice does not match primitive return type for: " + method);
        }
        return retVal;
    }
    finally {
        if (target != null && !targetSource.isStatic()) {
            // Must have come from TargetSource.
            targetSource.releaseTarget(target);
        }
        if (setProxyContext) {
            // Restore old proxy.
            AopContext.setCurrentProxy(oldProxy);
        }
    }
}

CGLIB代理

代理的流程

  • 在上图中,我们可以通过在Enhancer中配置更多的参数来控制代理的行为,比如如果只希望增强这个类中的一个方法(而不是所有方法),那就增加callbackFilter来对目标类中方法进行过滤;Enhancer可以有更多的参数类配置其行为,不过我们在学习上述主要的流程就够了。

  • final方法为什么不能被代理?很显然final方法没法被子类覆盖,当然不能代理了。

  • Mockito为什么不能mock静态方法?因为mockito也是基于cglib动态代理来实现的,static方法也不能被子类覆盖,所以显然不能mock。但PowerMock可以mock静态方法,因为它直接在bytecode上工作。

SpringAOP中Cglib代理的实现

SpringAOP封装了cglib,通过其进行动态代理的创建。

我们看下CglibAopProxy的getProxy方法

@Override
public Object getProxy() {
  return getProxy(null);
}

@Override
public Object getProxy(@Nullable ClassLoader classLoader) {
  if (logger.isTraceEnabled()) {
    logger.trace("Creating CGLIB proxy: " + this.advised.getTargetSource());
  }

  try {
    Class<?> rootClass = this.advised.getTargetClass();
    Assert.state(rootClass != null, "Target class must be available for creating a CGLIB proxy");

    // 上面流程图中的目标类
    Class<?> proxySuperClass = rootClass;
    if (rootClass.getName().contains(ClassUtils.CGLIB_CLASS_SEPARATOR)) {
      proxySuperClass = rootClass.getSuperclass();
      Class<?>[] additionalInterfaces = rootClass.getInterfaces();
      for (Class<?> additionalInterface : additionalInterfaces) {
        this.advised.addInterface(additionalInterface);
      }
    }

    // Validate the class, writing log messages as necessary.
    validateClassIfNecessary(proxySuperClass, classLoader);

    // 重点看这里,就是上图的enhancer,设置各种参数来构建
    Enhancer enhancer = createEnhancer();
    if (classLoader != null) {
      enhancer.setClassLoader(classLoader);
      if (classLoader instanceof SmartClassLoader &&
          ((SmartClassLoader) classLoader).isClassReloadable(proxySuperClass)) {
        enhancer.setUseCache(false);
      }
    }
    enhancer.setSuperclass(proxySuperClass);
    enhancer.setInterfaces(AopProxyUtils.completeProxiedInterfaces(this.advised));
    enhancer.setNamingPolicy(SpringNamingPolicy.INSTANCE);
    enhancer.setStrategy(new ClassLoaderAwareGeneratorStrategy(classLoader));

    // 设置callback回调接口,即方法的增强点
    Callback[] callbacks = getCallbacks(rootClass);
    Class<?>[] types = new Class<?>[callbacks.length];
    for (int x = 0; x < types.length; x++) {
      types[x] = callbacks[x].getClass();
    }
    // 上节说到的filter
    enhancer.setCallbackFilter(new ProxyCallbackFilter(
        this.advised.getConfigurationOnlyCopy(), this.fixedInterceptorMap, this.fixedInterceptorOffset));
    enhancer.setCallbackTypes(types);

    // 重点:创建proxy和其实例
    return createProxyClassAndInstance(enhancer, callbacks);
  }
  catch (CodeGenerationException | IllegalArgumentException ex) {
    throw new AopConfigException("Could not generate CGLIB subclass of " + this.advised.getTargetClass() +
        ": Common causes of this problem include using a final class or a non-visible class",
        ex);
  }
  catch (Throwable ex) {
    // TargetSource.getTarget() failed
    throw new AopConfigException("Unexpected AOP exception", ex);
  }
}

获取callback的方法如下,提几个理解的要点吧,具体读者在学习的时候建议把我的例子跑一下,然后打一个断点进行理解。

  • rootClass
    : 即目标代理类
  • advised
    : 包含上文中我们获取到的advisor增强器的集合
  • exposeProxy
    : 在xml配置文件中配置的,背景就是如果在事务A中使用了代理,事务A调用了目标类的的方法a,在方法a中又调用目标类的方法b,方法a,b同时都是要被增强的方法,如果不配置exposeProxy属性,方法b的增强将会失效,如果配置exposeProxy,方法b在方法a的执行中也会被增强了
  • DynamicAdvisedInterceptor
    : 拦截器将advised(包含上文中我们获取到的advisor增强器)构建配置的AOP的callback(第一个callback)
  • targetInterceptor
    : xml配置的optimize属性使用的(第二个callback)
  • 最后连同其它5个默认的Interceptor 返回作为cglib的拦截器链,之后通过CallbackFilter的accpet方法返回的索引从这个集合中返回对应的拦截增强器执行增强操作。
private Callback[] getCallbacks(Class<?> rootClass) throws Exception {
  // Parameters used for optimization choices...
  boolean exposeProxy = this.advised.isExposeProxy();
  boolean isFrozen = this.advised.isFrozen();
  boolean isStatic = this.advised.getTargetSource().isStatic();

  // Choose an "aop" interceptor (used for AOP calls).
  Callback aopInterceptor = new DynamicAdvisedInterceptor(this.advised);

  // Choose a "straight to target" interceptor. (used for calls that are
  // unadvised but can return this). May be required to expose the proxy.
  Callback targetInterceptor;
  if (exposeProxy) {
    targetInterceptor = (isStatic ?
        new StaticUnadvisedExposedInterceptor(this.advised.getTargetSource().getTarget()) :
        new DynamicUnadvisedExposedInterceptor(this.advised.getTargetSource()));
  }
  else {
    targetInterceptor = (isStatic ?
        new StaticUnadvisedInterceptor(this.advised.getTargetSource().getTarget()) :
        new DynamicUnadvisedInterceptor(this.advised.getTargetSource()));
  }

  // Choose a "direct to target" dispatcher (used for
  // unadvised calls to static targets that cannot return this).
  Callback targetDispatcher = (isStatic ?
      new StaticDispatcher(this.advised.getTargetSource().getTarget()) : new SerializableNoOp());

  Callback[] mainCallbacks = new Callback[] {
      aopInterceptor,  // 
      targetInterceptor,  // invoke target without considering advice, if optimized
      new SerializableNoOp(),  // no override for methods mapped to this
      targetDispatcher, this.advisedDispatcher,
      new EqualsInterceptor(this.advised),
      new HashCodeInterceptor(this.advised)
  };

  Callback[] callbacks;

  // If the target is a static one and the advice chain is frozen,
  // then we can make some optimizations by sending the AOP calls
  // direct to the target using the fixed chain for that method.
  if (isStatic && isFrozen) {
    Method[] methods = rootClass.getMethods();
    Callback[] fixedCallbacks = new Callback[methods.length];
    this.fixedInterceptorMap = CollectionUtils.newHashMap(methods.length);

    // TODO: small memory optimization here (can skip creation for methods with no advice)
    for (int x = 0; x < methods.length; x++) {
      Method method = methods[x];
      List<Object> chain = this.advised.getInterceptorsAndDynamicInterceptionAdvice(method, rootClass);
      fixedCallbacks[x] = new FixedChainStaticTargetInterceptor(
          chain, this.advised.getTargetSource().getTarget(), this.advised.getTargetClass());
      this.fixedInterceptorMap.put(method, x);
    }

    // Now copy both the callbacks from mainCallbacks
    // and fixedCallbacks into the callbacks array.
    callbacks = new Callback[mainCallbacks.length + fixedCallbacks.length];
    System.arraycopy(mainCallbacks, 0, callbacks, 0, mainCallbacks.length);
    System.arraycopy(fixedCallbacks, 0, callbacks, mainCallbacks.length, fixedCallbacks.length);
    this.fixedInterceptorOffset = mainCallbacks.length;
  }
  else {
    callbacks = mainCallbacks;
  }
  return callbacks;
}

可以结合调试,方便理解

AOP在嵌套方法调用时不生效

在一个实现类中,有2个方法,方法A,方法B,其中方法B上面有个注解切面,当方法B被外部调用的时候,会进入切面方法。
但当方法B是被方法A调用时,并不能从方法B的注解上,进入到切面方法,即我们经常碰到的方法嵌套时,AOP注解不生效的问题。

案例

外部调用AOP方法正常进入

通过外部,调用方法B,可以正常进入切面方法,这个场景的代码如下:

  • 注解类:
@Target({ElementType.METHOD, ElementType.TYPE})
@Retention(RetentionPolicy.RUNTIME)
public @interface DemoAnno {

}
  • 切面类
@Aspect
@Order(-1)
@Component
public class DemoAspect {

    @Before("@annotation(da)")
    public void beforDoSomething(JoinPoint point, DemoAnno da) throws Exception {
        System.out.println("before method B, print 'hello,world' " );
    }
}
  • 接口类
public interface DemoService {
    void methodDemoA();

    void methodDemoB();
}
  • 服务实现类
@Service
public class DemoServiceImpl implements DemoService {
    @Override
    public void methodDemoA(){
        System.out.println("this is method A");
    }

    @Override
    @DemoAnno
    public void methodDemoB() {
        System.out.println("this is method B");
    }
}
  • 测试方法
@Autowired
DemoService demoService;
@Test
public void testMethod(){
    demoService.methodDemoA();
    demoService.methodDemoB();
}

输出结果:

this is method A
before method B, print 'hello,world' 
this is method B

方法嵌套调用,AOP不生效

上面的代码,做下修改。在DemoServiceImpl实现类中,通过方法A去调用方法B,然后再单元测试类中,调用方法A。代码修改后如下:

  • 服务实现类:
@Service
public class DemoServiceImpl implements DemoService {
    @Override
    public void methodDemoA(){
        System.out.println("this is method A");
        methodDemoB();
    }

    @Override
    @DemoAnno
    public void methodDemoB() {
        System.out.println("this is method B");
    }
}
  • 输出结果:
this is method A
this is method B

原因分析

场景1中,通过外部调用方法B,是由于spring在启动时,根据切面类及注解,生成了DemoService的代理类,在调用方法B时,实际上是代理类先对目标方法进行了业务增强处理(执行切面类中的业务逻辑),然后再调用方法B本身。所以场景1可以正常进入切面方法;

场景2中,通过外部调用的是方法A,虽然spring也会创建一个cglib的代理类去调用方法A,但当方法A调用方法B的时候,属于类里面的内部调用,使用的是实例对象本身去去调用方法B,非aop的cglib代理对象调用,方法B自然就不会进入到切面方法了。

解决方案

但实际上我们期望的是,方法A在调用方法B的时候,仍然能够进入切面方法,即需要AOP切面生效。这种情况下,在调用方法B的时候,需要使用
AopContext.currentProxy()
获取当前的代理对象,然后使用代理对象调用方法B。

注:需要开启
exposeProxy=true
的配置,springboot项目中,可以在启动类上面,添加 @EnableAspectJAutoProxy(exposeProxy = true)注解。

@Service
public class DemoServiceImpl implements DemoService {
    @Override
    public void methodDemoA(){
        System.out.println("this is method A");
        DemoService service = (DemoService) AopContext.currentProxy();
        service.methodDemoB();
    }

    @Override
    @DemoAnno
    public void methodDemoB() {
        System.out.println("this is method B");
    }
}

面试题专栏

Java面试题专栏
已上线,欢迎访问。

  • 如果你不知道简历怎么写,简历项目不知道怎么包装;
  • 如果简历中有些内容你不知道该不该写上去;
  • 如果有些综合性问题你不知道怎么答;

那么可以私信我,我会尽我所能帮助你。