2023年4月

一、前言和开发环境及配置

可以转载,但请注明出处。

之前自己写的SpringBoot整合MongoDB的聚合查询操作,感兴趣的可以点击查阅。

https://www.cnblogs.com/zaoyu/p/springboot-mongodb.html

使用mongodb存储文件并实现读取,通过springboot集成mongodb操作。

可以有两种实现方式:

1. 单个文件小于16MB的,可以直接把文件转成二进制或者使用如Base64编码对文件做编码转换,以二进制或者string格式存入mongodb。

读取时,把二进制数据或者string数据转成对应的IO流或做解码,再返回即可。

2. 对于单个文件大于16MB的,可以使用mongodb自带的GridFS

开发环境、工具:JDK1.8,IDEA 2021

Springboot版本:2.7.5

Mongodb依赖版本:4.6.1

SpringBoot的配置 application.properties 如下

# 应用名称
spring.application.name
=demo
#server.port
=10086不配置的话,默认8080

# springboot下mongoDB的配置参数。
spring.data.mongodb.host
=localhost
spring.data.mongodb.port
=27017# 指定数据库库名
spring.data.mongodb.database
=temp

二、实现步骤和代码

1. 小文件存储

1.1 说明和限制

由于MongoDB限制单个文档大小不能超过16MB,所以这种方式仅适用于单个文件小于16MB的。

如果传入大于16MB的文件,存储是会失败的,报错如下。

1.2 实现代码

packagecom.onepiece.mongo;importorg.bson.Document;importorg.bson.types.Binary;importorg.junit.jupiter.api.Test;importorg.springframework.beans.factory.annotation.Autowired;importorg.springframework.boot.test.context.SpringBootTest;importorg.springframework.data.mongodb.core.MongoTemplate;importorg.springframework.data.mongodb.core.query.Criteria;importorg.springframework.data.mongodb.core.query.Query;import java.io.*;importjava.util.Base64;importjava.util.List;/***@authorzaoyu
* @description 用于演示Mongodb的文件存储(单个文件不大于16MB)
*/@SpringBootTestpublic classMongoSaveFiles {

@Autowired
privateMongoTemplate mongoTemplate;//collection名 private String IMAGE_COLLECTION = "image";//源文件完整路径 private String FILE_PATH = "D:\\temp\\onepiece.jpg";//输出文件路径 private String FILE_OUTPUT_PATH = "C:\\Users\\onepiece\\Desktop\\";//限制16MB private Long FILE_SIZE_LIMIT = 16L * 1024L * 1024L;

@Test
public voidsaveFiles(){byte[] fileContent = null;
FileInputStream fis
= null;try{
File file
= newFile(FILE_PATH);long length =file.length();//校验文件大小,大于16MB返回。 这里的操作逻辑依据你自己业务需求调整即可。 if (length >=FILE_SIZE_LIMIT) {
System.out.println(
"文件: " + file.getAbsolutePath() + " 超出单个文件16MB的限制。");return;
}
fileContent
= new byte[(int) file.length()];
fis
= newFileInputStream(file);//读取整个文件 fis.read(fileContent);//把文件内容以二进制格式写入到mongodb Document document = newDocument();//fileName字段、content字段自定义。 document.append("fileName", file.getName());
document.append(
"content", newBinary(fileContent));
Document insert
=mongoTemplate.insert(document, IMAGE_COLLECTION);
System.out.println(
"文件 " + file.getName() + " 已存入mongodb,对应ID是: " + insert.get("_id").toString());
}
catch(IOException e) {
e.printStackTrace();
}
finally{try{
fis.close();
}
catch(IOException e) {
e.printStackTrace();
}
}
}
/*** 测试读取并写入到指定路径。*/@Testpublic voidreadAndWriteFiles(){//这里也是,默认查所有,需要条件自行增加。 简单取1条验证。 List<Document> result = mongoTemplate.find(new Query(), Document.class, IMAGE_COLLECTION);
Document document
= result.get(0);//取出存储的二进制数据,这里用binary.class处理。 Binary content = document.get("content", Binary.class);
String fileName
= document.get("fileName", String.class);try{
String newFilePath
= FILE_OUTPUT_PATH +fileName;//写入到指定路径 FileOutputStream fos = newFileOutputStream(newFilePath);
fos.write(content.getData());
}
catch(IOException e) {
e.printStackTrace();
}
}

除了二进制的格式,也可以直接把文件用如Base64之类的编码工具来转码存储String。

@Testpublic voidtestBase64(){
saveFileWithBase64(FILE_PATH);
getFileWithBase64();
}
public voidsaveFileWithBase64(String filePath){//读取文件并编码为 Base64 格式 File file = newFile(filePath);byte[] fileContent = new byte[(int) file.length()];try (FileInputStream inputStream = newFileInputStream(file)) {
inputStream.read(fileContent);
}
catch(IOException e) {
e.printStackTrace();
}
//把读取到的流转成base64 String encodedString =Base64.getEncoder().encodeToString(fileContent);//将 Base64 编码的文件内容存储到 MongoDB 文档中 Document document = newDocument();
document.put(
"fileName", file.getName());
document.put(
"base64Content", encodedString);
Document insert
=mongoTemplate.insert(document, IMAGE_COLLECTION);
System.out.println(
"文件 " + file.getName() + " 已存入mongodb,对应ID是: " + insert.get("_id").toString());
}
public voidgetFileWithBase64(){
Criteria criteria
= Criteria.where("base64Content").exists(true);
List
<Document> result = mongoTemplate.find(new Query(criteria), Document.class, IMAGE_COLLECTION);
Document document
= result.get(0);
String base64Content
= document.get("base64Content", String.class);
String fileName
= document.get("fileName", String.class);byte[] decode =Base64.getDecoder().decode(base64Content);try{
String newFilePath
= FILE_OUTPUT_PATH +fileName;
FileOutputStream fos
= newFileOutputStream(newFilePath);
fos.write(decode);
System.out.println(
"文件已读取并复制到指定路径,详情为:" +newFilePath);
}
catch(IOException e) {
e.printStackTrace();
}
}

1.3 落库效果

直接存储二进制数据,可以看到,使用BinData存储,还会显示字节数(文件大小)。

2. 大于16MB的文件存储,使用GridFS

2.1 gridFS简介

GridFS
is a specification for storing and retrieving files that exceed the
BSON
-document
size limit
of 16 MB.

字面直译就是说GridFS是用来存储大于BSON文档限制的16MB的文件。

官方文档
https://www.mongodb.com/docs/manual/core/gridfs/

存储原理
:GridFS 会将大文件对象分割成多个小的chunk(文件片段), 一般为256k/个,每个chunk将作为MongoDB的一个文档(document)被存储在chunks集合中。

每一个数据库有一个GridFS区域,用来存储。

需要通过先创建bucket(和OSS中一样的概念)来存储,一个bucket创建后,一旦有文件存入,在collections中就会自动生成2个集合来存储文件的数据和信息,一般是bucket名字+files和bucket名字+chunks。

每个文件的实际内容被存在chunks(二进制数据)中,和文件有关的meta数据(filename,content_type,还有用户自定义的属性)将会被存在files集合中。

如下图结构

2.2 实现代码

packagecom.onepiece.mongo;importcom.mongodb.client.MongoDatabase;importcom.mongodb.client.gridfs.GridFSBucket;importcom.mongodb.client.gridfs.GridFSBuckets;importcom.mongodb.client.gridfs.model.GridFSUploadOptions;importorg.bson.Document;importorg.bson.types.ObjectId;importorg.junit.jupiter.api.Test;importorg.springframework.beans.factory.annotation.Autowired;importorg.springframework.boot.test.context.SpringBootTest;importorg.springframework.data.mongodb.core.MongoTemplate;importorg.springframework.data.mongodb.core.query.Query;importorg.springframework.util.FileCopyUtils;import java.io.*;importjava.util.List;/***@authorzaoyu
* @description:使用GridFS存储文件并做读取。
*/@SpringBootTestpublic classMongoGridFS {


@Autowired
privateMongoTemplate mongoTemplate;//GridFS下的bucket,自行指定要把文件存储到哪个bucket。 private String BUCKET_NAME = "images";//源文件,即要被存储的文件的绝对路径 private String FILE_PATH = "D:\\temp\\onepiece.jpg";//存储文件后自动生成的存储文件信息的collection,一般是xx.files。 private String COLLECTION_NAME = "images.files";//用于演示接收输出文件的路径 private String FILE_OUTPUT_PATH = "C:\\Users\\onepiece\\Desktop\\";

@Test
public voidtestGridFSSaveFiles() {
saveToGridFS();
System.out.println(
"------------");
readFromGridFS();
}
/*** 传入bucketName得到指定bucket操作对象。
*
*
@parambucketName
*
@return */ publicGridFSBucket createGridFSBucket(String bucketName) {
MongoDatabase db
=mongoTemplate.getDb();returnGridFSBuckets.create(db, bucketName);
}
/*** 储存文件到GridFS*/ public voidsaveToGridFS() {//先调用上面方法得到一个GridFSBucket的操作对象 GridFSBucket gridFSBucket =createGridFSBucket(BUCKET_NAME);
File file
= newFile(FILE_PATH);
FileInputStream inputStream
= null;try{
inputStream
= newFileInputStream(file);
}
catch(FileNotFoundException e) {
e.printStackTrace();
}
//设置GridFS存储配置,这里是设置了每个chunk(块)的大小为1024个字节,也可以设置大一点。 MetaData是对文件的说明,如果不需要可以不写。 也是以键值对存在,BSON格式。 GridFSUploadOptions options = new GridFSUploadOptions().chunkSizeBytes(1024).metadata(new Document("user", "onepiece"));//调用GridFSBucket中的uploadFromStream方法,把对应的文件流传递进去,然后就会以binary(二进制格式)存储到GridFS中,并得到一个文件在xx.files中的主键ID,后面可以用这个ID来查找关联的二进制文件数据。 ObjectId objectId =gridFSBucket.uploadFromStream(file.getName(), inputStream, options);
System.out.println(file.getName()
+ "已存入mongodb gridFS, 对应id是:" +objectId);
}
/*** 从GridFS中读取文件*/ public voidreadFromGridFS() {//这里查找条件我先不写,默认查所有,取第一条做验证演示。 用Document类接收。 List<Document> files = mongoTemplate.find(new Query(), Document.class, COLLECTION_NAME);
Document file
= files.get(0);//得到主键ID,作为等下要查询的文件ID值。 ObjectId fileId = file.getObjectId("_id");
String filename
= file.getString("filename");//先调用上面方法得到一个GridFSBucket的操作对象 GridFSBucket gridFSBucket =createGridFSBucket(BUCKET_NAME);//调用openDownloadStream方法得到文件IO流。 InputStream downloadStream =gridFSBucket.openDownloadStream(fileId);
FileOutputStream fileOutputStream
= null;try{
fileOutputStream
= new FileOutputStream(FILE_OUTPUT_PATH +filename);//把IO流直接到指定路径的输出流对象实现输出。 FileCopyUtils.copy(downloadStream, fileOutputStream);
}
catch(IOException e) {
e.printStackTrace();
}
finally{try{
fileOutputStream.close();
}
catch(IOException e) {
e.printStackTrace();
}
}
}

}

2.3 落库效果

bucket:

注意这里的ID,就是files中的主键ID。

files collection (image.files):

chunks collection (image.chunks)

可以看到这里的files_id就是对应image.files中的主键ID。文件被拆成多个chunk块。

三、小结

对于小文件的,可以直接转二进制存储,对于大于等于16MB的,使用GridFS存储。

希望这篇文章能帮到大家,有错漏之处,欢迎指正。

请多点赞、评论~

完。
1. 前言

synchronized在我们的程序中非常的常见,主要是为了解决多个线程抢占同一个资源。那么我们知道synchronized有多种用法,以下从实践出发,
题目由简入深
,看你能答对几道题目?

2. 问题

调用代码如下

public static void main(String[] args) throws Exception {
	ThreadPoolExecutor executor = new ThreadPoolExecutor(10, 10, 60, TimeUnit.SECONDS, new LinkedBlockingQueue<>(1024));

	SyncTest st = new SyncTest();
	// 注意是不同方法
	executor.submit(() -> st.sync1_1());
	executor.submit(() -> st.sync1_2());

	executor.shutdown();
}

问题2.1

锁lock全局对象,会输出什么?

public static final Object LOCK = new Object();

public void sync1_1() {
	// 锁住lock对象
	synchronized (LOCK) {
		sleep("sync1_1");
	}
}

public void sync1_2() {
	// 锁住lock对象
	synchronized (LOCK) {
		sleep("sync1_2");
	}
}

public static void sleep(String name) {
	try {
		log.info(name + " get lock");
		TimeUnit.SECONDS.sleep(1);
		log.info(name + " release lock");
	} catch (Exception e) {}
}


点击查看答案(请思考后在点击查看)
[INFO  2023-04-14 15:12:46.639] [pool-2-thread-1] [] - [SyncTest.java.sleep:86] [sync1_1 get lock]
[INFO  2023-04-14 15:12:47.652] [pool-2-thread-1] [] - [SyncTest.java.sleep:88] [sync1_1 release lock]

[INFO  2023-04-14 15:12:47.652] [pool-2-thread-2] [] - [SyncTest.java.sleep:86] [sync1_2 get lock]
[INFO  2023-04-14 15:12:48.652] [pool-2-thread-2] [] - [SyncTest.java.sleep:88] [sync1_2 release lock]

等待线程A执行完成后,线程B才能执行,否则阻塞。符合我们预期。
锁的资源就是我们所谓的LOCK对象

问题2.2

锁this对象,会输出什么?this是代表什么?

public void sync2_1() {
	synchronized (this) {
		sleep("sync2_1");
	}
}
public void sync2_2() {
	synchronized (this) {
		sleep("sync2_2");
	}
}


点击查看答案(请思考后在点击查看)
[INFO  2023-04-14 15:12:46.639] [pool-2-thread-1] [] - [SyncTest.java.sleep:86] [sync2_1 get lock]
[INFO  2023-04-14 15:12:47.652] [pool-2-thread-1] [] - [SyncTest.java.sleep:88] [sync2_1 release lock]

[INFO  2023-04-14 15:12:47.652] [pool-2-thread-2] [] - [SyncTest.java.sleep:86] [sync2_2 get lock]
[INFO  2023-04-14 15:12:48.652] [pool-2-thread-2] [] - [SyncTest.java.sleep:88] [sync2_2 release lock]

等待线程A执行完成后,线程B才能执行,否则阻塞。符合我们预期。锁的是调用方,SyncTest st = new SyncTest(); 中的st对象。 st是SyncTest类的一个对象。也就是锁的这个this资源

问题2.3

锁方法,会输出什么? 锁的又是什么资源?

public synchronized void sync3_1() {
	sleep("sync3_1");
}

public synchronized void sync3_2() {
	sleep("sync3_2");
}


点击查看答案(请思考后在点击查看) 结论同 问题2.2

问题2.4

锁static方法,会输出什么? 锁的又是什么资源?

public static synchronized void sync4_1() {
	sleep("sync4_1");
}

public static synchronized void sync4_2() {
	sleep("sync4_2");
}


点击查看答案(请思考后在点击查看)
[INFO  2023-04-14 15:12:46.639] [pool-2-thread-1] [] - [SyncTest.java.sleep:86] [sync4_1 get lock]
[INFO  2023-04-14 15:12:47.652] [pool-2-thread-1] [] - [SyncTest.java.sleep:88] [sync4_1 release lock]

[INFO  2023-04-14 15:12:47.652] [pool-2-thread-2] [] - [SyncTest.java.sleep:86] [sync4_2 get lock]
[INFO  2023-04-14 15:12:48.652] [pool-2-thread-2] [] - [SyncTest.java.sleep:88] [sync4_2 release lock]

等待线程A执行完成后,线程B才能执行,否则阻塞。符合我们预期。因为是在static上面加锁,而static方法即是类方法,因此他锁的是这个类,也就是对SyncTest这个this class加的锁

问题2.5

锁类的class,会输出什么? 锁的又是什么资源?

public void sync5_1() {
	synchronized (SyncTest.class) {
		sleep("sync5_1");
	}
}

public void sync5_2() {
	synchronized (SyncTest.class) {
		sleep("sync5_2");
	}
}


点击查看答案(请思考后在点击查看) 结论同问题2.4

3. 问题(修改调用方式)

其他全部代码不改变,仅修改调用方式。具体代码如下

public static void main(String[] args) throws Exception {
	ThreadPoolExecutor executor = new ThreadPoolExecutor(10, 10, 60, TimeUnit.SECONDS, new LinkedBlockingQueue<>(1024));

	// 这个是new了一个st1
	SyncTest st1 = new SyncTest();
	executor.submit(() -> st1.sync1_1());
	
	// 这里new了一个st2
	SyncTest st2 = new SyncTest();
	executor.submit(() -> st2.sync1_2());

	executor.shutdown();
}

其他全部不变,
问题从2.1 - 2.5重新全部调用一遍
。结果又是否相同。
注意一下:调用方为 new 了
两个st1以及st2
, 如果你完全理解上述问题,这个问题就非常简单了。我们以问题1以及问题2为例:

问题2.1

[INFO  2023-04-14 15:12:46.639] [pool-2-thread-1] [] - [SyncTest.java.sleep:86] [sync1_1 get lock]
[INFO  2023-04-14 15:12:47.652] [pool-2-thread-1] [] - [SyncTest.java.sleep:88] [sync1_1 release lock]

[INFO  2023-04-14 15:12:47.652] [pool-2-thread-2] [] - [SyncTest.java.sleep:86] [sync1_2 get lock]
[INFO  2023-04-14 15:12:48.652] [pool-2-thread-2] [] - [SyncTest.java.sleep:88] [sync1_2 release lock]

这是由于无论new几个st,锁的永远是唯一资源lock,因此结论不变

问题2.2

[INFO  2023-04-14 15:26:31.676] [pool-2-thread-2] [] - [SyncTest.java.sleep:86] [sync2_1 get lock]
[INFO  2023-04-14 15:26:31.676] [pool-2-thread-1] [] - [SyncTest.java.sleep:86] [sync2_1 get lock]

[INFO  2023-04-14 15:26:32.688] [pool-2-thread-1] [] - [SyncTest.java.sleep:88] [sync2_1 release lock]
[INFO  2023-04-14 15:26:32.688] [pool-2-thread-2] [] - [SyncTest.java.sleep:88] [sync2_1 release lock]

这个结果就非常有意思了。注意看,线程B并没有阻塞,而是直接获取到了这个资源。也就是synchronized失效了。我们来分析一下为什么synchronized失效了?
我们知道在问题2中,synchronized锁的是this对象,
而这个this对象分别为st1, 以及st2
。那么是不是就是两个资源了。如果是两个资源,就不存在互斥的作用了,也就是不会相互争夺资源。

请各位读者自己分析问题2.3 - 2.5的第二种代码调用方式的结果。

4. 结论

synchronized是我们工程中常用的一个方法。但对于其用法,如果深究,还是有非常多意外的惊喜。如果小伙伴有其他问题,随时欢迎交流讨论

本系列文章导航
  1. https://www.cnblogs.com/aierong/p/17300066.html
  2. https://github.com/aierong/WpfDemo (自我Demo地址)

希望提到的知识对您有所提示,同时欢迎交流和指正
作者:
aierong
出处:
https://www.cnblogs.com/aierong

说明

为了应用程序的不同模块分离,减少模块之间引用,CommunityToolkit.Mvvm提供了消息通知功能,可以方便模块之间数据传递。

发送消息

方法:WeakReferenceMessenger.Default.Send

官方推荐用ValueChangedMessage封装数据传递

//Send发送消息
WeakReferenceMessenger.Default.Send<string>( "qq1" );

//特别注意:直接传递值,只可以是引用类型,值类型不可以编译成功的(例如:下面2句不行)
//WeakReferenceMessenger.Default.Send<int , string>( 11 , "token_1" );
//WeakReferenceMessenger.Default.Send<bool , string>( true  , "token_1" );

//上面这样也是可以的,但是官方推荐用ValueChangedMessage封装数据传递
WeakReferenceMessenger.Default.Send<ValueChangedMessage<string> , string>( new ValueChangedMessage<string>( "UserControlLeftViewModel发来的qq1" ) , "token_1" );

建议发送消息时都带上token名称,这样方便订阅接收方过滤数据

WeakReferenceMessenger.Default.Send<ValueChangedMessage<string> , string>( new ValueChangedMessage<string>( "UserControlLeftViewModel发来的qq1" ) , "token_1" );

发送消息传递对象

    public class MyUserMessage
    {
        public string UserName
        {
            get; set;
        }


        public int Age
        {
            get; set;
        }
    }
//Send发送 一个复杂数据 
var _data1 = new MyUserMessage() { Age = 18 , UserName = "qq" };
           
WeakReferenceMessenger.Default.Send<ValueChangedMessage<MyUserMessage> , string>( new ValueChangedMessage<MyUserMessage>( _data1 ) , "token_class" );

发送消息并有返回响应值

    /// <summary>
    /// 必须继承RequestMessage  RequestMessage<string>代表返回数据的类型是string
    /// </summary>
    public class MyMessage : RequestMessage<string>
    {
        public string Datas;

        public int Ids;
    }
            //result接收返回的值
            //MyMessage这个类必须继承RequestMessage
            var _data2 = new MyMessage() { Datas = "qqq" , Ids = 100 };
            var result1 = WeakReferenceMessenger.Default.Send<MyMessage , string>( _data2 , "token_Response" );
            if ( result1 != null )
            {
                //获取到 返回的值
                var val = result1.Response;

                Name = val;

            }

接收订阅消息

接收2种方式:

方式1.继承ObservableRecipient

方式2.实现接口IRecipient

方式1比方式2灵活,推荐使用方式1

接收方记得设置IsActive=true,才可以收到消息

我们在vm的OnActivated中接收消息数据

        [ObservableProperty]
        private string name = "hello";

        public UserControlTopViewModel ()
        {
            //注意这样要写,才可以接听
            IsActive = true;
        }
        protected override void OnActivated ()
        {
            //Register<>第一个类型一般是自己的类型,第2个是接收数据的类型
            //Register方法第1个参数一般是this,第2个参数是一个方法,可以获取接收到的值
            Messenger.Register<UserControlTopViewModel , string>( this , ( r , message ) =>
            {
                Name = Name + "  收到msg:" + message;
            } );

            //Register<>第一个类型一般是自己的类型,第2个是接收数据的类型,第3个是token数据的类型
            //Register方法第1个参数一般是this,第2个参数是token,第3个参数是一个方法,可以获取接收到的值
            //Messenger.Register<UserControlTopViewModel , string , string>( this , "token_1" , ( r , message ) =>
            //{

            //    Name = Name + "  收到msg:" + message;
            //} );
            //ValueChangedMessage<string>                  
            Messenger.Register<UserControlTopViewModel , ValueChangedMessage<string> , string>( this , "token_1" , ( r , message ) =>
            {

                Name = Name + "  收到msg:" + message.Value;
            } );


            //Messenger.Register<UserControlTopViewModel , MyUserMessage , string>( this , "token_class" , ( r , user ) =>
            //{
            //    Name = Name + "  收到msg:" + user.UserName + user.Age;
            //} );
            Messenger.Register<UserControlTopViewModel , ValueChangedMessage<MyUserMessage> , string>( this , "token_class" , ( r , user ) =>
            {
                Name = Name + "  收到msg:" + user.Value.UserName + user.Value.Age;
            } );


            Messenger.Register<UserControlTopViewModel , MyMessage , string>( this , "token_Response" , ( r , message ) =>
            {
                Name = Name + "  收到msg:" + message.Datas;

                //Reply是答复 ,这样可以返回值
                message.Reply( "UserControlTopViewModel给你返回值" );      

            } );
        }

自我Demo地址:

https://github.com/aierong/WpfDemo/tree/main/WpfDemoNet6/MessengerDemo

$\Gamma$函数

$\Gamma$函数(Gamma函数)是阶乘函数在实数和复数域的扩展。对于正整数$n$,阶乘函数表示为$n! = 1 \times 2 \times ... \times n$。然而,这个定义仅适用于正整数。Gamma函数的目的是将阶乘扩展到实数和复数域,从而计算实数和复数的“阶乘”。$\Gamma$函数定义如下:

$\displaystyle \Gamma(x) = \int_0^\infty t^{x-1}e^{-t} dt $

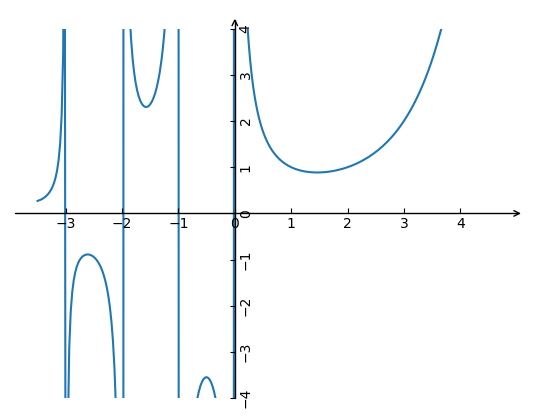
其中,$x$是一个复数,定义域是$\{x|x\in C- Z^--\{0\}\}$,也就是除了负整数和$0$之外的所有复数。通过这个定义,$\Gamma$函数可以用来计算实数和复数的“阶乘”。在实数域与复数域的可视化如下:

$\Gamma$函数具有以下性质:

1、对于正整数$n$,有$\Gamma(n) = (n - 1)!$。这表明$\Gamma$函数在正整数上与阶乘函数相符。

2、$\Gamma$函数满足递推关系:$\Gamma(x + 1) = x\Gamma(x)$(注意和整数阶乘的联系)。

3、$\Gamma$函数用于定义很多常见的概率分布,如$\Gamma$分布、Beta分布和t分布等。

$\Beta$分布

基于伯努利实验的推导

$\Beta$分布(Beta分布)与伯努利试验相关。在伯努利试验中,假设硬币朝上的概率为$p$。当抛$a+b$次硬币,硬币朝上的次数为$a$时,计算该情况的概率为

$ \displaystyle C_{a+b}^ap^a(1-p)^b$

上式表示二项分布在这一事件(即$a+b$次实验,$a$次正面)下的概率。则$\Beta$分布表示:把概率$p$看做随机变量,固定$a,b$,发生相应事件的概率分布。为了获取$\Beta$分布的概率密度,需要计算以上概率关于$p$的积分的归一化系数$k$,使得:

$\displaystyle k \int_0^1C_{a+b}^ap^a(1-p)^b  dp=1$

推导出

$\displaystyle k =\left(\int_0^1C_{a+b}^ap^a(1-p)^b dp\right)^{-1}=a+b+1 $

以上积分我不会算,但是可以通过以下程序来验证。

from scipy.special importcombdef Int(func, l, h, n=1000): #模拟定积分
    a =np.linspace(l, h, n)return func(a).sum()*(h-l)/n
a, b
= 5, 2 #取任意整数 k = a + b + 1 deffunc(x):return comb(a+b, a) * (x**a) *((1-x)**b)
Int(func, 0,
1) * k #= 1

获得概率密度函数:

$ \begin{align} f(p; a, b)&=(a+b+1)C_{a+b}^ap^a(1-p)^b\\ &=\frac{(a+b+1)!}{a!b!}p^a(1-p)^b\\ \end{align} $

把阶乘拓展为$\Gamma$函数,上式就变成

$ \begin{align}f(p; a, b)= \frac{\Gamma(a+b+2)}{\Gamma(a+1)\Gamma(b+1)}p^a(1-p)^b\end{align}$

令$a=\alpha-1,b=\beta-1,p=x$,就可以得到常见的$\Beta$分布的密度函数表示形式:

$ \begin{align}\displaystyle f(x;\alpha,\beta)=\frac{\Gamma(\alpha+\beta)}{\Gamma(\alpha)\Gamma(\beta)}x^{\alpha-1}(1-x)^{\beta-1}=\frac{1}{\Beta(\alpha,\beta)}x^{\alpha-1}(1-x)^{\beta-1}\end{align}$

其中$\Beta(\alpha,\beta)$为$\Beta$函数,$\alpha>0,\beta>0,0<x<1$。关于均值、方差什么的这里就不赘述了。

联合概率密度

正整数情况

关于(2)式,我们把其中的$a,b,p$都看作随机变量,再除以一个归一化系数,就可以构成这三个随机变量的联合概率密度,从而可以非常直观地理解$\Beta$分布。分别固定抽样次数$n=0,1,2,5,10,15$,可视化如下:

其中,当以抽样概率$p$为条件时,在y轴上,就是离散的关于$a$的二项分布。当以$a$为条件时,在x轴上,就是连续的关于$p$的$\Beta$分布。可以观察到,当$a<b$时,$\Beta$分布左偏,否则右偏,在$n=0$时,变为均匀分布。

此外,当在y轴方向上进行求和,可以得到$p$的边缘分布,为均匀分布;而当在x轴方向上进行积分,得到$a$的边缘分布,也是均匀分布。但感觉边缘分布似乎没有什么意义,不知理解是否正确。可视化代码如下:

importmatplotlib.pyplot as pltfrom scipy.special importgammaimportnumpy as npimportmatplotlib 
matplotlib.rcParams[
'font.family'] = 'Times New Roman' defBeta(a, b, p):
g1, g2, g3
= gamma(a+b+2), gamma(a+1), gamma(b+1)return g1/(g2*g3) * p**(a) * (1-p)**(b)def BetaHot(n, samp_n = 1000):
p
= np.linspace(0, 1, samp_n)
a
= np.linspace(0, n, n+1)
P, A
=np.meshgrid(p, a)

Z
= Beta(A, n-A, P)/(n+1)
per_width
= samp_n//(n+1)
Z1
=np.repeat(Z, per_width, 0)#热力图 plt.imshow(Z1, origin='lower', cmap='Blues')
plt.colorbar()
#关于p的密度图 for i, t inenumerate(Z):
plt.plot(np.linspace(
-0.5, samp_n-0.5, samp_n), i*per_width+per_width*t-0.5, '--', c='red')#绘图设置 plt.xlabel("p")
plt.ylabel(
'a')
old_yticks
= np.linspace(per_width/2-0.5, Z1.shape[0]-0.5-per_width/2, n+1)
plt.yticks(old_yticks, [f
'{i:.0f}' for i in np.linspace(0, n, n+1)])
old_xticks
= np.linspace(-0.5, samp_n-0.5, 6)
plt.xticks(old_xticks, [f
'{i:.1f}' for i in np.linspace(0, 1, 6)])
plt.ylim([0, samp_n
+4])
plt.title(
"n = a + b = %d"%n)
plt.savefig(
'img/n = %d.png'%n)
plt.show()
for n in [0, 1, 2, 5, 10, 15]:
BetaHot(n)

一般情况

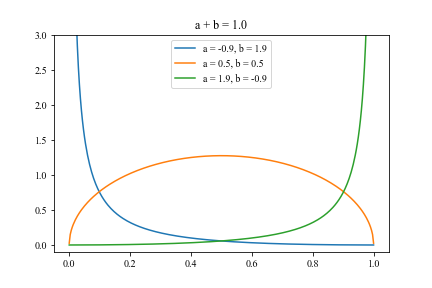
以上可视化的是$a,b$取为正整数时$\Beta$分布的情况,即(2)式。对于更一般的情况(4)式,即取$\alpha,\beta$为大于0的实数,在(3)式中就是$a>-1,b>-1$,尽管并不符合真实伯努利试验的情况,但仍可以计算。可视化如下:

可以看出,$a,b$都小于0时,密度函数会变成U形。且依旧是,$a$相比$b$越小,形状越往左偏。可视化代码如下:

importmatplotlib.pyplot as pltfrom scipy.special importgammaimportnumpy as npimportmatplotlib 
matplotlib.rcParams[
'font.family'] = 'Times New Roman' defBeta(a, b, p):
g1, g2, g3
= gamma(a+b+2), gamma(a+1), gamma(b+1)
beta
= g1/(g2*g3) * p**(a) * (1-p)**(b)returnbetafor n in [-1, 0, 1, 2, 5, 10]:for a in np.linspace(-0.9, n+0.9, 3):
p
= np.linspace(0.0001, 0.9999, 300)
b
= n-a
y
=Beta(a, b, p)
plt.plot(p, y, label
="a = %.1f, b = %.1f"%(a, b))
plt.legend(loc
='upper center')
plt.ylim([
-0.1, 3])
plt.title(
'a + b = %.1f' %n)
plt.savefig(
'img/a + b = %.1f.png' %n)
plt.show()

狄利克雷分布

狄利克雷分布是$\Beta$分布在高维上的推广。也就是把伯努利实验得到的二项分布变成多项分布(比如骰子实验),相应地得到狄利克雷分布。狄利克雷分布中的正单纯形,即表示多项分布每种抽样的概率之和为1。

参考

1.  共轭先验:
https://www.zhihu.com/question/41846423?sort=created

2. 狄利克雷分布:
https://zhuanlan.zhihu.com/p/425388698