# 借用Ultralytics Yolo快速训练一个物体检测器
[同步发表于 https://www.codebonobo.tech/post/14](https://www.codebonobo.tech/post/14 "https://www.codebonobo.tech/post/14")
大约在16/17年, 深度学习刚刚流行时, Object Detection 还是相当高端的技术, 各大高校还很流行水Fast RCNN / Faster RCNN之类的论文, 干着安全帽/行人/车辆检测之类的横项. 但到了2024年, 随着技术成熟, 物体检测几乎已经是个死方向了, 现在的学校应该忙着把别人好不容易训练的通用大模型退化成各领域的专用大模型吧...哈哈
回到主题, 目前物体检测模型的训练已经流程化了, 不再需要费脑去写训练代码, 使用Ultralytics Yolo就可以快速训练一个特定物品的检测器, 比如安全帽检测.
[https://github.com/ultralytics/ultralytics](https://github.com/ultralytics/ultralytics)

# Step-1 准备数据集
你需要一些待检测物体比如安全帽, 把它从各个角度拍摄一下. 再找一些不相关的背景图片. 然后把安全帽给放大缩小旋转等等贴到背景图片上去, 生成一堆训练数据.
配置文件:
```python
extract_cfg:
output_dir: '/datasets/images'
fps: 0.25
screen_images_path: '/datasets/待检测图片'
max_scale: 1.0
min_scale: 0.1
manual_scale: [ {name: 'logo', min_scale: 0.05, max_scale: 0.3},
{name: 'logo', min_scale: 0.1, max_scale: 0.5},
{name: '箭头', min_scale: 0.1, max_scale: 0.5}
]
data_cfgs: [ {id: 0, name: 'logo', min_scale: 0.05, max_scale: 0.3, gen_num: 2},
{id: 1, name: '截屏', min_scale: 0.1, max_scale: 1.0, gen_num: 3, need_full_screen: true},
{id: 2, name: '红包', min_scale: 0.1, max_scale: 0.5, gen_num: 2},
{id: 3, name: '箭头', min_scale: 0.1, max_scale: 0.5, gen_num: 2, rotate_aug: true},
]
save_oss_dir: /datasets/gen_datasets/
gen_num_per_image: 2
max_bg_img_sample:
```
数据集生成:
```python
from pathlib import Path
import io
import random
import cv2
import numpy as np
from PIL import Image
import hydra
from omegaconf import DictConfig
import json
from tqdm import tqdm
# 加载图片
def load_images(background_path, overlay_path):
background = cv2.imread(background_path)
overlay = cv2.imread(overlay_path, cv2.IMREAD_UNCHANGED)
return background, overlay
# 随机缩放和位置
def random_scale_and_position(bg_shape, overlay_shape, max_scale=1.0, min_scale=0.1):
max_height, max_width = bg_shape[:2]
overlay_height, overlay_width = overlay_shape[:2]
base_scale = min(max_height / overlay_height, max_width / overlay_width)
# 随机缩放
scale_factor = random.uniform(
min_scale * base_scale, max_scale * base_scale)
new_height, new_width = int(
overlay_height * scale_factor), int(overlay_width * scale_factor)
# 随机位置
max_x = max_width - new_width - 1
max_y = max_height - new_height - 1
position_x = random.randint(0, max_x)
position_y = random.randint(0, max_y)
return scale_factor, (position_x, position_y)
def get_resized_overlay(overlay, scale):
overlay_resized = cv2.resize(overlay, (0, 0), fx=scale, fy=scale)
return overlay_resized
def rotate_image(img, angle):
if isinstance(img, np.ndarray):
img = Image.fromarray(cv2.cvtColor(img, cv2.COLOR_BGRA2RGBA))
# 确保图像具有alpha通道(透明度)
img = img.convert("RGBA")
# 旋转原始图像并粘贴到新的透明图像框架中
rotated_img = img.rotate(angle, resample=Image.BICUBIC, expand=True)
rotated_img = np.asarray(rotated_img)
return cv2.cvtColor(rotated_img, cv2.COLOR_RGBA2BGRA)
# 合成图片
def overlay_image(background, overlay_resized, position, scale):
h, w = overlay_resized.shape[:2]
x, y = position
# 透明度处理
alpha_s = overlay_resized[:, :, 3] / 255.0
alpha_l = 1.0 - alpha_s
for c in range(0, 3):
background[y:y + h, x:x + w, c] = (alpha_s * overlay_resized[:, :, c] +
alpha_l * background[y:y + h, x:x + w, c])
# 画出位置,调试使用
# print("position", x, y, w, h)
# cv2.rectangle(background, (x, y), (x + w, y + h), (0, 255, 0), 2)
background = cv2.cvtColor(background, cv2.COLOR_BGR2RGB)
return Image.fromarray(background)
class Box:
def __init__(self, x, y, width, height, category_id, image_width, image_height):
self.x = x
self.y = y
self.width = width
self.height = height
self.image_width = image_width
self.image_height = image_height
self.category_id = category_id
def to_yolo_format(self):
x_center = (self.x + self.width / 2) / self.image_width
y_center = (self.y + self.height / 2) / self.image_height
width = self.width / self.image_width
height = self.height / self.image_height
box_line = f"{self.category_id} {x_center} {y_center} {width} {height}"
return box_line
class SingleCategoryGen:
def __init__(self, cfg, data_cfg, output_dir):
self.output_dir = output_dir
self.screen_png_images = []
self.coco_images = []
self.coco_annotations = []
screen_images_path = Path(
cfg.screen_images_path.format(user_root=user_root))
self.manual_scale = {}
self.data_cfg = data_cfg
self.category_id = data_cfg.id
self.category_name = self.data_cfg.name
self.max_scale = self.data_cfg.max_scale
self.min_scale = self.data_cfg.min_scale
self.gen_num = self.data_cfg.gen_num
self.rotate_aug = self.data_cfg.get("rotate_aug", False)
self.need_full_screen = self.data_cfg.get("need_full_screen", False)
self.category_num = 0
self.category_names = {}
self.butcket = get_oss_bucket(cfg.bucket_name)
output_dir = Path(output_dir)
save_oss_dir = f"{cfg.save_oss_dir}/{output_dir.parent.name}/{output_dir.name}"
self.save_oss_dir = save_oss_dir
self.images_save_oss_dir = f"{save_oss_dir}/images"
self.label_save_oss_dir = f"{save_oss_dir}/labels"
self.annotations_save_oss_path = f"{save_oss_dir}/annotations.json"
self.load_screen_png_images_and_category(screen_images_path)
def load_screen_png_images_and_category(self, screen_images_dir):
screen_images_dir = Path(screen_images_dir)
category_id = self.category_id
screen_images_path = screen_images_dir / self.category_name
img_files = [p for p in screen_images_path.iterdir() if p.suffix in [
".png", ".jpg"]]
img_files.sort(key=lambda x: x.stem)
for i, img_file in enumerate(img_files):
self.screen_png_images.append(
dict(id=i, name=img_file.stem, supercategory=None, path=str(img_file)))
def add_new_images(self, bg_img_path: Path, gen_image_num=None, subset="train"):
gen_image_num = gen_image_num or self.gen_num
background_origin = cv2.imread(str(bg_img_path))
if background_origin is None:
print(f"open image {bg_img_path} failed")
return
max_box_num = 1
for gen_id in range(gen_image_num):
background = background_origin.copy()
category_id = self.category_id
overlay_img_path = self.sample_category_data()
overlay = cv2.imread(overlay_img_path, cv2.IMREAD_UNCHANGED)
if overlay.shape[2] == 3:
overlay = cv2.cvtColor(overlay, cv2.COLOR_BGR2BGRA)
if self.rotate_aug:
overlay = rotate_image(overlay, random.uniform(-180, 180))
# # 随机裁剪图片
# if random.random() < 0.5:
# origin_height = overlay.shape[0]
# min_height = origin_height // 4
# new_height = random.randint(min_height, origin_height)
# new_top = random.randint(0, origin_height - new_height)
# overlay = overlay[new_top:new_top+new_height, :, :]
box_num = random.randint(1, max_box_num)
# 获取随机缩放和位置
max_scale = self.max_scale
min_scale = self.min_scale
scale, position = random_scale_and_position(
background.shape, overlay.shape, max_scale, min_scale)
# 缩放overlay图片
overlay_resized = get_resized_overlay(overlay, scale)
# 合成后的图片
merged_img = overlay_image(background, overlay_resized, position, scale)
# 保存合成后的图片
filename = f"{bg_img_path.stem}_{category_id}_{gen_id:02d}.png"
merged_img.save(f'{output_dir}/{filename}')
# 生成COCO格式的标注数据
box = Box(*position, overlay_resized.shape[1], overlay_resized.shape[0], category_id, background.shape[1],
background.shape[0])
self.upload_image_to_oss(merged_img, filename, subset, [box])
def sample_category_data(self):
return random.choice(self.screen_png_images)["path"]
image_id = self.gen_image_id()
image_json = {
"id": image_id,
"width": image.width,
"height": image.height,
"file_name": image_name,
}
self.coco_images.append(image_json)
annotation_json = {
"id": image_id,
"image_id": image_id,
"category_id": 0,
"segmentation": None,
"area": bbox[2] * bbox[3],
"bbox": bbox,
"iscrowd": 0
}
self.coco_annotations.append(annotation_json)
def upload_image_to_oss(self, image, image_name, subset, box_list=None):
image_bytesio = io.BytesIO()
image.save(image_bytesio, format="PNG")
self.butcket.put_object(
f"{self.images_save_oss_dir}/{subset}/{image_name}", image_bytesio.getvalue())
if box_list:
label_str = "\n".join([box.to_yolo_format() for box in box_list])
label_name = image_name.split(".")[0] + ".txt"
self.butcket.put_object(
f"{self.label_save_oss_dir}/{subset}/{label_name}", label_str)
def upload_full_screen_image(self):
if not self.need_full_screen:
return
name = self.category_name
category_id = self.category_id
image_list = self.screen_png_images
subset_list = ["train" if i % 10 <= 7 else "val" if i %
10 <= 8 else "test" for i in range(len(image_list))]
for i in range(len(image_list)):
image_data = image_list[i]
subset = subset_list[i]
overlay_img_path = image_data["path"]
image = Image.open(overlay_img_path)
if random.random() < 0.5:
origin_height = image.height
min_height = origin_height // 4
new_height = random.randint(min_height, origin_height)
new_top = random.randint(0, origin_height - new_height)
image = image.crop(
(0, new_top, image.width, new_top + new_height))
filename = f"{name}_{category_id}_{i:05}.png"
box = Box(0, 0, image.width, image.height,
category_id, image.width, image.height)
self.upload_image_to_oss(image, filename, subset, [box])
class ScreenDatasetGen:
def __init__(self, cfg, output_dir):
self.output_dir = output_dir
self.screen_png_images = {}
self.coco_images = []
self.coco_annotations = []
screen_images_path = Path(
cfg.screen_images_path.format(user_root=user_root))
self.max_scale = cfg.max_scale
self.min_scale = cfg.min_scale
self.manual_scale = {}
for info in cfg.manual_scale:
self.manual_scale[info.name] = dict(
max_scale=info.max_scale, min_scale=info.min_scale)
self.category_num = 0
self.category_names = {}
self.category_id_loop = -1
self.butcket = get_oss_bucket(cfg.bucket_name)
output_dir = Path(output_dir)
save_oss_dir = f"{cfg.save_oss_dir}/{output_dir.parent.name}/{output_dir.name}"
self.save_oss_dir = save_oss_dir
self.images_save_oss_dir = f"{save_oss_dir}/images"
self.label_save_oss_dir = f"{save_oss_dir}/labels"
self.annotations_save_oss_path = f"{save_oss_dir}/annotations.json"
self.load_screen_png_images_and_category(screen_images_path)
def add_new_images(self, bg_img_path: Path, gen_image_num=1, subset="train"):
background_origin = cv2.imread(str(bg_img_path))
if background_origin is None:
print(f"open image {bg_img_path} failed")
return
max_box_num = 1
for gen_id in range(gen_image_num):
background = background_origin.copy()
category_id = self.get_category_id_loop()
overlay_img_path = self.sample_category_data(
category_id, subset=subset)
overlay = cv2.imread(overlay_img_path, cv2.IMREAD_UNCHANGED)
if overlay.shape[2] == 3:
overlay = cv2.cvtColor(overlay, cv2.COLOR_BGR2BGRA)
# # 随机裁剪图片
# if random.random() < 0.5:
# origin_height = overlay.shape[0]
# min_height = origin_height // 4
# new_height = random.randint(min_height, origin_height)
# new_top = random.randint(0, origin_height - new_height)
# overlay = overlay[new_top:new_top+new_height, :, :]
box_num = random.randint(1, max_box_num)
# 获取随机缩放和位置
category_name = self.category_names[category_id]
if category_name in self.manual_scale:
max_scale = self.manual_scale[category_name]["max_scale"]
min_scale = self.manual_scale[category_name]["min_scale"]
else:
max_scale = self.max_scale
min_scale = self.min_scale
scale, position = random_scale_and_position(
background.shape, overlay.shape, max_scale, min_scale)
# 缩放overlay图片
overlay_resized = get_resized_overlay(overlay, scale)
# 合成后的图片
merged_img = overlay_image(
background, overlay_resized, position, scale)
# 保存合成后的图片
filename = f"{bg_img_path.stem}_{category_id}_{gen_id:02d}.png"
# merged_img.save(f'{output_dir}/{filename}')
# 生成COCO格式的标注数据
box = Box(*position, overlay_resized.shape[1], overlay_resized.shape[0], category_id, background.shape[1],
background.shape[0])
self.upload_image_to_oss(merged_img, filename, subset, [box])
# self.add_image_annotion_to_coco(box, merged_img, filename)
def upload_full_screen_image(self, category_name=None):
if category_name is None:
return
if not isinstance(category_name, list):
category_name = [category_name]
for category_id in range(self.category_num):
name = self.category_names[category_id]
if name not in category_name:
continue
image_list = self.screen_png_images[category_id]
subset_list = ["train" if i % 10 <= 7 else "val" if i %
10 <= 8 else "test" for i in range(len(image_list))]
for i in range(len(image_list)):
image_data = image_list[i]
subset = subset_list[i]
overlay_img_path = image_data["path"]
image = Image.open(overlay_img_path)
if random.random() < 0.5:
origin_height = image.height
min_height = origin_height // 4
new_height = random.randint(min_height, origin_height)
new_top = random.randint(0, origin_height - new_height)
image = image.crop(
(0, new_top, image.width, new_top + new_height))
filename = f"{name}_{category_id}_{i:05}.png"
box = Box(0, 0, image.width, image.height,
category_id, image.width, image.height)
self.upload_image_to_oss(image, filename, subset, [box])
def load_screen_png_images_and_category(self, screen_images_dir):
screen_images_dir = Path(screen_images_dir)
screen_images_paths = [
f for f in screen_images_dir.iterdir() if f.is_dir()]
screen_images_paths.sort(key=lambda x: x.stem)
for category_id, screen_images_path in enumerate(screen_images_paths):
img_files = [p for p in screen_images_path.iterdir() if p.suffix in [
".png", ".jpg"]]
img_files.sort(key=lambda x: x.stem)
self.screen_png_images[category_id] = []
self.category_names[category_id] = screen_images_path.stem
print(f"{category_id}: {self.category_names[category_id]}")
for i, img_file in enumerate(img_files):
self.screen_png_images[category_id].append(
dict(id=i, name=img_file.stem, supercategory=None, path=str(img_file)))
self.category_num = len(screen_images_paths)
print(f"category_num: {self.category_num}")
def get_category_id_loop(self):
# self.category_id_loop = (self.category_id_loop + 1) % self.category_num
self.category_id_loop = random.randint(0, self.category_num - 1)
return self.category_id_loop
def sample_category_data(self, category_id, subset):
image_data = self.screen_png_images[category_id]
# valid_id = []
# if subset == "train":
# valid_id = [i for i in range(len(image_data)) if i % 10 <= 7]
# elif subset == "val":
# valid_id = [i for i in range(len(image_data)) if i % 10 == 8]
# elif subset == "test":
# valid_id = [i for i in range(len(image_data)) if i % 10 == 9]
# image_data = [image_data[i] for i in valid_id]
return random.choice(image_data)["path"]
def gen_image_id(self):
return len(self.coco_images) + 1
def add_image_annotion_to_coco(self, bbox, image: Image.Image, image_name):
image_id = self.gen_image_id()
image_json = {
"id": image_id,
"width": image.width,
"height": image.height,
"file_name": image_name,
}
self.coco_images.append(image_json)
annotation_json = {
"id": image_id,
"image_id": image_id,
"category_id": 0,
"segmentation": None,
"area": bbox[2] * bbox[3],
"bbox": bbox,
"iscrowd": 0
}
self.coco_annotations.append(annotation_json)
def upload_image_to_oss(self, image, image_name, subset, box_list=None):
image_bytesio = io.BytesIO()
image.save(image_bytesio, format="PNG")
self.butcket.put_object(
f"{self.images_save_oss_dir}/{subset}/{image_name}", image_bytesio.getvalue())
if box_list:
label_str = "\n".join([box.to_yolo_format() for box in box_list])
label_name = image_name.split(".")[0] + ".txt"
self.butcket.put_object(
f"{self.label_save_oss_dir}/{subset}/{label_name}", label_str)
def dump_coco_json(self):
categories = [{key: item[key] for key in ("id", "name", "supercategory")} for item in
self.screen_png_images.values()]
coco_json = {
"images": self.coco_images,
"annotations": self.coco_annotations,
"categories": categories
}
self.butcket.put_object(
self.annotations_save_oss_path, json.dumps(coco_json, indent=2))
# with open(f"{self.output_dir}/coco.json", "w") as fp:
# json.dump(coco_json, fp, indent=2)
@hydra.main(version_base=None, config_path=".", config_name="conf")
def main(cfg: DictConfig):
output_dir = hydra.core.hydra_config.HydraConfig.get().runtime.output_dir
# get_image_and_annotation(output_dir)
# screen_dataset_gen = ScreenDatasetGen(cfg, output_dir)
category_generators = []
for data_cfg in cfg.data_cfgs:
category_generators.append(SingleCategoryGen(cfg, data_cfg, output_dir))
bg_img_files = [f for f in Path(cfg.extract_cfg.output_dir.format(user_root=user_root)).iterdir() if
f.suffix in [".png", ".jpg"]]
if cfg.get("max_bg_img_sample"):
bg_img_files = random.sample(bg_img_files, cfg.max_bg_img_sample)
img_index = 0
for bg_img_file in tqdm(bg_img_files):
subset = "train" if img_index % 10 <= 7 else "val" if img_index % 10 == 8 else "test"
img_index += 1
for category_generator in category_generators:
category_generator.add_new_images(bg_img_path=bg_img_file, subset=subset)
for category_generator in category_generators:
category_generator.upload_full_screen_image()
if __name__ == '__main__':
main()
```
运行后, 可以在outputs文件夹下生成符合要求的训练数据.
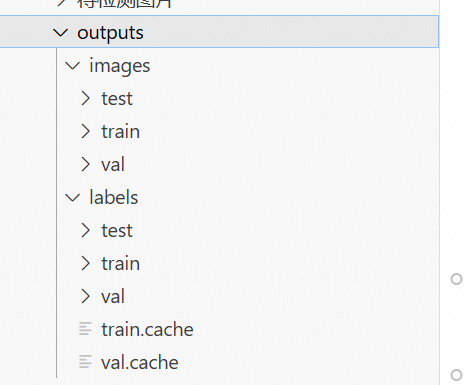
image 就是背景+检测物体
labels 中的内容就是这样的文件:
```python
1 0.6701388888888888 0.289453125 0.5736111111111111 0.57421875
# 类型 box
```
# Step-2 训练模型
这个更简单, 在官网下载一个模型权重, 比如yolo8s.pt, 对付安全帽这种东西, 几M大的模型就够了.
训练配置文件:
```python
names:
0: logo
1: 截屏
2: 红包
path: /outputs
test: images/test
train: images/train
val: images/val
```
训练代码:
没错就这么一点
```python
from ultralytics import YOLO
model = YOLO('./yolo8s.pt')
model.train(data='dataset.yaml', epochs=100, imgsz=1280)
```
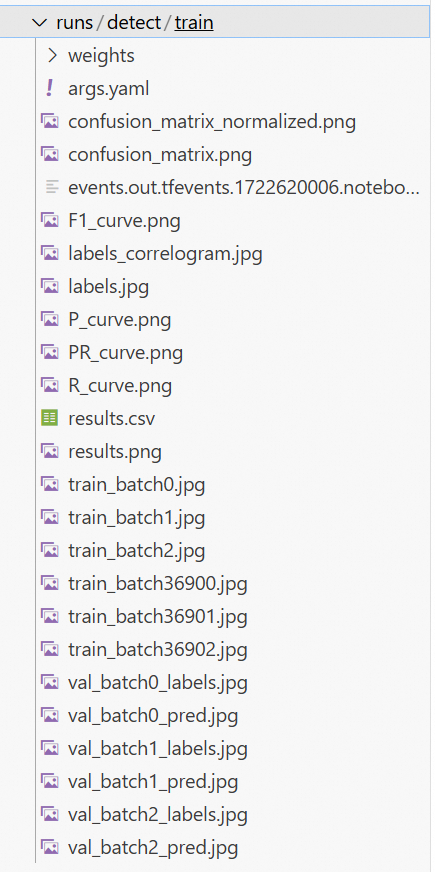
然后就可以自动化训练了, 结束后会自动保存模型与评估检测效果.
# Step-3 检测
检测代码示意:
```python
class Special_Obj_Detect(object):
def __init__(self, cfg) -> None:
model_path = cfg.model_path
self.model = YOLO(model_path)
self.model.requires_grad_ = False
self.cls_names = {0: 'logo', 1: '截屏', 2: '红包'}
# 单帧图像检测
def detect_image(self, img_path):
results = self.model(img_path)
objects = []
objects_cnt = dict()
objects_area_pct = dict()
for result in results:
result = result.cpu()
boxes = list(result.boxes)
for box in boxes:
if box.conf < 0.8: continue
boxcls = box.cls[0].item()
objects.append(self.cls_names[boxcls])
objects_cnt[self.cls_names[boxcls]] = objects_cnt.get(self.cls_names[boxcls], 0) + 1
area_p = sum([ (xywh[2]*xywh[3]).item() for xywh in box.xywhn])
area_p = min(1, area_p)
objects_area_pct[self.cls_names[boxcls]] = area_p
objects = list(set(objects))
return objects, objects_cnt, objects_area_pct
```
收工.
#
