Redis中的分布式锁(步步为营)
分布式锁
概述
分布式锁指的是,所有服务中的所有线程都去获取同一把锁,但只有一个线程可以成功的获得锁,其他没有获得锁的线程必须全部等待,直到持有锁的线程释放锁。
分布式锁是可以跨越多个实例,多个进程的锁

分布式锁具备的条件:
- 互斥性:任意时刻,只能有一个客户端持有锁
- 锁超时释放:持有锁超时,可以释放,防止死锁
- 可重入性:一个线程获取了锁之后,可以再次对其请求加锁
- 高可用、高性能:加锁和解锁开销要尽可能低,同时保证高可用
- 安全性:锁只能被持有该锁的服务(或应用)释放。
- 容错性:在持有锁的服务崩溃时,锁仍能得到释放,避免死锁。
分布式锁实现方案
分布式锁都是通过第三方组件来实现的,目前比较流行的分布式锁的解决方案有:
- 数据库,通过数据库可以实现分布式锁,但是在高并发的情况下对数据库压力较大,所以很少使用。
- Redis,借助Redis也可以实现分布式锁,而且Redis的Java客户端种类很多,使用的方法也不尽相同。
- Zookeeper,Zookeeper也可以实现分布式锁,同样Zookeeper也存在多个Java客户端,使用方法也不相同
Redis实现分布式锁
SETNX
基本方案:Redis提供了setXX指令来实现分布式锁
格式: setnx key value
将key 的值设为value ,当且仅当key不存在。
若给定的 key已经存在,则SETNX不做任何动作。

设置分布式锁后,能保证并发安全,但上述代码还存在问题,如果执行过程中出现异常,程序就直接抛出异常退出,导致锁没有释放造成最终死锁的问题。(即使将锁放在finally中释放,但是假如是执行到中途系统宕机,锁还是没有被成功的释放掉,依然会出现死锁现象)
设置超时时间
SET lock_key unique_value NX PX 10000
但是,即使设置了超时时间后,还存在问题。
假设有多个线程,假设设置锁的过期时间10s,线程1上锁后执行业务逻辑的时长超过十秒,锁到期释放锁,线程2就可以获得锁执行,此时线程1执行完删除锁,删除的就是线程2持有的锁,线程3又可以获取锁,线程2执行完删除锁,删除的是线程3的锁,如此往后,这样就会出问题。
让线程只删除自己的锁
解决办法就是让线程只能删除自己的锁,即给每个线程上的锁添加唯一标识(这里UUID实现,基本不会出现重复),删除锁时判断这个标识:
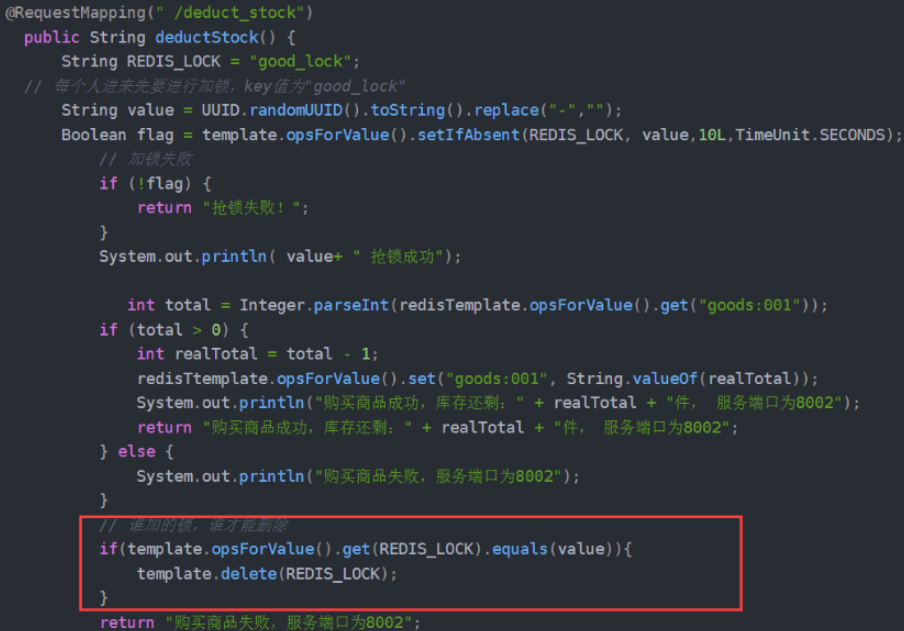
但上述红框中由于判定和释放锁不是原子的,极端情况下,可能判定可以释放锁,在执行删除锁操作前刚好时间到了,其他线程获取锁执行,前者线程删除锁删除的依然是别的线程的锁,所以要让删除锁具有原子性,可以利用redis事务或
lua脚本实现原子操作判断+删除
Redis的单条命令操作是原子性的,但是多条命令操作并不是原子性的,因此Lua脚本实现的就是令Redis的多条命令也实现原子操作
redis事务不是原子操作的,详情请看
Redis的事务但是,可以利用Redis的事务和watch实现的乐观锁 来监视锁的状态
    @RequestMapping(" /deduct_stock")
    public String deductStock() {
        String REDIS_LOCK = "good_lock";
        // 每个人进来先要进行加锁,key值为"good_lock"
        String value = UUID.randomUUID().toString().replace("-","");
        try{
            // 为key加一个过期时间
            Boolean flag = template.opsForValue().setIfAbsent(REDIS_LOCK, value,10L,TimeUnit.SECONDS);

            // 加锁失败
            if(!flag){
                return "抢锁失败!";
            }
            System.out.println( value+ " 抢锁成功");
            String result = template.opsForValue().get("goods:001");
            int total = result == null ? 0 : Integer.parseInt(result);
            if (total > 0) {
                // 如果在此处需要调用其他微服务,处理时间较长。。。
                int realTotal = total - 1;
                template.opsForValue().set("goods:001", String.valueOf(realTotal));
                System.out.println("购买商品成功,库存还剩:" + realTotal + "件, 服务端口为8002");
                return "购买商品成功,库存还剩:" + realTotal + "件, 服务端口为8002";
            } else {
                System.out.println("购买商品失败,服务端口为8002");
            }
            return "购买商品失败,服务端口为8002";
        }finally {
            // 谁加的锁,谁才能删除
            // 也可以使用redis事务
            // https://redis.io/commands/set
            // 使用Lua脚本,进行锁的删除

            Jedis jedis = null;
            try{
                jedis = RedisUtils.getJedis();

                String script = "if redis.call('get',KEYS[1]) == ARGV[1] " +
                        "then " +
                        "return redis.call('del',KEYS[1]) " +
                        "else " +
                        "   return 0 " +
                        "end";

                Object eval = jedis.eval(script, Collections.singletonList(REDIS_LOCK), Collections.singletonList(value));
                if("1".equals(eval.toString())){
                    System.out.println("-----del redis lock ok....");
                }else{
                    System.out.println("-----del redis lock error ....");
                }
            }catch (Exception e){

            }finally {

                if(null != jedis){
                    jedis.close();
                }
            }

            // redis事务
//            while(true){
//                template.watch(REDIS_LOCK);
//                if(template.opsForValue().get(REDIS_LOCK).equalsIgnoreCase(value)){
//                    template.setEnableTransactionSupport(true);
//                    template.multi();
//                    template.delete(REDIS_LOCK);
//                    List<Object> list = template.exec();
//                    if(list == null){
//                        continue;
//                    }
//                }
//                template.unwatch();
//                break;
//            }
        }

    }
}
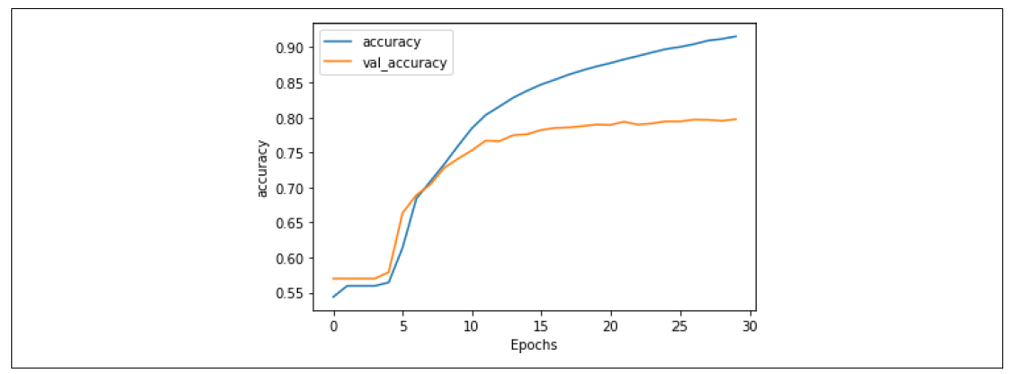
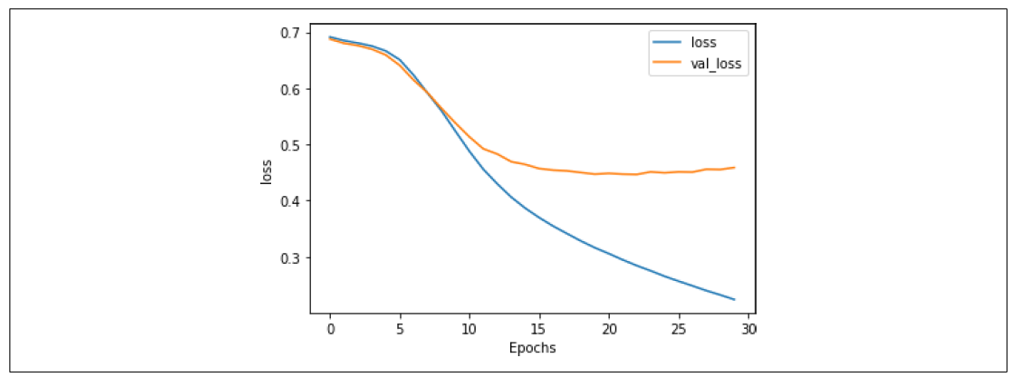
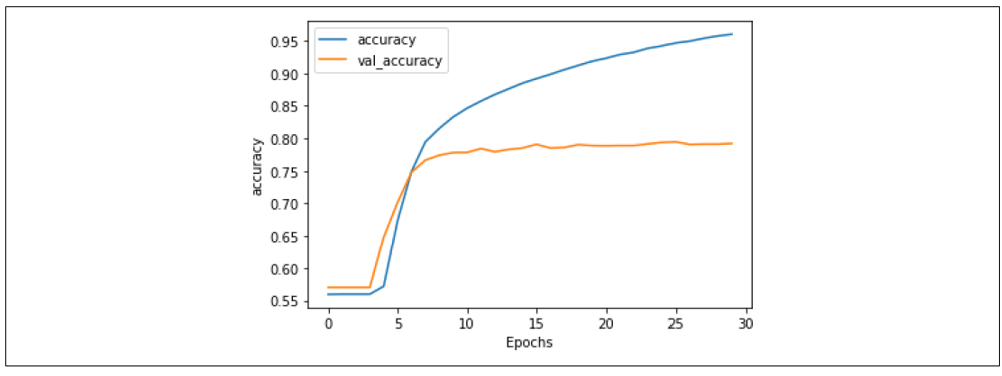
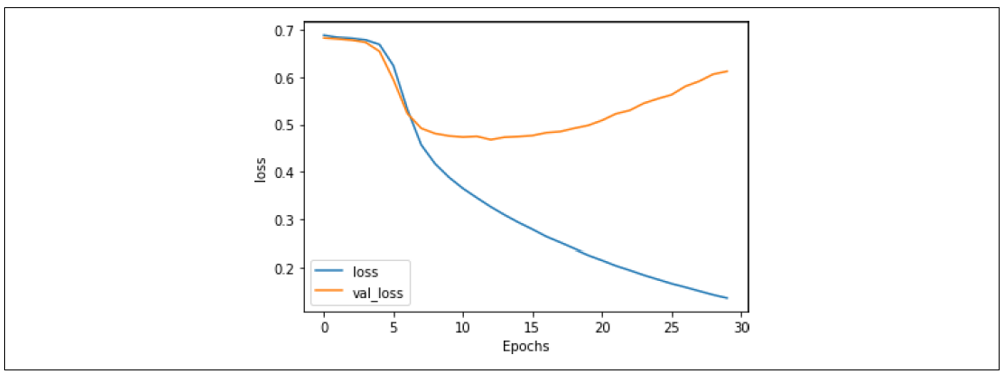
尽管这样,还是会有问题,锁超时释放虽然可以避免死锁,但如果是业务执行耗时较长,也会导致锁的释放,但其实此时业务还在执行中,还是应该将业务执行结束之后再释放锁。
续时
因此可以设定,任务不完成,锁就不释放。
可以维护一个定时线程池
ScheduledExecutorService
,每隔 2s 去扫描加入队列中的 Task,判断失效时间是否快到了,如果快到了,则给锁续上时间。
那如何判断是否快到失效时间了呢?可以用以下公式:【失效时间】<= 【当前时间】+【失效间隔(三分之一超时)】
// 扫描的任务队列
private static ConcurrentLinkedQueue<RedisLockDefinitionHolder> holderList = new ConcurrentLinkedQueue();
/**
 * 线程池,维护keyAliveTime
 */
private static final ScheduledExecutorService SCHEDULER = new ScheduledThreadPoolExecutor(1,
        new BasicThreadFactory.Builder().namingPattern("redisLock-schedule-pool").daemon(true).build());
{
    // 两秒执行一次「续时」操作
    SCHEDULER.scheduleAtFixedRate(() -> {
        // 这里记得加 try-catch,否者报错后定时任务将不会再执行=-=
        Iterator<RedisLockDefinitionHolder> iterator = holderList.iterator();
        while (iterator.hasNext()) {
            RedisLockDefinitionHolder holder = iterator.next();
            // 判空
            if (holder == null) {
                iterator.remove();
                continue;
            }
            // 判断 key 是否还有效,无效的话进行移除
            if (redisTemplate.opsForValue().get(holder.getBusinessKey()) == null) {
                iterator.remove();
                continue;
            }
            // 超时重试次数,超过时给线程设定中断
            if (holder.getCurrentCount() > holder.getTryCount()) {
                holder.getCurrentTread().interrupt();
                iterator.remove();
                continue;
            }
            // 判断是否进入最后三分之一时间
            long curTime = System.currentTimeMillis();
            boolean shouldExtend = (holder.getLastModifyTime() + holder.getModifyPeriod()) <= curTime;
            if (shouldExtend) {
                holder.setLastModifyTime(curTime);
                redisTemplate.expire(holder.getBusinessKey(), holder.getLockTime(), TimeUnit.SECONDS);
                log.info("businessKey : [" + holder.getBusinessKey() + "], try count : " + holder.getCurrentCount());
                holder.setCurrentCount(holder.getCurrentCount() + 1);
            }
        }
    }, 0, 2, TimeUnit.SECONDS);
}
Redisson
使用Redis + lua方式可能存在的问题
- 不可重入性。同一个线程无法多次获取同一把锁
- 不可重试。获取锁只尝试一次就返回false,没有重试机制
- 超时释放。锁超时释放虽然可以避免死锁,但如果是业务执行耗时较长,也会导致锁的释放,存在安全隐患
- 主从一致性。如果Redis是主从集群,主从同步存在延迟,当主机宕机时,从成为了主,但可能存在从此时还未完成同步,因此从上就没有锁标识,此时会出现线程安全问题。
RLock是Redisson分布式锁的最核心接口,继承了concurrent包的Lock接口和自己的RLockAsync接口,RLockAsync的返回值都是RFuture,是Redisson执行异步实现的核心逻辑,也是Netty发挥的主要阵地。
RLock如何加锁解锁,实现可重入性?
从RLock进入,找到RedissonLock类,找到tryLock 方法再继续找到tryAcquireOnceAsync 方法,这是加锁的主要代码(版本不一此处实现有差别,和最新3.15.x有一定出入,但是核心逻辑依然未变。此处以3.13.6为例)
// waitTime 等待时间,多久时间内都会在这尝试获取锁
// leaseTime 加锁时是否设置过期时间
private RFuture<Boolean> tryAcquireOnceAsync(long waitTime, long leaseTime, TimeUnit unit, long threadId) {
    if (leaseTime != -1L) {
        return this.tryLockInnerAsync(waitTime, leaseTime, unit, threadId, RedisCommands.EVAL_NULL_BOOLEAN);
    } else {
        RFuture<Boolean> ttlRemainingFuture = this.tryLockInnerAsync(waitTime, this.commandExecutor.getConnectionManager().getCfg().getLockWatchdogTimeout(), TimeUnit.MILLISECONDS, threadId, RedisCommands.EVAL_NULL_BOOLEAN);
        ttlRemainingFuture.onComplete((ttlRemaining, e) -> {
            if (e == null) {
                if (ttlRemaining) {
                    this.scheduleExpirationRenewal(threadId);
                }
            }
        });
        return ttlRemainingFuture;
    }
 }
此处出现leaseTime时间判断的2个分支,实际上就是加锁时是否设置过期时间,未设置过期时间(-1)时则会有watchDog 的锁续约 (下文),一个注册了加锁事件的续约任务。我们先来看有过期时间tryLockInnerAsync 部分
evalWriteAsync方法是eval命令执行lua的入口
<T> RFuture<T> tryLockInnerAsync(long waitTime, long leaseTime, TimeUnit unit, long threadId, RedisStrictCommand<T> command) {
    this.internalLockLeaseTime = unit.toMillis(leaseTime);
    return this.evalWriteAsync(this.getName(), LongCodec.INSTANCE, command, "if (redis.call('exists', KEYS[1]) == 0) then redis.call('hincrby', KEYS[1], ARGV[2], 1); redis.call('pexpire', KEYS[1], ARGV[1]); return nil; end; if (redis.call('hexists', KEYS[1], ARGV[2]) == 1) then redis.call('hincrby', KEYS[1], ARGV[2], 1); redis.call('pexpire', KEYS[1], ARGV[1]); return nil; end; return redis.call('pttl', KEYS[1]);", Collections.singletonList(this.getName()), this.internalLockLeaseTime, this.getLockName(threadId));
}
eval命令执行Lua脚本的地方,此处将Lua脚本展开
-- 不存在该key时
if (redis.call('exists', KEYS[1]) == 0) then
  -- 新增该锁并且hash中该线程id对应的count置1
  redis.call('hincrby', KEYS[1], ARGV[2], 1);
  -- 设置过期时间
  redis.call('pexpire', KEYS[1], ARGV[1]);
  return nil;
end;

-- 存在该key 并且 hash中线程id的key也存在
if (redis.call('hexists', KEYS[1], ARGV[2]) == 1) then
  -- 线程重入次数++
  redis.call('hincrby', KEYS[1], ARGV[2], 1);
  redis.call('pexpire', KEYS[1], ARGV[1]);
  return nil;
end;
return redis.call('pttl', KEYS[1]);
// keyName
KEYS[1] = Collections.singletonList(this.getName())
// leaseTime
ARGV[1] = this.internalLockLeaseTime
// uuid+threadId组合的唯一值
ARGV[2] = this.getLockName(threadId)
总共3个参数完成了一段逻辑:
- 判断该锁是否已经有对应hash表存在,
- 没有对应的hash表:则set该hash表中一个entry的key为锁名称,value为1,之后设置该hash表失效时间为leaseTime
- 存在对应的hash表:则将该lockName的value执行+1操作,也就是计算进入次数,再设置失效时间leaseTime
- 最后返回这把锁的ttl剩余时间
再看看RLock如何解锁?
看unlock方法,同样查找方法名,一路到unlockInnerAsync
protected RFuture<Boolean> unlockInnerAsync(long threadId) {
    return this.evalWriteAsync(this.getName(), LongCodec.INSTANCE, RedisCommands.EVAL_BOOLEAN, "if (redis.call('hexists', KEYS[1], ARGV[3]) == 0) then return nil;end; local counter = redis.call('hincrby', KEYS[1], ARGV[3], -1); if (counter > 0) then redis.call('pexpire', KEYS[1], ARGV[2]); return 0; else redis.call('del', KEYS[1]); redis.call('publish', KEYS[2], ARGV[1]); return 1; end; return nil;", Arrays.asList(this.getName(), this.getChannelName()), LockPubSub.UNLOCK_MESSAGE, this.internalLockLeaseTime, this.getLockName(threadId));
}
将lua脚本展开
-- 不存在key
if (redis.call('hexists', KEYS[1], ARGV[3]) == 0) then
  return nil;
end;
-- 存在,计数器 -1
local counter = redis.call('hincrby', KEYS[1], ARGV[3], -1);
if (counter > 0) then
  -- 过期时间重设
  redis.call('pexpire', KEYS[1], ARGV[2]);
  return 0;
else
  -- 删除并发布解锁消息
  redis.call('del', KEYS[1]);
  redis.call('publish', KEYS[2], ARGV[1]);
  return 1;
end;
return nil;
该Lua KEYS有2个Arrays.asList(getName(), getChannelName())
name 锁名称
channelName,用于pubSub发布消息的channel名称
ARGV变量有三个LockPubSub.UNLOCK_MESSAGE, internalLockLeaseTime, getLockName(threadId)
LockPubSub.UNLOCK_MESSAGE,channel发送消息的类别,此处解锁为0
internalLockLeaseTime,watchDog配置的超时时间,默认为30s
lockName 这里的lockName指的是uuid和threadId组合的唯一值
具体执行步骤如下:
- 如果该锁不存在则返回nil;
- 如果该锁存在则将其线程的hash key计数器-1,
- 计数器counter>0,重置下失效时间,返回0;否则,删除该锁,发布解锁消息unlockMessage,返回1;
加锁解锁流程总结如下:
总的来说就是通过Hash类型来存储锁的次数: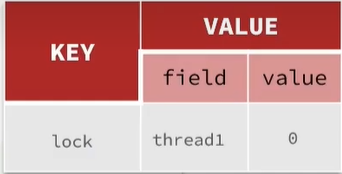
RLock的锁重试问题
需要分析的是锁重试的,所以,在使用lock.tryLock()方法的时候,不能用无参的。
public boolean tryLock(long waitTime, TimeUnit unit) throws InterruptedException {
    return this.tryLock(waitTime, -1L, unit);
}
在调用tryAcquire方法后,返回了一个Long的ttl
 public boolean tryLock(long waitTime, long leaseTime, TimeUnit unit) throws InterruptedException {
    long time = unit.toMillis(waitTime);
    long current = System.currentTimeMillis();
    long threadId = Thread.currentThread().getId();
    Long ttl = this.tryAcquire(waitTime, leaseTime, unit, threadId);
    if (ttl == null) {
        return true;
    } else {
        time -= System.currentTimeMillis() - current;
        if (time <= 0L) {
            this.acquireFailed(waitTime, unit, threadId);
            return false;
        } else {
		//省略
继续跟着代码进去查看,最后会发现,调用tryLockInnerAsync方法。这个方法就是获取锁的Lua脚本的。
<T> RFuture<T> tryLockInnerAsync(long waitTime, long leaseTime, TimeUnit unit, long threadId, RedisStrictCommand<T> command) {
    this.internalLockLeaseTime = unit.toMillis(leaseTime);
    return this.evalWriteAsync(this.getName(), LongCodec.INSTANCE, command, "if (redis.call('exists', KEYS[1]) == 0) then redis.call('hincrby', KEYS[1], ARGV[2], 1); redis.call('pexpire', KEYS[1], ARGV[1]); return nil; end; if (redis.call('hexists', KEYS[1], ARGV[2]) == 1) then redis.call('hincrby', KEYS[1], ARGV[2], 1); redis.call('pexpire', KEYS[1], ARGV[1]); return nil; end; return redis.call('pttl', KEYS[1]);", Collections.singletonList(this.getName()), this.internalLockLeaseTime, this.getLockName(threadId));
}
这个lua脚本上面提到了。就是 判断,如果获取到锁,返回一个nil.也就是null。如果没有获取到,就调用 pttl,name。其实就是获取当前name锁的剩余有效期。
获取到ttl。如果返回null说获取锁成功,直接返回true.如果返回的不是null,说明需要进行重试操作了。主要是根据时间进行判断的。经过一系列判断后,do,while是真正执行重试相关逻辑的。如下:
public boolean tryLock(long waitTime, long leaseTime, TimeUnit unit) throws InterruptedException {
    long time = unit.toMillis(waitTime);
    long current = System.currentTimeMillis();
    long threadId = Thread.currentThread().getId();
    Long ttl = this.tryAcquire(waitTime, leaseTime, unit, threadId);
	//如果返回null,说明获取到了锁,直接返回
    if (ttl == null) {
        return true;
    } else {
    	//当前时间与进入方法时的时间进行比较
		//System.currentTimeMillis() - current表示前面获取锁消耗时间
        time -= System.currentTimeMillis() - current;////time是重试锁的等待时间,
        if (time <= 0L) {//剩余等待时间,如果剩余等待时间<=0,设置获取锁失败。
            this.acquireFailed(waitTime, unit, threadId);
            return false;
        } else {
			//再次获取当前时间
            current = System.currentTimeMillis();
			//刚刚尝试完获取锁失败,如果继续立即尝试一般是获取不到锁的,因此这里选择订阅的方式
			//订阅当前锁,在unlock释放锁的时候有个:redis.call('publish', KEYS[2], ARGV[1]); 所以这里就订阅了
            RFuture<RedissonLockEntry> subscribeFuture = this.subscribe(threadId);
			//进行等待RFuture的结果,等多久?等time的时间
            if (!subscribeFuture.await(time, TimeUnit.MILLISECONDS)) {
				//time时间过完了还没有等到锁释放的通知
                if (!subscribeFuture.cancel(false)) {
                    subscribeFuture.onComplete((res, e) -> {
                        if (e == null) {
							//如果等待超时,就取消订阅
                            this.unsubscribe(subscribeFuture, threadId);
                        }
                    });
                }

                this.acquireFailed(waitTime, unit, threadId);
				//返回获取锁失败
                return false;
            } else {//到这里表示在tme时间内获得了释放锁的通知
                boolean var16;
                try {
					//检查之前订阅等待的消耗时间
                    time -= System.currentTimeMillis() - current;
                    if (time <= 0L) {//当前的剩余等待时间
                        this.acquireFailed(waitTime, unit, threadId);
                        boolean var20 = false;
                        return var20;
                    }
					//这里开始进行重试相关逻辑。主要就是当前时间和进入方法时候的时间进行比较
                    do {
                        long currentTime = System.currentTimeMillis();
						//这里就是第一次重试
                        ttl = this.tryAcquire(waitTime, leaseTime, unit, threadId);
                        if (ttl == null) {//null表示获取锁失败
                            var16 = true;
                            return var16;
                        }

						//再试一次
                        time -= System.currentTimeMillis() - currentTime;
                        if (time <= 0L) {
                            this.acquireFailed(waitTime, unit, threadId);
                            var16 = false;
                            return var16;
                        }

                        currentTime = System.currentTimeMillis();
                        if (ttl >= 0L && ttl < time) { //也不是一直试,等别人释放
                           ((RedissonLockEntry)subscribeFuture.getNow()).getLatch().tryAcquire(ttl, TimeUnit.MILLISECONDS);
                        } else {
                            ((RedissonLockEntry)subscribeFuture.getNow()).getLatch().tryAcquire(time, TimeUnit.MILLISECONDS);
                        }

                        time -= System.currentTimeMillis() - currentTime;
                    } while(time > 0L);//时间还充足,继续等待
					//时间到期了,还没获取到锁,返回失败
                    this.acquireFailed(waitTime, unit, threadId);
                    var16 = false;
                } finally {
                    this.unsubscribe(subscribeFuture, threadId);
                }

                return var16;
            }
        }
    }
}
主要是do while机制进行锁重试的,while会检查时间是否还充足会继续循环。当然这个循环不是直接while(true)的盲等机制,而是利用信号量和订阅的方式实现的,会等别人释放锁,再进行尝试,这种方式对cpu友好
Redisson的超时续约
跟随tryLock代码,在RedissonLock类中的tryAcquireOnceAsync方法中,会看到如下代码:
private RFuture<Boolean> tryAcquireOnceAsync(long waitTime, long leaseTime, TimeUnit unit, long threadId) {
    if (leaseTime != -1L) {//设置了锁过期时间
        return this.tryLockInnerAsync(waitTime, leaseTime, unit, threadId, RedisCommands.EVAL_NULL_BOOLEAN);
    } else {
	//leaseTime = -1时,即没有设置了锁过期时间
        RFuture<Boolean> ttlRemainingFuture = this.tryLockInnerAsync(waitTime, this.commandExecutor.getConnectionManager().getCfg().getLockWatchdogTimeout(),//,默认30秒
		TimeUnit.MILLISECONDS, threadId, RedisCommands.EVAL_NULL_BOOLEAN);
		//ttlRemainingFuture完成以后
        ttlRemainingFuture.onComplete((ttlRemaining, e) -> {
            if (e == null) {//没有抛异常
                if (ttlRemaining) {//获取锁成功
                    this.scheduleExpirationRenewal(threadId);//自动更新续期时间的任务调度
                }

            }
        });
        return ttlRemainingFuture;
    }
}
- 在使用trylock的时候,如果设置了锁过期时间,就不会执行续命相关逻辑了。
- 其中默认的watchdogTimeout时间是30秒。
private void scheduleExpirationRenewal(long threadId) {
    RedissonLock.ExpirationEntry entry = new RedissonLock.ExpirationEntry();
	//获取一个entry,将entry放到map里,getEntryName()就是当前锁名称。
	//放到map里,即一个锁对应一个entry
    RedissonLock.ExpirationEntry oldEntry = (RedissonLock.ExpirationEntry)EXPIRATION_RENEWAL_MAP.putIfAbsent(this.getEntryName(), entry);
    if (oldEntry != null) {//表示重入的,第二次放
        oldEntry.addThreadId(threadId);
    } else {//表示第一次放
        entry.addThreadId(threadId);
        this.renewExpiration();//第一次放,进行续约
    }

}
看门狗机制:在获取锁成功以后,开启一个定时任务,每隔一段时间就会去重置锁的超时时间,以
确保锁是在程序执行完unlock手动释放的,不会发生因为业务阻塞,key超时而自动释放的情况
。
到期续约方法:
private void renewExpiration() {
    RedissonLock.ExpirationEntry ee = (RedissonLock.ExpirationEntry)EXPIRATION_RENEWAL_MAP.get(this.getEntryName());
    if (ee != null) {       //Timeout定时任务,或者叫周期任务
        Timeout task = this.commandExecutor.getConnectionManager().newTimeout(new TimerTask() {
            public void run(Timeout timeout) throws Exception {
                RedissonLock.ExpirationEntry ent = (RedissonLock.ExpirationEntry)RedissonLock.EXPIRATION_RENEWAL_MAP.get(RedissonLock.this.getEntryName());
                if (ent != null) {
                    Long threadId = ent.getFirstThreadId();
                    if (threadId != null) {
						//执行续命的操作
                        RFuture<Boolean> future = RedissonLock.this.renewExpirationAsync(threadId);
                        future.onComplete((res, e) -> {
                            if (e != null) {
                                RedissonLock.log.error("Can't update lock " + RedissonLock.this.getName() + " expiration", e);
                            } else {
                                if (res) {
                                    RedissonLock.this.renewExpiration();//再次调用
                                }

                            }
                        });
                    }
                }
            }
			//刷新周期, this.internalLockLeaseTime / 3L, 默认释放时间是30秒,除以3就是每10秒更新一次
		//续命时间为1/3的过期时间,设置续命单位是秒
		},this.internalLockLeaseTime / 3L, TimeUnit.MILLISECONDS);
		ee.setTimeout(task);
	}
}
查看renewExpirationAsync方法源码,其调用了Lua脚本执行续命操作的。
protected RFuture<Boolean> renewExpirationAsync(long threadId) {
    return this.evalWriteAsync(this.getName(), LongCodec.INSTANCE, RedisCommands.EVAL_BOOLEAN, "if (redis.call('hexists', KEYS[1], ARGV[2]) == 1) then redis.call('pexpire', KEYS[1], ARGV[1]); return 1; end; return 0;", Collections.singletonList(this.getName()), this.internalLockLeaseTime, this.getLockName(threadId));
}
pexpire重置锁的有效期。
总体逻辑如下:
- 开启一个任务,10秒钟后执行
- 开始的这个任务中重置有效期。假设设置的是默认30秒,则重置为30秒
- 更新后又重复步骤1、2
那么什么时候取消这个续约的任务呢?在释放锁unlock时
 public RFuture<Void> unlockAsync(long threadId) {
    RPromise<Void> result = new RedissonPromise();
    RFuture<Boolean> future = this.unlockInnerAsync(threadId);
    future.onComplete((opStatus, e) -> {
		//取消这个任务
        this.cancelExpirationRenewal(threadId);
        if (e != null) {
            result.tryFailure(e);
        } else if (opStatus == null) {
            IllegalMonitorStateException cause = new IllegalMonitorStateException("attempt to unlock lock, not locked by current thread by node id: " + this.id + " thread-id: " + threadId);
            result.tryFailure(cause);
        } else {
            result.trySuccess((Object)null);
        }
    });
    return result;
}
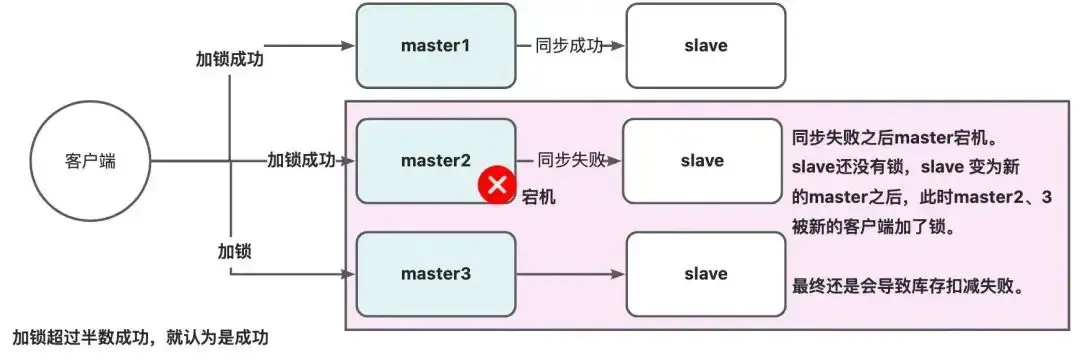
multilock解决主从一致性问题
如果Redis是主从集群,主从同步存在延迟,当主机宕机时,从成为了主,但可能存在从此时还未完成同步,因此从上就没有锁标识,此时会出现并发安全问题。
因此redisson提出来了MutiLock锁,使用这把锁就不使用主从了,每个节点的地位都是一样的, 这把锁加锁的逻辑需要写入到每一个主丛节点上,只有所有的服务器都写入成功,此时才是加锁成功,假设现在某个节点挂了,那么他去获得锁的时候,只要有一个节点拿不到,都不能算是加锁成功,就保证了加锁的可靠性。
使用multilock()方法。必须在所有的节点都获取锁成功,才算成功。 缺点是运维成本高,实现复杂。
@Resource
private RedissonClient redissonClient;
@Resource
private RedissonClient2 redissonClient2;
@Resource
private RedissonClient3 redissonClient3;

RLock lock = redissonClient.getMultilock(lock1,lock2,lock3)
总结Redisson
Redisson分布式锁解决前三个问题原理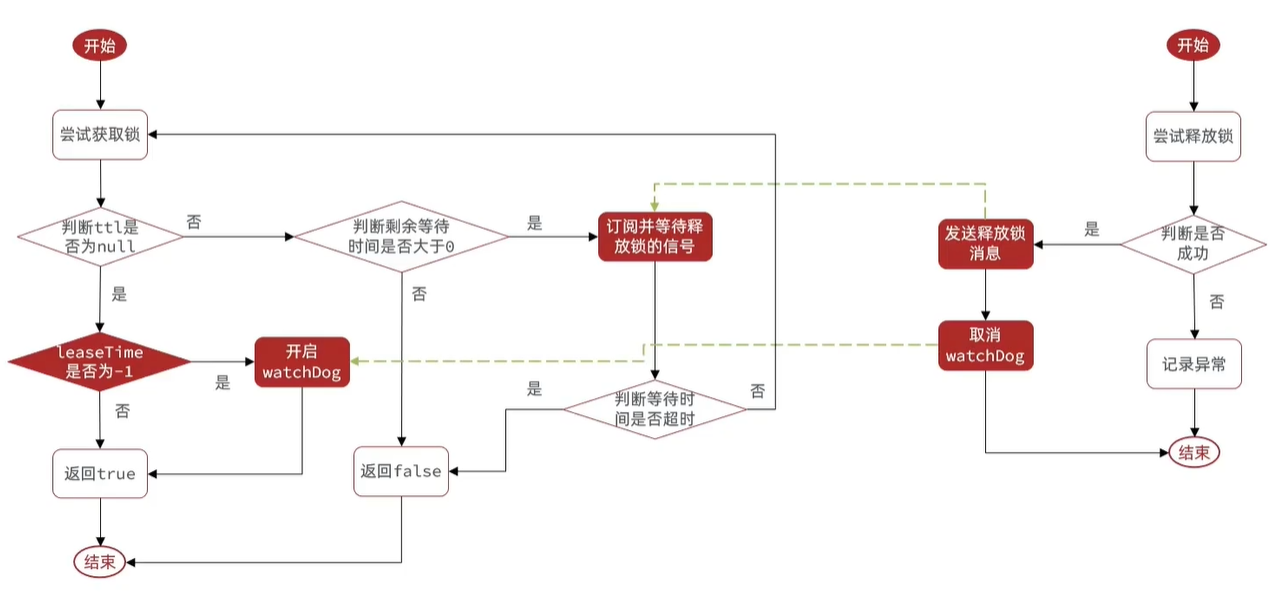
总结Redisson分布式锁原理:
- 可重入:利用hash结构记录线程id和重入次数
- 可重试:利用信号量和PubSub功能来实现等待、唤醒,获取锁失败的重试机制
- 超时续约:利用watchDog,开启一个定时任务,每隔一段时间(releaseTime/3),重置超时时间。
- 使用multilock: 多个独立的redis节点,必须在所有节点都获取重入锁,才算获取成功;
redLock
不管是redLock,还是redissonLock,两者底层都是通过相同的lua脚本来加锁、释放锁的,所以,两者只是外部形态的不同,底层是一样的。redLock是继承了redissonMultiLock,大部分的逻辑,都是在redissonMultiLock中去实现的,所以源码部分,大部分都是RedissonMultiLock
原理
- redLock的使用,需要有奇数台独立部署的Redis节点
- 在加锁的时候,会分别去N台节点上加锁,如果半数以上的节点加锁成功,就认为当前线程加锁成功
面试题专栏
Java面试题专栏
已上线,欢迎访问。
- 如果你不知道简历怎么写,简历项目不知道怎么包装;
- 如果简历中有些内容你不知道该不该写上去;
- 如果有些综合性问题你不知道怎么答;
那么可以私信我,我会尽我所能帮助你。