微信小程序结合后台数据管理实现商品数据的动态展示、维护
微信小程序给我们提供了一个很好的开发平台,可以用于展现各种数据和实现丰富的功能,本篇随笔介绍微信小程序结合后台数据管理实现商品数据的动态展示、维护,介绍如何实现商品数据在后台管理系统中的维护管理,并通过小程序的请求Web API 平台获取JSON数据在小程序界面上进行动态展示。
1、整体性的架构设计
我们整体性的架构设计,包含一个Web管理后台、一个Web API统一接口层、当然还有数据库什么,另外还有一个小程序客户端。整个架构体系还是以我之前随笔介绍的《
整合微信小程序的Web API接口层的架构设计
》内容为蓝本
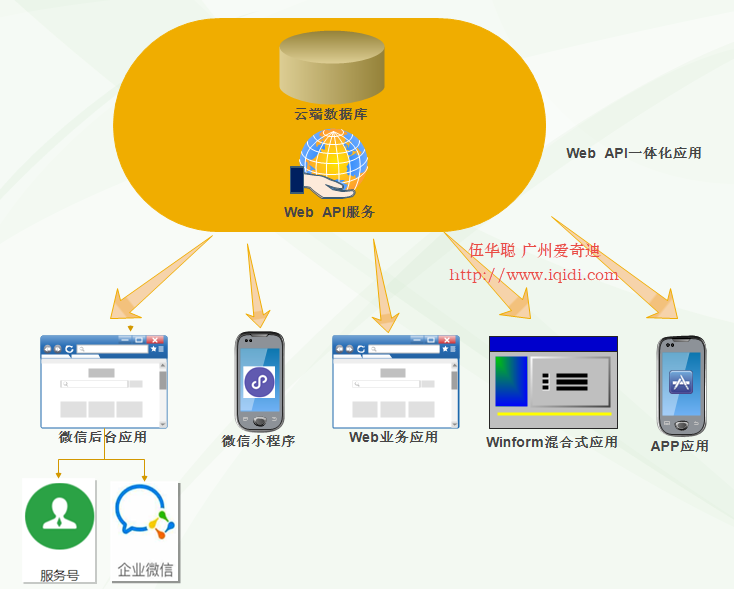
整个体系以Web API为主提供服务,同时后台管理系统通过各种界面维护着数据的增删改等基础管理工作。
Web API的分层,我们可以通过下图来了解具体的分层结构。
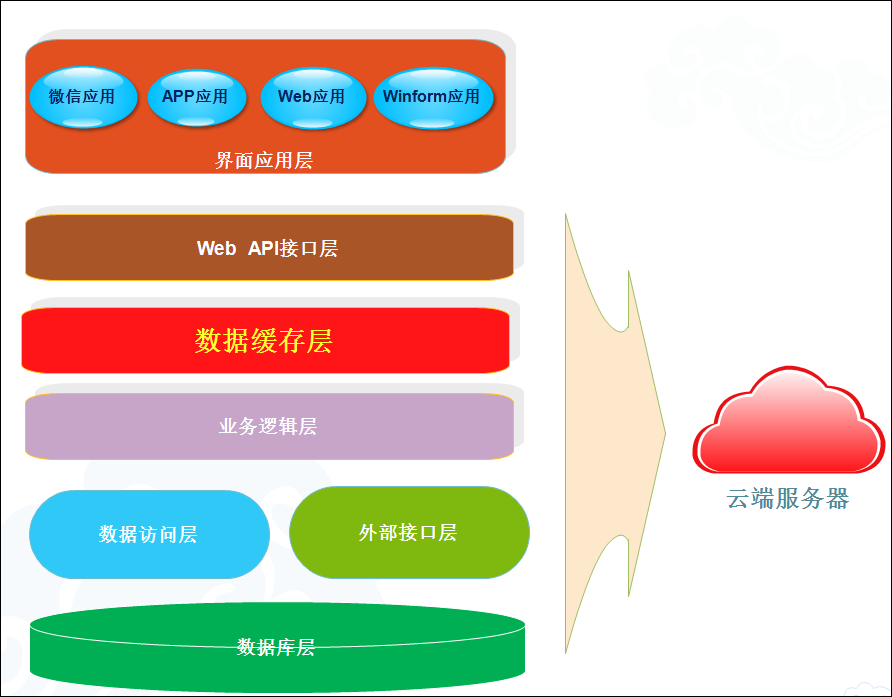
Web API 是一个统一的出口,因此会整合很多Web API控制器,以提供所有业务的接口,因此对Web API 控制器的管理就显得很重要,这里建议引入Area区域进行管理控制器类,这种各个模块就能够很好分门别类的进行管理了。
如下图所示是我们的Web API项目的控制器Area区域分类,把微信公众号、企业号、小程序、基础框架、第三方接口、CRM等内容进行不同的划分。

而后台管理系统,我们通过下面的来了解整体功能,整个后台管理系统使用了Bootstrap的框架进行前端处理。
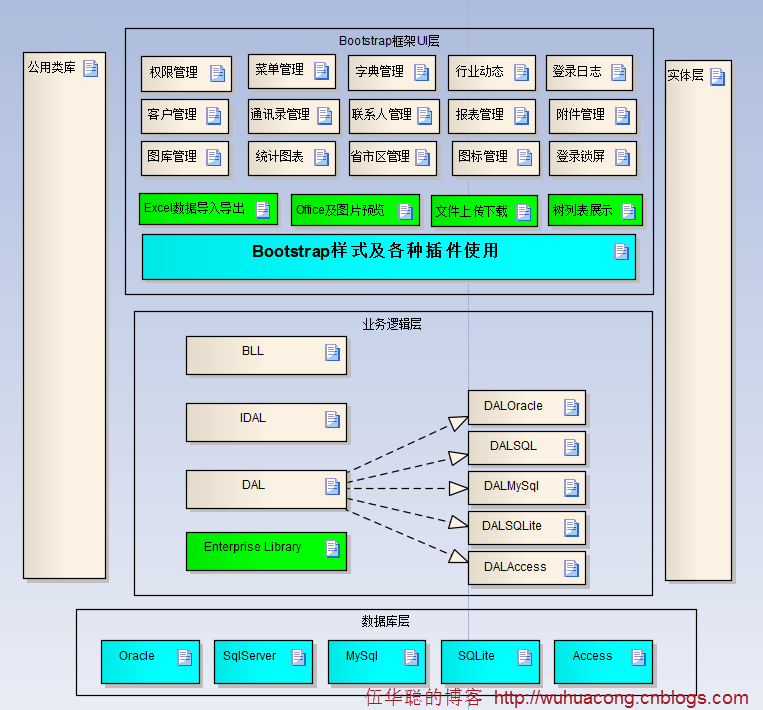
各种账号的维护如下所示。

2、后台管理系统的数据维护
前面介绍了,后台管理和Web API层是分开的,它们的数据最终都是集中在一个数据库上,实现我们所要的数据集中化管理。
我们言归正题,介绍如何实现商品数据的后台管理,数据数据我们分为几种类型,方便在前端界面展示。

商品编辑界面包括对基础信息的修改、封面和Banner图片的维护、以及商品多个展示图片、商品详细介绍的内容维护,如下界面所示。

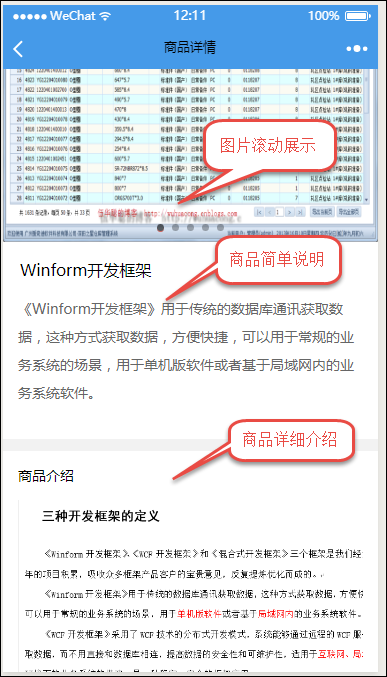
除了商品的封面图片以及Banne图片外,我们在小程序的商品详细界面里面,需要在顶端展示多个可以滚动的图片效果,那么我们需要维护商品的图片,如下界面所示。

当然商品的详细信息需要一个富文本的编辑器来进行图片文字的编辑处理,如下界面所示。

HTML图文的编辑,我们这里是用SummerNote插件来进行处理,这个控件的使用非常方便,另外通过修改onImageUpload回调函数,可以实现图片的随时上传处理。
        functioninitEditor() {

            $('#Note').summernote({

                lang:'zh-CN',       //default: 'en-US'
                height: 600,         //set editor height
                minHeight: null,    //set minimum height of editor
                maxHeight: null,    //set maximum height of editor
                focus: true,         //set focus to editable area after initializing summe
callbacks: {

                    onImageUpload:function (files) { //the onImageUpload API
                        img = sendFile(files[0]);

                    }

                }

            });

        }//提交文件到服务器处理
        functionsendFile(file) {

            data= newFormData();

            data.append("file", file);//增加额外的参数
            data.append("folder", '商品信息');

            data.append("guid", $("#ID").val());


            $.ajax({

                data: data,

                type:"POST",

                url:"/FileUpload/Upload",

                cache:false,

                contentType:false,

                processData:false,

                success:function(json) {var data =$.parseJSON(json);var url = data.urls[0];

                    $("#Note").summernote('insertImage', url, 'image name'); //the insertImage API
}

            });

        }
3、小程序整合Web API接口实现数据展示
上面介绍了管理后台的数据维护,我们就是基于上面的数据模型,在小程序上实现商品数据的展示的。
下图是小程序的商品展示首图,其中包括了顶部Banner栏目、中间的商品分类、底部的商品信息展示几部分。

其中Banner栏目的是一个swiper界面组件,商品类型使用了scroll-view来展示,而商品信息则是使用普通的View处理即可。
整个界面的视图部分代码如下所示。
<!--pages/product/index.wxml-->
<!--1px = 750/320 = 2.34rpx;-->
<viewclass="container">
   <viewclass="swiper-container">
        <swiperclass="swiper_box"autoplay="{{autoplay}}"interval="{{interval}}"duration="{{duration}}"bindchange="swiperchange">
            <blockwx:for="{{banners}}">
                <swiper-item>
                    <imagebindtap="tapBanner"data-id="{{item.ID}}"src="{{item.Banner}}"class="slide-image"width="750rpx"height="562.5rpx"/>
                </swiper-item>
            </block>
        </swiper>
        <viewclass="dots">
            <blockwx:for="{{banners}}"wx:key="unique">
                <viewclass="dot{{index == swiperCurrent ? ' active' : ''}}"></view>
            </block>
        </view>
   </view>

    <viewclass="type-container">
        <scroll-viewclass="type-navbar"scroll-x="true"style="width: 100%">
            <viewclass="type-box"wx:for-items="{{categories}}">
                <viewid="{{item.id}}"class="type-navbar-item {{activeCategoryId == item.id ? 'type-item-on' : ''}}"bindtap="tabClick">{{item.name}}</view>
            </view>
        </scroll-view>
    </view>
    <viewclass="goods-container">
        <viewclass="goods-box"wx:for-items="{{goods}}"wx:key="{{index}}"bindtap="toDetailsTap"data-id="{{item.ID}}">
           <viewclass="img-box">
              <imagesrc="{{item.Picture}}"class="image"/>
           </view>
           <viewclass="goods-title">{{item.ProductName}}</view>
        </view>
    </view>
    <viewhidden="{{loadingMoreHidden ? true : false}}"class="no-more-goods">没有更多啦</view>
</view>
其中小程序的数据是通过后台的JS文件实现数据的加载绑定的。
  /**

   * 生命周期函数--监听页面加载*/onLoad:function(options) {var that = this;this.getCategorys();this.getTopBanners();this.getGoodsList(0);

  },
其中上面的几个函数就是分别通过Web API来获取对应的JSON数据的,函数代码如下所示。
 //获取顶部Banner的数据
  getTopBanners : function() {//获取产品列表
    var url = config.product_api;//'http://localhost:27206/api/Framework/Product/list'
    var data ={

      status :1, //推荐
      pageindex : 1,

      pagesize:10}

    app.utils.get(url, data).then(res=>{this.setData({

        banners : res.list

      })

    });

  },//获取商品类型
  getCategorys : function() {var url = config.category_api;//'http://localhost:27206/api/Framework/Product/GetProductType'
    app.utils.get(url, {}).then(res=>{var that = this;var categories = [{id:0, name:"全部"}];for(var i=0;i<res.length;i++){

        categories.push(res[i]);

      }

      that.setData({

        categories:categories,

        activeCategoryId:0});

    });

  },//获取商品列表
  getGoodsList: function(categoryId) {if (categoryId == 0) {

      categoryId= "";

    }this.setData({

      goods: [],

      loadingMoreHidden:true});//获取产品列表
    var url = config.product_api;//'http://localhost:27206/api/Framework/Product/list'
    var data ={

      type: categoryId,

      status:'', //所有状态
      pageindex: 1,

      pagesize:50}

    app.utils.get(url, data).then(res=>{this.setData({

        goods: res.list,

        loadingMoreHidden:false,

      })

    });

  },
如果你对上面请求数据的代码
    app.utils.get(url, data).then(res=>{this.setData({

        banners : res.list

      })

    });
有疑问,你可以参考我的随笔《
在微信小程序的JS脚本中使用Promise来优化函数处理
》了解Promise插件的使用过程,这里通过引入Promise以及JS的模块化方式,可以直接重用这些通用的JS函数,
而详细部分内容,则是需要滚动展示商品的多个图片,另外还需要展示详细的HTML内容,HTML内容的展示使用富文本转化插件wxParse即可实现,这部分在随笔《
在微信小程序中使用富文本转化插件wxParse
》有详细的使用介绍。
商品详细内容的视图代码如下所示。
<importsrc="../../utils/wxParse/wxParse.wxml" />
<viewclass="container">
   <viewclass="swiper-container">
        <swiperclass="swiper_box"autoplay="{{autoplay}}"interval="{{interval}}"duration="{{duration}}"bindchange="swiperchange">
            <blockwx:for="{{goodsDetail.pics}}">
                <swiper-item>
                    <imagesrc="{{item.pic}}"class="slide-image"width="355"height="150"/>
                </swiper-item>
            </block>
        </swiper>
        <viewclass="dots">
            <blockwx:for="{{goodsDetail.pics}}"wx:key="unique">
                <viewclass="dot{{index == swiperCurrent ? ' active' : ''}}"></view>
            </block>
        </view>
   </view>
   <viewclass="goods-info">
        <viewclass="goods-title">{{goodsDetail.ProductName}}</view>
        <viewclass="goods-price"hidden="true">¥ {{goodsDetail.Price}}</view>
        <viewclass="goods-text">{{goodsDetail.Description}}</view>
   </view>
    <viewclass="goods-des-info">
        <viewclass="label-title">商品介绍</view>
        <viewclass="goods-text">
            <templateis="wxParse"data="{{wxParseData:article.nodes}}"/>
         </view>
    </view>

</view>
其中后台的JS主要负责详细信息的获取和绑定工作。
  onLoad: function(e) {var that = this;//获取商品详细信息
    var url = config.product_detail_api;//'http://localhost:27206/api/Framework/Product/getdetail';
    var data ={id: e.id};

    app.utils.get(url, data).then(res=>{

        console.log(res);

        that.data.goodsDetail=res;

        that.setData({

          goodsDetail:res

        });

        WxParse.wxParse('article', 'html', res.Note, that, 5);

    });

  },
最后来段视频了解下整体性的功能展示。