C#开发微信门户及应用(42)--使用Autofac实现微信接口处理的控制反转处理
在很多情况下,我们利用IOC控制反转可以很方便实现一些接口的适配处理,可以在需要的时候切换不同的接口实现,使用这种方式在调用的时候,只需要知道相应的接口接口,具体调用哪个实现类,可以在配置文件中动态指定,本篇主要介绍AutoFac的IOC组件的使用,用来实现微信接口处理的控制反转功能。
我们知道,实
现IOC的方式有很多,如Unity、AutoFac、Ninject、Castle Windsor、Spring.NET等等,每种IOC组件均有自己的一些特点,我在之前的实体框架随笔系列介绍过Unity的使用《
Entity Framework 实体框架的形成之旅--利用Unity对象依赖注入优化实体框架(2)
》,本来也想用这个来实现微信的接口调用处理,不过由于其版本以及一些其他问题,总是没有那么方便,最后决定使用也比较流行,应用较多的的AutoFac组件来实现。
1、微信接口的处理需求
我们在使用微信公众号实现一些业务处理的时候,往往需要根据不同的条件进行不同的接口调用。
如通过二维码扫码的结果处理,然后呈现给微信用户的相关信息,有下面两种方式。

根据用户的扫码结果,我们可以自定义自己的业务处理,然后呈现给用户,那么这里使用IOC来实现具体的业务是比较好的,我们在具体的业务实现里面,可以根据不同的条件实现所需要的复杂处理。

当然我们还可以扩展到很多的业务接口里面,如百度的地理位置解析接口、电影院信息查询、天气信息查询、交通信息查询、旅游信息查询等,还有短信、邮件发送等常规接口,都可以使用这种方式进行处理。
接口的效果展示如下所示。
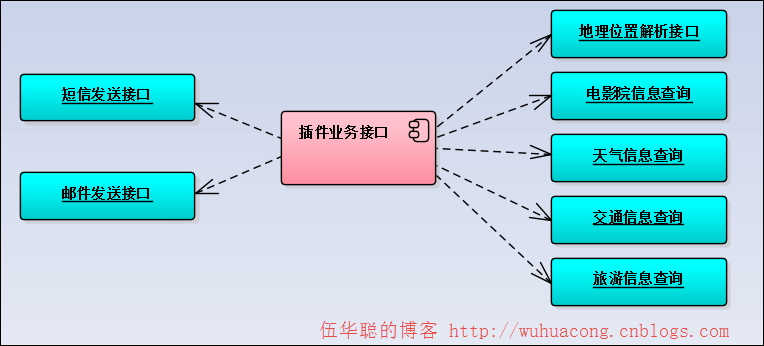
这些给其他项目模块使用的时候,我们可以在配置文件里面指定具体的接口实现信息,这种可以具体指定所需的实现。
<?xml version="1.0" encoding="utf-8"?>
<configuration>
  <configSections>
    <sectionname="autofac"type="Autofac.Configuration.SectionHandler, Autofac.Configuration"/>
  </configSections>
  <autofacdefaultAssembly="WHC.Common.Handler">
    <components>
      <componenttype="WHC.Common.Handler.TestHandler, WHC.Common.Handler"service="WHC.Common.Handler.ITestHandler" />
      <componenttype="WHC.Common.Handler.QRCodeHandler, WHC.Common.Handler"service="WHC.Common.Handler.IQRCodeHandler" />
      <!--邮件短信-->
      <componenttype="WHC.Common.Handler.SmsSendHandler, WHC.Common.Handler"service="WHC.Common.Handler.ISmsHandler" />
      <componenttype="WHC.Common.Handler.MailSendHandler, WHC.Common.Handler"service="WHC.Common.Handler.IMailHandler" />

    </components>
  </autofac>
</configuration>
直接使用AutoFac的操作应该是比较方便,使用接口获取方式获取具体实现就可以了。
2、使用Autofac实现
为了方便使用Autofac,我们可以先在项目上的Nuget包管理,引用相关的DLL,其中包括核心的Autofac类库,以及读取配置文件的Autofac Configuration,后者为方便读取XML配置信息所必须。

引入这两个DLL就可以使用Autofac的功能了。
一般通过配置文件,初始化的Autofac组件的代码如下所示
    instance = newAutoFactory();//初始化相关的注册接口
    var builder = newContainerBuilder();//从配置文件注册相关的接口处理
    builder.RegisterModule(new ConfigurationSettingsReader("autofac", configurationFile));

    container= builder.Build();
而我们使用Autofac的接口也是很容易的,常规的使用代码如下所示。
            var handler = container.Resolve<ITestHandler>();

            handler.Test("测试");
当然,为了方便,我们可以使用一个辅助类来简化这个接口的调用:在辅助类初始化的时候,我们从配置文件加载对应的组件接口实现,当我们需要解析具体接口的时候,就可以直接从Container容器里面胡获取了,辅助类代码如下所示。
    /// <summary>
    ///使用AutoFac的工厂类,通过配置/// </summary>
    public classAutoFactory

    {//普通局部变量
        private static object syncRoot = newObject();//工厂类的单例
        private static AutoFactory instance = null;//配置文件
        private const string configurationFile = "autofac.config";/// <summary>
        ///IOC的容器,可调用来获取对应接口实例。/// </summary>
        public IContainer Container { get; set; }/// <summary>
        ///IOC容器工厂类的单例/// </summary>
        public staticAutoFactory Instatnce

        {get{if (instance == null)

                {lock(syncRoot)

                    {if (instance == null)

                        {

                            instance= newAutoFactory();//初始化相关的注册接口
                            var builder = newContainerBuilder();//从配置文件注册相关的接口处理
                            builder.RegisterModule(new ConfigurationSettingsReader("autofac", configurationFile));

                            instance.Container=builder.Build();

                        }

                    }

                }returninstance;

            }

        }/// <summary>
        ///测试的接口/// </summary>
        public voidTest()

        {var handler = AutoFactory.Instatnce.Container.Resolve<ITestHandler>();

            handler.Test("测试");

        }

    }
3、外部接口实现及调用
这样我们所有的接口都定义好,并给每个定义的接口相应个实现就可以使用这个Autofac组件进行调用了。
    /// <summary>
    ///短信发送接口/// </summary>
    public interfaceISmsHandler

    {/// <summary>
        ///发送短信/// </summary>
        /// <param name="content">短信内容</param>
        /// <param name="mobiles">手机号码(多个号码用”,”分隔)</param>
        /// <param name="sendTime">预约发送时间</param>
        /// <returns></returns>
        CommonResult Send(string content, string mobiles, DateTime? sendTime = null);/// <summary>
        ///查询剩余条数/// </summary>
        /// <returns></returns>
CommonResult GetLeftCount();

    }
    /// <summary>
    ///邮件发送接口/// </summary>
    public interfaceIMailHandler

    {/// <summary>
        ///发送外部邮件(自定义邮件配置,如个人邮件)/// </summary>
        /// <param name="mailInfo">发送邮件信息</param>
        /// <param name="settingInfo">SMTP协议设置信息</param>
        /// <returns></returns>
CommonResult Send(MailInfo mailInfo, SmtpSettingInfo settingInfo);/// <summary>
        ///发送外部邮件(系统配置,系统邮件)/// </summary>
        /// <param name="mailInfo">发送邮件信息</param>
        /// <returns></returns>
CommonResult Send(MailInfo mailInfo);

    }
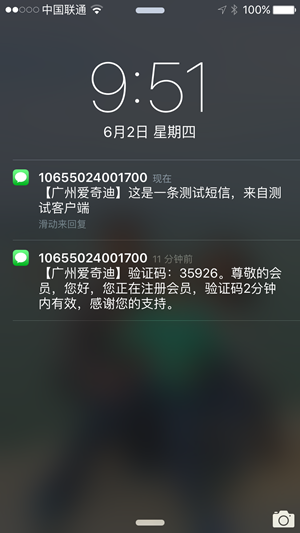
例如,测试发送短信和邮件的IOC调用代码如下所示
//使用IOC模块发送 var sms = AutoFactory.Instatnce.Container.Resolve<ISmsHandler>();var smsTemplate = string.Format("验证码:{0}。尊敬的会员,您好,您正在注册会员,验证码2分钟内有效,感谢您的支持。", new Random().Next(100000));var result = sms.Send(smsTemplate, "18620292076");
Console.WriteLine(result.Success? "发送短信成功" : "发送短信失败:" +result.ErrorMessage);
MailInfo info= newMailInfo();
info.ToEmail= "wuhuacong@163.com";
info.FromEmail= "wuhuacong@163.com";
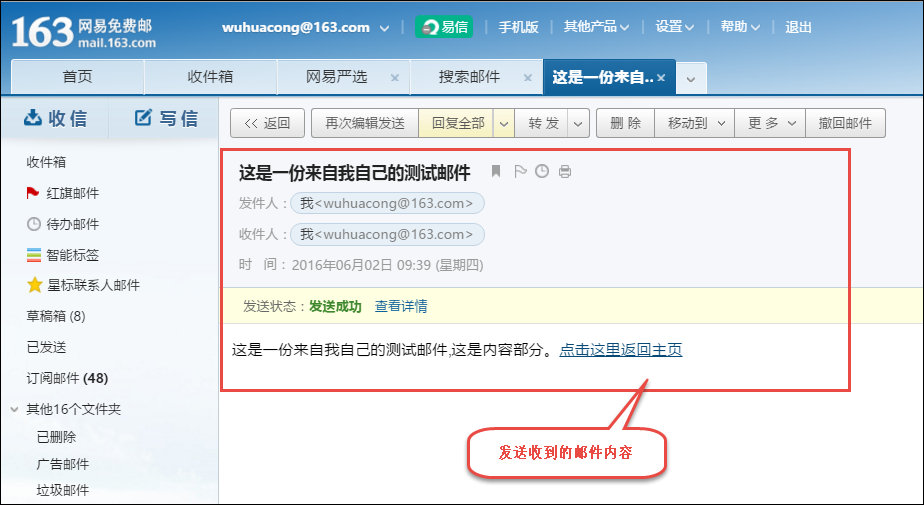
info.Subject= "这是一份来自我自己的测试邮件";
info.Body= info.Subject + ",这是内容部分。<a href='http://www.iqidi.com'>点击这里返回主页</a>";var mail = AutoFactory.Instatnce.Container.Resolve<IMailHandler>();var mailResult =mail.Send(info);
Console.WriteLine(mailResult.Success? "发送邮件成功" : "发送邮件失败:" + mailResult.ErrorMessage);
测试后得到的结果如下:
邮件结果一样可以收到。
我们回到上面介绍的二维码扫描的业务实现效果,上面提到了,一个二维码事件可以派生出不同的接口实现,从而给不同的响应信息。
    /// <summary>
    ///扫码进行的处理/// </summary>
    public interfaceIQRCodeHandler

    {/// <summary>
        ///处理ScancodePush的事件/// </summary>
        /// <param name="info">扫描信息</param>
        /// <param name="accountInfo">账号信息</param>
        /// <returns></returns>
        stringHandleScancodePush(RequestEventScancodePush info, AccountInfo accountInfo);/// <summary>
        ///处理ScancodeWaitmsg的事件/// </summary>
        /// <param name="info">扫描信息</param>
        /// <param name="accountInfo">账号信息</param>
        /// <returns></returns>
        stringHandleScancodeWaitmsg(RequestEventScancodeWaitmsg info, AccountInfo accountInfo);

    }
我们可以定义两个简单的接口处理,用来承接微信二维码扫描接口的处理操作。
这样我们在处理二维码扫描事件的时候,我们就可以把它分配到接口里面进行处理即可。
        /// <summary>
        ///扫码推事件的事件推送处理/// </summary>
        /// <param name="info">扫描信息</param>
        /// <returns></returns>
        public stringHandleEventScancodePush(RequestEventScancodePush info, AccountInfo accountInfo)

        {string result = "";var handler = AutoFactory.Instatnce.Container.Resolve<IQRCodeHandler>();if(handler != null)

            {

                result=handler.HandleScancodePush(info, accountInfo);

            }returnresult;

        }/// <summary>
        ///扫码推事件且弹出“消息接收中”提示框的事件推送的处理/// </summary>
        /// <param name="info">扫描信息</param>
        /// <returns></returns>
        public stringHandleEventScancodeWaitmsg(RequestEventScancodeWaitmsg info, AccountInfo accountInfo)

        {string result = "";try{var handler = AutoFactory.Instatnce.Container.Resolve<IQRCodeHandler>();if (handler != null)

                {

                    result=handler.HandleScancodeWaitmsg(info, accountInfo);

                }

            }catch(Exception ex)

            {

                LogHelper.Error(ex);

            }returnresult;

        }
对于其中之一的接口处理,我们都可以把它分拆,根据扫描的事件键值Key进行不同的信息相应。
        /// <summary>
        ///扫描后,会等待事件处理结果返回给用户/// </summary>
        public stringHandleScancodeWaitmsg(RequestEventScancodeWaitmsg info, AccountInfo accountInfo)

        {

            ResponseText response= newResponseText(info);

            response.Content= string.Format("您的信息为:{0},可以结合后台进行数据查询。", info.ScanCodeInfo.ScanResult);var result =response.ToXml();string devicecode = GetParam(info.ScanCodeInfo, "devicecode");//参数名为小写
            if (!string.IsNullOrEmpty(devicecode))

            {switch(info.EventKey.ToLower())

                {case "device_view"://设备查看
{var deviceinfo = BLLFactory<Device>.Instance.FindByCode(devicecode);

                            response.Content=ConvertDeviceInfo(deviceinfo);

                            result=response.ToXml();

                        }break;case "measure"://设备计量
{var deviceinfo = BLLFactory<Device>.Instance.FindByCode(devicecode);

                            response.Content=ConvertMeasure(deviceinfo);

                            result=response.ToXml();

                        }break;case "repair"://设备报修,返回报修单号
{var content =ConvertRepaire(info, accountInfo, devicecode);

                            response.Content=content;

                            result=response.ToXml();

                        }break;case "inventory"://设备盘点,转到盘点界面
{var content =ConvertInventory(info, accountInfo, devicecode);

                            response.Content=content;

                            result=response.ToXml();

                        }break;case "maintain":break;case "check":break;case "device_add":break;

                }

            }returnresult;

        }
以上就是关于使用Autofac实现一些常规接口处理的实现,这种控制反转的方式,可以便于我们项目的开发效率,可以根据需要指定一些特定的实现处理即可,而且通过配置文件的方式加载,可以很方便的进行配置。