基于Lumisoft.NET实现的邮件发送功能
在前面的一些文章中,有介绍过DotNet内置SMTP类的邮件发送功能,附件、嵌入图片的模式都有介绍,本文继续介绍Lumisoft.NET这个非常优秀的开源组件,用该组件来设计开发邮件工具,将变得更加方便,功能更加强大。网上很多文章基本介绍如何使用该组件来收取邮件较多,较少介绍使用该组件做邮件发送功能的。本文主要探寻使用该组件实现邮件的发送功能,邮件发送有两种方式,一种是不用发件人即可发送邮件,一种是使用发件人账户密码和SMTP服务器来实现邮件发送的,本文分别对这两种方式进行介绍。
组件下载地址:
http://www.lumisoft.ee/lswww/download/downloads/
组件论坛地址:
http://www.lumisoft.ee/Forum/default.aspx?g=forum
秉承一贯的做法,先贴出相关的实现图形,感官认识下,在进入详细的介绍说明,以求达到最好的理解深度。
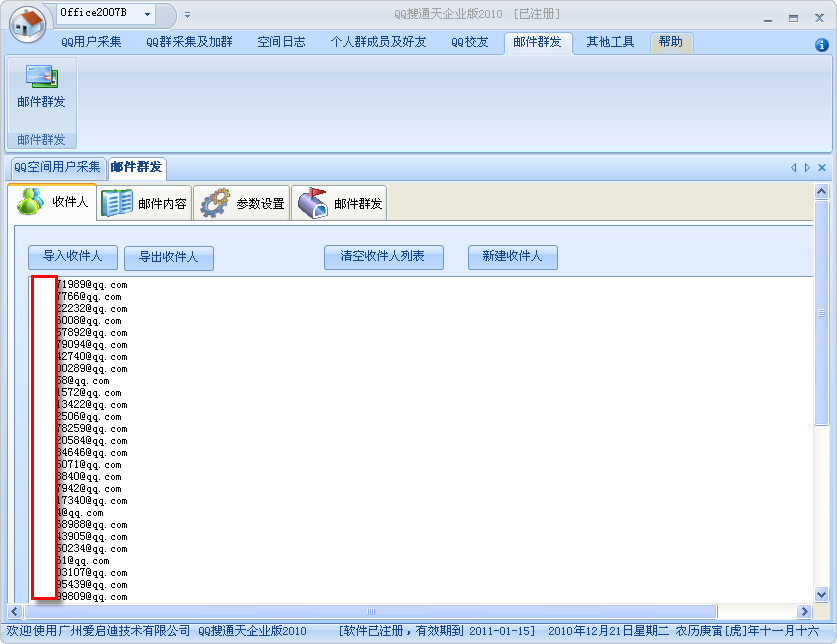
1、 首先是发件人的设置,可以从文本文件的导出,以及新建等操作,以方便用户操作。
2、 内容也支持导入导出,并且保存到数据库,方便进行记录及操作等,另外可以对内容进行随机混淆,混淆的内容在HTML邮件中式隐藏的,方便糊弄一下服务器的识别。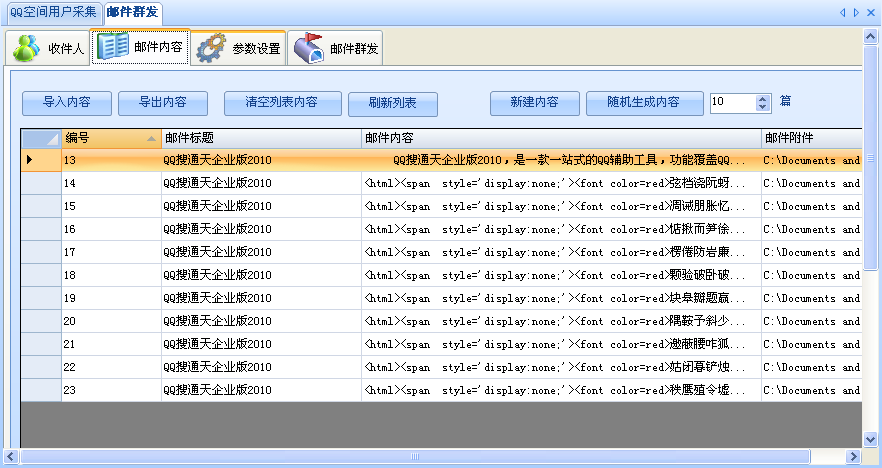
3、 邮件发送可以选择两种方式,下面将分别介绍这两种方式的实现,一种采用该控件封装非常好的邮件直投技术,不需要SMTP账号发送的;一种是普通的SMTP发送方式。当然我们还可以设置更多的参数,例如邮件尾部信息、HTML内容提示、 以及一些发送期间自动拨号的设置操作等。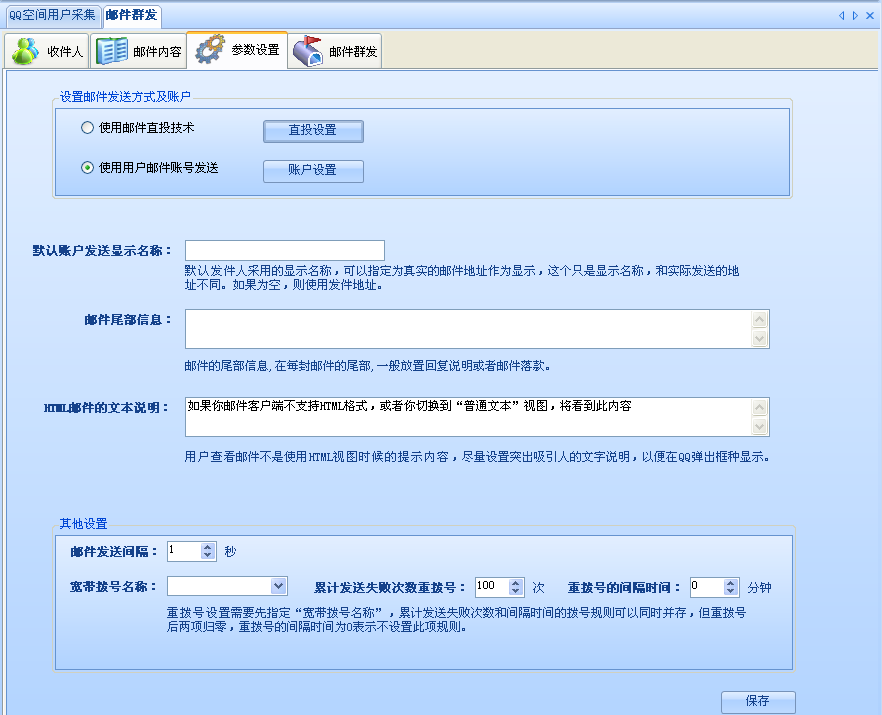
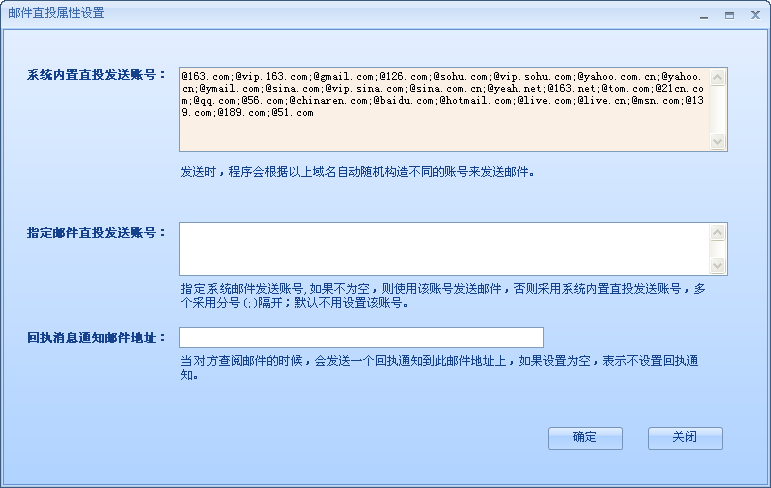
4、 邮件直投技术,通过模拟账户来附加用户的邮件地址(或者可以成为伪装)。其中我填写了一些常用的SMTP服务器的域名,方便在其中构造合乎要求的邮件格式,还可以设置邮件回执通知,如下图所示。
5、 如果是采用普通发送方式,那么就需要制定用户的账号密码等信息,发送的时候,自动从启动获取发件人信息进行批量发送操作。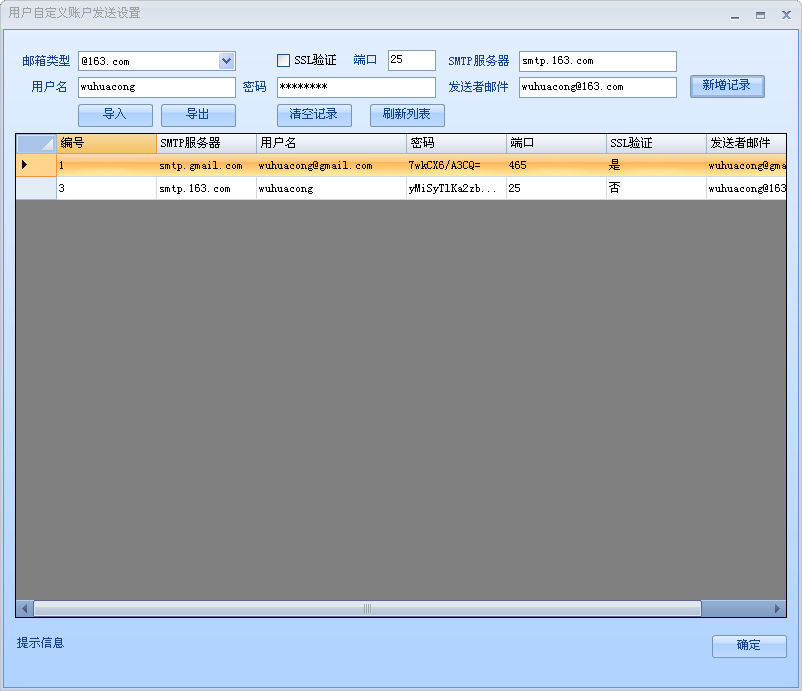
6、 最后体验一下少量邮件的发送效果,发送采用多线程发送,多线程采用比较有名的SmartThreadPool组件,并且发送过程总详细记录其中的日志,供参考。

介绍完毕相关的功能效果图,下面我们来分析下主要功能实现的代码:

代码
private
TimerHelper timer
=
null
;
private
void
btnSend_Click(
object
sender, EventArgs e)
{
//
重置计数变量
failedItems
=
0
;
successItems
=
0
;
workItemsCompleted
=
0
;
workItemsGenerated
=
0
;
Portal.gc.FailedCount
=
0
;
//
重置失败次数
STPStartInfo stpStartInfo
=
new
STPStartInfo();
stpStartInfo.IdleTimeout
=
10
;
stpStartInfo.MaxWorkerThreads
=
100
;
stpStartInfo.MinWorkerThreads
=
0
;
//
stpStartInfo.StartSuspended = true;
_smartThreadPool
=
new
SmartThreadPool(stpStartInfo);
_workItemsGroup
=
_smartThreadPool;
workItemsProducerThread
=
new
Thread(
new
ThreadStart(
this
.WorkItemsProducer));
workItemsProducerThread.IsBackground
=
true
;
workItemsProducerThread.Start();
RefreshStatusCount();
int
intervalRedial
=
SystemConfig.Default.IntervalRedial
*
1000
*
60
;
if
(intervalRedial
>
0
)
{
if
(timer
!=
null
)
{
timer.Stop();
timer.Dispose();
}
timer
=
new
TimerHelper(intervalRedial,
false
);
timer.Execute
+=
new
TimerHelper.TimerExecution(timer_Execute);
timer.Start();
}
}
private
static
object
locker
=
new
object
();
private
void
timer_Execute()
{
if
(Monitor.TryEnter(locker))
{
string
message
=
string
.Format(
"
在时间 {0} 时刻执行了一次重拨号操作!
"
, DateTime.Now);
ShowSendStatus(message);
string
RasName
=
SystemConfig.Default.RasName;
if
(
!
string
.IsNullOrEmpty(RasName))
{
message
=
string
.Format(
"
正在准备重新拨号({0})
"
, RasName);
ShowSendStatus(message);
Portal.gc.ReConnect(RasName);
Portal.gc.FailedCount
=
0
;
//
重新归零
}
Monitor.Exit(locker);
}
else
{
Monitor.Enter(locker);
Monitor.Exit(locker);
}
}
上面是主要的任务生成操作以及相关的拨号操作,其中任务详细的生成代码如下所示。
private
void
WorkItemsProducer()
CallCtrlWithThreadSafetyEx.SetText(
this
.txtSendDetail,
""
);
EnableControl(
false
,
true
,
true
);
string
message
=
string
.Format(
"
任务开始
"
);
RecordMessage(message);
#region
生成任务
IWorkItemsGroup workItemsGroup
=
_workItemsGroup;
if
(
null
==
workItemsGroup)
{
return
;
}
List
<
string
>
addressList
=
GetAddressList();
List
<
MyMailInfo
>
mailInfoList
=
GetMailInfo();
for
(
int
i
=
0
; i
<
addressList.Count; i
++
)
{
try
{
SendJobInfo jobInfo
=
new
SendJobInfo();
jobInfo.domainList
=
mailDomainList;
jobInfo.mailTo
=
addressList[i];
jobInfo.mailInfo
=
GetOneMail(mailInfoList, i);
jobInfo.ShowSendStatus
=
ShowSendStatus;
jobInfo.currentDomain
=
(i
%
mailDomainList.Count);
//
设置一个标志,默认那个账户开始发送
jobInfo.UseDirectSendType
=
SystemConfig.Default.EmailDirectSend;
//
如果用户未指定发送账号,那么采用默认的显示名称
//
如果为空,发送的时候,会自动采用邮件地址作为显示名称
if
(
string
.IsNullOrEmpty(SystemConfig.Default.UserEmailFrom))
{
jobInfo.mailFromDisplay
=
SystemConfig.Default.DefaultFromDisplayName;
}
workItemCallback
=
new
WorkItemCallback(
this
.DoWork);
workItemsGroup.QueueWorkItem(workItemCallback, jobInfo);
Thread.Sleep(
100
);
}
catch
(ObjectDisposedException ex)
{
LogTextHelper.WriteLine(ex.ToString());
continue
;
}
Interlocked.Increment(
ref
workItemsGenerated);
}
#endregion
RefreshStatusCount();
message
=
string
.Format(
"
共有 {0} 个任务,还剩下 {1} 个
"
,
workItemsGenerated, workItemsGenerated
-
workItemsCompleted);
CallCtrlWithThreadSafetyEx.SetText(
this
, message);
RecordMessage(message);
try
{
//
workItemsGroup.Start();
workItemsGroup.WaitForIdle();
_smartThreadPool.Shutdown();
}
catch
(Exception ex)
{
LogTextHelper.WriteLine(ex.ToString());
}
UpdateFinishStatus();
}
由于采用了多线程来处理,所以停止发送的时候,需要把相关的线程对象进行释放,如下代码所示。
代码
private
void
btnStop_Click(
object
sender, EventArgs e)
{
try
{
_smartThreadPool.Shutdown();
_smartThreadPool.Dispose();
_smartThreadPool
=
null
;
if
(timer
!=
null
)
{
timer.Stop();
timer.Dispose();
}
}
catch
(Exception ex)
{
LogTextHelper.WriteLine(ex.ToString());
}
UpdateFinishStatus();
}
其中具体的邮件发送功能封装在SendJobInfo中,通过判断不同的类型,进行不同的发送操作。
其中最为关键的发送代码,就是如何利用LumiSoft.NET组件来构造相应的邮件对象,下面先先介绍下邮件直投的发送方式,由于该组件封装比较好,直投发送方式很简单:
=
Create_PlainText_Html_Attachment_Image(mailTo, mailFrom, mailFromDisplay);
SMTP_Client.QuickSend(message);
其中
Create_PlainText_Html_Attachment_Image的封装函数详细内容如下所示:

代码
private
Mail_Message Create_PlainText_Html_Attachment_Image(
string
mailTo,
string
mailFrom,
string
mailFromDisplay)
{
Mail_Message msg
=
new
Mail_Message();
msg.MimeVersion
=
"
1.0
"
;
msg.MessageID
=
MIME_Utils.CreateMessageID();
msg.Date
=
DateTime.Now;
msg.From
=
new
Mail_t_MailboxList();
msg.From.Add(
new
Mail_t_Mailbox(mailFromDisplay, mailFrom));
msg.To
=
new
Mail_t_AddressList();
msg.To.Add(
new
Mail_t_Mailbox(mailTo, mailTo));
msg.Subject
=
mailInfo.Title;
//
设置回执通知
string
notifyEmail
=
SystemConfig.Default.DispositionNotificationTo;
if
(
!
string
.IsNullOrEmpty(notifyEmail)
&&
ValidateUtil.IsEmail(notifyEmail))
{
msg.DispositionNotificationTo
=
new
Mail_t_Mailbox(notifyEmail, notifyEmail);
}
#region
MyRegion
//
--- multipart/mixed -----------------------------------
MIME_h_ContentType contentType_multipartMixed
=
new
MIME_h_ContentType(MIME_MediaTypes.Multipart.mixed);
contentType_multipartMixed.Param_Boundary
=
Guid.NewGuid().ToString().Replace(
'
-
'
,
'
.
'
);
MIME_b_MultipartMixed multipartMixed
=
new
MIME_b_MultipartMixed(contentType_multipartMixed);
msg.Body
=
multipartMixed;
//
--- multipart/alternative -----------------------------
MIME_Entity entity_multipartAlternative
=
new
MIME_Entity();
MIME_h_ContentType contentType_multipartAlternative
=
new
MIME_h_ContentType(MIME_MediaTypes.Multipart.alternative);
contentType_multipartAlternative.Param_Boundary
=
Guid.NewGuid().ToString().Replace(
'
-
'
,
'
.
'
);
MIME_b_MultipartAlternative multipartAlternative
=
new
MIME_b_MultipartAlternative(contentType_multipartAlternative);
entity_multipartAlternative.Body
=
multipartAlternative;
multipartMixed.BodyParts.Add(entity_multipartAlternative);
//
--- text/plain ----------------------------------------
MIME_Entity entity_text_plain
=
new
MIME_Entity();
MIME_b_Text text_plain
=
new
MIME_b_Text(MIME_MediaTypes.Text.plain);
entity_text_plain.Body
=
text_plain;
//
普通文本邮件内容,如果对方的收件客户端不支持HTML,这是必需的
string
plainTextBody
=
"
如果你邮件客户端不支持HTML格式,或者你切换到“普通文本”视图,将看到此内容
"
;
if
(
!
string
.IsNullOrEmpty(SystemConfig.Default.PlaintTextTips))
{
plainTextBody
=
SystemConfig.Default.PlaintTextTips;
}
text_plain.SetText(MIME_TransferEncodings.QuotedPrintable, Encoding.UTF8, plainTextBody);
multipartAlternative.BodyParts.Add(entity_text_plain);
//
--- text/html -----------------------------------------
string
htmlText
=
mailInfo.Content;
//
"<html>这是一份测试邮件,<img src=\"cid:test.jpg\">来自<font color=red><b>LumiSoft.Net</b></font></html>";
MIME_Entity entity_text_html
=
new
MIME_Entity();
MIME_b_Text text_html
=
new
MIME_b_Text(MIME_MediaTypes.Text.html);
entity_text_html.Body
=
text_html;
text_html.SetText(MIME_TransferEncodings.QuotedPrintable, Encoding.UTF8, htmlText);
multipartAlternative.BodyParts.Add(entity_text_html);
//
--- application/octet-stream -------------------------
foreach
(
string
attach
in
mailInfo.Attachments)
{
multipartMixed.BodyParts.Add(Mail_Message.CreateAttachment(attach));
}
foreach
(
string
imageFile
in
mailInfo.EmbedImages)
{
MIME_Entity entity_image
=
new
MIME_Entity();
entity_image.ContentDisposition
=
new
MIME_h_ContentDisposition(MIME_DispositionTypes.Inline);
string
fileName
=
DirectoryUtil.GetFileName(imageFile,
true
);
entity_image.ContentID
=
BytesTools.BytesToHex(Encoding.Default.GetBytes(fileName));
MIME_b_Image body_image
=
new
MIME_b_Image(MIME_MediaTypes.Image.jpeg);
entity_image.Body
=
body_image;
body_image.SetDataFromFile(imageFile, MIME_TransferEncodings.Base64);
multipartMixed.BodyParts.Add(entity_image);
}
#endregion
return
msg;
}
如果使用普通的账号方式发送SMTP邮件,主要代码如下所示,其中可以看出是利用了命令方式一步步和服务器进行交互的。
using
(SMTP_Client client
=
new
SMTP_Client())
{
int
port
=
domainInfo.Ssl
?
WellKnownPorts.SMTP_SSL : WellKnownPorts.SMTP;
if
(domainInfo.Port
>
0
)
{
port
=
domainInfo.Port;
}
client.Connect(domainInfo.SmtpServer, port, domainInfo.Ssl);
client.Authenticate(domainInfo.Username, domainInfo.Password);
//
string text = client.GreetingText;
client.MailFrom(mailFrom,
-
1
);
client.RcptTo(mailTo);
MemoryStream stream
=
Create_Html_Attachment_Image(mailTo, mailFrom, mailFromDisplay);
client.SendMessage(stream);
client.Disconnect();
}
其中构造邮件内容的代码和刚才的部分类似,详细代码如下所示。
private
MemoryStream Create_Html_Attachment_Image(
string
mailTo,
string
mailFrom,
string
mailFromDisplay)
{
Mime m
=
new
Mime();
MimeEntity mainEntity
=
m.MainEntity;
mainEntity.From
=
new
AddressList();
mainEntity.From.Add(
new
MailboxAddress(mailFromDisplay, mailFrom));
mainEntity.To
=
new
AddressList();
mainEntity.To.Add(
new
MailboxAddress(mailTo, mailTo));
mainEntity.Subject
=
mailInfo.Title;
mainEntity.ContentType
=
MediaType_enum.Multipart_mixed;
MimeEntity textEntity
=
mainEntity.ChildEntities.Add();
textEntity.ContentType
=
MediaType_enum.Text_html;
textEntity.ContentTransferEncoding
=
ContentTransferEncoding_enum.QuotedPrintable;
textEntity.DataText
=
mailInfo.Content;
.........................
MemoryStream msg
=
new
MemoryStream();
m.ToStream(msg);
msg.Position
=
0
;
return
msg;
}
利用Lumisoft.NET这个组件,可以实现很多相关的邮件操作,这里介于兴趣及篇幅原因,主要介绍邮件发送的功能模块,其中贴出的代码,一个是为了和感兴趣的朋友相互交流,一个也是为了自己今后做一个借鉴,并不鼓励大家用此软件或者代码来大批量发送垃圾邮件。