学习ASP.NET Core Blazor编程系列三十——JWT登录(4)
十三、实现登出
至此关于Blazor的内容,先写到这里, 我们基本上完成了登入、增加、删除、查询、修改等功能,应对一般的应用,已经足够。今天实现登录功能。有登入,必然要有登出,本文我们来介绍一下如何登出。
1. 在Visual Studio 2022的解决方案资源管理器中,鼠标左键选中“Pages”文件夹,右键单击,在弹出菜单中选择“添加—>Razor组件…”,并将组件命名为“Logout.razor”。登出组件的功能是用于退出登入,返回首面。其代码如下:
@page "/Logout"

@using BlazorAppDemo.Auth;

@inject IAuthService authService

@inject NavigationManager navigation


@code {

    protected override async Task OnInitializedAsync()

    {


        await authService.LogoutAsync();

        navigation.NavigateTo("/");

    }


}
2. 在Visual Studio 2022的解决方案管理器中,使用鼠标左键,双击TokenManager.cs文件,对代码进行修改。具体代码如下:
usingBlazorAppDemo.Models;usingSystem.Collections.Concurrent;namespaceBlazorAppDemo.Utils

{public classTokenManager

    {private const string TOKEN = "authToken";private static readonly ConcurrentDictionary<string, UserToken>tokenManager;staticTokenManager()

        {

            tokenManager=new ConcurrentDictionary<string, UserToken>();

        }public static ConcurrentDictionary<string, UserToken> Instance { get { returntokenManager; } }public static string Token { get { returnTOKEN; } }public static bool RemoveToken(stringtoken)

        {if (tokenManager.TryRemove(token,outUserToken delUserToken))

            {

                Console.WriteLine($"delete token {delUserToken.Token}");return true;

            }else{


                Console.WriteLine($"unable delete token {delUserToken.Token}");return false;

            }

        }

    }

}
3.在Visual Studio 2022的解决方案资源管理器中,鼠标左键双击“Api”文件夹中的 “AuthController.cs”文件,将此文件中的Logout方法的代码补全。代码如下:
usingBlazorAppDemo.Models;usingBlazorAppDemo.Utils;usingMicrosoft.AspNetCore.Http;usingMicrosoft.AspNetCore.Identity;usingMicrosoft.AspNetCore.Mvc;usingMicrosoft.Extensions.Configuration;usingMicrosoft.IdentityModel.Tokens;usingNewtonsoft.Json.Linq;usingSystem.IdentityModel.Tokens.Jwt;usingSystem.Security.Claims;usingSystem.Text;namespaceBlazorAppDemo.Api

{

    [Route("api/[controller]")]

    [ApiController]public classAuthController : ControllerBase

    {private readonlyIJWTHelper jwtHelper;publicAuthController(IJWTHelper _IJWTHelper)

        {this.jwtHelper =_IJWTHelper;


            }


        [HttpPost("Login")]public async Task<ActionResult<UserToken>>Login(UserInfo userInfo)

        {//Demo用

            if (userInfo.UserName == "admin" && userInfo.Password == "666666666666")

            {returnBuildToken(userInfo);

            }else{

                UserToken userToken= newUserToken()

                {

                    StatusCode=System.Net.HttpStatusCode.Unauthorized,

                    IsSuccess= false};returnuserToken;

            }

        }/// <summary>

        ///建立Token/// </summary>

        /// <param name="userInfo"></param>

        /// <returns></returns>

        privateUserToken BuildToken(UserInfo userInfo)

        {string jwtToken = jwtHelper.CreateJwtToken<UserInfo>(userInfo);//建立UserToken,回传客户端

            UserToken userToken = newUserToken()

            {

                StatusCode=System.Net.HttpStatusCode.OK,

                Token=jwtToken,

                ExpireTime= DateTime.Now.AddMinutes(30),

                IsSuccess= true};returnuserToken;

        }


   [HttpGet("Logout")]public async Task<ActionResult<UserToken>>Logout()

        {bool flag=TokenManager.RemoveToken(TokenManager.Token);var response = newUserToken();

            response.IsSuccess= !flag;returnresponse;

        }

    }

}
4.在Visual Studio 2022的解决方案资源管理器中,鼠标左键选中“Auth”文件夹中的 “AuthService.cs”文件,将此文件中的LogoutAsync方法中添加如下代码:
usingBlazorAppDemo.Models;usingBlazorAppDemo.Utils;usingMicrosoft.AspNetCore.Components.Authorization;usingMicrosoft.AspNetCore.Identity;usingNewtonsoft.Json;usingNewtonsoft.Json.Linq;usingSystem.Collections.Concurrent;usingSystem.Net.Http;usingSystem.Text;namespaceBlazorAppDemo.Auth

{public classAuthService : IAuthService

    {private readonlyHttpClient httpClient;private readonlyAuthenticationStateProvider authenticationStateProvider;private readonlyIConfiguration configuration;private readonlyApi.AuthController authController;private readonly stringcurrentUserUrl, loginUrl, logoutUrl;publicAuthService( HttpClient httpClient, AuthenticationStateProvider authenticationStateProvider,
IConfiguration configuration,Api.AuthController authController)

        {this.authController =authController;this.httpClient =httpClient;this.authenticationStateProvider =authenticationStateProvider;this.configuration =configuration;

            currentUserUrl= configuration["AuthUrl:Current"] ?? "Auth/Current/";


            loginUrl= configuration["AuthUrl:Login"] ?? "api/Auth/Login";

            logoutUrl= configuration["AuthUrl:Logout"] ?? "/api/Auth/Logout/";

        }public async Task<UserToken>LoginAsync(UserInfo userInfo)

        {

 response.Content.ReadFromJsonAsync<UserToken>();var result =authController.Login(userInfo);var loginResponse =result.Result.Value;if (loginResponse != null &&loginResponse.IsSuccess)

                {

                    TokenManager.Instance.TryAdd(TokenManager.Token, loginResponse);

                    ((ImitateAuthStateProvider)authenticationStateProvider).NotifyUserAuthentication(loginResponse.Token);


                    httpClient.DefaultRequestHeaders.Authorization= new System.Net.Http.Headers.AuthenticationHeaderValue("bearer",
loginResponse.Token);returnloginResponse;

                }return new UserToken() { IsSuccess = false};

        }public async Task<UserToken>LogoutAsync()

        {var result =authController.Logout();var logoutResponse =result.Result.Value;

           ((ImitateAuthStateProvider)authenticationStateProvider).NotifyUserLogOut();

            httpClient.DefaultRequestHeaders.Authorization= null;returnlogoutResponse;

        }

  }


}
LogoutAsync方法:
- 将token从TokenManger实例中移除
- 通知前面页面更新登录状态
- 将request中的header参数bearer token移除。
5. 在Visual Studio 2022的解决方案管理器中,使用鼠标左键,双击ImitateAuthStateProvider.cs文件,对代码进行修改。具体代码如下:
usingBlazorAppDemo.Models;usingBlazorAppDemo.Utils;usingMicrosoft.AspNetCore.Components.Authorization;usingSystem.Net.Http;usingSystem.Security.Claims;namespaceBlazorAppDemo.Auth

{public classImitateAuthStateProvider : AuthenticationStateProvider

    {private readonlyIJWTHelper jwt;privateAuthenticationState anonymous;private readonlyHttpClient httpClient;publicImitateAuthStateProvider(IJWTHelper _jwt, HttpClient httpClient)

        {

            anonymous= new AuthenticationState(new ClaimsPrincipal(newClaimsIdentity()));

            jwt=_jwt;this.httpClient =httpClient;

        }bool isLogin = false;string token = string.Empty;public override Task<AuthenticationState>GetAuthenticationStateAsync()

        {//确认是否已经登录

UserToken userToken;

                TokenManager.Instance.TryGetValue(TokenManager.Token,outuserToken);string tokenInLocalStorage=string.Empty;if (userToken != null)

            {

                tokenInLocalStorage=userToken.Token;

            }if (string.IsNullOrEmpty(tokenInLocalStorage))

            {//沒有登录,则返回匿名登录者

                returnTask.FromResult(anonymous);

            }//將token取出转换为claim

            var claims =jwt.ParseToken(tokenInLocalStorage);//在每次request的header中都将加入bearer token

            httpClient.DefaultRequestHeaders.Authorization = new System.Net.Http.Headers.AuthenticationHeaderValue("bearer",
tokenInLocalStorage);//回传带有user claim的AuthenticationState


            return Task.FromResult(new AuthenticationState(new ClaimsPrincipal(new ClaimsIdentity(claims, "jwt"))));


        }public voidLogin(UserInfo request)

        {//1.验证用户账号密码是否正确

            if (request == null)

            {

                isLogin=false;

            }if (request.UserName == "user" && request.Password == "666666666666")


            {

                isLogin= true;

               token= jwt.CreateJwtToken<UserInfo>(request);

                Console.WriteLine($"JWT Token={token}");

            }


            NotifyAuthenticationStateChanged(GetAuthenticationStateAsync());

        }public void NotifyUserAuthentication(stringtoken)

        {var claims =jwt.ParseToken(token);var authenticatedUser = new ClaimsPrincipal(new ClaimsIdentity(claims, "jwt"));var authState = Task.FromResult(newAuthenticationState(authenticatedUser));

            NotifyAuthenticationStateChanged(authState);

        }public voidNotifyUserLogOut()

        {var authState =Task.FromResult(anonymous);

            NotifyAuthenticationStateChanged(authState);

        }


    }

}
6. 在Visual Studio 2022的解决方案管理器中,使用鼠标左键,双击MainLayout.razor文件,对代码进行修改。具体代码如下:
@using BlazorAppDemo.Pages

@inherits LayoutComponentBase<PageTitle>BlazorAppDemo</PageTitle>


<divclass="page">

    <divclass="sidebar">

        <NavMenu/>

    </div>


    <main>

        <AuthorizeView>

            <Authorized>

              <divclass="top-row px-4">


            <ahref="https://docs.microsoft.com/aspnet/"target="_blank">About</a>

                <divclass="col-3 oi-align-right">你好, @context.User.Identity.Name!<ahref="/Logout">Logout</a>

                        </div>

      </div>


        <articleclass="content px-4">@Body</article>


            </Authorized>

            <NotAuthorized>

                <divstyle="margin: 120px 0; width:100%; text-align: center; color: red;">


                    <spanstyle="font-size:20px">检测到登录超时,请重新<ahref="/login"style="text-decoration:underline">登录</a>!

</span>

                </div>

                <RedirectToLogin></RedirectToLogin>

            </NotAuthorized>

        </AuthorizeView>


    </main>

</div>
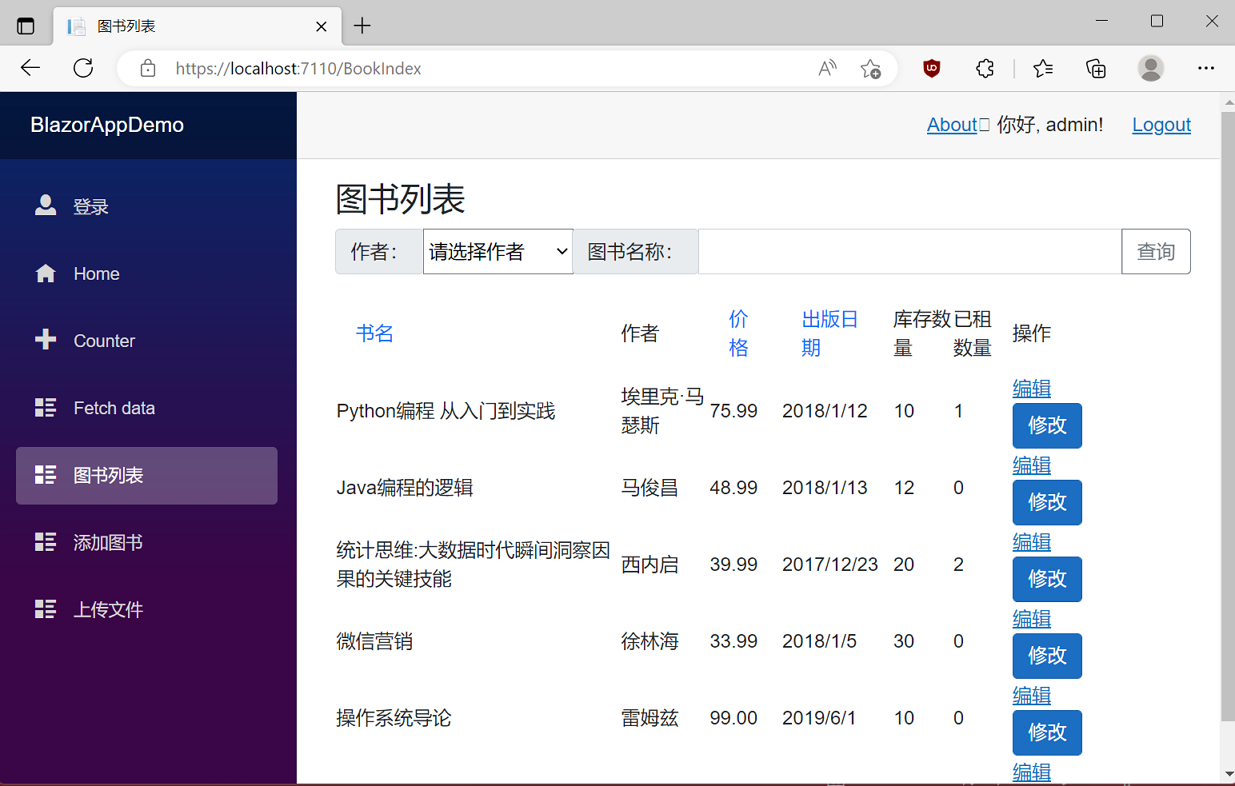
7. 在Visual Studio 2022的菜单栏上,找到“调试-->开始调试”或是按F5键,Visual Studio 2022会生成BlazorAppDemo应用程序。浏览器会打开登录页面。我们在登录页面的用户名输入框中输入用户名,在密码输入框中输入密码,点击“登录”按钮,进行登录。我们进入了系统,在页面的右上角处,会出现登录用户的用户名,与一个“Logout”按钮。如下图。
