补充
之前的文章简单介绍了工作流和Elsa工作流库,这里再补充说明两点
工作流的使用场景非常广泛,几乎涵盖了所有需要进行业务流程自动化管理的领域。
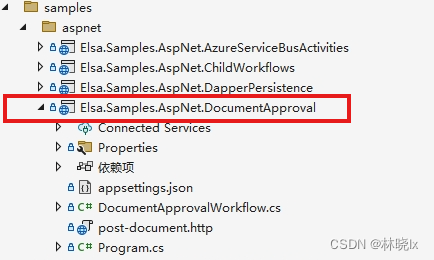
学习一个开源库,最简单的方法就是看源码,Elsa的工作流引擎源码非常简单易懂,并且提供了非常丰富的示例代码,举一个例子:审批工作流示例
.\src\samples\aspnet\Elsa.Samples.AspNet.DocumentApproval
这个审批流是这样的:
作者发来一个文章,有两个审批人需要全部审批通过,文章才算通过,否则退回。
我们尝试阅读工作流源代码
DocumentApprovalWorkflow.cs
,并运行此项目,用postman发送请求
第一步:
假设这名叫Amanda的作者要发布文章,请求发送后,作者浏览器显示发送成功稍安勿躁之类的提示
同时后台打印作者信息和4个链接,分别是Jack和Lucy两位审批人“通过”和“退回”的url链接
Activities =
{
    new HttpEndpoint
    {
        Path = new("/documents"),
        SupportedMethods = new(new[] { HttpMethods.Post }),
        ParsedContent = new(documentVariable),
        CanStartWorkflow = true
    },
    new WriteLine(context => $"Document received from {documentVariable.Get<dynamic>(context)!.Author.Name}."),
    new WriteHttpResponse
    {
        Content = new("<h1>Request for Approval Sent</h1><p>Your document has been received and will be reviewed shortly.</p>"),
        ContentType = new(MediaTypeNames.Text.Html),
        StatusCode = new(HttpStatusCode.OK),
        ResponseHeaders = new(new HttpHeaders { ["X-Powered-By"] = new[] { "Elsa 3.0" } })
    },
第二步:
Jack觉得文章不错,通过浏览器请求了“通过”链接,而Lucy觉得文章还不够好,需改进,她在浏览器中请求了“退回”链接。
两位审批人的审批结果存储于
approvedVariable
变量中
同时他们的浏览器返回的响应内容:Thanks for the approval 或 Sorry to hear that
    new Fork
    {
        JoinMode = ForkJoinMode.WaitAll,
        Branches =
        {
            // Jack
            new Sequence
            {
                Activities =
                {
                    new WriteLine(context => $"Jack approve url: \n {GenerateSignalUrl(context, "Approve:Jack")}"),
                    new WriteLine(context => $"Jack reject url: \n {GenerateSignalUrl(context, "Reject:Jack")}"),
                    new Fork
                    {
                        JoinMode = ForkJoinMode.WaitAny,
                        Branches =
                        {
                            // Approve
                            new Sequence
                            {
                                Activities =
                                {
                                    new Event("Approve:Jack"),
                                    new SetVariable
                                    {
                                        Variable = approvedVariable,
                                        Value = new(true)
                                    },
                                    new WriteHttpResponse
                                    {
                                        Content = new("Thanks for the approval, Jack!"),
                                    }
                                }
                            },

                            // Reject
                            new Sequence
                            {
                                Activities =
                                {
                                    new Event("Reject:Jack"),
                                    new SetVariable
                                    {
                                        Variable = approvedVariable,
                                        Value = new(false)
                                    },
                                    new WriteHttpResponse
                                    {
                                        Content = new("Sorry to hear that, Jack!"),
                                    }
                                }
                            }
                        }
                    }
                }
            },

            // Lucy
            new Sequence
            {
                Activities =
                {
                    new WriteLine(context => $"Lucy approve url: \n {GenerateSignalUrl(context, "Approve:Lucy")}"),
                    new WriteLine(context => $"Lucy reject url: \n {GenerateSignalUrl(context, "Reject:Lucy")}"),
                    new Fork
                    {
                        JoinMode = ForkJoinMode.WaitAny,
                        Branches =
                        {
                            // Approve
                            new Sequence
                            {
                                Activities =
                                {
                                    new Event("Approve:Lucy"),
                                    new SetVariable
                                    {
                                        Variable = approvedVariable,
                                        Value = new(true)
                                    },
                                    new WriteHttpResponse
                                    {
                                        Content = new("Thanks for the approval, Lucy!"),
                                    }
                                }
                            },

                            // Reject
                            new Sequence
                            {
                                Activities =
                                {
                                    new Event("Reject:Lucy"),
                                    new SetVariable
                                    {
                                        Variable = approvedVariable,
                                        Value = new(false)
                                    },
                                    new WriteHttpResponse
                                    {
                                        Content = new("Sorry to hear that, Lucy!"),
                                    }
                                }
                            }
                        }
                    }
                }
            }
        }
    },
第三步:
根据
approvedVariable
变量判定文章是否被审核通过。
如果通过则在控制台打印Document document-1 approved!, 否则打印Document document-1 rejected!
    new WriteLine(context => $"Approved: {approvedVariable.Get<bool>(context)}"),
    new If(context => approvedVariable.Get<bool>(context))
    {
        Then = new WriteLine(context => $"Document ${documentVariable.Get<dynamic>(context)!.Id} approved!"),
        Else = new WriteLine(context => $"Document ${documentVariable.Get<dynamic>(context)!.Id} rejected!")
    }
}
Elsa工作流源码还提供了大量的Sample,这里就不一一列举了,
需求描述
根据不同的时间规则,发送下发问卷给客户填写。
下发问卷给用户填写,且填写有超时时间,期间要提醒用户答题,
如果问卷未在规定的时间内作答则,则作废,并提醒用户。
需求分析
我们将需求尽可能分解成为单一职责的功能单元,并定义这些功能单元的输入输出。
下发问卷任务 PublishQuestionnaireActivity
下发问卷是将问卷(Questionnaire)实例化成问卷实例(Survey),问卷实例绑定用户Id,用户在问卷实例上作答。明确输入和输出:
- 输入:问卷ID
- 输出:问卷实例对象SurveyDto
通知任务 NotificationActivity
通知在这个需求中需要发送问卷状态,时间等内容给对应的用户,同通至少包含标题和内容。
问卷状态跟踪任务 WaitFillInSurveyActivity
这个任务要追踪问卷实例的状态,当问卷实例状态为已完成时,可以继续执行后续任务。
定时和延时任务
用于延时执行每个下发问卷的时间,等待问卷超时,以及延时发送通知等。
- 输入:开始日期,延时日期,间隔时间或cron表达式
- 输出:无
根任务
根任务包含所有的子任务,完成这个任务后,整个流程结束。在这个需求中根任务只需要知道将什么问卷,发送给哪位用户,以及在何时发送这三个问题。
各子任务参数对于他们的根任务是透明的(Invisible),根任务只需要关心是否完成,而不需要知道任务参数。
代码实现
下发问卷活动 PublishQuestionnaireActivity
下发问卷任务可以抽象成为下发问卷活动 PublishQuestionnaireActivity
创建PublishQuestionnaireActivity类并设置输入QuestionnaireId,输出SurveyDto
public class PublishQuestionnaireActivity : Activity<SurveyDto>
{
    public PublishQuestionnaireActivity()
    {

    }
    public PublishQuestionnaireActivity(long questionnaireId)
    {
        QuestionnaireId = new Input<long>(questionnaireId);
    }


    public Input<long> QuestionnaireId { get; set; } = default!;
}
重写ExecuteAsync方法,完成问卷下发逻辑
protected override async ValueTask ExecuteAsync(ActivityExecutionContext context)
{
    var _surveyAppService = context.GetRequiredService<ISurveyAppService>();
    if (_surveyAppService != null)
    {
        var currentUserId = await context.GetInputValueAsync<Guid>("UserId");
        var survey = await _surveyAppService.PublishAsync(new PublishInput()
        {
            QuestionnaireId = this.QuestionnaireId.Get<long>(context),
            UserId = currentUserId

        }) ?? throw new Exception("创建问卷失败");
        context.SetResult(survey);
    }


    await context.CompleteActivityAsync();

}
如此,其他的任务分别抽象成为相应的活动,这里展示完整代码
通知活动:NotificationActivity
public class NotificationActivity : Activity
{


    public NotificationActivity()
    {

    }
    public NotificationActivity(string title, string content)
    {
        Content = new Input<string>(content);
        Title = new Input<string>(title);
    }

    protected override async ValueTask ExecuteAsync(ActivityExecutionContext context)
    {
        var notificationManager = context.GetRequiredService<NotificationManager>();

        if (notificationManager != null)
        {
            var title = this.Title.Get(context);
            var content = this.Content.Get(context);
            var currentUserId = await context.GetInputValueAsync<Guid>("UserId");
            var data = new CreatePrivateMessageNotificationEto(currentUserId, title, content);
            await notificationManager.Send(data);
        }


    await context.CompleteActivityAsync();

}

    public Input<string> Title { get; set; } = default!;
    public Input<string> Content { get; set; } = default!;
}
等待问卷完成活动:WaitFillInSurveyActivity
public class WaitFillInSurveyActivity : Activity
{
    public WaitFillInSurveyActivity()
    {

    }
    public WaitFillInSurveyActivity(Func<ExpressionExecutionContext, long?> surveyId)
: this(Expression.DelegateExpression(surveyId))
    {
    }

    public WaitFillInSurveyActivity(long surveyId) => SurveyId = new Input<long>(surveyId);

    public WaitFillInSurveyActivity(Expression expression) => SurveyId = new Input<long>(expression, new MemoryBlockReference());


    /// <inheritdoc />
    protected override ValueTask ExecuteAsync(ActivityExecutionContext context)
    {
        var surveyId = SurveyId.Get(context);
        if (surveyId == default)
        {
            var survey = context.ExpressionExecutionContext.GetLastResult<SurveyDto>();
            surveyId = survey.Id;
        }
        var payload = new WaitFillInSurveyBookmarkPayload(surveyId);
        context.CreateBookmark(new CreateBookmarkArgs
        {
            Payload = payload,
            Callback = Resume,
            BookmarkName = Type,
            IncludeActivityInstanceId = false
        });
        return ValueTask.CompletedTask;
    }

    private async ValueTask Resume(ActivityExecutionContext context)
    {
        await context.CompleteActivityAsync();
    }

    public Input<long> SurveyId { get; set; } = default!;
}
此任务需要等待,我们创建一个Bookmark,注意创建Bookmark时,我们根据问卷实例SurveyId判断是否完成问卷的回答,因此指定
IncludeActivityInstanceId
为
false
,创建携带SurveyId的Payload类型:
public record WaitFillInSurveyBookmarkPayload(long SurveyId);
在回调
OnResumeAsync
中,我们使用
context.CompleteActivityAsync
来完成任务。
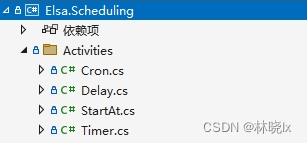
定时和延时活动:
Elsa.Scheduling库提供了用于定时和延时任务的触发器(触发器属于工作流的一种)
在
[.NET项目实战] Elsa开源工作流组件应用(二):内核解读
一文 "构建 - 构建活动 "章节 列出了Elsa所有内建的活动。
这里使用Elsa内建的三个触发器:
StartAt 在未来特定的时间戳触发工作流触发器
Delay 延迟执行工作流触发器。
Timer 定期触发工作流触发器。
问卷活动:QuestionnaireActivity
问卷活动是下发问卷,通知,等待填写问卷等活动的父级。
Elsa定义了容器类型的活动Container类型,其中的Activities可以包含其他活动。
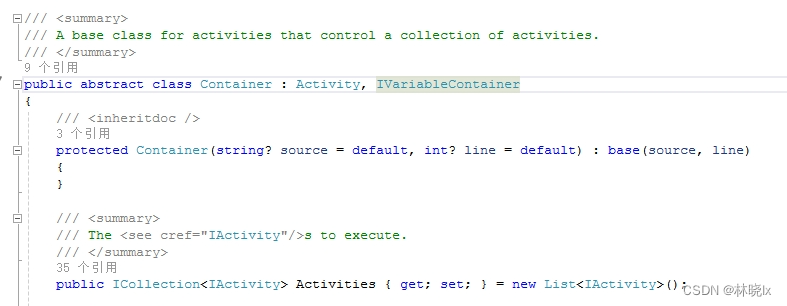
Sequence和Parallel都是容器类型,是Activity的子类,它们分别表示并行和顺序执行。
除此之外我们还需要两个内建活动:
Fork:分支,用于分支并行执行,与Parallel类似,但比它多了一个等待完成功能。
通过ForkJoinMode属性,可以指定分支任务的执行方式,
ForkJoinMode.WaitAny
:等待任意一个任务完成,
ForkJoinMode.WaitAll
:等待所有任务完成。
Fault:故障,用于在工作流执行过程中,遇到异常时,触发故障。并结束工作流。
创建问卷活动类型QuestionnaireActivity,继承自Sequence类型,并设置一些属性,如问卷Id,问卷填写超时时间等。
[可选]Elsa在注册工作流时,Activity对象是会被序列化并存储到WorflowDefinition表中的, 因此这些属性可以被持久化到数据库中。
public class QuestionnaireActivity : Sequence
{
    //可选,用于持久化一些属性
    public TimeSpan Delay { get; set; }
    public DateTime StartAt { get; set; }
    public TimeSpan Interval { get; set; }
    public string Cron { get; set; }
    public TimeSpan Duration { get; set; }
    public long QuestionnaireId { get; set; }
    public TimeSpan FillInTimeout { get; set; } = TimeSpan.FromHours(2);

    public QuestionnaireActivity()
    {

    }
}
重写构造函数,并设置Activities属性
public QuestionnaireActivity(long questionnaireId, TimeSpan fillInTimeout)
{
    this.QuestionnaireId = questionnaireId;
    this.FillInTimeout = fillInTimeout;
    var currentSurvey = new Variable<SurveyDto>();
    Variables.Add(currentSurvey);
    Activities = new List<IActivity>()
    {
        //流程开始打印
        new WriteLine("问卷流程开始"),

        //下发问卷任务
        new PublishQuestionnaireActivity(QuestionnaireId)
        {
            Name="PublishQuestionnaire",
            Result=new Output<Questionnaire.Survey.Dto.SurveyDto> (currentSurvey)
        },
        //问卷到达提醒
        new NotificationActivity("新问卷提醒", "您有新的问卷,请查收"),

        //问卷处理分支
        new Fork
        {
            JoinMode = ForkJoinMode.WaitAny,
            Branches =
            {
                //问卷即将过期提醒
                new Sequence
                {
                    Activities =
                    {
                        //等待
                        new Delay
                        {
                            Name = "RemindDelay",
                            TimeSpan = new(RemindDelay)
                        },
                        //通知
                        new NotificationActivity("问卷即将超时", "问卷即将超时,请尽快回答")
                    }
                },
                //问卷过期处理以及提醒
                new Sequence
                {
                    Activities =
                    {
                        //等待
                        new Delay
                        {
                            Name = "TimeoutDelay",
                            TimeSpan = new(FillInTimeout)
                        },
                        //通知
                        new NotificationActivity("问卷已过期", "问卷已过期,请等待工作人员处理"),

                        //处理
                        new Fault()
                        {
                            Message=new ("问卷回答超时")
                        }
                    }
                },
                //问卷状态跟踪
                new Sequence
                {
                    Activities =
                    {
                        new WriteLine("开始等待问卷提交信号"),
                        new WaitFillInSurveyActivity(context => currentSurvey.Get<SurveyDto>(context)?.Id)

                    }
                }
            }
        },
        //流程结束打印
        new WriteLine("完成流程结束"),
        new Finish(),
    };
}
创建工作流
现在我们来创建测试工作流,
- 添加一个工作流参数UserId,用于各活动中对用户的查询依赖。
- 分别实现4个并行任务:延时发送问卷,定时发送问卷,定期间隔发送问卷,根据Cron表达式执行。和一个串行任务
public class Test1Workflow : WorkflowBase
{
    public Guid UserId { get; set; }
    protected override void Build(IWorkflowBuilder workflow)
    {
        var startTime = new Variable<DateTimeOffset>();
        workflow.Inputs.Add(
                    new InputDefinition() { Name = "UserId", Type = typeof(Guid), StorageDriverType = typeof(WorkflowStorageDriver) }
            );
        workflow.WithVariable(startTime);

        workflow.Root = new Sequence
        {
            Activities =
                {
                    new WriteLine("Start"),
                    new SetVariable<DateTimeOffset>
                    {
                        Variable = startTime,
                        Value = new (DateTime.Now )
                    },

                    new Parallel()
                    {
                        Activities =
                        {
                            //并行任务1:延时发送问卷
                            new Sequence()
                            {
                                Activities =
                                {
                                    //问卷1 将在工作流启动后1小时执行

                                    new Delay(TimeSpan.FromHours(1)),
                                    new QuestionnaireActivity(1),
                                }
                            },
                            //并行任务2:定时发送问卷
                            new Sequence()
                            {
                                Activities =
                                {
                                    //问卷2 将在 2024-4-1 08:30:00 执行
                                    new StartAt(new DateTime(2024,4,1,8,30,0)),
                                    new Delay(TimeSpan.FromHours(2)),
                                    new QuestionnaireActivity(2),
                                }
                            },
                            //并行任务3:定期间隔发送问卷
                            new Sequence()
                            {
                                Activities =
                                {
                                    //问卷3 每隔两个小时执行
                                    new Timer(new TimeSpan(2,0,0)),

                                    new Delay(TimeSpan.FromHours(2)),
                                    new QuestionnaireActivity(3),
                                }
                            },
                            //并行任务4:根据Cron表达式执行
                            new Sequence()
                            {
                                Activities =
                                {
                                    //问卷4 每个月的最后一天上午10点执行任务
                                    new Cron(cronExpression:"0 0 10 L * ?"),

                                    new Delay(TimeSpan.FromHours(2)),
                                    new QuestionnaireActivity(4),
                                }
                            },
                            //并行任务5:根据某时间发送问卷
                            new Sequence()
                            {
                                Activities =
                                {
                                    new StartAt(context=> startTime.Get(context).AddMinutes(90)),

                                    new Delay(TimeSpan.FromHours(2)),
                                    new QuestionnaireActivity(5),
                                }
                            },


                            //串行任务
                            new Sequence()
                            {
                                Activities =
                                {
                                    //问卷3 将在工作流启动后2小时执行

                                    new Delay(TimeSpan.FromHours(2)),
                                    new QuestionnaireActivity(3),

                                        //问卷4 将在问卷3完成1天后执行

                                    new Delay(TimeSpan.FromDays(1)),
                                    new QuestionnaireActivity(4),

                                    //问卷5 将在问卷4完成3天后执行

                                    new Delay(TimeSpan.FromDays(3)),
                                    new QuestionnaireActivity(5),
                                }
                            }
                        }
                    },
                    new Finish(),
            },
        };
    }
}
开始工作流
工作流启动参数需设置Input对象
var input = new Dictionary<string, object>
{

    {"UserId", "D1522DBC-5BFC-6173-EB60-3A114454350C"},

};

var startWorkflowOptions = new StartWorkflowRuntimeOptions
{
    Input = input,
    VersionOptions = versionOptions,
    InstanceId = instanceId,
};


// Start the workflow.
var result = await _workflowRuntime.StartWorkflowAsync(workflowDefinition.DefinitionId, startWorkflowOptions);
下面进入喜闻乐见的踩坑填坑环节
TroubleShooting
在活动中执行异步操作时,会导致报错:
如下面的代码,执行Excute方法中的 context.CompleteActivityAsync()方法,时报错

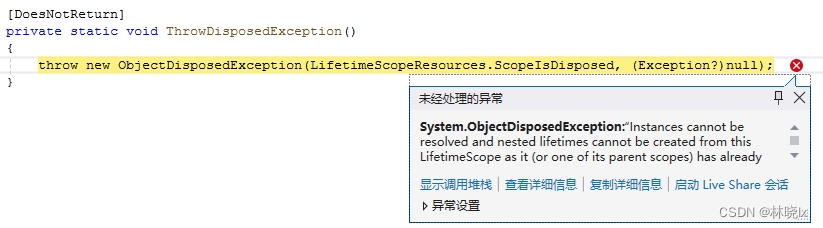
原因分析:scope资源被提前释放
代码先执行到了112行,scope释放
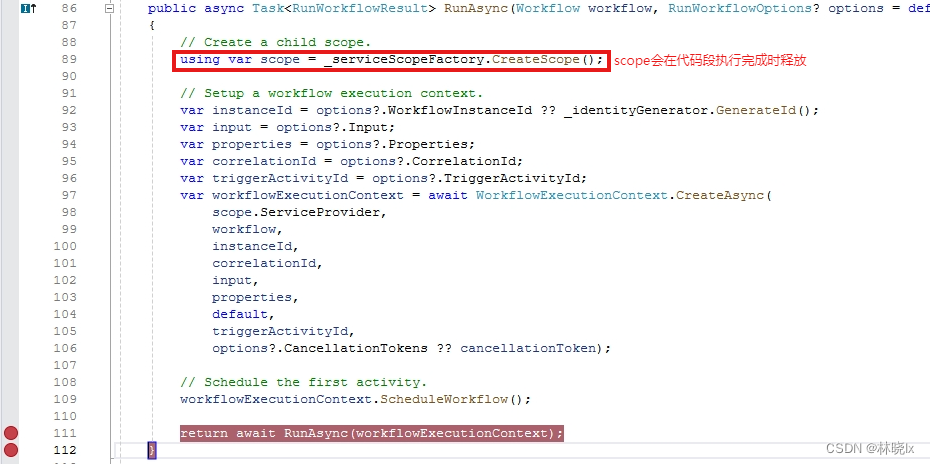
解决:带有异步的操作一定要使用ExecuteAsync方法

- delay之后,Workflow的Input无法访问
原因分析:
Delay或其他Schedule类型的Activity,通过创建Bookmark挂起任务,当任务被唤醒时,input被workflowState.Output替换掉,和原先的input不一样了。

解决:
虽然input被替换了,但数据库的input还在,可以通过workflowInstanceId先取回workflowInstance对象,再通过
instance.WorkflowState.Input.TryGetValue
方法获取原始input值。
可以创建一个一个扩展方法GetInputValueAsync,Delay之后的活动中调用即可。
public static async Task<TValue> GetInputValueAsync<TValue>(this ActivityExecutionContext context, string name)
{
    TValue value;
    if (!context.TryGetWorkflowInput(name, out value))
    {
        var workflowInstanceStore = context.GetRequiredService<IWorkflowInstanceStore>();

        var instance = await workflowInstanceStore.FindAsync(new WorkflowInstanceFilter()
        {
            Id = context.WorkflowExecutionContext.Id

        });
        if (instance != null)
        {
            instance.WorkflowState.Input.TryGetValue(name, out value);
        }
    }

    return value;


}
在Activity中调用:
await context.GetInputValueAsync<Guid>("UserId");
持续更新中...
--完结--

